Android 状态栏虚拟导航键透明效果的实现方法
状态栏和虚拟导航键 4.4上半透明,5.0以上可以全透明
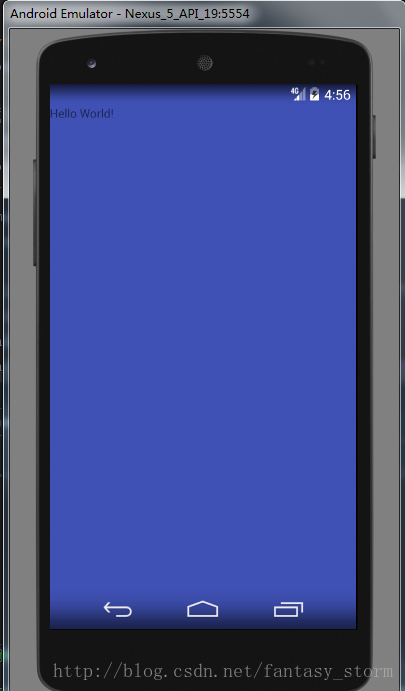
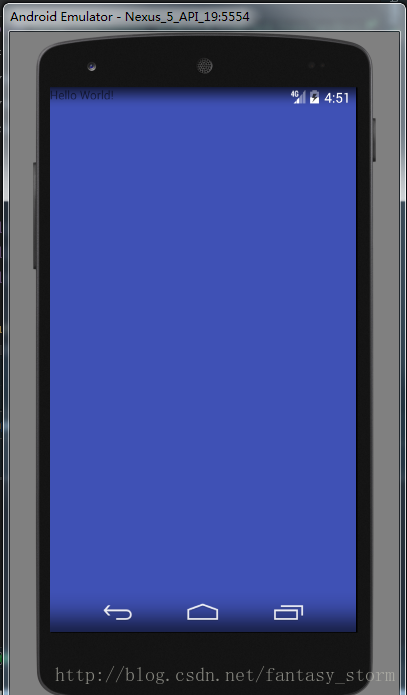
先上效果
4.4 半透明效果

5.0及以上 全透明效果

上代码
MainActivity代码
public class MainActivity extends AppCompatActivity {
  @Override
  protected void onCreate(Bundle savedInstanceState) {
    super.onCreate(savedInstanceState);
    // 隐藏标题栏
    supportRequestWindowFeature(Window.FEATURE_NO_TITLE);
    View root = LayoutInflater.from(this).inflate(R.layout.activity_main, null);
    // 或者 在界面的根层加入 android:fitsSystemWindows=”true” 这个属性,这样就可以让内容界面从 状态栏 下方开始。
    ViewCompat.setFitsSystemWindows(root, true);
    setContentView(root);
    if (Build.VERSION.SDK_INT >= Build.VERSION_CODES.LOLLIPOP) {
      // Android 5.0 以上 全透明
      Window window = getWindow();
      window.clearFlags(WindowManager.LayoutParams.FLAG_TRANSLUCENT_STATUS
          | WindowManager.LayoutParams.FLAG_TRANSLUCENT_NAVIGATION);
      window.getDecorView().setSystemUiVisibility(View.SYSTEM_UI_FLAG_LAYOUT_FULLSCREEN
          | View.SYSTEM_UI_FLAG_LAYOUT_HIDE_NAVIGATION
          | View.SYSTEM_UI_FLAG_LAYOUT_STABLE);
      window.addFlags(WindowManager.LayoutParams.FLAG_DRAWS_SYSTEM_BAR_BACKGROUNDS);
      // 状态栏(以上几行代码必须,参考setStatusBarColor|setNavigationBarColor方法源码)
      window.setStatusBarColor(Color.TRANSPARENT);
      // 虚拟导航键
      window.setNavigationBarColor(Color.TRANSPARENT);
    } else if (Build.VERSION.SDK_INT >= Build.VERSION_CODES.KITKAT) {
      // Android 4.4 以上 半透明
      Window window = getWindow();
      // 状态栏
      window.addFlags(WindowManager.LayoutParams.FLAG_TRANSLUCENT_STATUS);
      // 虚拟导航键
      window.addFlags(WindowManager.LayoutParams.FLAG_TRANSLUCENT_NAVIGATION);
    }
  }
}
activity_main.xml代码:
<?xml version="1.0" encoding="utf-8"?>
<RelativeLayout
  xmlns:android="http://schemas.android.com/apk/res/android"
  android:id="@+id/activity_main"
  android:layout_width="match_parent"
  android:layout_height="match_parent"
  android:background="@color/colorPrimary"
  >
  <TextView
    android:layout_width="wrap_content"
    android:layout_height="wrap_content"
    android:text="Hello World!"
    />
</RelativeLayout>
5.0以上的几行代码不是很懂,从源码看是需要添加的,以后找到这几个方法是做什么用的再回来注明
setStatusBarColor源码
/**
   * Sets the color of the status bar to {@code color}.
   *
   * For this to take effect,
   * the window must be drawing the system bar backgrounds with
   * {@link android.view.WindowManager.LayoutParams#FLAG_DRAWS_SYSTEM_BAR_BACKGROUNDS} and
   * {@link android.view.WindowManager.LayoutParams#FLAG_TRANSLUCENT_STATUS} must not be set.
   *
   * If {@code color} is not opaque, consider setting
   * {@link android.view.View#SYSTEM_UI_FLAG_LAYOUT_STABLE} and
   * {@link android.view.View#SYSTEM_UI_FLAG_LAYOUT_FULLSCREEN}.
   * <p>
   * The transitionName for the view background will be "android:status:background".
   * </p>
   */
  public abstract void setStatusBarColor(@ColorInt int color);
setNavigationBarColor源码方法
 /**
   * Sets the color of the navigation bar to {@param color}.
   *
   * For this to take effect,
   * the window must be drawing the system bar backgrounds with
   * {@link android.view.WindowManager.LayoutParams#FLAG_DRAWS_SYSTEM_BAR_BACKGROUNDS} and
   * {@link android.view.WindowManager.LayoutParams#FLAG_TRANSLUCENT_NAVIGATION} must not be set.
   *
   * If {@param color} is not opaque, consider setting
   * {@link android.view.View#SYSTEM_UI_FLAG_LAYOUT_STABLE} and
   * {@link android.view.View#SYSTEM_UI_FLAG_LAYOUT_HIDE_NAVIGATION}.
   * <p>
   * The transitionName for the view background will be "android:navigation:background".
   * </p>
   */
  public abstract void setNavigationBarColor(@ColorInt int color);
fitsSystemWindows属性需设置为true,否则布局会和状态栏重叠
如图:

两种方式:
方式一(xml文件根布局添加属性):
Android:fitsSystemWindows=”true”
方式二(代码中设置):
ViewCompat.setFitsSystemWindows(rootView, true);
其实还有第三种方式解决此问题,获取状态栏高度,在最上设置一个等高的View
/**
   * 获取状态栏高度
   * @return
   */
  public int getStatusBarHeight() {
    int statusBarHeight = 0;
    int resourceId = getResources().getIdentifier("status_bar_height", "dimen", "android");
    if (resourceId > 0) {
      statusBarHeight = getResources().getDimensionPixelSize(resourceId);
    }
    return statusBarHeight;
  }
源码地址:https://github.com/StormSunCC/MyCompatStatusBar
以上所述是小编给大家介绍的Android 状态栏虚拟导航键透明效果的实现方法,希望对大家有所帮助,如果大家有任何疑问请给我留言,小编会及时回复大家的。在此也非常感谢大家对我们网站的支持!
赞 (0)

