bootstrap fileinput插件实现预览上传照片功能
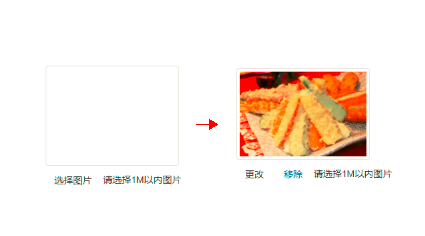
效果图如下所示:

具体代码如下:
<!DOCTYPE html>
<html>
 <head>
  <meta charset="UTF-8">
  <title></title>
  <link rel="stylesheet" href="http://cdn.static.runoob.com/libs/bootstrap/3.3.7/css/bootstrap.min.css" rel="external nofollow" >
  <link rel="stylesheet" href="bootstrap-fileinput.css" rel="external nofollow" >
  <script src="http://cdn.static.runoob.com/libs/jquery/2.1.1/jquery.min.js"></script>
  <script src="http://cdn.static.runoob.com/libs/bootstrap/3.3.7/js/bootstrap.min.js"></script>
  <script src="bootstrap-fileinput.js"></script>
 </head>
 <body>
  <div class="form-group">
   <div class="col-md-8">
    <div class="fileinput fileinput-new" data-provides="fileinput" id="uploadImageDiv">
     <div class="fileinput-new thumbnail" style="width: 200px; height: 150px;">
      <img src="${companyInfo.image}" alt="" />
     </div>
     <div class="fileinput-preview fileinput-exists thumbnail" style="max-width: 200px; max-height: 150px;"></div>
     <div>
      <span class="btn default btn-file"> <span
           class="fileinput-new">选择图片</span> <span class="fileinput-exists">更改</span> <input type="file" name="uploadImage" id="uploadImage" /></span>
      <a href="#" rel="external nofollow" class="btn default fileinput-exists" data-dismiss="fileinput">移除</a>
      <span>请选择1M以内图片</span>
     </div>
    </div>
    <div id="titleImageError" style="color: #a94442"></div>
   </div>
  </div>
 </body>
 <script>
  var handleEvent = function() {
   $("#uploadImage").fileupload({
    url: "design/resource/uploadFile",
    dataType: 'json',
    autoUpload: false,
    acceptFileTypes: /(gif|jpe?g|png)$/i,
    maxFileSize: 1000000, // 1 MB
    imageMaxWidth: 100,
    imageMaxHeight: 100,
    messages: {
     acceptFileTypes: '文件类型不匹配',
     maxFileSize: '文件过大',
     minFileSize: '文件过小'
    }
   }).on("fileuploadadd", function(e, data) {
    $("#titleImageError").html("");
    $("#addBtn,#updateBtn").off("click").on("click", function() {
     if($("#dialogForm").validate().form()) {
      customGlobal.blockUI("#modalContent");
      data.submit()
     }
    })
   }).on("fileuploadprocessalways", function(e, data) {
    var index = data.index,
     file = data.files[index];
    if(file.error) {
     $("#titleImageError").html(file.error)
    }
    $("#addBtn,#updateBtn").prop('disabled', !!data.files.error);
   }).on("fileuploaddone", function(e, data) {
    if(data.result.returnState == "ERROR") {
     toastr.warning(data.result.returnMsg);
     customGlobal.ajaxCallback(data);
     return;
    }
    addNews(data.result.returnData.url);
   });
  }
 </script>
</html>
bootstrap-fileinput.css文件:(github目前正在维护中,之后所有代码上传至我的github)
/*!
 * Jasny Bootstrap v3.1.3 (http://jasny.github.io/bootstrap)
 * Copyright 2012-2014 Arnold Daniels
 * Licensed under Apache-2.0 (https://github.com/jasny/bootstrap/blob/master/LICENSE)
 */
.btn-file {
 position: relative;
 overflow: hidden;
 vertical-align: middle;
}
.btn-file > input {
 position: absolute;
 top: 0;
 right: 0;
 width: 100%;
 height: 100%;
 margin: 0;
 font-size: 23px;
 cursor: pointer;
 filter: alpha(opacity=0);
 opacity: 0;
 direction: ltr;
}
.fileinput {
 display: inline-block;
 margin-bottom: 9px;
}
.fileinput .form-control {
 display: inline-block;
 padding-top: 7px;
 padding-bottom: 5px;
 margin-bottom: 0;
 vertical-align: middle;
 cursor: text;
}
.fileinput .thumbnail {
 display: inline-block;
 margin-bottom: 5px;
 overflow: hidden;
 text-align: center;
 vertical-align: middle;
}
.fileinput .thumbnail > img {
 max-height: 100%;
}
.fileinput .btn {
 vertical-align: middle;
}
.fileinput-exists .fileinput-new,
.fileinput-new .fileinput-exists {
 display: none;
}
.fileinput-inline .fileinput-controls {
 display: inline;
}
.fileinput-filename {
 display: inline-block;
 overflow: hidden;
 vertical-align: middle;
}
.form-control .fileinput-filename {
 vertical-align: bottom;
}
.fileinput.input-group {
 display: table;
}
.fileinput.input-group > * {
 position: relative;
 z-index: 2;
}
.fileinput.input-group > .btn-file {
 z-index: 1;
}
.fileinput-new.input-group .btn-file,
.fileinput-new .input-group .btn-file {
 border-radius: 0 4px 4px 0;
}
.fileinput-new.input-group .btn-file.btn-xs,
.fileinput-new .input-group .btn-file.btn-xs,
.fileinput-new.input-group .btn-file.btn-sm,
.fileinput-new .input-group .btn-file.btn-sm {
 border-radius: 0 3px 3px 0;
}
.fileinput-new.input-group .btn-file.btn-lg,
.fileinput-new .input-group .btn-file.btn-lg {
 border-radius: 0 6px 6px 0;
}
.form-group.has-warning .fileinput .fileinput-preview {
 color: #8a6d3b;
}
.form-group.has-warning .fileinput .thumbnail {
 border-color: #faebcc;
}
.form-group.has-error .fileinput .fileinput-preview {
 color: #a94442;
}
.form-group.has-error .fileinput .thumbnail {
 border-color: #ebccd1;
}
.form-group.has-success .fileinput .fileinput-preview {
 color: #3c763d;
}
.form-group.has-success .fileinput .thumbnail {
 border-color: #d6e9c6;
}
.input-group-addon:not(:first-child) {
 border-left: 0;
}
bootstrap-fileinput.js:
/* ===========================================================
 * Bootstrap: fileinput.js v3.1.3
 * http://jasny.github.com/bootstrap/javascript/#fileinput
 * ===========================================================
 * Copyright 2012-2014 Arnold Daniels
 *
 * Licensed under the Apache License, Version 2.0 (the "License")
 * you may not use this file except in compliance with the License.
 * You may obtain a copy of the License at
 *
 * http://www.apache.org/licenses/LICENSE-2.0
 *
 * Unless required by applicable law or agreed to in writing, software
 * distributed under the License is distributed on an "AS IS" BASIS,
 * WITHOUT WARRANTIES OR CONDITIONS OF ANY KIND, either express or implied.
 * See the License for the specific language governing permissions and
 * limitations under the License.
 * ========================================================== */
+function ($) { "use strict";
 var isIE = window.navigator.appName == 'Microsoft Internet Explorer'
 // FILEUPLOAD PUBLIC CLASS DEFINITION
 // =================================
 var Fileinput = function (element, options) {
 this.$element = $(element)
 this.$input = this.$element.find(':file')
 if (this.$input.length === 0) return
 this.name = this.$input.attr('name') || options.name
 this.$hidden = this.$element.find('input[type=hidden][name="' + this.name + '"]')
 if (this.$hidden.length === 0) {
  this.$hidden = $('<input type="hidden">').insertBefore(this.$input)
 }
 this.$preview = this.$element.find('.fileinput-preview')
 var height = this.$preview.css('height')
 if (this.$preview.css('display') !== 'inline' && height !== '0px' && height !== 'none') {
  this.$preview.css('line-height', height)
 }
 this.original = {
  exists: this.$element.hasClass('fileinput-exists'),
  preview: this.$preview.html(),
  hiddenVal: this.$hidden.val()
 }
 this.listen()
 }
 Fileinput.prototype.listen = function() {
 this.$input.on('change.bs.fileinput', $.proxy(this.change, this))
 $(this.$input[0].form).on('reset.bs.fileinput', $.proxy(this.reset, this))
 this.$element.find('[data-trigger="fileinput"]').on('click.bs.fileinput', $.proxy(this.trigger, this))
 this.$element.find('[data-dismiss="fileinput"]').on('click.bs.fileinput', $.proxy(this.clear, this))
 },
 Fileinput.prototype.change = function(e) {
 var files = e.target.files === undefined ? (e.target && e.target.value ? [{ name: e.target.value.replace(/^.+\\/, '')}] : []) : e.target.files
 e.stopPropagation()
 if (files.length === 0) {
  this.clear()
  return
 }
 this.$hidden.val('')
 this.$hidden.attr('name', '')
 this.$input.attr('name', this.name)
 var file = files[0]
 if (this.$preview.length > 0 && (typeof file.type !== "undefined" ? file.type.match(/^image\/(gif|png|jpeg)$/) : file.name.match(/\.(gif|png|jpe?g)$/i)) && typeof FileReader !== "undefined") {
  var reader = new FileReader()
  var preview = this.$preview
  var element = this.$element
  reader.onload = function(re) {
  var $img = $('<img>')
  $img[0].src = re.target.result
  files[0].result = re.target.result
  element.find('.fileinput-filename').text(file.name)
  // if parent has max-height, using `(max-)height: 100%` on child doesn't take padding and border into account
  if (preview.css('max-height') != 'none') $img.css('max-height', parseInt(preview.css('max-height'), 10) - parseInt(preview.css('padding-top'), 10) - parseInt(preview.css('padding-bottom'), 10) - parseInt(preview.css('border-top'), 10) - parseInt(preview.css('border-bottom'), 10))
  preview.html($img)
  element.addClass('fileinput-exists').removeClass('fileinput-new')
  element.trigger('change.bs.fileinput', files)
  }
  reader.readAsDataURL(file)
 } else {
  this.$element.find('.fileinput-filename').text(file.name)
  this.$preview.text(file.name)
  this.$element.addClass('fileinput-exists').removeClass('fileinput-new')
  this.$element.trigger('change.bs.fileinput')
 }
 },
 Fileinput.prototype.clear = function(e) {
 if (e) e.preventDefault()
 this.$hidden.val('')
 this.$hidden.attr('name', this.name)
 this.$input.attr('name', '')
 //ie8+ doesn't support changing the value of input with type=file so clone instead
 if (isIE) {
  var inputClone = this.$input.clone(true);
  this.$input.after(inputClone);
  this.$input.remove();
  this.$input = inputClone;
 } else {
  this.$input.val('')
 }
 this.$preview.html('')
 this.$element.find('.fileinput-filename').text('')
 this.$element.addClass('fileinput-new').removeClass('fileinput-exists')
 if (e !== undefined) {
  this.$input.trigger('change')
  this.$element.trigger('clear.bs.fileinput')
 }
 },
 Fileinput.prototype.reset = function() {
 this.clear()
 this.$hidden.val(this.original.hiddenVal)
 this.$preview.html(this.original.preview)
 this.$element.find('.fileinput-filename').text('')
 if (this.original.exists) this.$element.addClass('fileinput-exists').removeClass('fileinput-new')
  else this.$element.addClass('fileinput-new').removeClass('fileinput-exists')
 this.$element.trigger('reset.bs.fileinput')
 },
 Fileinput.prototype.trigger = function(e) {
 this.$input.trigger('click')
 e.preventDefault()
 }
 // FILEUPLOAD PLUGIN DEFINITION
 // ===========================
 var old = $.fn.fileinput
 $.fn.fileinput = function (options) {
 return this.each(function () {
  var $this = $(this),
   data = $this.data('bs.fileinput')
  if (!data) $this.data('bs.fileinput', (data = new Fileinput(this, options)))
  if (typeof options == 'string') data[options]()
 })
 }
 $.fn.fileinput.Constructor = Fileinput
 // FILEINPUT NO CONFLICT
 // ====================
 $.fn.fileinput.noConflict = function () {
 $.fn.fileinput = old
 return this
 }
 // FILEUPLOAD DATA-API
 // ==================
 $(document).on('click.fileinput.data-api', '[data-provides="fileinput"]', function (e) {
 var $this = $(this)
 if ($this.data('bs.fileinput')) return
 $this.fileinput($this.data())
 var $target = $(e.target).closest('[data-dismiss="fileinput"],[data-trigger="fileinput"]');
 if ($target.length > 0) {
  e.preventDefault()
  $target.trigger('click.bs.fileinput')
 }
 })
}(window.jQuery);
总结
以上所述是小编给大家介绍的bootstrap fileinput插件实现预览上传照片功能,希望对大家有所帮助,如果大家有任何疑问请给我留言,小编会及时回复大家的。在此也非常感谢大家对我们网站的支持!
您可能感兴趣的文章:
- Bootstrap fileinput文件上传预览插件使用详解
- 基于bootstrap的上传插件fileinput实现ajax异步上传功能(支持多文件上传预览拖拽)
- Bootstrap fileinput组件封装及使用详解
- BootStrap fileinput.js文件上传组件实例代码
- BootStrap Fileinput初始化时的一些参数
赞 (0)

