基于jQuery的消息提示插件 DivAlert之旅(二)

改进的代码部分主要如下:
1、创建default.css文件:
代码


代码如下:

img
{
vertical-align:middle;
}
.jBg
{
position: absolute;
top: 0;
left: 0;
z-index: 9999;
background-color: #999;
filter: alpha(opacity=70);
opacity: 0.7;
}
.jWrap
{
position: absolute;
border: 1px solid #cef;
z-index: 10000;
overflow: hidden;
}
.jTit
{
text-align: left;
background:#F1F1F1;
padding: 8px;
cursor: move;
height: 20px;
vertical-align: middle;
border-bottom:1px solid #DEDEDE;
text-indent:5px;
font-size:15px;
line-height:20px;
}
.jCon
{
background-color: #fff;
padding: 10px 13px;
overflow: auto;
font-size:15px;
}
.jBtn, jBtn:hover
{
cursor:pointer;
height:17px;
width:17px;
}
.jBtn
{
background:transparent url(close.png) no-repeat;
position:absolute;
right:8px;
top:7px;
}
.jBtn:hover
{
background:transparent url(close.png) no-repeat -19px 0px;
}
.jConBottom
{
background:#F1F1F1;
text-align:right;
width:100%;
height:41px;
position:absolute;
}
.jBtnConfirm
{
background:url(btn.png) no-repeat 0 -24px transparent;
cursor:pointer;
color:#3F3F3F;
width:46px;
height:21px;
line-height:23px;
text-align:center;
font-size:12px;
float:right;
margin-top:10px;
margin-right:10px;
}

  2、修改JS默认options部分(以便与css文件配合):


代码如下:

options.bgClass = o.bgClass || 'jBg';
options.wrapClass = o.wrapClass || 'jWrap';
options.titClass = o.titClass || 'jTit';
options.conClass = o.conClass || 'jCon';
options.clsClass = o.clsClass || 'jBtn';
options.botDivClass = o.botDivClass || 'jBot';
options.botBtnClass = o.botBtnClass || 'jBotBtn';

  3、由于俺以前只构建了title和content两个部分的div,为了实现效果还要添加两个div,一个是底部大的div,还有一个是确定按钮


代码如下:

//创建底部包含确定按钮的div
var $conBottomDiv = createElement("div")
.addClass('jConBottom')
.css('top', options.height - $titDiv.outerHeight() -40 + 'px');

//创建底部确定按钮
var $conBottomBtn = createElement("div")
.addClass('jBtnConfirm')
.html('确定')
.click(close);

  最后别忘了在Dom创建时将这两块附加在需要的位置就ok了。。。
  效果图:
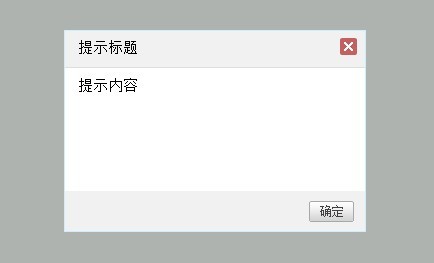
装饰了一下,确实比以前要好看了啊^_^
代码打包下载

基于jQuery的弹出消息插件 DivAlert之旅(一)

基于jQuery的消息提示插件 DivAlert之旅(二)

基于jQuery的消息提示插件 DivAlert之旅(三) 推荐

(0)

相关推荐

  • 基于jQuery的弹出消息插件 DivAlert之旅(一)

    想着自己学习Javascript,以及Ajax.jQuery等已经有一段时间了,不过貌似还没有写过一个插件,看到jQuery官网上那么多令人眼前一亮的插件,自己今天也动心说是不是能够写一个类似的插件来瞧瞧,了解了jQuery插件的基本格式,理一下基本的思路,动工吧... 这个DivAlert插件,顾名思义就是页面弹出框,也就相当于Winform里面MessageBox.Show()那样的东西. 首先,我们来定义一下一些最基本的参数: 插件初始化 复制代码 代码如下: (function($) {

  • jQuery绑定事件不执行但alert后可以正常执行

    因为我不知道怎么描述这个问题,故标题起的这么坑爹 主要过程是这样的,今天我写一个类似于百度知道那样有提问答案的页面,所有的数据都是页面第一次加载时通过ajax得到的  希望实现的效果是提问者可以通过店家每个答案后面的星星符号选择采纳此答案,被采纳的答案星星图标会变成全黑的. 开始我是这样写的 复制代码 代码如下: $('.choose_right_answer').bind('click',function(){ if(currentUser==questioner) { if ($(this)

  • jQuery)扩展jQuery系列之一 模拟alert,confirm(一)

    效果图 全部代码 复制代码 代码如下: /** * @author xing */ (function($){ $.extend({ alert:function(html,callback){ var dialog=new Dialog(); dialog.build('alert',callback,html); }, confirm:function(html,callback){ var dialog=new Dialog(); dialog.build('confirm',callba

  • jQuery提示插件alertify使用指南

    1.alertify插件功能 主要实现提示功能,用于代替js中的alert,confirm,prompt,显示友好的提示框 2.alertify使用方法 1.使用的文件 主要使用三个文件,两个css(alertify.core.css,alertify.default.css),用于设置提示框的样式.一个js(alertify.min.js或alertify.js),用于实现提示框的功能. 2.实现提示框代码 alertify使用非常简单,主要步骤为:初始化(初始化alertify)->绑定(绑

  • jquery.alert 弹出式复选框实现代码

    //jQuery Alert Dialogs Plugin Version 1.0 //插件下载地址:http://abeautifulsite.net/notebook/87 自身的原方法为: 复制代码 代码如下: // Usage: // jAlert( message, [title, callback] ) // jConfirm( message, [title, callback] ) // jPrompt( message, [value, title, callback] ) 1

  • 基于jquery的弹出提示框始终处于窗口的居中位置(类似于alert弹出框的效果)

    原理很简单: 获取当前屏幕(窗体)的宽度和高度,因为不同浏览器的窗体大小是不一样的.有了这个,可以计算出来垂直居中的坐标.但是滑动了滚动条怎么依然垂直居中呢?这个时候就要获取当前窗体距离页面顶部的高度,加到刚刚的y轴坐标即可. $(document)是获取整个网页的,$(window)是获取当前窗体的,这个要搞清楚. 最后把获取的坐标赋给窗体即可,窗体本身是绝对定位的,所以自然可以到窗体中间. 具体代码: 复制代码 代码如下: <!DOCTYPE HTML> <html> <

  • 用Jquery重写windows.alert方法实现思路

    已经在 IE8 , firefox3.0.11下面测试通过 复制代码 代码如下: $.extend({ includePath: '', include: function(file) { var files = typeof file == "string" ? [file] : file; for (var i = 0; i < files.length; i++) { var name = files[i].replace(/^\s|\s$/g, "")

  • jQuery实现摸拟alert提示框

    页面调用JS: $(document).ready(function() { $("#delete_without_layer").click(function () { $.tConfirm.open({body:'Are you sure to delete?',type:'confirm',onOk:function(){ alert("yes"); }}); }); $("#delete_with_layer").click(functi

  • jquery SweetAlert插件实现响应式提示框

    jquery弹出层插件,支持消息提示.错误提示.确认框提示等.交互体验度非常好,大家都用微信支付.支付宝等完成用户体验度非常的不错.本插件至少要支持IE9+.使用方式也非常的简单.粗暴,很符合大众的jquery插件使用方法. 先给大家演示效果: 在线预览    源码下载 代码如下: <h1>Sweet Alert</h1> <h2>A beautiful replacement for JavaScript's "Alert"</h2>

  • 自编jQuery插件实现模拟alert和confirm

    啥也不说,先上图,有图有真相 :) 现在绝大多数网站都不用自带的alert和confirm了,因为界面太生硬了.因此这个插件就这样产生了... 来看插件的实现代码吧: (function () { $.MsgBox = { Alert: function (title, msg) { GenerateHtml("alert", title, msg); btnOk(); //alert只是弹出消息,因此没必要用到回调函数callback btnNo(); }, Confirm: fun

  • JQuery的Alert消息框插件使用介绍

    下载JS文件引用到page中,如下代码: 复制代码 代码如下: <!-- Dependencies --> <script src="/path/to/jquery.js" type="text/javascript"></script> <script src="/path/to/jquery.ui.draggable.js" type="text/javascript">&l

随机推荐