SpringBoot工程中Spring Security应用实践记录流程分析
目录
- SpringSecurity 应用
- 简介
- 认证授权分析
- SpringSecurity 架构设计
- 快速入门实践
- 创建项目
- 添加项目依赖
- 启动服务访问测试
- 自定义认证逻辑
- 认证流程分析
- 定义security配置类
- 定义数据访问层对象
- 定义UserDetailService接口实现类
- 自定义登陆页面
- 启动服务进行访问测试
- 授权逻辑设计及实现
- 修改授权配置类
- 定义资源访问对象
- 启动服务实现访问测试
- 总结(Summary)
SpringSecurity 应用
简介
Spring Security是一个能够为基于Spring的企业应用系统提供声明式的安全访问控制解决方案的安全框架。它提供了一组可以在Spring应用上下文中配置的Bean,充分利用了Spring IoC,DI(控制反转Inversion of Control ,DI:Dependency Injection 依赖注入)和AOP(面向切面编程)功能,为应用系统提供声明式的安全访问控制功能,减少了为企业系统安全控制编写大量重复代码的工作。
认证授权分析
用户在进行资源访问时,要求系统要对用户进行权限控制,其具体流程如图-1所示:

SpringSecurity 架构设计
鸟瞰SpringSecurity 基本技术架构,例如:
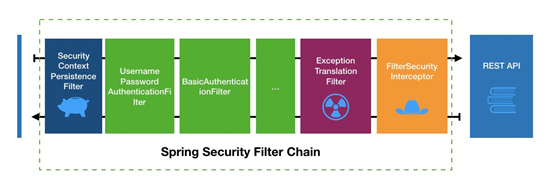
绿色部分是认证过滤器,需要我们自己配置,可以配置多个认证过滤器。认证过滤器可以使用 Spring Security 提供的认证过滤器,也可以自定义过滤器(例如:短信验证)。认证过滤器要在 configure(HttpSecurity http)方法中配置,没有配置不生效。下面会重点介绍以下三个过滤器:
UsernamePasswordAuthenticationFilter 过滤器:该过滤器会拦截前端提交的 POST 方式的登录表单请求,并进行身份认证。
BasicAuthenticationFilter:检测和处理 http basic 认证。
ExceptionTranslationFilter 过滤器:该过滤器不需要我们配置,对于前端提交的请求会直接放行,捕获后续抛出的异常并进行处理(例如:权限访问限制)。
FilterSecurityInterceptor 过滤器:该过滤器是过滤器链的最后一个过滤器,根据资源权限配置来判断当前请求是否有权限访问对应的资源。如果访问受限会抛出相关异常,并由 ExceptionTranslationFilter 过滤器进行捕获和处理。
快速入门实践
创建项目
创建security项目,其pom.xml文件内容如下:
<?xml version="1.0" encoding="UTF-8"?>
<project xmlns="http://maven.apache.org/POM/4.0.0"
         xmlns:xsi="http://www.w3.org/2001/XMLSchema-instance"
         xsi:schemaLocation="http://maven.apache.org/POM/4.0.0 http://maven.apache.org/xsd/maven-4.0.0.xsd">
    <modelVersion>4.0.0</modelVersion>

    <parent>
        <artifactId>spring-boot-starter-parent</artifactId>
        <groupId>org.springframework.boot</groupId>
        <version>2.3.2.RELEASE</version>
    </parent>
    <groupId>com.cy</groupId>
    <artifactId>05-security</artifactId>
    <version>1.0-SNAPSHOT</version>

    <properties>
        <maven.compiler.source>8</maven.compiler.source>
        <maven.compiler.target>8</maven.compiler.target>
    </properties>
</project>
添加项目依赖
第一步:创建项目,其pom.xml文件核心依赖如下:
<dependencies>

<dependency>
    <groupId>org.springframework.boot</groupId>
    <artifactId>spring-boot-starter-web</artifactId>
  </dependency>

    <dependency>
        <groupId>org.springframework.boot</groupId>
        <artifactId>spring-boot-starter-security</artifactId>
    </dependency>
</dependencies>
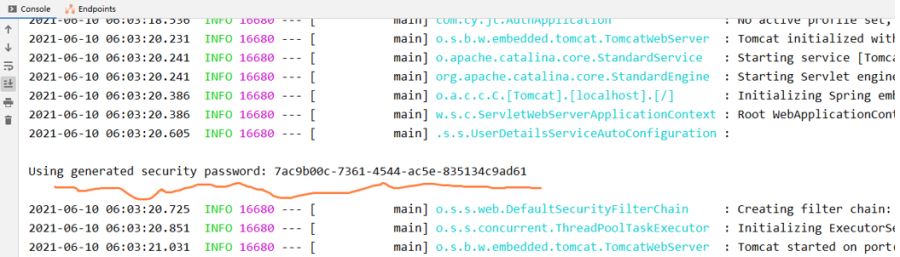
第二步:启动服务(依赖添加以后会默认添加一个tomcat,端口8080)
服务启动之后,你会发现,控制台会出现一个随机的密码,用于访问当前系统,默认用户名是user,密码就是控制台上的密码,如图所示:
启动服务访问测试
服务启动后,打开浏览器进行访问,如图所示:

输入账号(默认用户名为user)和密码登陆成功默认为如下页面.

其中,出现这个页面表示还没有配置登陆成功页面,这个资源页面现在还不存在,可以在项目的resources目录下创建static目录(假如没有此目录),然后在此目录下创建index.html页面,内容如下:
<!DOCTYPE html>
  <html lang="en">
  <head>
    <meta charset="UTF-8">
    <title>Title</title>
  </head>
  <body>
     <div>
       <h1>The Index Page</h1>
     </div>
   </body>
 </html>
此时,再次启动服务进行登陆,呈现登陆成功的效果,如图所示:

自定义认证逻辑
认证流程分析

定义security配置类
定义配置类,基于此类配置认证和授权逻辑,例如:
package com.cy.security.config;
import org.springframework.context.annotation.Bean;
import org.springframework.context.annotation.Configuration;
import org.springframework.security.config.annotation.method.configuration.EnableGlobalMethodSecurity;
import org.springframework.security.config.annotation.web.builders.HttpSecurity;
import org.springframework.security.config.annotation.web.configuration.EnableWebSecurity;
import org.springframework.security.config.annotation.web.configuration.WebSecurityConfigurerAdapter;
import org.springframework.security.crypto.bcrypt.BCryptPasswordEncoder;

@Configuration
public class SecurityConfig extends WebSecurityConfigurerAdapter {
    /**
     * 认证授权管理器对用户输入的密码与数据库中存储的密码进行比对时,
     * 需要对这个密码加密,加密算法需要我们自己指定
     * @return
     */
    @Bean
    public BCryptPasswordEncoder passwordEncoder(){
        return new BCryptPasswordEncoder();
    }

    @Override
    protected void configure(HttpSecurity http) throws Exception {
        //super.configure(http);
        //关闭跨域攻击
        http.csrf().disable();
        //自定义登陆表单
        http.formLogin().loginPage("/login.html").loginProcessingUrl("/login");
        //请求资源的认证配置
        http.authorizeRequests()
                .antMatchers("/login","/login.html")
                .permitAll()
                .anyRequest().authenticated();
    }
}
定义数据访问层对象
定义数据访问层对象,基于此对象实现用户及用户权限信息的获取,例如:
package com.cy.security.dao;
import com.cy.security.domain.SysUser;
import org.apache.ibatis.annotations.Mapper;
import org.apache.ibatis.annotations.Select;
import java.util.List;

@Mapper
public interface UserMapper {
     /**
     * 基于用户名获取用户信息
     * @param username
     * @return
     */
    @Select("select id,username,password,status " +
            "from tb_users " +
            "where username=#{username}")
     SysUser selectUserByUsername(String username);

    /**
     * 基于用户id查询用户权限
     * @param userId 用户id
     * @return 用户的权限
     * 涉及到的表:tb_user_roles,tb_role_menus,tb_menus
     */
    @Select("select distinct m.permission " +
            "from tb_user_roles ur join tb_role_menus rm on ur.role_id=rm.role_id" +
            "     join tb_menus m on rm.menu_id=m.id " +
            "where ur.user_id=#{userId} and m.permission is not null")
    List<String> selectUserPermissions(Long userId);
}
定义UserDetailService接口实现类
Spring Security 提供了一个UserDetailService接口,我们可以基于此接口实现类,实现用户信息的获取和封装,例如:
@Service
public class UserDetailServiceImpl implements UserDetailsService {

    @Autowired
    private UserMapper userMapper;
    /**
     * 客户端点击登陆时,添加些用户信息会传给此方法
     * @param username
     * @return
     * @throws UsernameNotFoundException
     */
    @Override
    public UserDetails loadUserByUsername(String username) throws UsernameNotFoundException {
        //1.基于用户名查询用户信息
        SysUser user=userMapper.selectUserByUsername(username);
        //...判断自己写...
        System.out.println(user);
        //2.查询用户登陆用户权限
        List<String> permissions=userMapper.selectUserPermissions(user.getId());
        System.out.println(permissions);
        //3.封装用户信息并返回,将用户信息交给认证管理器,认证授权管理器负责对用户输入的信息进行认证和授权
        List<GrantedAuthority> authorityList =
                AuthorityUtils.createAuthorityList(permissions.toArray(new String[]{}));
        return new User(username, user.getPassword(),authorityList);
    }
}
自定义登陆页面
在resources的static目录下创建login.html页面,例如:
<!doctype html>
<html lang="en">
<head>
    <!-- Required meta tags -->
    <meta charset="utf-8">
    <meta name="viewport" content="width=device-width, initial-scale=1">
    <!-- Bootstrap CSS -->
    <link href="https://cdn.jsdelivr.net/npm/bootstrap@5.0.2/dist/css/bootstrap.min.css" rel="external nofollow"  rel="stylesheet"
          integrity="sha384-EVSTQN3/azprG1Anm3QDgpJLIm9Nao0Yz1ztcQTwFspd3yD65VohhpuuCOmLASjC" crossorigin="anonymous">
    <title>login</title>
</head>
<body>
<div class="container"id="app">
    <h3>Please Login</h3>
    <form>
        <div class="mb-3">
            <label for="usernameId" class="form-label">Username</label>
            <input type="text" v-model="username" class="form-control" id="usernameId" aria-describedby="emailHelp">
        </div>
        <div class="mb-3">
            <label for="passwordId" class="form-label">Password</label>
            <input type="password" v-model="password" class="form-control" id="passwordId">
        </div>
        <button type="button" @click="doLogin()" class="btn btn-primary">Submit</button>
    </form>
</div>
<script src="https://cdn.jsdelivr.net/npm/bootstrap@5.0.2/dist/js/bootstrap.bundle.min.js" integrity="sha384-MrcW6ZMFYlzcLA8Nl+NtUVF0sA7MsXsP1UyJoMp4YLEuNSfAP+JcXn/tWtIaxVXM" crossorigin="anonymous"></script>
<script src="https://cdn.jsdelivr.net/npm/vue/dist/vue.js"></script>
<script src="https://unpkg.com/axios/dist/axios.min.js"></script>

<script>
    var vm=new Vue({
        el:"#app",//定义监控点,vue底层会基于此监控点在内存中构建dom树
        data:{ //此对象中定义页面上要操作的数据
            username:"",
            password:""
        },
        methods: {//此位置定义所有业务事件处理函数
            doLogin() {
                //1.定义url
                let url = "http://localhost:8080/login"
                //2.定义参数
                let params = new URLSearchParams()
                params.append('username',this.username);
                params.append('password',this.password);
                debugger
                //3.发送异步请求
                axios.post(url, params).then((response) => {
                        alert("login ok");
                        location.href="/index.html" rel="external nofollow"
                })
            }
        }
    });
</script>
</body>
</html>
启动服务进行访问测试

授权逻辑设计及实现
修改授权配置类
在权限配置类上添加启用全局方法访问控制注解,例如
package com.cy.auth.config;

//这个配置类是配置Spring-Security的,
//prePostEnabled= true表示启动权限管理功能
@EnableGlobalMethodSecurity(prePostEnabled = true)
@Configuration
public class SpringSecurityConfigurer extends WebSecurityConfigurerAdapter {

    ……
}
定义资源访问对象
package com.cy.res.controller;

@RequestMapping("/res")
@RestController
public class ResourceController {
    @PreAuthorize("hasAuthority('sys:res:view')")
    @RequestMapping("/retrieve")
    public String doRetrieve(){
        return "select resource ok";
    }
    @PreAuthorize("hasAuthority('sys:res:create')")
    @RequestMapping("/create")
    public String doCreate(){
        return "create resource";
    }
}
其中,@PreAuthorize注解描述方法时,用于告诉系统访问此方法时需要进行权限检测。需要具备指定权限才可以访问。例如:
启动服务实现访问测试
打开浏览器分别输入http://localhost:8080/res/create和http://localhost:8080/res/select进行测试分析。
总结(Summary)
本章节主要是对spring security 在springboot平台下是如何使用的。
到此这篇关于SpringBoot工程中Spring Security应用实践的文章就介绍到这了,更多相关Spring Security应用实践内容请搜索我们以前的文章或继续浏览下面的相关文章希望大家以后多多支持我们!
相关推荐
-
SpringBoot+SpringSecurity 不拦截静态资源的实现
一.问题描述 在 SpringBoot 中加入 SpringSecurity 中之后,静态资源总是被过滤,导致界面很难看: 目录结构: 二.问题解决 正常不拦截资源,我查阅资料,基本都是重新 config 方法即可: package org.yolo.securitylogin.config; import org.springframework.context.annotation.Bean; import org.springframework.context.annotation.Conf
-
Springboot WebFlux集成Spring Security实现JWT认证的示例
1 简介 在之前的文章<Springboot集成Spring Security实现JWT认证>讲解了如何在传统的Web项目中整合Spring Security和JWT,今天我们讲解如何在响应式WebFlux项目中整合.二者大体是相同的,主要区别在于Reactive WebFlux与传统Web的区别. 2 项目整合 引入必要的依赖: <dependency> <groupId>org.springframework.boot</groupId> <art
-

SpringSecurity整合springBoot、redis实现登录互踢功能
背景 基于我的文章--<SpringSecurity整合springBoot.redis token动态url权限校验>.要实现的功能是要实现一个用户不可以同时在两台设备上登录,有两种思路: (1)后来的登录自动踢掉前面的登录. (2)如果用户已经登录,则不允许后来者登录. 需要特别说明的是,项目的基础是已经是redis维护的session. 配置redisHttpSession 设置spring session由redis 管理. 2.1去掉yml中的http session 配置,yml和
-
SpringBoot+Spring Security无法实现跨域的解决方案
SpringBoot+Spring Security无法实现跨域 未使用Security时跨域: import org.slf4j.Logger; import org.slf4j.LoggerFactory; import org.springframework.beans.factory.annotation.Value; import org.springframework.boot.autoconfigure.AutoConfigureBefore; import org.springf
-
springboot+springsecurity如何实现动态url细粒度权限认证
谨记:Url表只储存受保护的资源,不在表里的资源说明不受保护,任何人都可以访问 1.MyFilterInvocationSecurityMetadataSource 类判断该访问路径是否被保护 @Component //用于设置受保护资源的权限信息的数据源 public class MyFilterInvocationSecurityMetadataSource implements FilterInvocationSecurityMetadataSource { @Bean public An
-
Springboot集成Spring Security实现JWT认证的步骤详解
1 简介 Spring Security作为成熟且强大的安全框架,得到许多大厂的青睐.而作为前后端分离的SSO方案,JWT也在许多项目中应用.本文将介绍如何通过Spring Security实现JWT认证. 用户与服务器交互大概如下: 客户端获取JWT,一般通过POST方法把用户名/密码传给server: 服务端接收到客户端的请求后,会检验用户名/密码是否正确,如果正确则生成JWT并返回:不正确则返回错误: 客户端拿到JWT后,在有效期内都可以通过JWT来访问资源了,一般把JWT放在请求头:一次
-
SpringBoot使用Spring Security实现登录注销功能
1.首先看下我的项目结构 我们逐个讲解 /** * 用户登录配置类 * @author Administrator * */ public class AdminUserDateils implements UserDetails { private static final long serialVersionUID = -1546619839676530441L; private transient YCAdmin yCAdmin; public AdminUserDateils() { }
-
SpringBoot集成Spring security JWT实现接口权限认证
1.添加依赖 <dependency> <groupId>org.springframework.boot</groupId> <artifactId>spring-boot-starter-security</artifactId> </dependency> <dependency> <groupId>io.jsonwebtoken</groupId> <artifactId>jjw
-
SpringBoot项目实现关闭数据库配置和springSecurity
SpringBoot关闭数据库配置和springSecurity 通过exclude不注入数据源和安全验证模块 @SpringBootApplication(exclude={DataSourceAutoConfiguration.class, SecurityAutoConfiguration.class}) public class ErpApplication { public static void main(String[] args) { SpringApplication.run(
-
SpringBoot整合Security实现权限控制框架(案例详解)
目录 一.前言 二.环境准备 2.1.数据库表 四.测试 五.总结 我想每个写项目的人,都肯定会遇到控制权限这个问题. 例如这个这个链接只能管理员访问,那个链接丫只能超级管理员访问等等,实现方式也有多种多样,控制的粒度也不一样. 以前刚学的时候,不会框架,大都是手写注解+过滤器来进行权限的控制,但这样增加了过滤器的负担.用起来也会稍微有些麻烦,粒度不太好控制. 用框架的话,就是封装了更多的操作,让一切更简单吧.当然不局限于Security,还有像Shiro安全框架,这两种非常常见. 一起加油吧!