Spring源码解析之Configuration
一、@Configuration
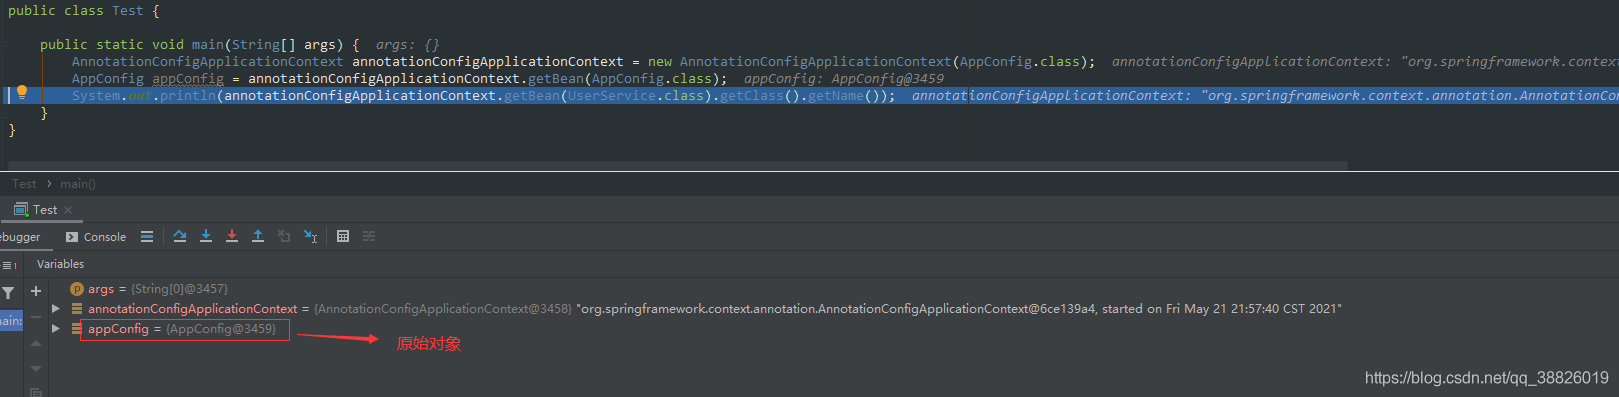
1.1 未加@Configuration


<!--logback-test.xml,配置不打印日志-->
<?xml version="1.0" encoding="UTF-8"?>
<configuration>
    <include resource="org/springframework/boot/logging/logback/base.xml" />
    <logger name="org.springframework" level="OFF"/>
</configuration>


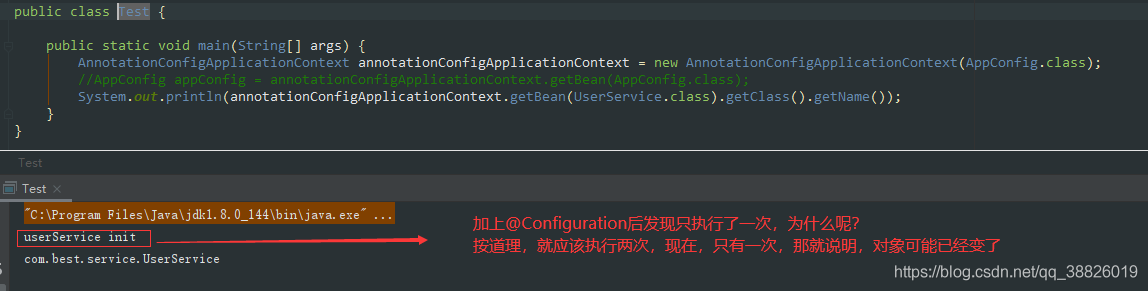
1.2 加上@Configuration


1.3 Cglib动态代理


二、源码跟踪
2.1 AnnotationConfigApplicationContext

2.2 AnnotationConfigApplicationContext#AnnotationConfigApplicationContext(Class<?>... annotatedClasses)

2.3 AbstractApplicationContext#refresh()
@Override
public void refresh() throws BeansException, IllegalStateException {
// 同步,线程安全; 防止 fresh还没结束 就又进入改方法 导致容器初始化错乱
synchronized (this.startupShutdownMonitor) {
// 准备刷新 记录开始时间 设置几个标志位 验证环境属性
prepareRefresh();
// 告诉子类刷新内部bean工厂 创建BeanFactory 并且获取BeanDefinition的定义信息
/**
* obtainFreshBeanFactory();方法
* 解析为一个个beanDefinition 放在我们beanDefinitionMap中管理起来
* 1. refreshBeanFactory(); 核心方法
* AbstractRefreshableApplicationContext#refreshBeanFactory()
* 创建DefaultListableBeanFactory 并设置属性
* 加载BeanFactory; 根据不同的类型,调用不同的方法
* org.springframework.context.support.AbstractXmlApplicationContext#loadBeanDefinitions(org.springframework.beans.factory.support.DefaultListableBeanFactory)
*/
ConfigurableListableBeanFactory beanFactory = obtainFreshBeanFactory();
// 准备在这种情况下使用的bean工厂 向beanFactory中设置一些属性 。对BeanFactory 进行各种功能填充
prepareBeanFactory(beanFactory);
try {
// 允许在上下文 的子类中对bean工厂进行后处理 由子类去实现; 主要是自定义去使用
postProcessBeanFactory(beanFactory);
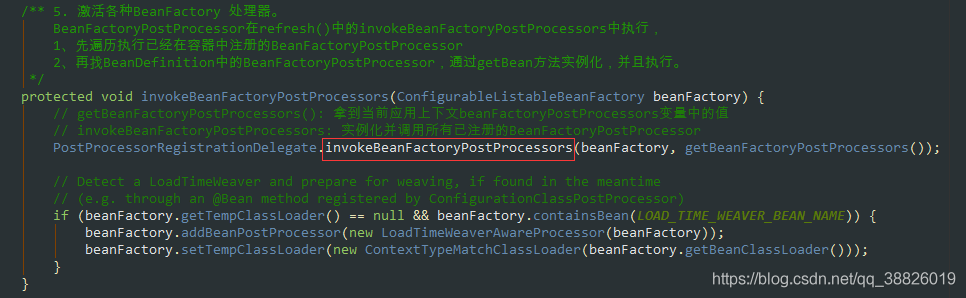
// 第5步 【BeanFactoryPostProcessors ;bean工厂后置处理器】调用我们的bean工厂后置处理器 (所有实现接口BeanFactoryPostProcessor接口的)
// 主要是
// 会在此将class扫描成BeanDefinition 并注册bean 到一个BeanDefinitionMap中 这个过程使用到代理
//BeanFactoryPostProcessor 可以 用于容器完成初始化()
// 此处可以 还没有实例化Bean之前读取Bean的信息,并作出一些修改。
// 例如修改Bean的属性,修改Bean的scope等
invokeBeanFactoryPostProcessors(beanFactory);
//https://blog.csdn.net/caihaijiang/article/details/35552859
// 【BeanPostProcessors ;bean后置处理器】 注册BeanPostProcessor
// BeanPostProcessor是Bean的后置处理器,
// 在Bean的初始化方法[InitializingBean 以及init-method]前,后执行。
registerBeanPostProcessors(beanFactory);
// 为上下文初始化Message 源, 即不同语言的消息体, 国际化处理 i18n
initMessageSource();
// 初始化事件传播器
//初始化应用消息广播器, 并放入"applicationEventMulticaster" bean 中
initApplicationEventMulticaster();
// 扩展的一个实现 ,留给子类来初始化其它的Bean。如springboot内嵌的tomcat在这个阶段完成
onRefresh();
// 注册监听器
// 在所有注册的bean 中查找Listener bean , 注册到消息广播报中
registerListeners();
/**第11步
对于非抽象类、非延迟初始化的单例bean,
在spring容器启动的时候调用getBean方法来实例化bean, 并进行相关初始化工作,
getBean方法最终调用AbstractAutowireCapableBeanFactory.doCreateBean方法
*/
// 在创建BeanFactory的过程中,BeanDefinition注册到了BeanFactory中的一个ConCurretHashMap对象中
// 以BeanName为key,BeanDefinition为value ; 实例化所有剩余的(非延迟初始化)单例。
finishBeanFactoryInitialization(beanFactory);
// 第12步 最后一步:发布相应的事件。
//完成刷新过程, 通知生命周期处现器lifecycleProcessor 刷新过程, 同时发出ContextRefreshEvent 通知别人
finishRefresh();
}
catch (BeansException ex) {
if (logger.isWarnEnabled()) {
logger.warn("Exception encountered during context initialization - " +
"cancelling refresh attempt: " + ex);
}
// 第13步 销毁以创建的Bean
destroyBeans();
//取消refresh操作,重置容器的同步标识
cancelRefresh(ex);
// Propagate exception to caller.
throw ex;
}
finally {
resetCommonCaches();
}
}
}
2.4 AbstractApplicationContext#invokeBeanFactoryPostProcessors
2.5 PostProcessorRegistrationDelegate#invokeBeanFactoryPostProcessors
public static void invokeBeanFactoryPostProcessors(
			ConfigurableListableBeanFactory beanFactory, List<BeanFactoryPostProcessor> beanFactoryPostProcessors) {

		Set<String> processedBeans = new HashSet<>();

		// 对BeanDefinitionRegistry 类型的处理
		if (beanFactory instanceof BeanDefinitionRegistry) {
			BeanDefinitionRegistry registry = (BeanDefinitionRegistry) beanFactory;
			List<BeanFactoryPostProcessor> regularPostProcessors = new ArrayList<>();
			// 用于存放BeanDefinitionRegistryPostProcessor
			List<BeanDefinitionRegistryPostProcessor> registryProcessors = new ArrayList<>();

			// 遍历所有的beanFactoryPostProcessors,将BeanDefinitionRegistryPostProcessor和普通BeanFactoryPostProcessor区分开
			for (BeanFactoryPostProcessor postProcessor : beanFactoryPostProcessors) {
				if (postProcessor instanceof BeanDefinitionRegistryPostProcessor) {
					BeanDefinitionRegistryPostProcessor registryProcessor =
							(BeanDefinitionRegistryPostProcessor) postProcessor;
					/**
						对于BeanDefinitionRegistryPostProcessor 类型, 在BeanFactoryPostProcessor 的
						基础上还有自己定义的方法,需要先调用
					 */
					registryProcessor.postProcessBeanDefinitionRegistry(registry);
					registryProcessors.add(registryProcessor);
				}
				else {
					// 记录常规BeanFactoryPostProcessor
					regularPostProcessors.add(postProcessor);
				}
			}

			/**
				不要在这里初始化FactoryBeans: 我们需要保留所有常规bean未初始化,让bean工厂后处理器应用到它们!
				BeanDefinitionRegistryPostProcessors之间的分离实现排好序,点好,等等。
				获取spring配置文件中定义的所有实现BeanFactoryPostProcessor接口的bean,然后根据优先级进行排序
			 */
			List<BeanDefinitionRegistryPostProcessor> currentRegistryProcessors = new ArrayList<>();

			// 首先,调用实现优先排序的BeanDefinitionRegistryPostProcessors
			String[] postProcessorNames =
					beanFactory.getBeanNamesForType(BeanDefinitionRegistryPostProcessor.class, true, false);
			for (String ppName : postProcessorNames) {
				// PriorityOrdered.class 优先排序
				if (beanFactory.isTypeMatch(ppName, PriorityOrdered.class)) {
					currentRegistryProcessors.add(beanFactory.getBean(ppName, BeanDefinitionRegistryPostProcessor.class));
					processedBeans.add(ppName);
				}
			}
			sortPostProcessors(currentRegistryProcessors, beanFactory);
			registryProcessors.addAll(currentRegistryProcessors);
			invokeBeanDefinitionRegistryPostProcessors(currentRegistryProcessors, registry);
			currentRegistryProcessors.clear();

			// 接下来,调用实现Ordered的BeanDefinitionRegistryPostProcessors
			postProcessorNames = beanFactory.getBeanNamesForType(BeanDefinitionRegistryPostProcessor.class, true, false);
			for (String ppName : postProcessorNames) {
				// Ordered.class
				if (!processedBeans.contains(ppName) && beanFactory.isTypeMatch(ppName, Ordered.class)) {
					currentRegistryProcessors.add(beanFactory.getBean(ppName, BeanDefinitionRegistryPostProcessor.class));
					processedBeans.add(ppName);
				}
			}
			sortPostProcessors(currentRegistryProcessors, beanFactory);
			registryProcessors.addAll(currentRegistryProcessors);
			invokeBeanDefinitionRegistryPostProcessors(currentRegistryProcessors, registry);
			currentRegistryProcessors.clear();

			// Finally, invoke all other BeanDefinitionRegistryPostProcessors until no further ones appear.
			boolean reiterate = true;
			while (reiterate) {
				reiterate = false;
				postProcessorNames = beanFactory.getBeanNamesForType(BeanDefinitionRegistryPostProcessor.class, true, false);
				for (String ppName : postProcessorNames) {
					if (!processedBeans.contains(ppName)) {
						currentRegistryProcessors.add(beanFactory.getBean(ppName, BeanDefinitionRegistryPostProcessor.class));
						processedBeans.add(ppName);
						reiterate = true;
					}
				}
				sortPostProcessors(currentRegistryProcessors, beanFactory);
				registryProcessors.addAll(currentRegistryProcessors);
				invokeBeanDefinitionRegistryPostProcessors(currentRegistryProcessors, registry);
				currentRegistryProcessors.clear();
			}

			// Now, invoke the postProcessBeanFactory callback of all processors handled so far.
			// 调用ConfigurationClassPostProcessor#postProcessBeanFactory增强配置类
			// 通过cglib生成增强类
			// 设置beanDefinition的beanClass为增强类,让@Bean生成的bean是单例
			invokeBeanFactoryPostProcessors(registryProcessors, beanFactory);
			invokeBeanFactoryPostProcessors(regularPostProcessors, beanFactory);
		}

		else {
			// Invoke factory processors registered with the context instance.
			invokeBeanFactoryPostProcessors(beanFactoryPostProcessors, beanFactory);
		}

		// BeanFactoryPostProcessor.class类型
		// Do not initialize FactoryBeans here: We need to leave all regular beans
		// uninitialized to let the bean factory post-processors apply to them!
		String[] postProcessorNames =
				beanFactory.getBeanNamesForType(BeanFactoryPostProcessor.class, true, false);
		// 筛选出bean工程中存在的所有实现BeanFactoryPostProcessor类的类名称

		// Separate between BeanFactoryPostProcessors that implement PriorityOrdered,
		// Ordered, and the rest.
		List<BeanFactoryPostProcessor> priorityOrderedPostProcessors = new ArrayList<>();
		List<String> orderedPostProcessorNames = new ArrayList<>();
		List<String> nonOrderedPostProcessorNames = new ArrayList<>();
		for (String ppName : postProcessorNames) {
			if (processedBeans.contains(ppName)) {
				// skip - already processed in first phase above
				// 已经存在了,不再处理
			}
			else if (beanFactory.isTypeMatch(ppName, PriorityOrdered.class)) {
				// 为PriorityOrdered类型
				priorityOrderedPostProcessors.add(beanFactory.getBean(ppName, BeanFactoryPostProcessor.class));
			}
			else if (beanFactory.isTypeMatch(ppName, Ordered.class)) {
				// 为Ordered类型
				orderedPostProcessorNames.add(ppName);
			}
			else {
				// 这个就是我们当前需要关心的PostProcessors
				//nonOrderedPostProcessors添加的不是bean实例,而是BeanDefinition
				nonOrderedPostProcessorNames.add(ppName);
			}
		}

		// First, invoke the BeanFactoryPostProcessors that implement PriorityOrdered.
		sortPostProcessors(priorityOrderedPostProcessors, beanFactory);
		invokeBeanFactoryPostProcessors(priorityOrderedPostProcessors, beanFactory);

		// Next, invoke the BeanFactoryPostProcessors that implement Ordered.
		List<BeanFactoryPostProcessor> orderedPostProcessors = new ArrayList<>();
		for (String postProcessorName : orderedPostProcessorNames) {
			orderedPostProcessors.add(beanFactory.getBean(postProcessorName, BeanFactoryPostProcessor.class));
		}
		sortPostProcessors(orderedPostProcessors, beanFactory);
		invokeBeanFactoryPostProcessors(orderedPostProcessors, beanFactory);

		// Finally, invoke all other BeanFactoryPostProcessors.
		List<BeanFactoryPostProcessor> nonOrderedPostProcessors = new ArrayList<>();
		for (String postProcessorName : nonOrderedPostProcessorNames) {
			nonOrderedPostProcessors.add(beanFactory.getBean(postProcessorName, BeanFactoryPostProcessor.class));
		}
		invokeBeanFactoryPostProcessors(nonOrderedPostProcessors, beanFactory);

		// Clear cached merged bean definitions since the post-processors might have
		// modified the original metadata, e.g. replacing placeholders in values...
		beanFactory.clearMetadataCache();
	}
2.6 PostProcessorRegistrationDelegate#invokeBeanFactoryPostProcessors

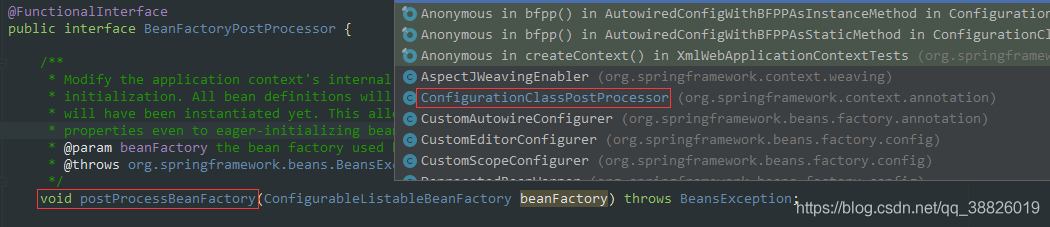
2.7 ConfigurationClassPostProcessor#postProcessBeanFactory

2.8 ConfigurationClaassPostProcessor#enhanceConfigurationClasses
public void enhanceConfigurationClasses(ConfigurableListableBeanFactory beanFactory) {
		Map<String, AbstractBeanDefinition> configBeanDefs = new LinkedHashMap<>();
		for (String beanName : beanFactory.getBeanDefinitionNames()) {
			BeanDefinition beanDef = beanFactory.getBeanDefinition(beanName);
			// 判断是否是一个全注解类
			// 扫描是全注解类?full和lite的关系
			if (ConfigurationClassUtils.isFullConfigurationClass(beanDef)) {
				if (!(beanDef instanceof AbstractBeanDefinition)) {
					throw new BeanDefinitionStoreException("Cannot enhance @Configuration bean definition '" +
							beanName + "' since it is not stored in an AbstractBeanDefinition subclass");
				}
				else if (logger.isInfoEnabled() && beanFactory.containsSingleton(beanName)) {
					logger.info("Cannot enhance @Configuration bean definition '" + beanName +
							"' since its singleton instance has been created too early. The typical cause " +
							"is a non-static @Bean method with a BeanDefinitionRegistryPostProcessor " +
							"return type: Consider declaring such methods as 'static'.");
				}
				// 是全注解,需要代理,添加到configBeanDefs中
				configBeanDefs.put(beanName, (AbstractBeanDefinition) beanDef);
			}
		}
		if (configBeanDefs.isEmpty()) {
			// nothing to enhance -> return immediately
			return;
		}

		ConfigurationClassEnhancer enhancer = new ConfigurationClassEnhancer();
		// 遍历这个map
		for (Map.Entry<String, AbstractBeanDefinition> entry : configBeanDefs.entrySet()) {
			AbstractBeanDefinition beanDef = entry.getValue();
			// If a @Configuration class gets proxied, always proxy the target class
			beanDef.setAttribute(AutoProxyUtils.PRESERVE_TARGET_CLASS_ATTRIBUTE, Boolean.TRUE);
			try {
				// Set enhanced subclass of the user-specified bean class
				Class<?> configClass = beanDef.resolveBeanClass(this.beanClassLoader);
				if (configClass != null) {
					// 进行cglib代理,为@Configuration注解的类生成增强类
					Class<?> enhancedClass = enhancer.enhance(configClass, this.beanClassLoader);
					if (configClass != enhancedClass) {
						if (logger.isTraceEnabled()) {
							logger.trace(String.format("Replacing bean definition '%s' existing class '%s' with " +
									"enhanced class '%s'", entry.getKey(), configClass.getName(), enhancedClass.getName()));
						}
						// 再通过beanDef.setBeanClass(enhancedClass)修改beanDefinition的BeanClass属性,
						// 在bean实例化阶段,会利用反射技术将beanClass属性对应的类实例化出来
						// 所以最终实例化出来的@Configuration bean是一个代理类的实例
						beanDef.setBeanClass(enhancedClass);
					}
				}
			}
			catch (Throwable ex) {
				throw new IllegalStateException("Cannot load configuration class: " + beanDef.getBeanClassName(), ex);
			}
		}

2.9 ConfigurationClassUtils#checkConfigurationClassCandidate


1.在ConfigurationClassUtils类中的checkConfigurationClassCandidate标记是Full @Configuration还是lite @Bean mode
2.通过"full".equals(configClassAttr)判断是否是全类注解是全注解
3.则将beandefinition放入map中configBeanDefs.put
4.遍历这个map
5.使用cglib技术为配置类生成一个enhancedClass
6.通过enhancer.enhance进行cglib代理,为@Configuration注解的类生成增强类
7.再通过beanDef.setBeanClass(enhancedClass)修改beanDefinition的BeanClass属性,在bean实例化阶段,会利用反射技术将beanClass属性对应的类实例化出来,所以最终实例化出来的@Configuration bean是一个代理类的实例
使用了@Configuration注解的类,属于Full @Configuration。@Configuration类允许通过调用同一类中的其他@Bean方法来定义bean之间的依赖关系,保证@Bean的对象作用域受到控制,避免多例。
@Configuration类中的@Bean地方会被CGLIB进行代理。Spring会拦截该方法的执行,在默认单例情况下,容器中只有一个Bean,所以我们多次调用user()方法,获取的都是同一个对象。
对于@Configuration注解的类中@Bean标记的方法,返回的都是一个bean,在增强的方法中,Spring会先去容器中查看一下是否有这个bean的实例了,如果有了的话,就返回已有对象,没有的话就创建一个,然后放到容器中。
2.10 ConfigurationClassEnhancer#enhance

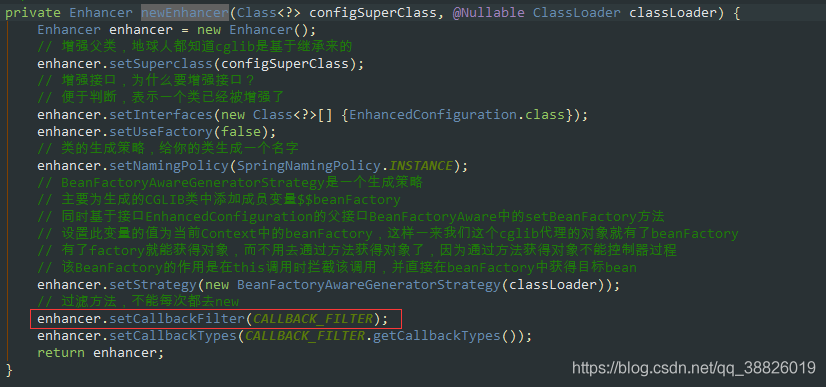
2.11 ConfigurationClassEnhancer#newEnhancer
2.12 ConfigurationClassEnhancer#CallBacks

2.13 ConfigurationClassEnhancer#intercept

2.13.1 ConfigurationClassEnhancer#isCurrentlyInvokedFactoryMethod

2.14 ConfigurationClassEnhancer#resolveBeanReference
	private Object resolveBeanReference(Method beanMethod, Object[] beanMethodArgs,
				ConfigurableBeanFactory beanFactory, String beanName) {

			// The user (i.e. not the factory) is requesting this bean through a call to
			// the bean method, direct or indirect. The bean may have already been marked
			// as 'in creation' in certain autowiring scenarios; if so, temporarily set
			// the in-creation status to false in order to avoid an exception.
			// 判断他是否正在创建
			boolean alreadyInCreation = beanFactory.isCurrentlyInCreation(beanName);
			try {
				if (alreadyInCreation) {
					beanFactory.setCurrentlyInCreation(beanName, false);
				}
				boolean useArgs = !ObjectUtils.isEmpty(beanMethodArgs);
				if (useArgs && beanFactory.isSingleton(beanName)) {
					// Stubbed null arguments just for reference purposes,
					// expecting them to be autowired for regular singleton references?
					// A safe assumption since @Bean singleton arguments cannot be optional...
					for (Object arg : beanMethodArgs) {
						if (arg == null) {
							useArgs = false;
							break;
						}
					}
				}
				Object beanInstance = (useArgs ? beanFactory.getBean(beanName, beanMethodArgs) :
						beanFactory.getBean(beanName));
				if (!ClassUtils.isAssignableValue(beanMethod.getReturnType(), beanInstance)) {
					// Detect package-protected NullBean instance through equals(null) check
					if (beanInstance.equals(null)) {
						if (logger.isDebugEnabled()) {
							logger.debug(String.format("@Bean method %s.%s called as bean reference " +
									"for type [%s] returned null bean; resolving to null value.",
									beanMethod.getDeclaringClass().getSimpleName(), beanMethod.getName(),
									beanMethod.getReturnType().getName()));
						}
						beanInstance = null;
					}
					else {
						String msg = String.format("@Bean method %s.%s called as bean reference " +
								"for type [%s] but overridden by non-compatible bean instance of type [%s].",
								beanMethod.getDeclaringClass().getSimpleName(), beanMethod.getName(),
								beanMethod.getReturnType().getName(), beanInstance.getClass().getName());
						try {
							BeanDefinition beanDefinition = beanFactory.getMergedBeanDefinition(beanName);
							msg += " Overriding bean of same name declared in: " + beanDefinition.getResourceDescription();
						}
						catch (NoSuchBeanDefinitionException ex) {
							// Ignore - simply no detailed message then.
						}
						throw new IllegalStateException(msg);
					}
				}
				Method currentlyInvoked = SimpleInstantiationStrategy.getCurrentlyInvokedFactoryMethod();
				if (currentlyInvoked != null) {
					String outerBeanName = BeanAnnotationHelper.determineBeanNameFor(currentlyInvoked);
					beanFactory.registerDependentBean(beanName, outerBeanName);
				}
				return beanInstance;
			}
			finally {
				if (alreadyInCreation) {
					beanFactory.setCurrentlyInCreation(beanName, true);
				}
			}
		}
三、总结
- lite @Bean mode :当@Bean方法在没有使用@Configuration注解的类中声明时称之为lite @Bean mode
- Full @Configuration:如果@Bean方法在使用@Configuration注解的类中声明时称之为Full @Configuration
Full @Configuration中的@Bean方法会被CGLIB所代理,而 lite @Bean mode中的@Bean方法不会被CGLIB代理
@Configuration注解作用
1.告诉spring这是一个配置类,相当于spring的xml配置文件
2.被@Configuration 注解的类,会被cglib代理进行增强
3.@Configuration类允许通过调用同一类中的其他@Bean方法来定义bean之间的依赖关系,保证@Bean的对象作用域受到控制,避免多例
@Configuration注解底层是如何实现的,通过源码咱们可以反推并总结为以下几点:

1.Spring首先会获取到所有的beanDefenition
2.ConfigurationClassUtils类中checkConfigurationClassCandidate方法判断是Full @Configuration还是lite @Bean mode
3.通过ConfigurationClassPostProcessor后置处理器遍历所有的beanDefenition
4.将标记了Full @Configuration模式的beanDefenition,会对这个类进行cglib代理,生成一个代理类,并把这个类设置到BeanDefenition的Class属性中
5.配置类会被CGLIB增强(生成代理对象),放进IoC容器内的是代理
6.对于内部类是没有限制的:可以是Full模式或者Lite模式
7.配置类内部可以通过方法调用来处理依赖,并且能够保证是同一个实例,都指向IoC内的那个单例
8.需要用这个Bean实例的时候,从这个Class属性中拿到的Class对象进行反射,最终反射出来的是代理增强后的类
9.通过@Configuration标注类的Bean,Spring会先去容器中查看是否有这个Bean实例,如果有就返回已有的对象,没有就创建一个,然后放到容器中
到此这篇关于Spring源码解析之Configuration的文章就介绍到这了,更多相关Configuration源码内容请搜索我们以前的文章或继续浏览下面的相关文章希望大家以后多多支持我们!
相关推荐
-
@ConfigurationProperties绑定配置信息至Array、List、Map、Bean的实现
相关说明: 在SpringBoot中,我们可以通过以下几种方式获取并绑定配置文件中的信息: @Value注解. 使用Environment. @ConfigurationProperties注解. 通过实现ApplicationListener接口,注册监听器,进行硬编码获取,可参考:https://www.jb51.net/article/187407.htm 硬编码加载文件获取. -- 注:一般情况下,第一种.第二种就够用了;但是如果想直接从配置文件中获取到数组.list.map.对象的话,
-

MyBatis异常-Property 'configLocation' not specified, using default MyBatis Configuration
配置文件如下: base-context.xml文件如下: <?xml version="1.0" encoding="UTF-8"?> <beans xmlns="http://www.springframework.org/schema/beans" xmlns:xsi="http://www.w3.org/2001/XMLSchema-instance" xmlns:context="http
-
matplotlib运行时配置(Runtime Configuration,rc)参数rcParams解析
什么是运行时配置(Runtime Configuration,rc) Matplotlib使用matplotlibrc配置文件来自定义图形的各种属性,称之为rc配置或rc参数(rcParams).通过rc参数可以修改matplotlib绝大多数属性的默认值,包括窗体大小.每英寸的点数.线条宽度.颜色.样式.坐标轴.坐标和网络属性.文本.字体等. 运行时配置的默认值 运行时配置的默认值存放在默认的matplotlibrc文件中. matplotlibrc文件与rcParams的关系 rcParam
-
mybatis的Configuration详解
上一篇介绍了mybatis中SqlSessionFactory的创建过程,今天来学习它默认实现中的唯一属性Configuration 回顾 还是最开始的mybatis源码环境中的测试代码如下图: 利用mybatis查出数据只用三步:创建SqlSessionFactory.通过SqlSessionFactory创建SqlSession.SqlSession执行selectOne方法. 上一篇文章梳理了SqlSessionFactory创建过程的源码,发现它返回的是它的默认实现类DefaultS
-
详解@ConfigurationProperties实现原理与实战
在SpringBoot中,当需要获取到配置文件数据时,除了可以用Spring自带的@Value注解外,SpringBoot提供了一种更加方便的方式:@ConfigurationProperties.只要在bean上添加上这个注解,指定好配置文件的前缀,那么对应的配置文件数据就会自动填充到bean中.举个栗子,现在有如下配置: myconfig.name=test myconfig.age=22 myconfig.desc=这是我的测试描述 添加对应的配置类,并添加上注解@Configuratio
-
解析SpringBoot @EnableAutoConfiguration的使用
刚做后端开发的时候,最早接触的是基础的spring,为了引用二方包提供bean,还需要在xml中增加对应的包<context:component-scan base-package="xxx" /> 或者增加注解@ComponentScan({ "xxx"}).当时觉得挺urgly的,但也没有去研究有没有更好的方式. 直到接触Spring Boot 后,发现其可以自动引入二方包的bean.不过一直没有看这块的实现原理.直到最近面试的时候被问到.所以就看了
-
SpringBoot @ConfigurationProperties使用详解
简介 本文将会详细讲解@ConfigurationProperties在Spring Boot中的使用. 添加依赖关系 首先我们需要添加Spring Boot依赖: <parent> <groupId>org.springframework.boot</groupId> <artifactId>spring-boot-starter-parent</artifactId> <relativePath/> <!-- lookup
-
如何在ASP.NET Core 的任意类中注入Configuration
遇到的问题 我已经通读了 MSDN 上关于 Configuration 的相关内容,文档说可实现在 application 的任意位置访问 Configuration . 下面是 Startup.cs 的模板代码. public class Startup { public Startup(IHostingEnvironment env) { var builder = new ConfigurationBuilder() .SetBase
-
Springboot @Configuration @bean注解作用解析
这篇文章主要介绍了springboot @Configuration @bean注解作用解析,文中通过示例代码介绍的非常详细,对大家的学习或者工作具有一定的参考学习价值,需要的朋友可以参考下 @Configuration注解可以达到在Spring中使用xml配置文件的作用 @Bean就等同于xml配置文件中的<bean> 在spring项目中我们集成第三方的框架如shiro会在spring.xml配置文件中进行配置,例如: <!-- 配置shiro框架提供过滤器工厂 --> <
-
@Configuration与@Component作为配置类的区别详解
@Configuration注解的类: /** * @Description 测试用的配置类 * @Author 弟中弟 * @CreateTime 2019/6/18 14:35 */ @Configuration public class MyBeanConfig { @Bean public Country country(){ return new Country(); } @Bean public UserInfo userInfo(){ return new UserInfo(cou
-
.NET Core 3.0之创建基于Consul的Configuration扩展组件
经过前面三篇关于.NET Core Configuration的文章之后,本篇文章主要讨论如何扩展一个Configuration组件出来. 了解了Configuration的源码后,再去扩展一个组件就会比较简单,接下来我们将在.NET Core 3.0-preview5的基础上创建一个基于Consul的配置组件. 相信大家对Consul已经比较了解了,很多项目都会使用Consul作为配置中心,此处也不做其他阐述了,主要是讲一下,创建Consul配置扩展的一些思路.使用Consul配置功能时,我们
-
继承WebMvcConfigurationSupport后自动配置不生效及如何配置拦截器
网上有很多文章说从spring boot2.0之后在构造spring配置文件时建议推荐直接实现WebMvcConfigurer或者直接继承WebMvcConfigurationSupport ,经测试实现WebMvcConfigurer是没问题,但继承WebMvcConfigurationSupport类是会导致自动配置失效的. 一.继承WebMvcConfigurationSupport类是会导致自动配置失效的原因 在spring boot的自定义配置类继承 WebMvcConfigurati
-
.Net Core3.0 配置Configuration的实现
准备 .NET core和.NET项目配置上有了很大的改变,支持的也更加丰富了比如命令行,环境变量,内存中.NET对象,设置文件等等..NET项目我们常常把配置信息放到webConfig 或者appConfig中.配置相关的源码https://github.com/aspnet/Extensions:如果打开源码项目如果遇到以下错误,未遇到直接跳过. 错误提示:error : The project file cannot be opened by the project system, bec
-
C# 添加对System.Configuration.dll文件的引用操作
却被编译器提示说: 警告 1 "System.Configuration.ConfigurationSettings.AppSettings" 已过时: "This method is obsolete, it has been replaced by System.Configuration!System.Configuration.ConfigurationManager.AppSettings" 于是转而想找到那个ConfigurationManager类来使
-
Spring @Configuration注解及配置方法
Spring @Configuration注解 Spring3.0开始,@Configuration用于定义配置类,定义的配置类可以替换xml文件,一般和@Bean注解联合使用. @Configuration注解主要标注在某个类上,相当于xml配置文件中的<beans> @Bean注解主要标注在某个方法上,相当于xml配置文件中的<bean> 等价于 注意:@Configuration注解的配置类有如下要求: @Configuration不可以是final类型: @Configur
-
详解配置类为什么要添加@Configuration注解
不加@Configuration导致的问题 我们先来看看如果不在配置类上添加@Configuration注解会有什么问题,代码示例如下: @ComponentScan("com.dmz.source.code") //@Configuration public class Config{ @Bean public A a(){ return new A(dmzService()); } @Bean public DmzService dmzService(){ return new D
-
SpringBoot 中 AutoConfiguration的使用方法
在SpringBoot中我们经常可以引入一些starter包来集成一些工具的使用,比如spring-boot-starter-data-redis. 使用起来很方便,那么是如何实现的呢? 代码分析 我们先看注解@SpringBootApplication,它里面包含一个@EnableAutoConfiguration 继续看@EnableAutoConfiguration注解 @Import({AutoConfigurationImportSelector.class}) 在这个类(AutoCo
-
Spring中基于Java的配置@Configuration和@Bean用法详解
一.首先,需要xml中进行少量的配置来启动Java配置: <?xml version="1.0" encoding="UTF-8"?> <beans xmlns="http://www.springframework.org/schema/beans" xmlns:xsi="http://www.w3.org/2001/XMLSchema-instance" xmlns:aop="http://ww