使用TensorFlow对图像进行随机旋转的实现示例

在使用深度学习对图像进行训练时,对图像进行随机旋转有助于提升模型泛化能力。然而之前在做旋转等预处理工作时,都是先对图像进行旋转后保存到本地,然后再输入模型进行训练,这样的过程会增加工作量,如果图片数量较多,生成旋转的图像会占用更多的空间。直接在训练过程中便对图像进行随机旋转,可有效提升工作效率节省硬盘空间。

使用TensorFlow对图像进行随机旋转如下:

TensorFlow版本为1.13.1

#-*- coding:utf-8 -*-
'''
  使用TensorFlow进行图像的随机旋转示例
'''

import tensorflow as tf
import numpy as np
import cv2
import matplotlib.pyplot as plt

img = cv2.imread('tf.jpg')
img = cv2.resize(img,(220,220))
img = cv2.cvtColor(img,cv2.COLOR_BGR2RGB)

def tf_rotate(input_image, min_angle = -np.pi/2, max_angle = np.pi/2):
  '''
  TensorFlow对图像进行随机旋转
  :param input_image: 图像输入
  :param min_angle: 最小旋转角度
  :param max_angle: 最大旋转角度
  :return: 旋转后的图像
  '''
  distorted_image = tf.expand_dims(input_image, 0)
  random_angles = tf.random.uniform(shape=(tf.shape(distorted_image)[0],), minval = min_angle , maxval = max_angle)
  distorted_image = tf.contrib.image.transform(
    distorted_image,
    tf.contrib.image.angles_to_projective_transforms(
      random_angles, tf.cast(tf.shape(distorted_image)[1], tf.float32), tf.cast(tf.shape(distorted_image)[2], tf.float32)
    ))
  rotate_image = tf.squeeze(distorted_image, [0])
  return rotate_image

global_init = tf.global_variables_initializer()
with tf.Session() as sess:
  init = tf.initialize_local_variables()
  sess.run([init, global_init])
  coord = tf.train.Coordinator()
  threads = tf.train.start_queue_runners(coord=coord)
  image = tf.placeholder(shape=(220, 220, 3), dtype=tf.float32)

  rotate_image = tf_rotate(image, -np.pi/2, np.pi/2)
  output = sess.run(rotate_image, feed_dict={image:img})
  # print('output:',output)
  plt.imshow(output.astype('uint8'))
  plt.title('rotate image')
  plt.show()

结果如下:

原图:

随机旋转后的图:
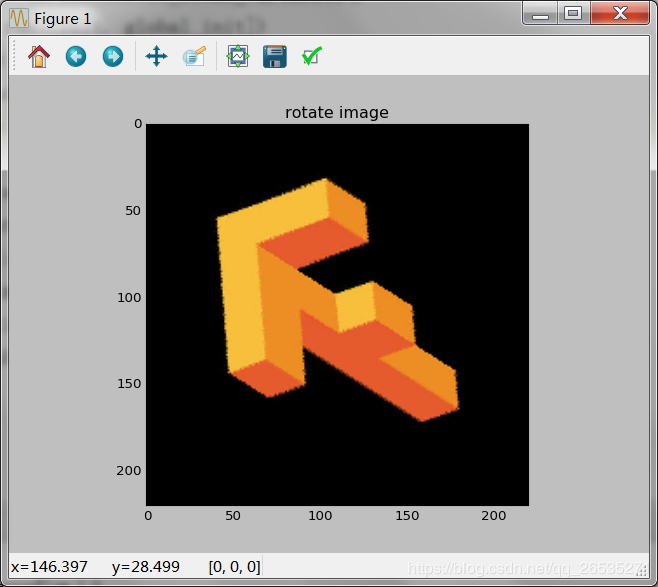
以上就是本文的全部内容,希望对大家的学习有所帮助,也希望大家多多支持我们。

(0)

相关推荐

  • python使用TensorFlow进行图像处理的方法

    一.图片的放大缩小 在使用TensorFlow进行图片的放大缩小时,有三种方式: 1.tf.image.resize_nearest_neighbor():临界点插值 2.tf.image.resize_bilinear():双线性插值 3.tf.image.resize_bicubic():双立方插值算法 下面是示例代码: # encoding:utf-8 # 使用TensorFlow进行图片的放缩 import tensorflow as tf import cv2 import numpy

  • 详解tensorflow训练自己的数据集实现CNN图像分类

    利用卷积神经网络训练图像数据分为以下几个步骤 1.读取图片文件 2.产生用于训练的批次 3.定义训练的模型(包括初始化参数,卷积.池化层等参数.网络) 4.训练 1 读取图片文件 def get_files(filename): class_train = [] label_train = [] for train_class in os.listdir(filename): for pic in os.listdir(filename+train_class): class_train.app

  • python生成tensorflow输入输出的图像格式的方法

    TensorFLow能够识别的图像文件,可以通过numpy,使用tf.Variable或者tf.placeholder加载进tensorflow:也可以通过自带函数(tf.read)读取,当图像文件过多时,一般使用pipeline通过队列的方法进行读取.下面我们介绍两种生成tensorflow的图像格式的方法,供给tensorflow的graph的输入与输出. import cv2 import numpy as np import h5py height = 460 width = 345 w

  • tensorflow 1.0用CNN进行图像分类

    tensorflow升级到1.0之后,增加了一些高级模块: 如tf.layers, tf.metrics, 和tf.losses,使得代码稍微有些简化. 任务:花卉分类 版本:tensorflow 1.0 数据:flower-photos 花总共有五类,分别放在5个文件夹下. 闲话不多说,直接上代码,希望大家能看懂:) 复制代码 # -*- coding: utf-8 -*- from skimage import io,transform import glob import os impor

  • 使用TensorFlow-Slim进行图像分类的实现

    参考 https://github.com/tensorflow/models/tree/master/slim 使用TensorFlow-Slim进行图像分类 准备 安装TensorFlow 参考 https://www.tensorflow.org/install/ 如在Ubuntu下安装TensorFlow with GPU support, python 2.7版本 wget https://storage.googleapis.com/tensorflow/linux/gpu/tens

  • tensorflow实现图像的裁剪和填充方法

    tensorflow里面提供了实现图像进行裁剪和填充的函数,就是tf.image.resize_image_with_crop_or_pad(img,height,width ).img表示需要改变的图像,height是改变后图像的高度,width是宽度. 例如: import matplotlib.pyplot as plt; import tensorflow as tf; image_raw_data_jpg = tf.gfile.FastGFile('11.jpg', 'r').read

  • 使用TensorFlow对图像进行随机旋转的实现示例

    在使用深度学习对图像进行训练时,对图像进行随机旋转有助于提升模型泛化能力.然而之前在做旋转等预处理工作时,都是先对图像进行旋转后保存到本地,然后再输入模型进行训练,这样的过程会增加工作量,如果图片数量较多,生成旋转的图像会占用更多的空间.直接在训练过程中便对图像进行随机旋转,可有效提升工作效率节省硬盘空间. 使用TensorFlow对图像进行随机旋转如下: TensorFlow版本为1.13.1 #-*- coding:utf-8 -*- ''' 使用TensorFlow进行图像的随机旋转示例

  • 13 款最热门的 jQuery 图像 360 度旋转插件推荐

    在 web 页面上使用 jQuery 图像 360 度旋转插件是最美也是最方便的显示图像的方式.这些超级棒的 360° 图像选择插件允许用户更详细的分析产品或者文章.jQuery 图像旋转插件可以让用户从各种角度进行 360 度的图像展示,经常在电子商务网站上使用,帮助消费者更好的了解产品,从任意的一个角度观察欣赏. 在这篇文章中,我们收集了 13 款最佳的 jQuery 图像 360 度旋转插件,这些插件都能进行 360 度图像旋转展示.希望大家能从中找到自己喜欢的,并应用在自己的网站上. 1

  • python 图像平移和旋转的实例

    如下所示: import cv2 import math import numpy as np def move(img): height, width, channels = img.shape emptyImage2 = img.copy() x=20 y=20 for i in range(height): for j in range(width): if i>=x and j>=y: emptyImage2[i,j]=img[i-x][j-y] else: emptyImage2[i

  • tensorflow对图像进行拼接的例子

    tensorflow对图像进行多个块的行列拼接tf.concat(), tf.stack() 在深度学习过程中,通过卷积得到的图像块大小是8×8×1024的图像块,对得到的图像块进行reshape得到[8×8]×[32×32],其中[8×8]是图像块的个数,[32×32]是小图像的大小.通过tf.concat对小块的图像进行拼接. -在做图像卷积的过程中,做了这样一个比较麻烦的拼接,现在还没想到更好的拼接方法,因为是块拼接,开始的时候使用了reshape,但是得到的结果不对,需要确定清楚数据的维

  • Python实现简单图像缩放与旋转

    目录 1. 图像缩放 1.2. 使用命令 1.2. 原理介绍 1.3. 方法比较 2. 旋转 2.1. 使用命令 2.2. 实验效果 总结 1. 图像缩放 1.2. 使用命令 import cv2 # 缩放 def resize(img, k, inter): res = cv2.resize(img, None, fx=k, fy=k, interpolation=inter) return res 参数设定(interpolation): 0:最近邻插值 1:双线性插值 2:基于局部像素的重

  • Java随机生成身份证完整示例代码

    身份证算法实现 1.号码的结构 公民身份号码是特征组合码, 由十七位数字本体码和一位校验码组成. 排列顺序从左至右依次为:六位数字地址码,八位数字出生日期码  三位数字顺序码和一位数字校验码. 2.地址码(前六位数) 表示编码对象常住户口所在县(市.旗.区)的行政区划代码,按GB/T2260的规定执行. 3.出生日期码(第七位至十四位) 表示编码对象出生的年.月.日,按GB/T7408的规定执行,年.月.日代码之间不用分隔符. 4.顺序码(第十五位至十七位) 表示在同一地址码所标识的区域范围内,

  • python 画三维图像 曲面图和散点图的示例

    用python画图很多是根据z=f(x,y)来画图的,本博文将三个对应的坐标点输入画图: 散点图: import matplotlib.pyplot as plt from mpl_toolkits.mplot3d import Axes3D fig = plt.figure() ax = fig.add_subplot(111, projection='3d') X = [1, 1, 2, 2] Y = [3, 4, 4, 3] Z = [1, 2, 1, 1] ax.scatter(X, Y

  • tensorflow 获取所有variable或tensor的name示例

    获取所有variable(每个op中可训练的张量)的name: for variable_name in tf.global_variables(): print(variable_name) 获取所有tensor(每个op的输出张量)的name: for tensor_name in tf.contrib.graph_editor.get_tensors(tf.get_default_graph()): print(tensor_name) 获取所有op及其输入输出的name: with tf

  • matplotlib 多个图像共用一个colorbar的实现示例

    本文主要介绍了matplotlib 多个图像共用一个colorbar的实现示例,分享给大家,具体如下: # -*- coding: utf-8 -*- """ Created on Sat Sep 5 18:05:11 2020 @author: 15025 draw three figures with one common colorbar """ import numpy as np import matplotlib.pyplot as

随机推荐