SpringCloud Hystrix熔断器使用方法介绍
目录
- Hystrix(hi si ju ke si)概述
- Hystix 主要功能
- 隔离
- Hystrix 降级
- Hystrix降级-服务提供方
- 初始化程序和Fiegn程序一致
- Hystrix降级-服务消费方
- provider与Fiegin一致
- Hystrix 熔断
- Hystrix 熔断监控
- Turbine聚合监控
- 搭建监控模块
- 修改被监控模块
- 启动测试
Hystrix(hi si ju ke si)概述
Hystix 是 Netflix 开源的一个延迟和容错库,用于隔离访问远程服务、第三方库,防止出现级联失败(雪崩)。
雪崩:一个服务失败,导致整条链路的服务都失败的情形。
Hystix 主要功能
- 隔离
- 降级
- 熔断
- 限流
隔离
- 线程池隔离
- 信号量隔离
Hystrix 降级
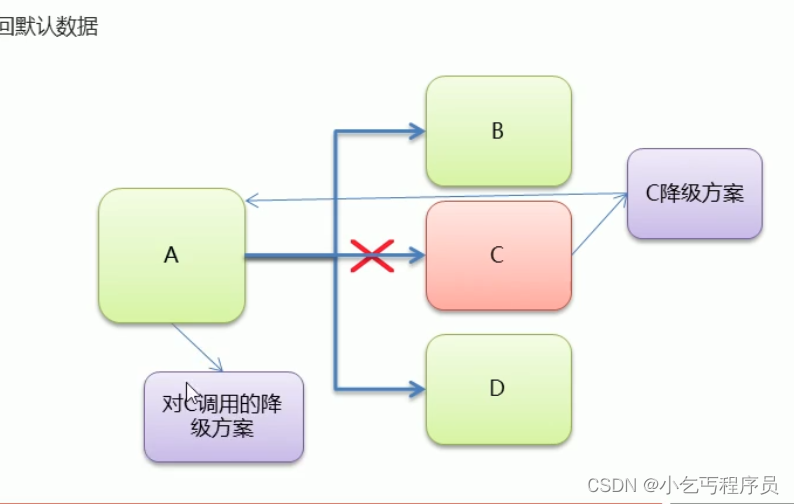
Hystix 降级:当服务发生异常或调用超时,返回默认数据
Hystrix降级-服务提供方
- 在服务提供方,引入 hystrix 依赖
- 定义降级方法
- 使用 @HystrixCommand 注解配置降级方法
- 在启动类上开启Hystrix功能:@EnableCircuitBreaker
初始化程序和Fiegn程序一致
需要修改的程序
package com.itheima.provider;
import org.springframework.boot.SpringApplication;
import org.springframework.boot.autoconfigure.SpringBootApplication;
import org.springframework.cloud.client.circuitbreaker.EnableCircuitBreaker;
import org.springframework.cloud.netflix.eureka.EnableEurekaClient;
/**
 * 启动类
 */
@EnableEurekaClient //该注解 在新版本中可以省略
@SpringBootApplication
@EnableCircuitBreaker ///开启Hystrix功能
public class ProviderApp {
    public static void main(String[] args) {
        SpringApplication.run(ProviderApp.class,args);
    }
}
测试的程序
package com.itheima.provider.controller;
import com.itheima.provider.domain.Goods;
import com.itheima.provider.service.GoodsService;
import com.netflix.hystrix.contrib.javanica.annotation.HystrixCommand;
import com.netflix.hystrix.contrib.javanica.annotation.HystrixProperty;
import org.springframework.beans.factory.annotation.Autowired;
import org.springframework.beans.factory.annotation.Value;
import org.springframework.web.bind.annotation.GetMapping;
import org.springframework.web.bind.annotation.PathVariable;
import org.springframework.web.bind.annotation.RequestMapping;
import org.springframework.web.bind.annotation.RestController;
import java.util.Date;
/**
 * Goods Controller 服务提供方
 */
@RestController
@RequestMapping("/goods")
public class GoodsController {
    @Autowired
    private GoodsService goodsService;
    @Value("${server.port}")
    private int port;
    /**
     * 降级:
     *   1 出现异常
     *   2 调用服务超时
     *      默认1s超时
     *
     *@HystrixCommand(fallbackMethod = "findOne_fallback")
     * fallbackMethod 指定降级后的名称
     * @param id
     * @return
     */
    @GetMapping("/findOne/{id}")
    @HystrixCommand(fallbackMethod = "findOne_fallback",commandProperties = {
            //设置Hystrix的超时时间 默认1s
            @HystrixProperty(name="execution.isolation.thread.timeoutInMilliseconds",value = "3000")
    })///指定降级后的方法
    public Goods findOne(@PathVariable("id") int id)  {
        ///1 造个异常
        //int i =3/0;
        try {
            Thread.sleep(2000);//sleep interrupted
        } catch (InterruptedException e) {
            e.printStackTrace();
        }
        Goods goods = goodsService.findOne(id);
        goods.setTitle(goods.getTitle() + ":" + port);//将端口号,设置到了 商品标题上
        return goods;
    }
    /**
     * 定义降级放啊
     * 1 方法的返回值需要和原方法一样
     * 2 方法参数需要和原方法一样
     */
    public Goods findOne_fallback(int id) {
        Goods goods = new Goods();
        goods.setTitle("降级了~~~");
        return goods;
    }
}
指定坐标
   <!--hystrix-->
        <dependency>
            <groupId>org.springframework.cloud</groupId>
            <artifactId>spring-cloud-starter-netflix-hystrix</artifactId>
        </dependency>
Hystrix降级-服务消费方
- feign 组件已经集成了 hystrix 组件。
- 定义feign 调用接口实现类,复写方法,即降级方法
- 在 @FeignClient 注解中使用 fallback 属性设置降级处理类。
- 配置开启 feign.hystrix.enabled = true
provider与Fiegin一致
application.yml修改
server:
port: 9000eureka:
instance:
hostname: localhost # 主机名
client:
service-url:
defaultZone: http://localhost:8761/eureka
spring:
application:
name: hystrix-consumer # 设置当前应用的名称。将来会在eureka中Application显示。将来需要使用该名称来获取路径
#开启feign对hystrix支持
feign:
hystrix:
enabled: true
ConsumerApp修改
package com.itheima.consumer;
import org.springframework.boot.SpringApplication;
import org.springframework.boot.autoconfigure.SpringBootApplication;
import org.springframework.cloud.client.discovery.EnableDiscoveryClient;
import org.springframework.cloud.netflix.eureka.EnableEurekaClient;
import org.springframework.cloud.openfeign.EnableFeignClients;
@EnableDiscoveryClient // 激活DiscoveryClient
@EnableEurekaClient
@SpringBootApplication
@EnableFeignClients //开启Feign的功能
public class ConsumerApp {
    public static void main(String[] args) {
        SpringApplication.run(ConsumerApp.class,args);
    }
}
修改GoodsFeignClient方法
package com.itheima.consumer.feign;
import com.itheima.consumer.domain.Goods;
import org.springframework.cloud.openfeign.FeignClient;
import org.springframework.web.bind.annotation.GetMapping;
import org.springframework.web.bind.annotation.PathVariable;
@FeignClient(value = "HYSTRIX-PROVIDER",fallback = GoodsFeignClientFallback.class)
public interface GoodsFeignClient {
    @GetMapping("/goods/findOne/{id}")
    public Goods findGoodsById(@PathVariable("id") int id);
}
复写方法
package com.itheima.consumer.feign;
import com.itheima.consumer.domain.Goods;
import org.springframework.stereotype.Component;
/**
 * Fegin 客户端降级处理类
 * 1 定义类 实现Feign 客户端接口
 * 2 使用@Component注解将该类的Bean加入SpringIOC容器
 */
@Component
public class GoodsFeignClientFallback implements  GoodsFeignClient{
    @Override
    public Goods findGoodsById(int id) {
        Goods goods = new Goods();
        goods.setTitle("又被降级了~~");
        return goods;
    }
}
Hystrix 熔断
Hystrix 熔断机制,用于监控微服务调用情况,当失败的情况达到预定的阈值(5秒失败20次),会打开断路器,拒绝所有请求,直到服务恢复正常为止。
- circuitBreaker.sleepWindowInMilliseconds:监控时间
- circuitBreaker.requestVolumeThreshold:失败次数
- circuitBreaker.errorThresholdPercentage:失败率

//设置Hystrix的超时时间 默认1s
@HystrixProperty(name="execution.isolation.thread.timeoutInMilliseconds",value = "3000"),
//监控的时间 默认5000ms
@HystrixProperty(name="circuitBreaker.sleepWindowInMilliseconds",value = "1000"),
//失败次数,默认20次
@HystrixProperty(name="circuitBreaker.requestVolumeThreshold",value = "2"),
//失败率 百分之50
@HystrixProperty(name="circuitBreaker.errorThresholdPercentage",value = "100")
Hystrix 熔断监控
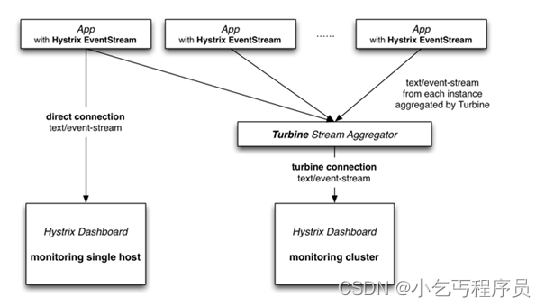
- Hystrix 提供了 Hystrix-dashboard 功能,用于实时监控微服务运行状态。
- 但是Hystrix-dashboard只能监控一个微服务。
- Netflix 还提供了 Turbine ,进行聚合监控。
Turbine聚合监控
搭建监控模块
1. 创建监控模块
创建hystrix-monitor模块,使用Turbine聚合监控多个Hystrix dashboard功能,
2. 引入Turbine聚合监控起步依赖
<?xml version="1.0" encoding="UTF-8"?>
<project xmlns="http://maven.apache.org/POM/4.0.0"
         xmlns:xsi="http://www.w3.org/2001/XMLSchema-instance"
         xsi:schemaLocation="http://maven.apache.org/POM/4.0.0 http://maven.apache.org/xsd/maven-4.0.0.xsd">
    <parent>
        <artifactId>hystrix-parent</artifactId>
        <groupId>com.itheima</groupId>
        <version>1.0-SNAPSHOT</version>
    </parent>
    <modelVersion>4.0.0</modelVersion>
    <artifactId>hystrix-monitor</artifactId>
    <properties>
        <project.build.sourceEncoding>UTF-8</project.build.sourceEncoding>
        <project.reporting.outputEncoding>UTF-8</project.reporting.outputEncoding>
        <java.version>1.8</java.version>
    </properties>
    <dependencies>
    	<!--单独熔断监控-->
        <dependency>
            <groupId>org.springframework.cloud</groupId>
            <artifactId>spring-cloud-starter-netflix-hystrix-dashboard</artifactId>
        </dependency>
		<!--聚合熔断监控-->
        <dependency>
            <groupId>org.springframework.cloud</groupId>
            <artifactId>spring-cloud-starter-netflix-turbine</artifactId>
        </dependency>
        <dependency>
            <groupId>org.springframework.boot</groupId>
            <artifactId>spring-boot-starter-actuator</artifactId>
        </dependency>
        <dependency>
            <groupId>org.springframework.cloud</groupId>
            <artifactId>spring-cloud-starter-netflix-eureka-client</artifactId>
        </dependency>
        <dependency>
            <groupId>org.springframework.boot</groupId>
            <artifactId>spring-boot-starter-test</artifactId>
            <scope>test</scope>
        </dependency>
    </dependencies>
    <build>
        <plugins>
            <plugin>
                <groupId>org.springframework.boot</groupId>
                <artifactId>spring-boot-maven-plugin</artifactId>
            </plugin>
        </plugins>
    </build>
</project>
3. 修改application.yml
spring:
application.name: hystrix-monitor
server:
port: 8769
turbine:
combine-host-port: true
# 配置需要监控的服务名称列表
app-config: hystrix-provider,hystrix-consumer
cluster-name-expression: "'default'"
aggregator:
cluster-config: default
#instanceUrlSuffix: /actuator/hystrix.stream
eureka:
client:
serviceUrl:
defaultZone: http://localhost:8761/eureka/
4. 创建启动类
@SpringBootApplication
@EnableEurekaClient
@EnableTurbine //开启Turbine 很聚合监控功能
@EnableHystrixDashboard //开启Hystrix仪表盘监控功能
public class HystrixMonitorApp {
    public static void main(String[] args) {
        SpringApplication.run(HystrixMonitorApp.class, args);
    }
}
修改被监控模块
需要分别修改 hystrix-provider 和 hystrix-consumer 模块:
1、导入依赖:
		<dependency>
            <groupId>org.springframework.boot</groupId>
            <artifactId>spring-boot-starter-actuator</artifactId>
        </dependency>
        <dependency>
            <groupId>org.springframework.cloud</groupId>
            <artifactId>spring-cloud-starter-netflix-hystrix</artifactId>
        </dependency>
        <dependency>
            <groupId>org.springframework.cloud</groupId>
            <artifactId>spring-cloud-starter-netflix-hystrix-dashboard</artifactId>
        </dependency>
2、配置Bean
此处为了方便,将其配置在启动类中。
@Bean
    public ServletRegistrationBean getServlet() {
        HystrixMetricsStreamServlet streamServlet = new HystrixMetricsStreamServlet();
        ServletRegistrationBean registrationBean = new ServletRegistrationBean(streamServlet);
        registrationBean.setLoadOnStartup(1);
        registrationBean.addUrlMappings("/actuator/hystrix.stream");
        registrationBean.setName("HystrixMetricsStreamServlet");
        return registrationBean;
    }
3、启动类上添加注解@EnableHystrixDashboard
@EnableDiscoveryClient
@EnableEurekaClient
@SpringBootApplication
@EnableFeignClients
@EnableHystrixDashboard // 开启Hystrix仪表盘监控功能
public class ConsumerApp {
    public static void main(String[] args) {
        SpringApplication.run(ConsumerApp.class,args);
    }
    @Bean
    public ServletRegistrationBean getServlet() {
        HystrixMetricsStreamServlet streamServlet = new HystrixMetricsStreamServlet();
        ServletRegistrationBean registrationBean = new ServletRegistrationBean(streamServlet);
        registrationBean.setLoadOnStartup(1);
        registrationBean.addUrlMappings("/actuator/hystrix.stream");
        registrationBean.setName("HystrixMetricsStreamServlet");
        return registrationBean;
    }
}
启动测试
1、启动服务:
- eureka-server
- hystrix-provider
- hystrix-consumer
- hystrix-monitor
2、访问:
在浏览器访问http://localhost:8769/hystrix/ 进入Hystrix Dashboard界面
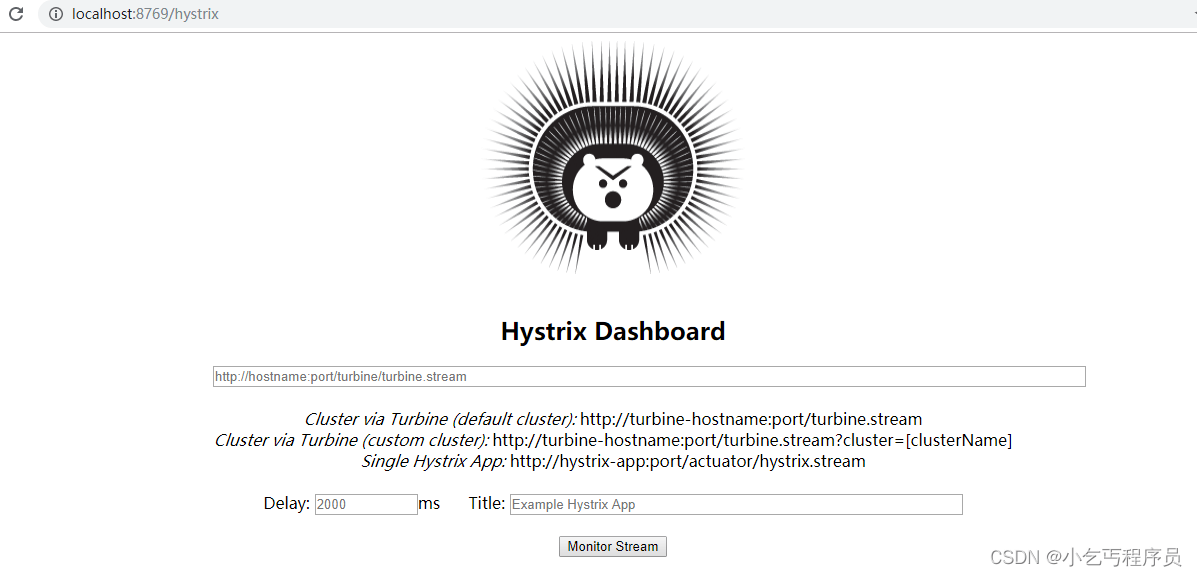
界面中输入监控的Url地址 http://localhost:8769/turbine.stream,监控时间间隔2000毫秒和title,如下图
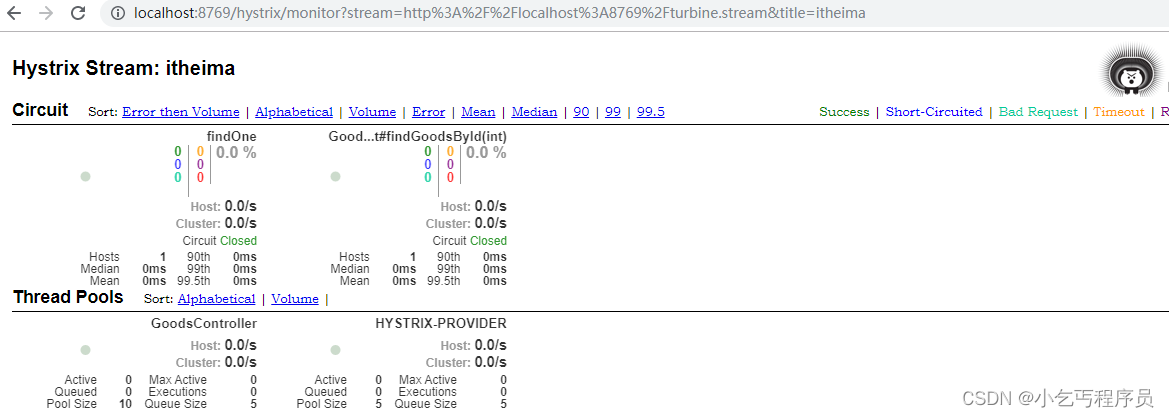
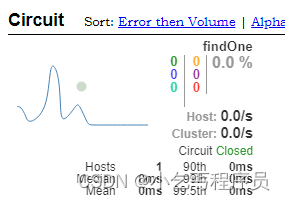
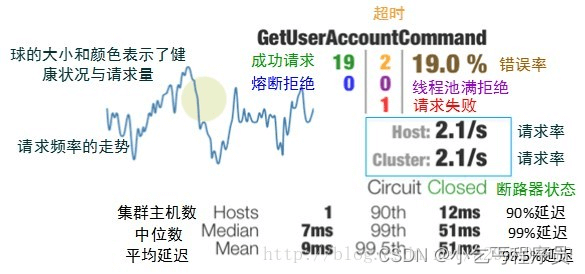
- 实心圆:它有颜色和大小之分,分别代表实例的监控程度和流量大小。如上图所示,它的健康度从绿色、黄色、橙色、红色递减。通过该实心圆的展示,我们就可以在大量的实例中快速的发现故障实例和高压力实例。
- 曲线:用来记录 2 分钟内流量的相对变化,我们可以通过它来观察到流量的上升和下降趋势。
到此这篇关于SpringCloud Hystrix熔断器使用方法介绍的文章就介绍到这了,更多相关SpringCloud Hystrix熔断器内容请搜索我们以前的文章或继续浏览下面的相关文章希望大家以后多多支持我们!
