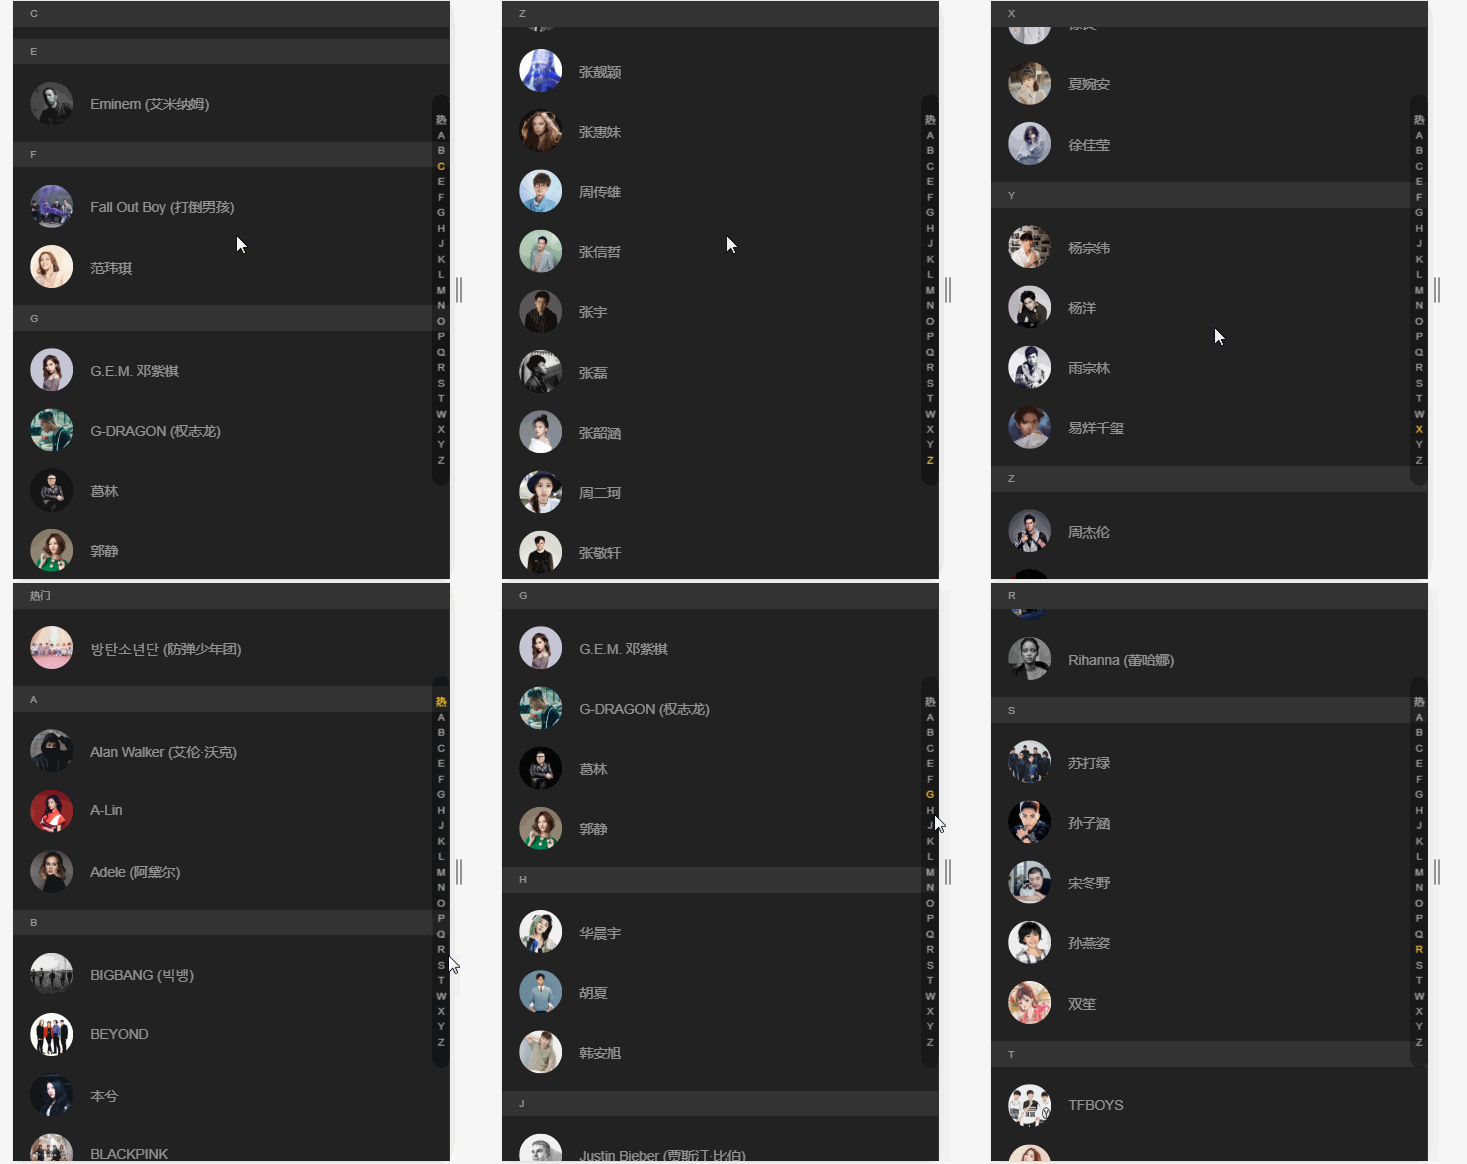
vue实现歌手列表字母排序下拉滚动条侧栏排序实时更新
今天写项目的时候遇到了歌手排序的问题,联想到了我们平时的手机通讯录侧栏字母排序,按照ABCDE这样的顺序对名字进行排序。
我们先来看看效果

那就用vue来实现一遍
首先新建一个vue页面,取名为helloworld.vue
在页面里写入内容
<template>
 <div class="hello">
 <div class="singer" id="singer">
  <div class="singer-top-tag">{{singerTopTag | filterSingerTag}}</div>
  <ul class="singer-ul">
  <li v-for="(item, index) in list" :key="index" class="singer-ul-li">
   <div class="singer-tag" :id="item.tag">{{item.tag | filterSingerTag}}</div>
   <ul>
   <li v-for="(fitem, findex) in item.data" :key="findex">
    <img :src="`https://y.gtimg.cn/music/photo_new/T001R300x300M000${fitem.Fsinger_mid}.jpg?max_age=2592000`">
    <div>{{fitem.Fsinger_name}}</div>
   </li>
   </ul>
  </li>
  </ul>
 </div>
 <div class="sort">
  <ul>
  <li
  v-for="(item, index) in sortList"
  :key="index"
  @click="jumpTag(item)"
  :class="{current:currentSort == item ? true : false}"
  >
   {{item == `hot` ? `热` : item}}
  </li>
  </ul>
 </div>
 </div>
</template>
<script>
import axios from 'axios'
export default {
name: "HelloWorld",
data() {
return {
list:[], // 歌手列表
sortList:[], // 侧栏排序列表
currentSort: 'hot', // 当前排序的标签
singerTopTag: 'hot', // 歌手栏头部的标签名字
};
},
mounted() {
this.testData()
// 监听滚动条
window.addEventListener('scroll', this.handleScroll)
},
destroyed () {
// 页面摧毁的时候要关闭监听
window.removeEventListener('scroll', this.handleScroll)
},
methods: {
handleScroll () {
let scrollTop = window.pageYOffset || document.documentElement.scrollTop || document.body.scrollTop
let offsetTop = 0
this.list.forEach((item,index) => {
// 获取每个排序标签的位置
offsetTop = document.querySelectorAll('.singer-ul-li')[index].offsetTop
// 当前滚动条的位置 和 当前的标签偏移顶部的距离进行对比
// 每一个歌手的li标签的高度必须要保持一致,我这里的高度是70,可以计算自己项目的内容的具体高度进行修改
if (scrollTop > offsetTop && scrollTop < (offsetTop+ 70*item.data.length)) {
this.singerTopTag = item.tag
this.currentSort = item.tag
}
})
},
// 请求数据
testData(){
axios.get(`https://c.y.qq.com/v8/fcg-bin/v8.fcg?g_tk=1928093487&inCharset=utf-8&outCharset=utf-8¬ice=0&format=jsonp&channel=singer&page=list&key=all_all_all&pagesize=100&pagenum=1&hostUin=0&needNewCode=0&platform=yqq&jsonpCallback=jp1`)
.then(res => {
res = res.data.substring(5,res.data.length-1)
res = JSON.parse(res).data.list
res = res.sort((a,b) => a.Findex.localeCompare(b.Findex))
res.forEach((item,index) => {
// 添加侧栏排序
item.Findex = item.Findex == 9 ? 'hot' : item.Findex
this.sortList.push(item.Findex)
})
// 去除重复
this.sortList = new Set(this.sortList)
this.sortList = [...this.sortList]
// 添加排序标签和歌手列表
this.sortList.forEach(e => {
this.list.push({
tag:e,
data:res.filter(i => i.Findex ==e)
})
})
})
},
// 跳转标签
jumpTag(i){
this.singerTopTag = i
this.currentSort = i
document.querySelector(`#${i}`).scrollIntoView()
}
},
filters :{
filterSingerTag(i) {
return i == `hot` ? `热门` : i
}
}
};
</script>
<!-- Add "scoped" attribute to limit CSS to this component only -->
<style scoped>
.hello {
position: relative;
background-color: #222;
}
.singer {
position: relative;
width: 100%;
height: 100%;
overflow: hidden;
background: #222;
}
.singer-top-tag {
position: fixed;
top: 0px;
left: 0;
width: 100%;
height: 30px;
line-height: 30px;
padding-left: 20px;
font-size: 12px;
color: hsla(0,0%,100%,.5);
background: #333;
}
.singer-tag {
width: 100%;
height: 30px;
margin-bottom: 20px;
line-height: 30px;
padding-left: 20px;
font-size: 12px;
color: hsla(0,0%,100%,.5);
background: #333;
}
.singer-ul-li ul li {
list-style-type: none;
display: flex;
justify-content: flex-start;
align-items: center;
padding: 0 0 20px 20px;
color: rgba(255, 255, 255, .5);
}
.singer-ul-li ul li img {
border-radius: 50%;
widows: 50px;
height: 50px;
}
.singer-ul-li ul li div {
padding-left: 20px;
}
.sort {
position: fixed;
z-index: 30;
right: 0;
top: 50%;
-webkit-transform: translateY(-50%);
transform: translateY(-50%);
width: 20px;
padding: 20px 0;
border-radius: 10px;
text-align: center;
background: rgba(0,0,0,.3);
font-family: Helvetica;
}
ul {
margin: 0;
padding: 0;
}
.sort ul{
color: rgba(255,255,255,.6);
}
.sort ul li {
list-style-type: none;
padding: 3px;
line-height: 1;
font-size: 12px;
}
.current {
color: #ffcd32;
}
</style>
我是使用的qq音乐接口,获取的数据需要进行处理,如果觉得麻烦可以自己写静态数据来代替
数据的格式
const list = [
 {
  tag:`A`,
  data:[
   {
    img:`https://timgsa.baidu.com/timg?image&quality=80&size=b9999_10000&sec=1558361071&di=0a522afe68fc7e2aa3af34cb5cd8c96a&imgtype=jpg&er=1&src=http%3A%2F%2Fwerkstette.dk%2Fwp-content%2Fuploads%2F2015%2F09%2FEntertainment_Weekly_Photographer_Marc_Hom_British_Actor_Charlie_Hunnam_as_King_Arthur_Retouch_Werkstette10-770x841.jpg`,
    Fsinger_name:`奥巴里`
  }
  ]
 },
 {
  tag:`B`,
  data:[
   {
    img:`https://timgsa.baidu.com/timg?image&quality=80&size=b9999_10000&sec=1558361071&di=0a522afe68fc7e2aa3af34cb5cd8c96a&imgtype=jpg&er=1&src=http%3A%2F%2Fwerkstette.dk%2Fwp-content%2Fuploads%2F2015%2F09%2FEntertainment_Weekly_Photographer_Marc_Hom_British_Actor_Charlie_Hunnam_as_King_Arthur_Retouch_Werkstette10-770x841.jpg`,
    Fsinger_name:`BIGBANG`
  }
  ]
 },
 {
  tag:`C`,
  data:[
   {
    img:`https://timgsa.baidu.com/timg?image&quality=80&size=b9999_10000&sec=1558361071&di=0a522afe68fc7e2aa3af34cb5cd8c96a&imgtype=jpg&er=1&src=http%3A%2F%2Fwerkstette.dk%2Fwp-content%2Fuploads%2F2015%2F09%2FEntertainment_Weekly_Photographer_Marc_Hom_British_Actor_Charlie_Hunnam_as_King_Arthur_Retouch_Werkstette10-770x841.jpg`,
    Fsinger_name:`蔡依林`
  }
  ]
 },
 {
  tag:`D`,
  data:[
   {
    img:`https://timgsa.baidu.com/timg?image&quality=80&size=b9999_10000&sec=1558361071&di=0a522afe68fc7e2aa3af34cb5cd8c96a&imgtype=jpg&er=1&src=http%3A%2F%2Fwerkstette.dk%2Fwp-content%2Fuploads%2F2015%2F09%2FEntertainment_Weekly_Photographer_Marc_Hom_British_Actor_Charlie_Hunnam_as_King_Arthur_Retouch_Werkstette10-770x841.jpg`,
    Fsinger_name:`邓紫棋`
  }
  ]
 },
]
再者还要注意页面的img标签,直接复制上面的数据的话要对img标签进行修改,去掉http那一串,直接用:src="item.img"代替
const list = [
 {
  tag:`A`,
  data:[
   {
    img:`https://timgsa.baidu.com/timg?image&quality=80&size=b9999_10000&sec=1558361071&di=0a522afe68fc7e2aa3af34cb5cd8c96a&imgtype=jpg&er=1&src=http%3A%2F%2Fwerkstette.dk%2Fwp-content%2Fuploads%2F2015%2F09%2FEntertainment_Weekly_Photographer_Marc_Hom_British_Actor_Charlie_Hunnam_as_King_Arthur_Retouch_Werkstette10-770x841.jpg`,
    Fsinger_name:`奥巴里`
  }
  ]
 },
 {
  tag:`B`,
  data:[
   {
    img:`https://timgsa.baidu.com/timg?image&quality=80&size=b9999_10000&sec=1558361071&di=0a522afe68fc7e2aa3af34cb5cd8c96a&imgtype=jpg&er=1&src=http%3A%2F%2Fwerkstette.dk%2Fwp-content%2Fuploads%2F2015%2F09%2FEntertainment_Weekly_Photographer_Marc_Hom_British_Actor_Charlie_Hunnam_as_King_Arthur_Retouch_Werkstette10-770x841.jpg`,
    Fsinger_name:`BIGBANG`
  }
  ]
 },
 {
  tag:`C`,
  data:[
   {
    img:`https://timgsa.baidu.com/timg?image&quality=80&size=b9999_10000&sec=1558361071&di=0a522afe68fc7e2aa3af34cb5cd8c96a&imgtype=jpg&er=1&src=http%3A%2F%2Fwerkstette.dk%2Fwp-content%2Fuploads%2F2015%2F09%2FEntertainment_Weekly_Photographer_Marc_Hom_British_Actor_Charlie_Hunnam_as_King_Arthur_Retouch_Werkstette10-770x841.jpg`,
    Fsinger_name:`蔡依林`
  }
  ]
 },
 {
  tag:`D`,
  data:[
   {
    img:`https://timgsa.baidu.com/timg?image&quality=80&size=b9999_10000&sec=1558361071&di=0a522afe68fc7e2aa3af34cb5cd8c96a&imgtype=jpg&er=1&src=http%3A%2F%2Fwerkstette.dk%2Fwp-content%2Fuploads%2F2015%2F09%2FEntertainment_Weekly_Photographer_Marc_Hom_British_Actor_Charlie_Hunnam_as_King_Arthur_Retouch_Werkstette10-770x841.jpg`,
    Fsinger_name:`邓紫棋`
  }
  ]
 },
]
总结
以上所述是小编给大家介绍的vue实现歌手列表字母排序下拉滚动条侧栏排序实时更新,希望对大家有所帮助,如果大家有任何疑问请给我留言,小编会及时回复大家的。在此也非常感谢大家对我们网站的支持!
如果你觉得本文对你有帮助,欢迎转载,烦请注明出处,谢谢!
赞 (0)

