vue+element+oss实现前端分片上传和断点续传
纯前端实现: 切片上传 断点续传 。断点续传需要在切上上传的基础上实现
前端之前上传OSS,无需后端提供接口。先上完整代码,直接复制,将new OSS里的参数修改成自己公司OSS相关信息后可用,如遇问题,请继续往下看。
oss官方文档
https://help.aliyun.com/document_detail/111268.html?spm=a2c4g.11186623.6.1111.5a583a07LknRUO
代码允许所需环境:vue + element + ali-oss
安装ali-oss: cnpm install ali-oss
代码实现
<template>
 <div class="dashboard-editor-container">
 <el-upload
  class="upload-demo"
  action=""
  ref="upload"
  :file-list="fileList"
  :limit="2"
  :on-change="handleChange"
  :on-remove="handleRemove"
  :auto-upload="false"
  accept=""
 >
  <el-button slot="trigger" size="small" type="primary">选取文件</el-button>
  <el-button style="margin-left: 10px;" size="small" type="success" @click="submitForm">上传到服务器</el-button>
  <el-button style="margin-left: 10px;" size="small" type="success" @click="resumeUpload">继续</el-button>
  <el-button style="margin-left: 10px;" size="small" type="success" @click="stopUplosd">暂停</el-button>
  <el-button style="margin-left: 10px;" size="small" type="success" @click="abortMultipartUpload">清除切片</el-button>
 </el-upload>
 <el-progress :percentage="percentage" :status="uploadStatus"></el-progress>
 </div>
</template>

<script>
 let OSS = require('ali-oss') // 引入ali-oss插件
 const client = new OSS({
 region: 'oss-cn-shanghai',//根据那你的Bucket地点来填写
 accessKeyId: 'LTA*********RaXY',//自己账户的accessKeyId
 accessKeySecret: 'uu1************GiS',//自己账户的accessKeySecret
 bucket: 'a******o',//bucket名字
 });
export default {
 data () {
 return {
  fileList:[],
  file: null,
  tempCheckpoint: null, // 用来缓存当前切片内容
  uploadId: '',
  uploadStatus: null, // 进度条上传状态
  percentage: 0, // 进度条百分比
  uploadName: '', //Object所在Bucket的完整路径
 }
 },
 mounted() {
 // window.addEventListener('online', this.resumeUpload);
 },
 methods: {
 // 点击上传至服务器
 submitForm(file) {
  this.multipartUpload();
 },
 // 取消分片上传事件
 async abortMultipartUpload() {
  window.removeEventListener('online', this.resumeUpload)
  const name = this.uploadName; // Object所在Bucket的完整路径。
  const uploadId = this.upload; // 分片上传uploadId。
  const result = await client.abortMultipartUpload(name, uploadId);
  console.log(result, '=======清除切片====');
 },
 // 暂停分片上传。
 stopUplosd () {
  window.removeEventListener('online', this.resumeUpload) // 暂停时清除时间监听
  let result = client.cancel();
  console.log( result, '---------暂停上传-----------')
 },
 // 切片上传
 async multipartUpload () {
  if (!this.file) {
  this.$message.error('请选择文件')
  return
  }
  this.uploadStatus = null
  // console.log("this.uploadStatus",this.file, this.uploadStatus);

  this.percentage = 0
  try {
  //object-name可以自定义为文件名(例如file.txt)或目录(例如abc/test/file.txt)的形式,实现将文件上传至当前Bucket或Bucket下的指定目录。
  let result = await client.multipartUpload(this.file.name, this.file, {
   headers: {
   'Content-Disposition': 'inline',
   'Content-Type': this.file.type //注意:根据图片或者文件的后缀来设置,我试验用的‘.png'的图片,具体为什么下文解释
   },
   progress: (p, checkpoint) => {
   this.tempCheckpoint = checkpoint;
   this.upload = checkpoint.uploadId
   this.uploadName = checkpoint.name
   this.percentage = p * 100
   // console.log(p, checkpoint, this.percentage, '---------uploadId-----------')
   // 断点记录点。浏览器重启后无法直接继续上传,您需要手动触发上传操作。
   },
   meta: { year: 2020, people: 'dev' },
   mime: this.file.type
  });
  console.log(result, this.percentage, 'result= 切片上传完毕=');
  } catch (e) {
  window.addEventListener('online', this.resumeUpload) // 该监听放在断网的异常处理
  // 捕获超时异常。
  if (e.code === 'ConnectionTimeoutError') { // 请求超时异常处理
   this.uploadStatus = 'exception'
   console.log("TimeoutError");
   // do ConnectionTimeoutError operation
  }
  // console.log(e)
  }
 },
 // 恢复上传。
 async resumeUpload () {
  window.removeEventListener('online', this.resumeUpload)
  if (!this.tempCheckpoint) {
  this.$message.error('请先上传')
  return
  }
  this.uploadStatus = null
  try {
  let result = await client.multipartUpload(this.file.name, this.file, {
   headers: {
   'Content-Disposition': 'inline',
   'Content-Type': this.file.type //注意:根据图片或者文件的后缀来设置,我试验用的‘.png'的图片,具体为什么下文解释
   },

   progress: (p, checkpoint) => {
   this.percentage = p * 100
   console.log(p, checkpoint, 'checkpoint----恢复上传的切片信息-------')
   this.tempCheckpoint = checkpoint;
   },
   checkpoint: this.tempCheckpoint,
   meta: { year: 2020, people: 'dev' },
   mime: this.file.type
  })
  console.log(result, 'result-=-=-恢复上传完毕')
  } catch (e) {
  console.log(e, 'e-=-=-');
  }
 },

 // 选择文件发生改变
 handleChange(file, fileList) {
  this.fileList = fileList.filter(row => row.uid == file.uid)
  this.file = file.raw
  // 文件改变时上传
  // this.submitForm(file)
 },
 handleRemove(file, fileList) {
  this.percentage = 0 //进度条置空
  this.fileList = []
 },
 }
}
</script>

<style scoped>
</style>
如果相关依赖已经安装完毕,但是上述代码操作时仍有报错,请检查以下问题
 const client = new OSS({
 region: 'oss-cn-shanghai',//根据那你的Bucket地点来填写
 accessKeyId: 'LT******XY',//自己账户的accessKeyId
 accessKeySecret: 'uu*********GiS',//自己账户的accessKeySecret
 bucket: 'a******io',//bucket名字
 });
上述信息放在前端会存在安全问题,如在项目中使用尽量由后端接口提供。或使用STS临时授权。demo中没有,请自行探索。
https://www.alibabacloud.com/help/zh/doc-detail/100624.htm?spm=a2c63.p38356.879954.5.7a234d04IQpf5I#concept-xzh-nzk-2gb
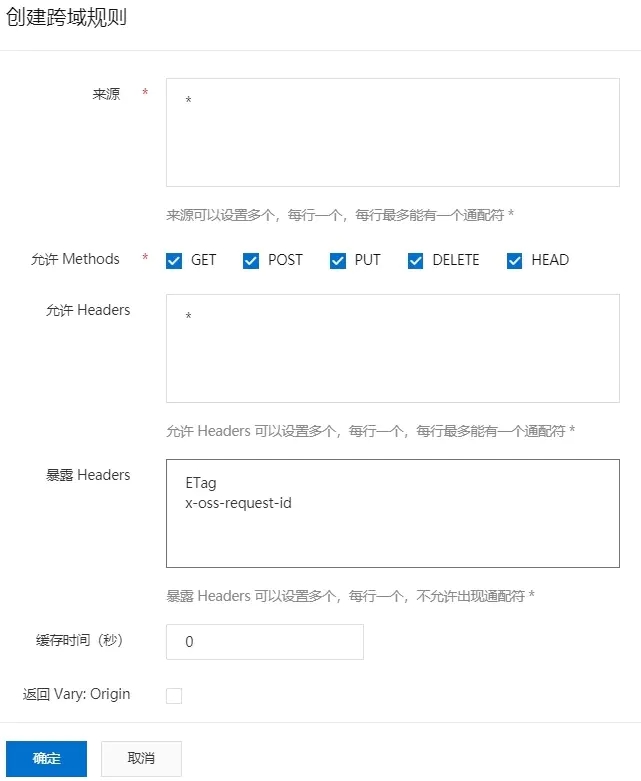
配置项中信息可以问后端或者运维,bucket的名字必须是你OSS上存在的且你有权限访问的,不然会一直报 Pleasr create a busket first或者一直报跨域
当遇到跨域时,或者遇到报报错信息中有etag时,请检查OSS配置,然后找有OSS服务器权限人员进行配置:

window.addEventListener('online', this.resumeUpload)用于监听网络状态(断网状态和连网状态),实现断网后恢复网络自动上传就必须设置监听。
window.removeEventListener('online', this.resumeUpload)取消监听。如果不设置取消监听,联网状态下会一直处于进行上传,因为一直满足监听条件`
headers: {
   'Content-Disposition': 'inline',
   'Content-Type': this.file.type //注意:根据图片或者文件的后缀来设置,我取得是文件的type,具体为什么下文解释
   },
'Content-Type': this.file.type`的作用:加了在文件上传完毕后,访问文件链接时可以直接查看,否则会直接下载。
文件上传完毕后查看,可以去resule.res.requestUrls中去取,但是注意要去点地址后面的 ?uploadId=******
上述代码只是demo,代码以实现功能为主,并不严谨,请自行完善。
到此这篇关于vue+element+oss实现前端分片上传和断点续传的文章就介绍到这了,更多相关vue 分片上传和断点续传内容请搜索我们以前的文章或继续浏览下面的相关文章希望大家以后多多支持我们!

