Android中AlertDialog各种对话框的用法实例详解
目标效果:
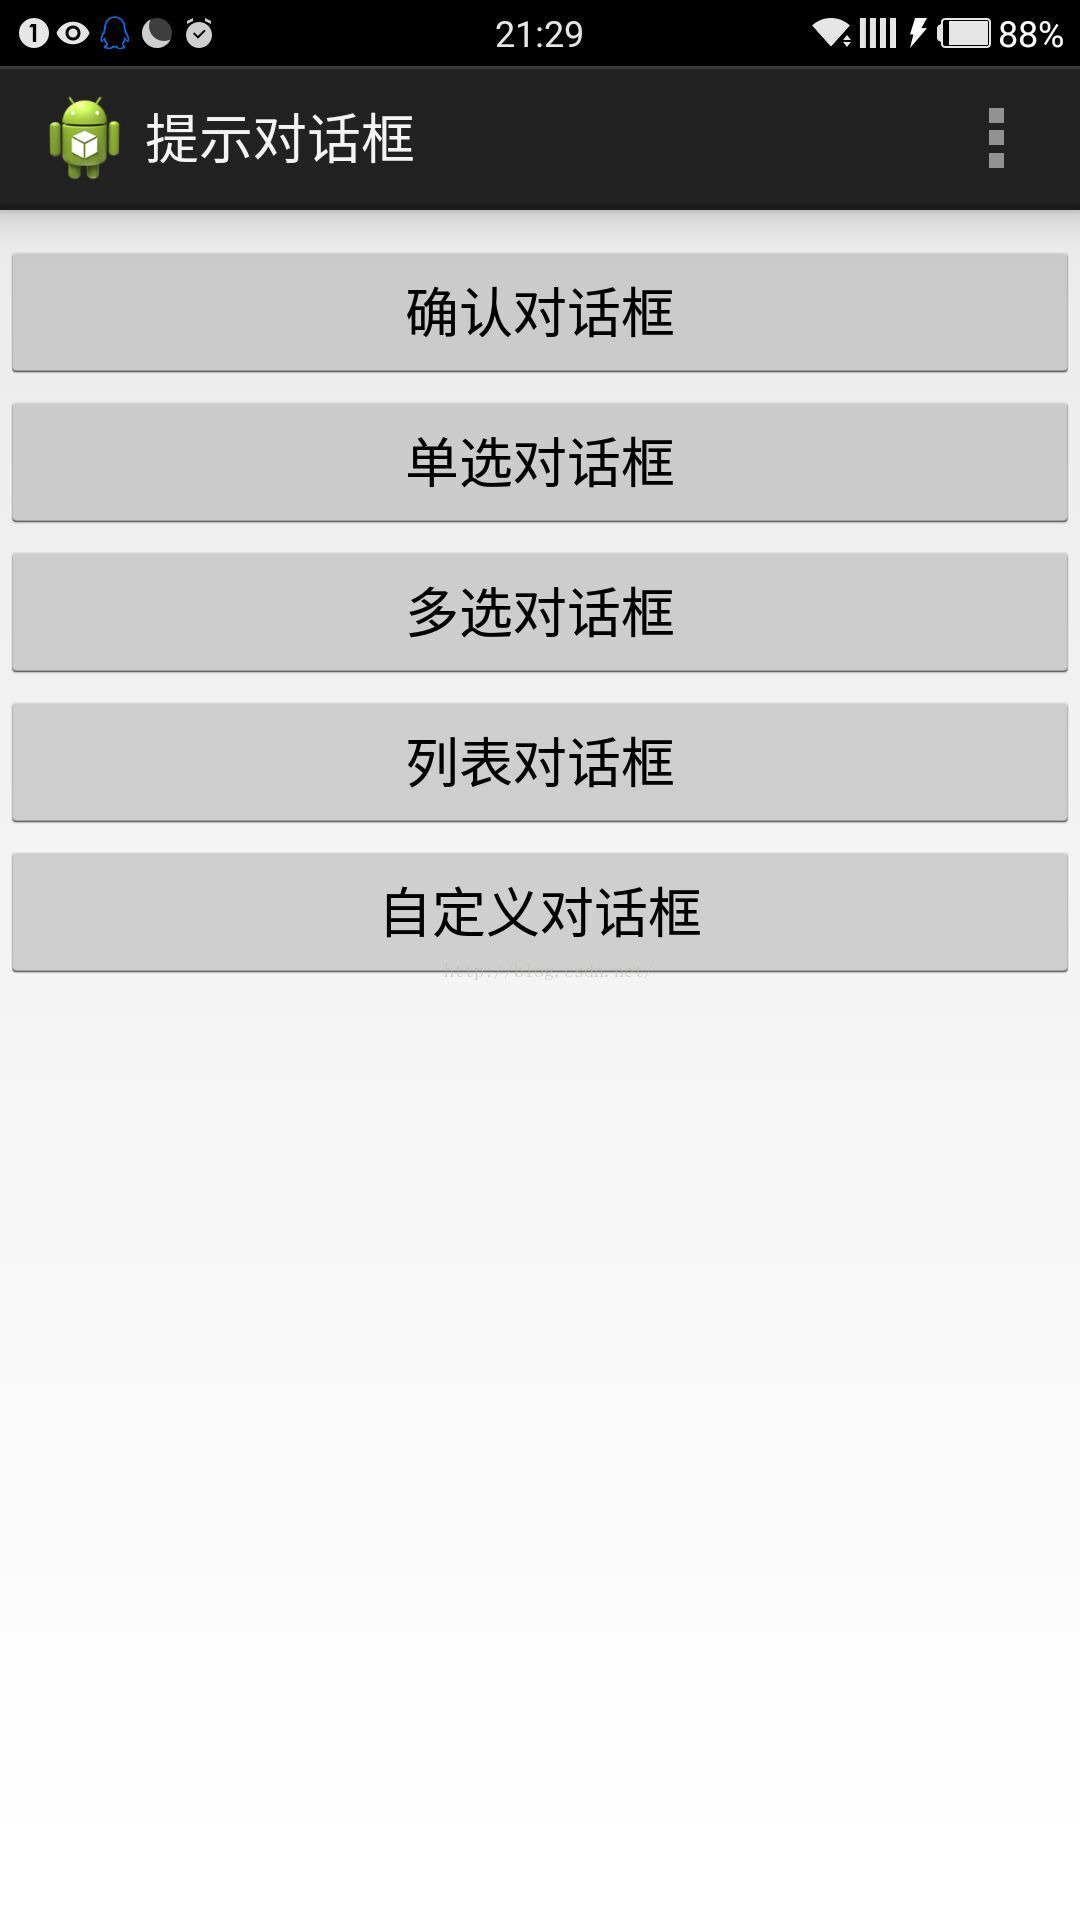
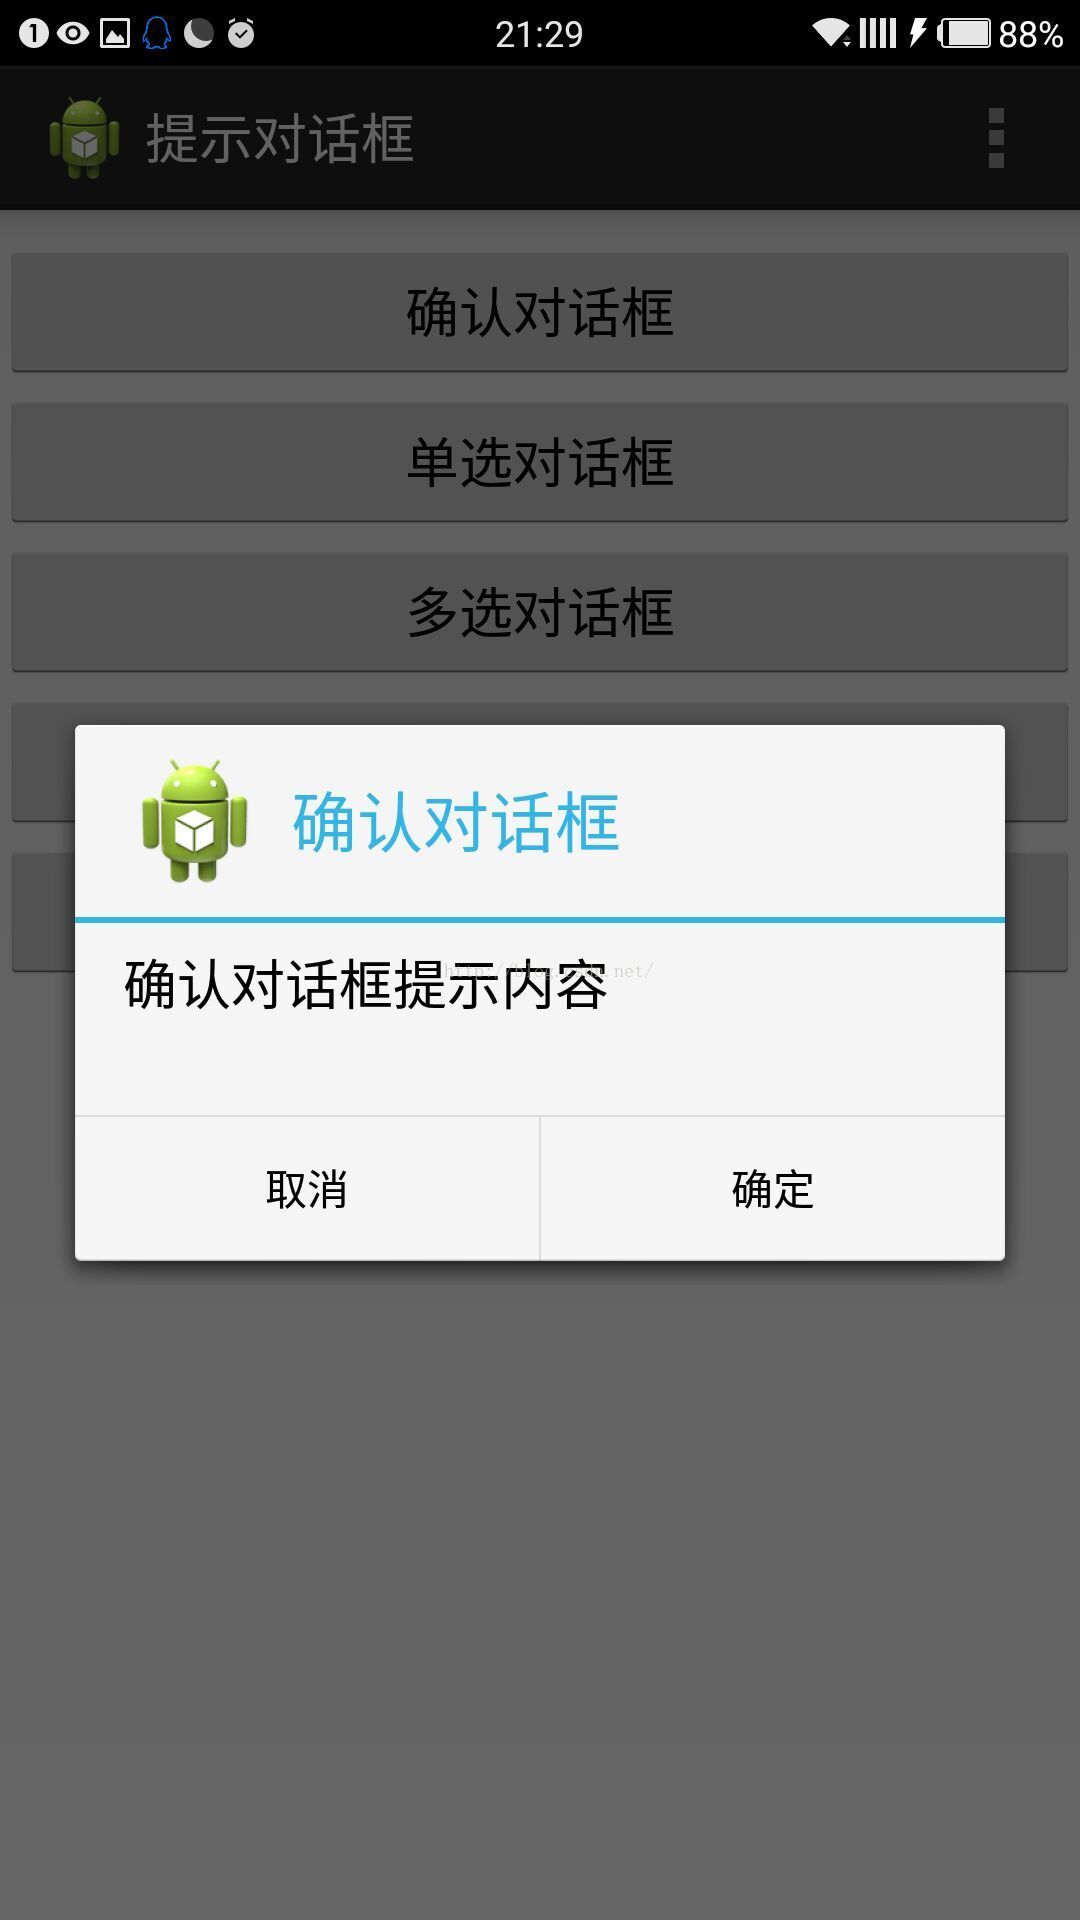
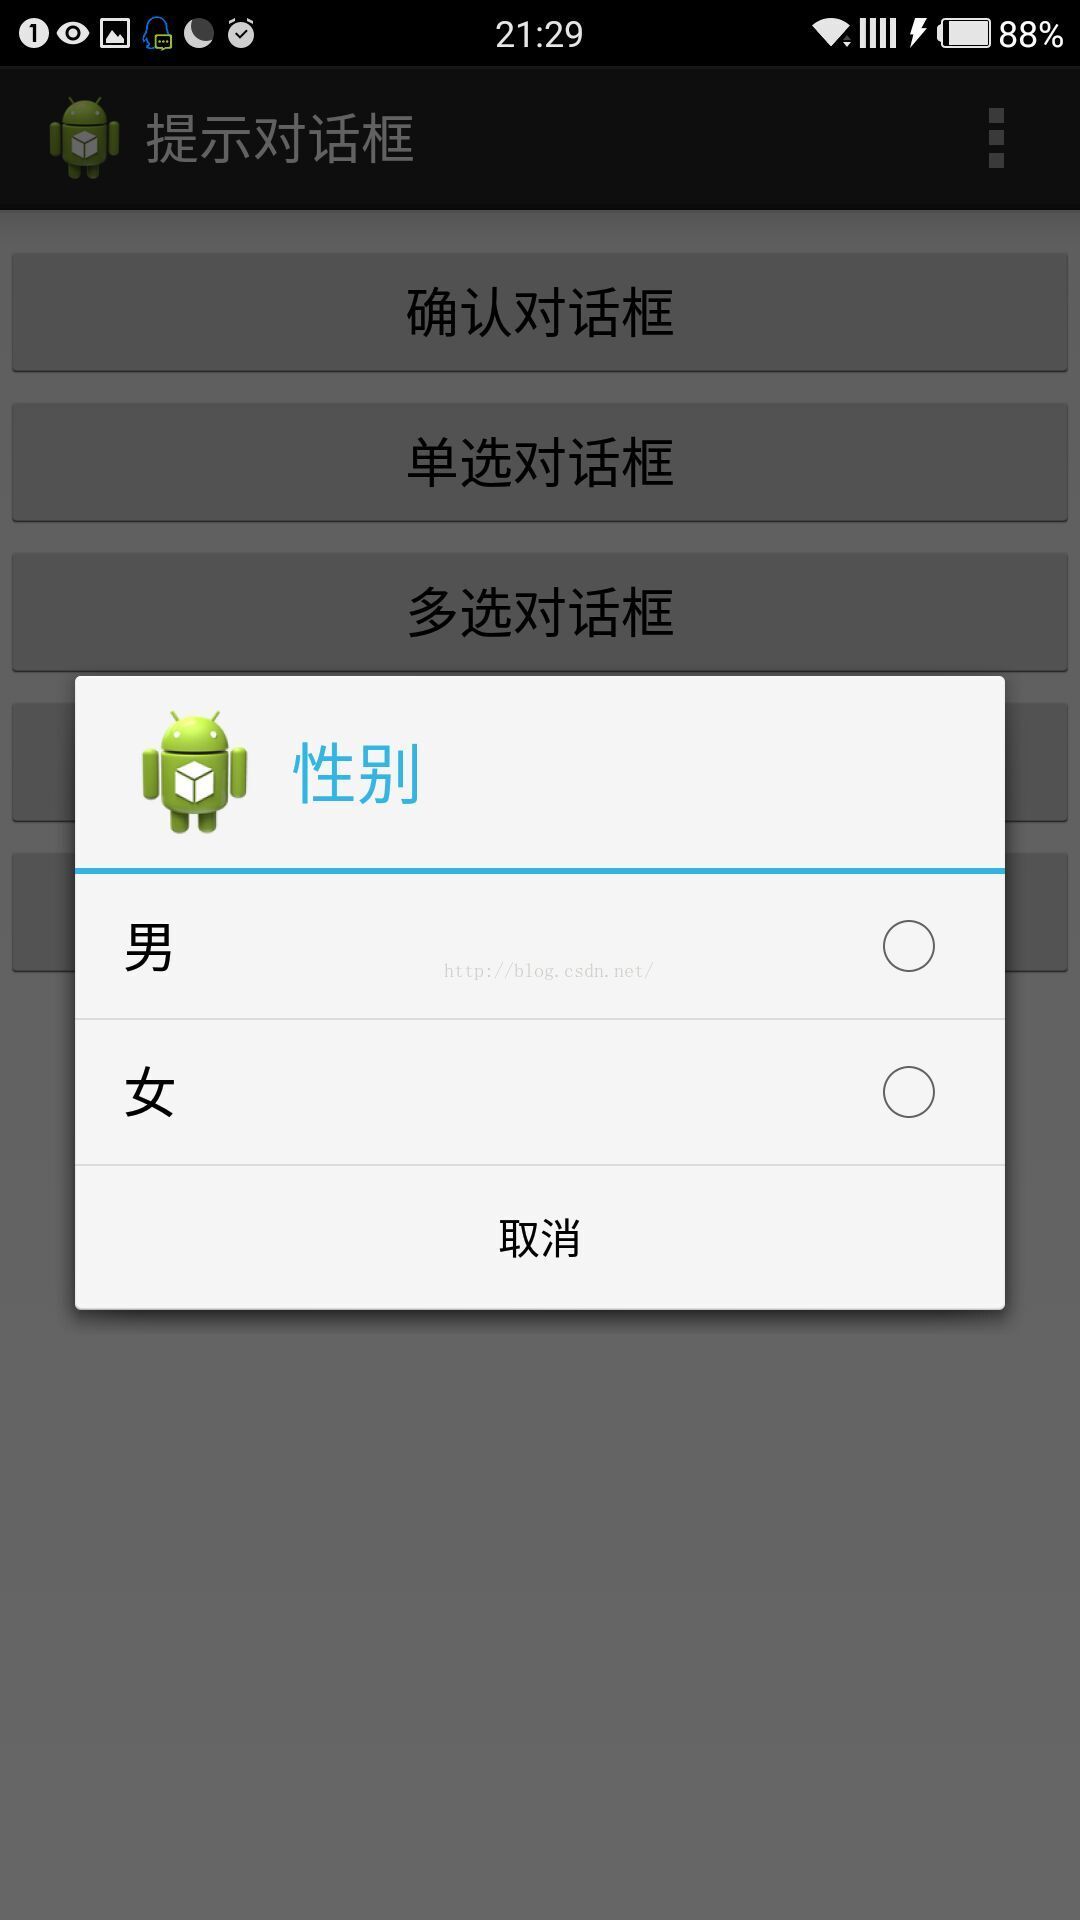
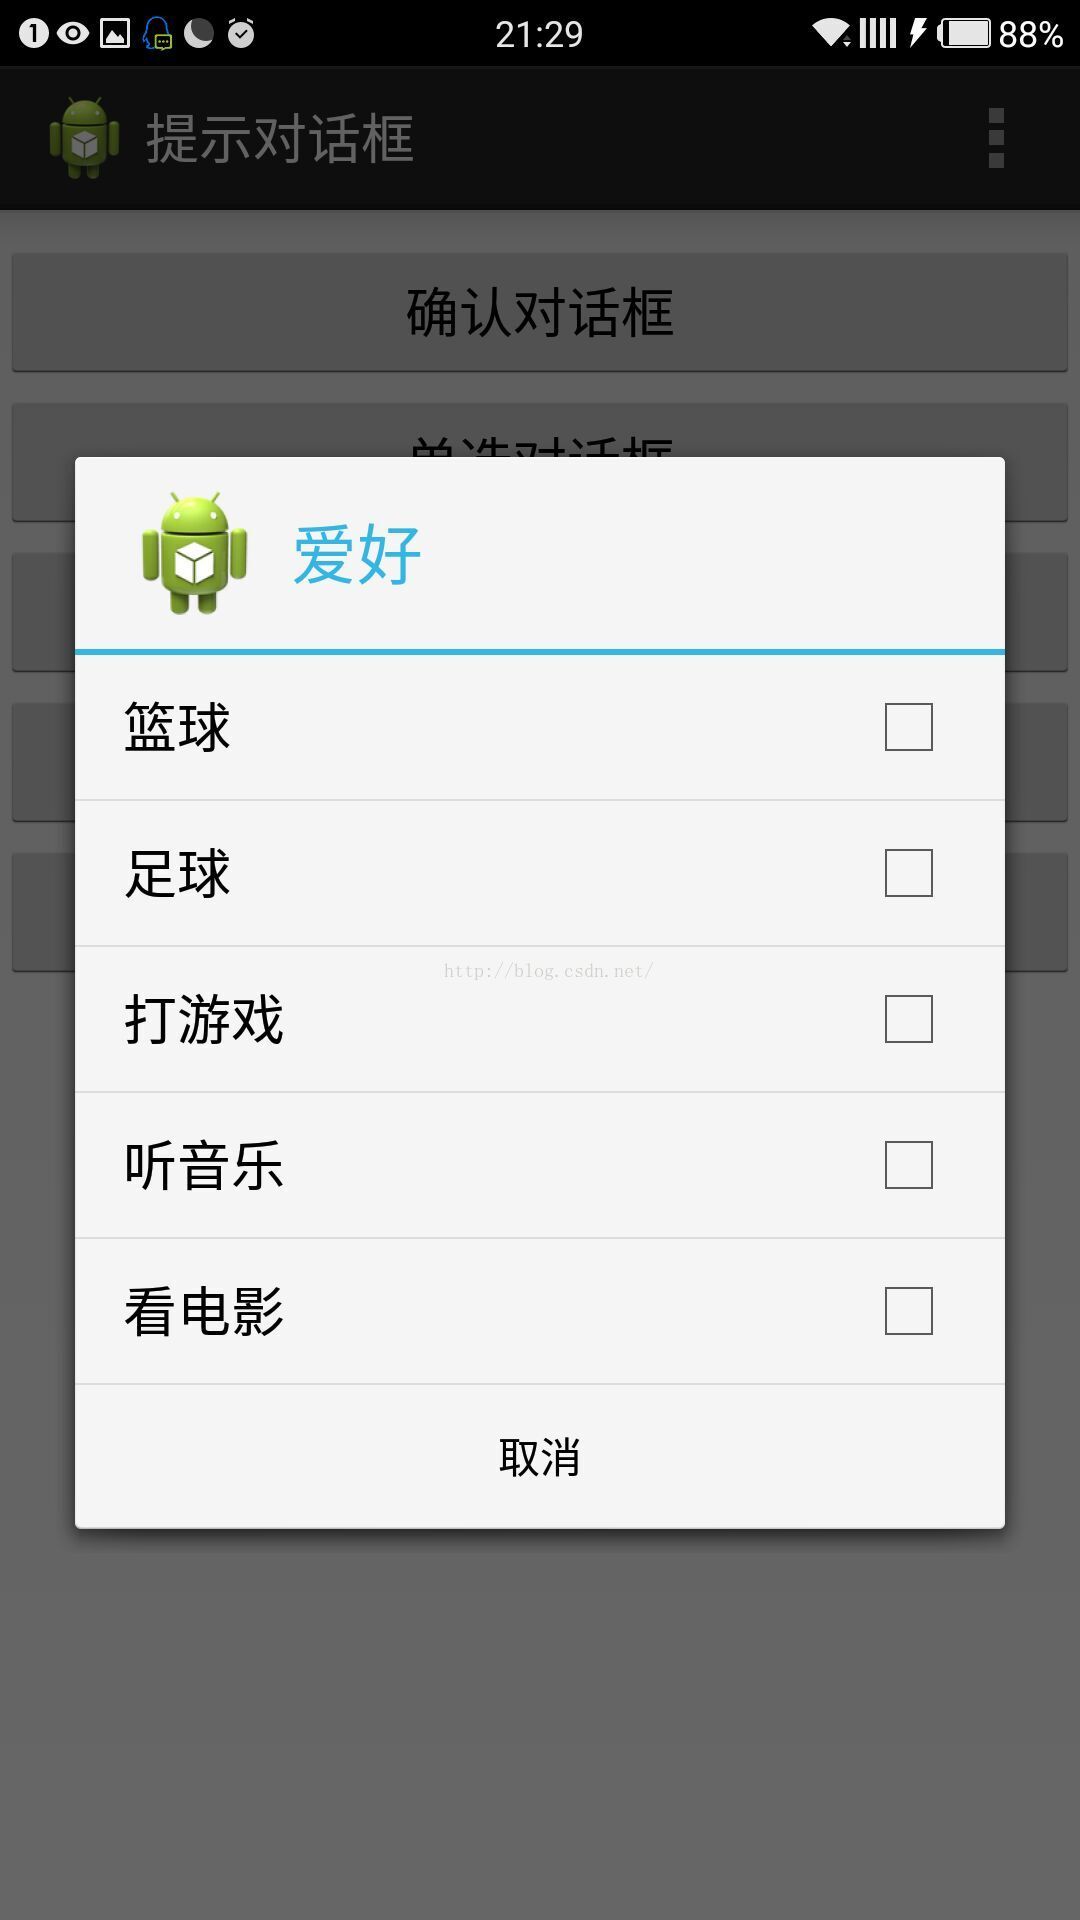
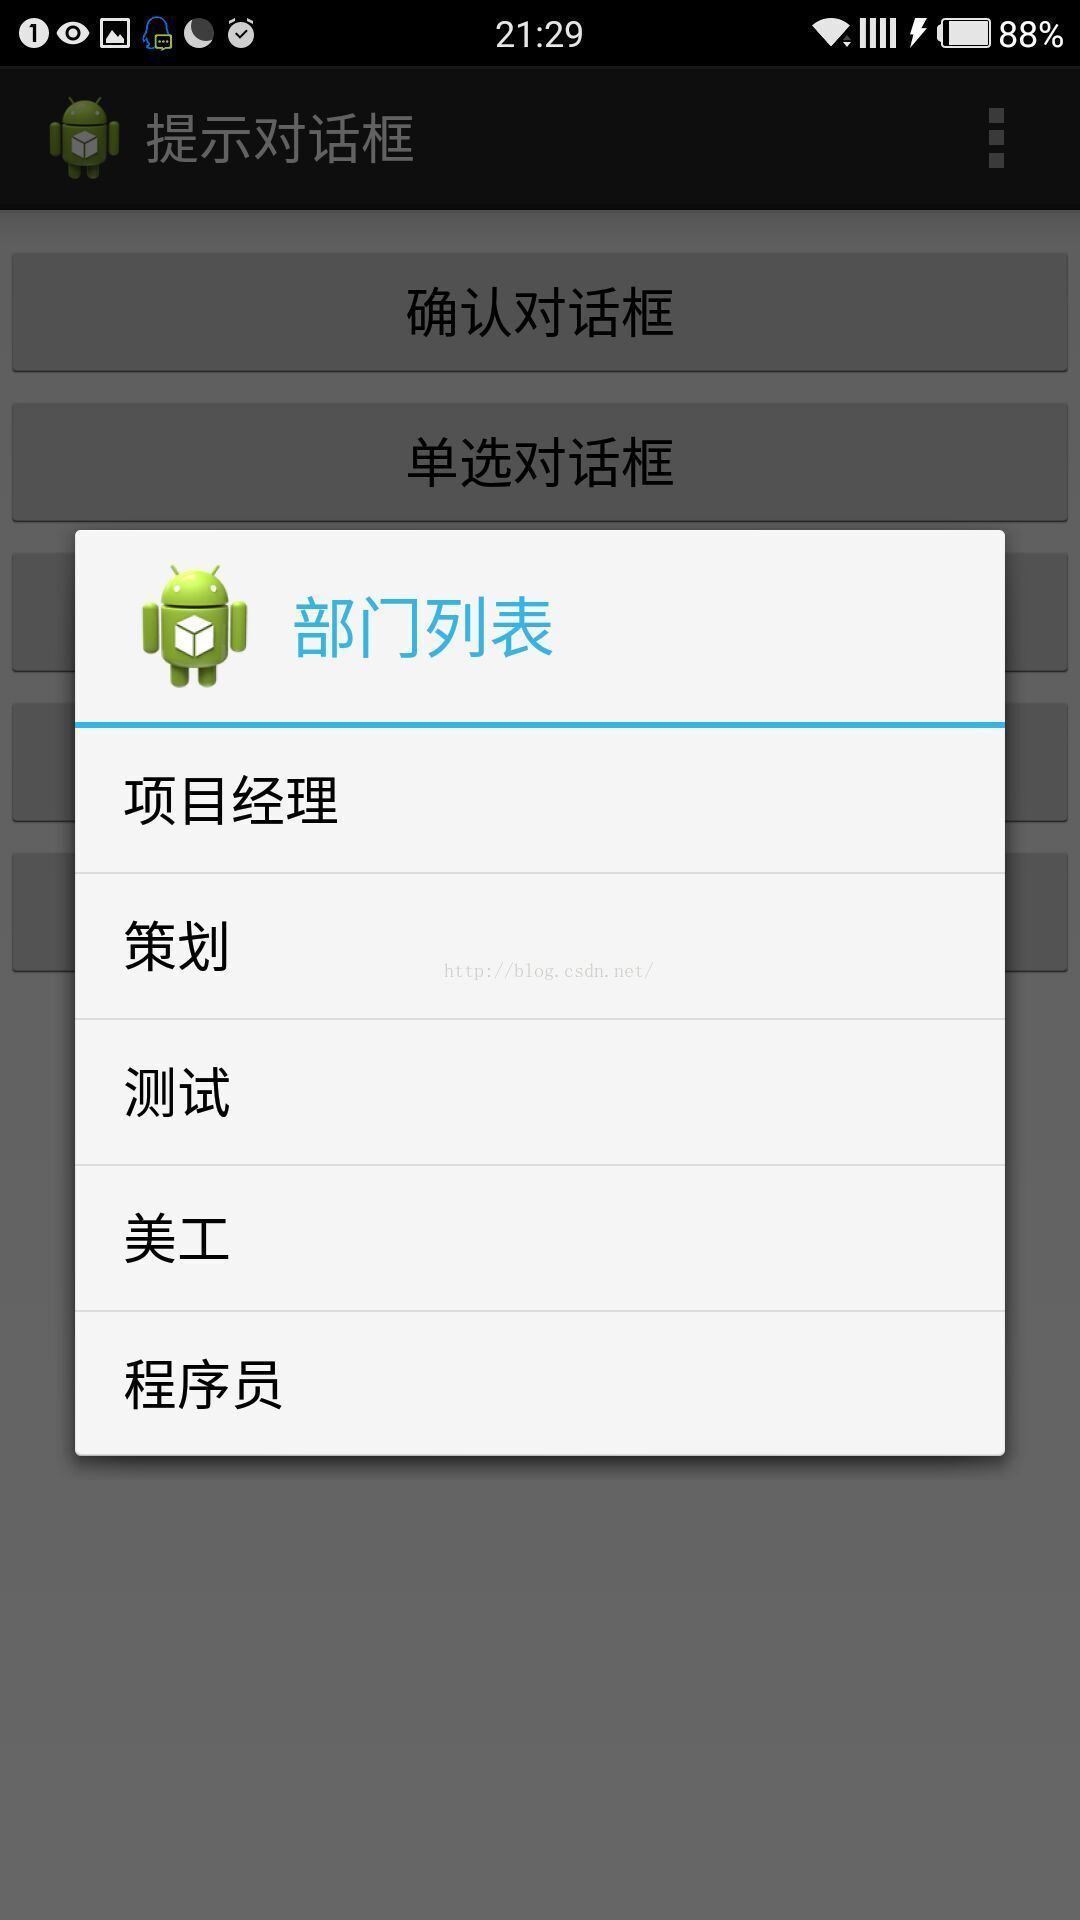
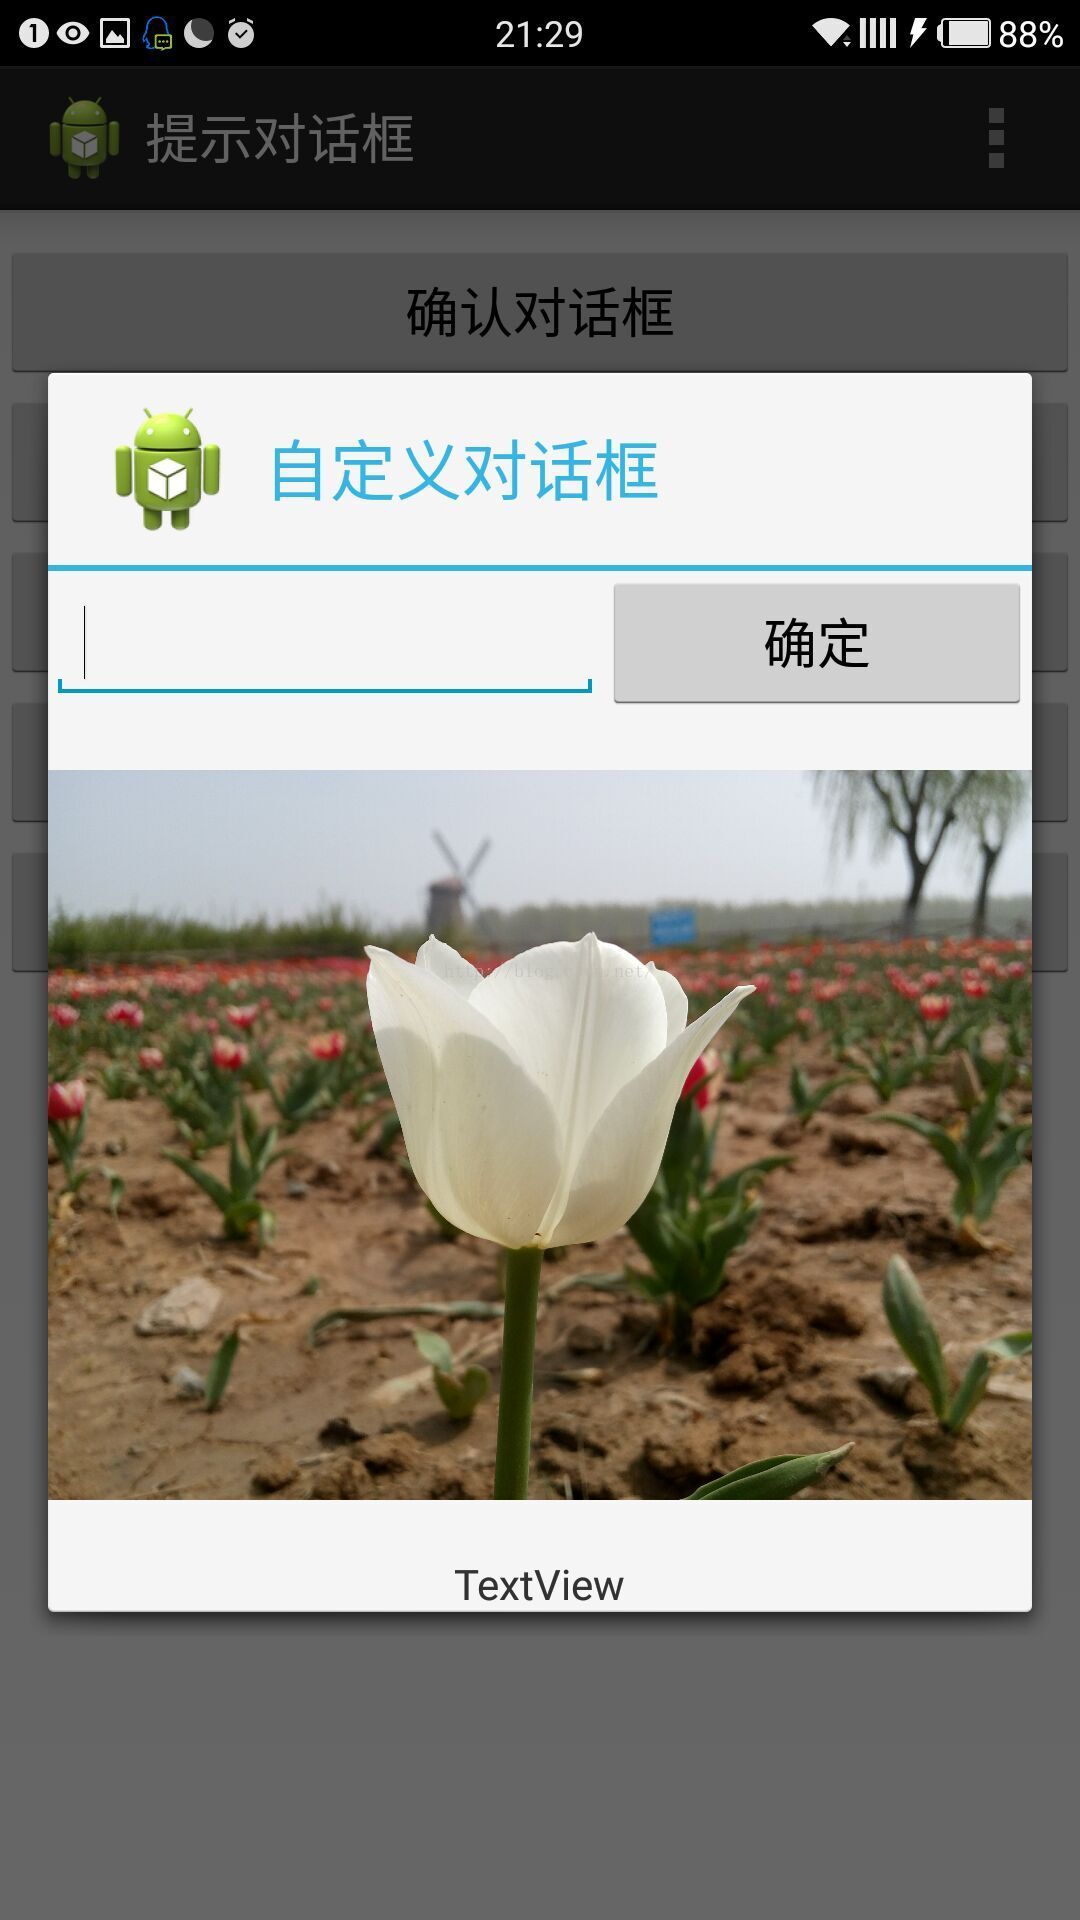
程序运行,显示图一的几个按钮,点击按钮分别显示图二到图六的对话框,点击对话框的某一项或者按钮,也会显示相应的吐司输出。
1.activity_main.xml页面存放五个按钮。
activity_main.xml页面:
<RelativeLayout xmlns:android="http://schemas.android.com/apk/res/android"
xmlns:tools="http://schemas.android.com/tools"
android:layout_width="match_parent"
android:layout_height="match_parent"
tools:context=".MainActivity" >
<Button
android:id="@+id/btnSure"
android:layout_width="match_parent"
android:layout_height="wrap_content"
android:layout_marginTop="10dp"
android:text="确认对话框"/>
<Button
android:id="@+id/btnRadio"
android:layout_width="match_parent"
android:layout_height="wrap_content"
android:layout_marginTop="60dp"
android:text="单选对话框"/>
<Button
android:id="@+id/btnCheck"
android:layout_width="match_parent"
android:layout_height="wrap_content"
android:layout_marginTop="110dp"
android:text="多选对话框"/>
<Button
android:id="@+id/btnList"
android:layout_width="match_parent"
android:layout_height="wrap_content"
android:layout_marginTop="160dp"
android:text="列表对话框"/>
<Button
android:id="@+id/btnMy"
android:layout_width="match_parent"
android:layout_height="wrap_content"
android:layout_marginTop="210dp"
android:text="自定义对话框"/>
</RelativeLayout>
2.新建dialog.xml页面,作为最后一个自定义对话框的布局页面。
dialog.xml页面:
<?xml version="1.0" encoding="utf-8"?>
<LinearLayout xmlns:android="http://schemas.android.com/apk/res/android"
android:layout_width="wrap_content"
android:layout_height="wrap_content"
android:orientation="vertical" >
<LinearLayout
android:layout_width="match_parent"
android:layout_height="wrap_content"
android:orientation="horizontal" >
<EditText
android:id="@+id/edInput"
android:layout_width="wrap_content"
android:layout_height="wrap_content"
android:layout_weight="2" >
<requestFocus />
</EditText>
<Button
android:id="@+id/btnOk"
android:layout_width="wrap_content"
android:layout_height="wrap_content"
android:layout_weight="1"
android:text="确定" />
</LinearLayout>
<ImageView
android:id="@+id/ivPicture"
android:layout_width="wrap_content"
android:layout_height="280dp"
android:src="@drawable/white" />
<TextView
android:id="@+id/textView1"
android:layout_gravity="center"
android:layout_width="wrap_content"
android:layout_height="wrap_content"
android:text="TextView" />
</LinearLayout>
3.MainActivity.java页面处理对话框的弹出及点击事件。
MainActivity.java页面:
package com.example.alertdialog;
import android.os.Bundle;
import android.app.Activity;
import android.app.AlertDialog;
import android.content.DialogInterface;
import android.view.LayoutInflater;
import android.view.Menu;
import android.view.View;
import android.view.View.OnClickListener;
import android.widget.Button;
import android.widget.Toast;
public class MainActivity extends Activity implements OnClickListener {
private Button btnSure,btnRadio,btnCheck,btnList,btnMy;
private String[] sexList={"男","女"};//单选列表
private String[] likeList={"篮球","足球","打游戏","听音乐","看电影"};//多选列表
private String[] itemList={"项目经理","策划","测试","美工","程序员"};//列表
@Override
protected void onCreate(Bundle savedInstanceState) {
super.onCreate(savedInstanceState);
setContentView(R.layout.activity_main);
getId();//获取控件id
click();//按钮绑定点击事件
}
/*获取控件id*/
private void getId() {
btnSure = (Button) findViewById(R.id.btnSure);
btnRadio=(Button) findViewById(R.id.btnRadio);
btnCheck=(Button) findViewById(R.id.btnCheck);
btnList=(Button) findViewById(R.id.btnList);
btnMy=(Button) findViewById(R.id.btnMy);
}
/*按钮绑定点击事件*/
private void click() {
btnSure.setOnClickListener(this);
btnRadio.setOnClickListener(this);
btnCheck.setOnClickListener(this);
btnList.setOnClickListener(this);
btnMy.setOnClickListener(this);
}
@Override
public boolean onCreateOptionsMenu(Menu menu) {
getMenuInflater().inflate(R.menu.main, menu);
return true;
}
@Override
public void onClick(View view) {
switch (view.getId()) {
case R.id.btnSure:
showDialog1();//确认对话框
break;
case R.id.btnRadio:
showDialog2();//单选对话框
break;
case R.id.btnCheck:
showDialog3();//多选对话框
break;
case R.id.btnList:
showDialog4();
break;
case R.id.btnMy:
showDialog5();
break;
}
}
/*确认对话框*/
private void showDialog1() {
AlertDialog.Builder builder=new AlertDialog.Builder(this);
builder.setTitle("确认对话框");//设置标题
builder.setIcon(R.drawable.ic_launcher);//设置图标
builder.setMessage("确认对话框提示内容");//设置内容
/*添加对话框中确定按钮和点击事件*/
builder.setPositiveButton("确定",new DialogInterface.OnClickListener() {
@Override
public void onClick(DialogInterface arg0, int arg1) {
Toast.makeText(MainActivity.this,"点击了确定按钮",Toast.LENGTH_SHORT).show();
}
});
/*添加对话框中取消按钮和点击事件*/
builder.setNegativeButton("取消",new DialogInterface.OnClickListener() {
@Override
public void onClick(DialogInterface arg0, int arg1) {
Toast.makeText(MainActivity.this,"点击了取消按钮",Toast.LENGTH_SHORT).show();
}
});
AlertDialog dialog=builder.create();//获取dialog
dialog.show();//显示对话框
}
/*单选对话框*/
private void showDialog2() {
AlertDialog.Builder builder=new AlertDialog.Builder(this);
builder.setTitle("性别");//设置标题
builder.setIcon(R.drawable.ic_launcher);//设置图标
/*参数一位单选列表文字,参数二为默认第几个选中(-1默认不选中),参数三是创建监听器*/
builder.setSingleChoiceItems(sexList,-1,new DialogInterface.OnClickListener() {
@Override
public void onClick(DialogInterface dialog, int which) {
String sex=sexList[which];
Toast.makeText(MainActivity.this,"这个人性别为"+sex, Toast.LENGTH_SHORT).show();
}
});
/*添加对话框中取消按钮点击事件*/
builder.setNegativeButton("取消",new DialogInterface.OnClickListener() {
@Override
public void onClick(DialogInterface dialog, int which) {
dialog.dismiss();//关闭对话框
}
});
AlertDialog dialog=builder.create();//获取dialog
dialog.show();//显示对话框
}
/*多选对话框*/
private void showDialog3() {
AlertDialog.Builder builder=new AlertDialog.Builder(this);
builder.setTitle("爱好");//设置标题
builder.setIcon(R.drawable.ic_launcher);//设置图标
/*参数同单选对话框一样,另外第二个参数默认不选中为null,而不是-1*/
builder.setMultiChoiceItems(likeList,null,new DialogInterface.OnMultiChoiceClickListener() {
@Override
public void onClick(DialogInterface dialog, int which, boolean isChecked) {
if(isChecked){
Toast.makeText(MainActivity.this,"我喜欢"+likeList[which],Toast.LENGTH_SHORT).show();
}else{
Toast.makeText(MainActivity.this,"我不喜欢"+likeList[which],Toast.LENGTH_SHORT).show();
}
}
});
/*添加对话框中取消按钮点击事件*/
builder.setNegativeButton("取消",new DialogInterface.OnClickListener() {
@Override
public void onClick(DialogInterface dialog, int which) {
dialog.dismiss();//关闭对话框
}
});
AlertDialog dialog=builder.create();//获取dialog
dialog.show();//显示对话框
}
/*列表对话框*/
private void showDialog4() {
AlertDialog.Builder builder=new AlertDialog.Builder(this);
builder.setTitle("部门列表");//设置标题
builder.setIcon(R.drawable.ic_launcher);//设置图标
builder.setItems(itemList,new DialogInterface.OnClickListener() {
@Override
public void onClick(DialogInterface dialog, int which) {
Toast.makeText(MainActivity.this,"我点击了"+itemList[which],Toast.LENGTH_SHORT).show();
}
});
AlertDialog dialog=builder.create();//获取dialog
dialog.show();//显示对话框
}
/*自定义对话框*/
private void showDialog5() {
LayoutInflater inflater=LayoutInflater.from(this);
View view=inflater.inflate(R.layout.dialog,null);//获取自定义布局
AlertDialog.Builder builder=new AlertDialog.Builder(this);
builder.setTitle("自定义对话框");//设置标题
builder.setIcon(R.drawable.ic_launcher);//设置图标
builder.setView(view);//设置自定义样式布局到对话框
AlertDialog dialog=builder.create();//获取dialog
dialog.show();//显示对话框
}
}
4.运行就出现目标效果了。
关于Android中AlertDialog各种对话框的用法就给大家介绍这么多,希望对大家有所帮助!
赞 (0)

