iOS实现新年抽奖转盘效果的思路
临近春节,相信不少app都会加一个新的需求——新年抽奖
不多废话,先上GIF效果图
DEMO链接
1. 跑马灯效果

2. 抽奖效果

实现步骤:
一、跑马灯效果
其实很简单,就是通过以下两张图片,用NSTimer无限替换,达到跑马灯的效果


实现代码:
_rotaryTable = [[UIImageView alloc] initWithFrame:CGRectMake((kScreenWidth-366*XT)/2, 218*XT, 366*XT, 318*XT)];
_rotaryTable.tag = 100;
[_rotaryTable setImage:[UIImage imageNamed:@"bg_lamp_1"]];
[scrollView addSubview:_rotaryTable];

_itemBordeTImer = [NSTimer scheduledTimerWithTimeInterval:0.5 target:self selector:@selector(itemBordeTImerEvent) userInfo:nil repeats:YES];
[[NSRunLoop currentRunLoop] addTimer:_itemBordeTImer forMode:NSRunLoopCommonModes];
- (void)itemBordeTImerEvent
{
 if (_rotaryTable.tag == 100) {
 _rotaryTable.tag = 101;
 [_rotaryTable setImage:[UIImage imageNamed:@"bg_lamp_2"]];
 }else if (_rotaryTable.tag == 101){
 _rotaryTable.tag = 100;
 [_rotaryTable setImage:[UIImage imageNamed:@"bg_lamp_1"]];
 }
}
二、抽奖效果
1.初始化奖品数组,以及按照 从上到下,从左到右 的顺序布局UI界面
_itemTitleArray = @[@"3跳币",@"嘉年华门票",@"8跳币",@"10朵花",@"128朵花",@"2018跳币",@"528跳币",@"128跳币",@"28朵花",@"88跳币"];
for (int i = 0 ; i < 4; i ++) {
 UIImageView *img = [[UIImageView alloc] initWithFrame:CGRectMake(i*82*XT, 0, 78*XT, 80*XT)];
 [img setImage:[UIImage imageNamed:itemImgArray[i]]];
 [itemView addSubview:img];

 UILabel *label = [[UILabel alloc] initWithFrame:CGRectMake(0, 63*XT, 78*XT, 13*XT)];
 label.textAlignment = NSTextAlignmentCenter;
 label.textColor = [UIColor whiteColor];
 label.font = [UIFont systemFontOfSize:13*XT];
 label.text = _itemTitleArray[I];
 [img addSubview:label];
 }

 for (int i = 0 ; i < 2; i ++) {
 UIImageView *img = [[UIImageView alloc] initWithFrame:CGRectMake(i*(78*XT+169*XT), 84*XT, 78*XT, 80*XT)];
 [img setImage:[UIImage imageNamed:itemImgArray[i+4]]];
 [itemView addSubview:img];

 UILabel *label = [[UILabel alloc] initWithFrame:CGRectMake(0, 63*XT, 78*XT, 13*XT)];
 label.textAlignment = NSTextAlignmentCenter;
 label.textColor = [UIColor whiteColor];
 label.font = [UIFont systemFontOfSize:13*XT];
 label.text = _itemTitleArray[i+4];
 [img addSubview:label];
 }

 for (int i = 0 ; i < 4; i ++) {
 UIImageView *img = [[UIImageView alloc] initWithFrame:CGRectMake(i*82*XT, 168*XT, 78*XT, 80*XT)];
 [img setImage:[UIImage imageNamed:itemImgArray[i+6]]];
 [itemView addSubview:img];

 UILabel *label = [[UILabel alloc] initWithFrame:CGRectMake(0, 63*XT, 78*XT, 13*XT)];
 label.textAlignment = NSTextAlignmentCenter;
 label.textColor = [UIColor whiteColor];
 label.font = [UIFont systemFontOfSize:13*XT];
 label.text = _itemTitleArray[i+6];
 [img addSubview:label];
 }
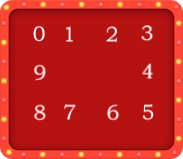
2.点击之后开始抽奖按钮后,先快速地将选中框 正时针 转三圈,再慢速地在 一圈之内 旋转至中奖位置,请 注意 是按照 正时针 的顺序旋转,和UI布局的顺序不一致,如图所示:

- (void)getLotteryInfo
{
 // 快速旋转计数,在NSTimer的方法下自增到29时结束,代表选中框快速旋转了三圈,结束快速旋转
 _fastIndex = 0;

 // 慢速旋转计数,在NSTimer的方法下自增到下面 _selectedIndex 的数字时,选中框到达中奖位置,结束慢速旋转
 _slowIndex = -1;

 // 中奖位置计数,按照顺时针的顺序,如上图所示,若 _selectedIndex = 9 则获得 9 所在位置的奖品
 _selectedIndex = arc4random()%10;

 // 根据奖品数组,获取中奖信息
 if (_selectedIndex<4) {
 _result = _itemTitleArray[_selectedIndex];
 }else if (_selectedIndex == 4){
 _result = @"2018跳币";
 }else if (_selectedIndex == 5){
 _result = @"88跳币";
 }else if (_selectedIndex == 6){
 _result = @"28朵花";
 }else if (_selectedIndex == 7){
 _result = @"128跳币";
 }else if (_selectedIndex == 8){
 _result = @"528跳币";
 }else if (_selectedIndex == 9){
 _result = @"128朵花";
 }
 _itemBorderView.hidden = NO;

 // 开启快速旋转,时间间隔为0.1秒
 _fastTimer = [NSTimer scheduledTimerWithTimeInterval:0.1 target:self selector:@selector(fastTimerEvent) userInfo:nil repeats:YES];
 [[NSRunLoop currentRunLoop] addTimer:_fastTimer forMode:NSRunLoopCommonModes];
}
3.NSTimer 快速旋转事件
- (void)fastTimerEvent
{
 // _fastIndex 自增
 _fastIndex = _fastIndex + 1;

 // 顺时针移动选中框的位置
 if (_fastIndex % 10 == 0) {
 [_itemBorderView setFrame:CGRectMake(-1*XT, -1*XT, 80*XT, 82*XT)];
 }else if (_fastIndex % 10 == 1){
 [_itemBorderView setFrame:CGRectMake(82*XT-1*XT, -1*XT, 80*XT, 82*XT)];
 }else if (_fastIndex % 10 == 2){
 [_itemBorderView setFrame:CGRectMake(2*82*XT-1*XT, -1*XT, 80*XT, 82*XT)];
 }else if (_fastIndex % 10 == 3){
 [_itemBorderView setFrame:CGRectMake(3*82*XT-1*XT, -1*XT, 80*XT, 82*XT)];
 }else if (_fastIndex % 10 == 4){
 [_itemBorderView setFrame:CGRectMake(3*82*XT-1*XT, 84*XT-1*XT, 80*XT, 82*XT)];
 }else if (_fastIndex % 10 == 5){
 [_itemBorderView setFrame:CGRectMake(3*82*XT-1*XT, 2*84*XT-1*XT, 80*XT, 82*XT)];
 }else if (_fastIndex % 10 == 6){
 [_itemBorderView setFrame:CGRectMake(2*82*XT-1*XT, 2*84*XT-1*XT, 80*XT, 82*XT)];
 }else if (_fastIndex % 10 == 7){
 [_itemBorderView setFrame:CGRectMake(82*XT-1*XT, 2*84*XT-1*XT, 80*XT, 82*XT)];
 }else if (_fastIndex % 10 == 8){
 [_itemBorderView setFrame:CGRectMake(-1*XT, 2*84*XT-1*XT, 80*XT, 82*XT)];
 }else if (_fastIndex % 10 == 9){
 [_itemBorderView setFrame:CGRectMake(-1*XT, 84*XT-1*XT, 80*XT, 82*XT)];
 }

 // _fastIndex = 29 时选中框结束快速旋转,开启慢速旋转,时间间隔为0.45秒
 if (_fastIndex >= 29) {
 [_fastTimer invalidate];
 _slowTimer = [NSTimer scheduledTimerWithTimeInterval:0.45 target:self selector:@selector(slowTimerEvent) userInfo:nil repeats:YES];
 [[NSRunLoop currentRunLoop] addTimer:_slowTimer forMode:NSRunLoopCommonModes];
 }
}
4.NSTimer 慢速旋转事件
// 慢速移动动画
- (void)slowTimerEvent
{
 // _slowIndex 自增
 _slowIndex = _slowIndex + 1;

 // 顺时针移动转中框的位置
 if (_slowIndex % 10 == 0) {
 [_itemBorderView setFrame:CGRectMake(-1*XT, -1*XT, 80*XT, 82*XT)];
 }else if (_slowIndex % 10 == 1){
 [_itemBorderView setFrame:CGRectMake(82*XT-1*XT, -1*XT, 80*XT, 82*XT)];
 }else if (_slowIndex % 10 == 2){
 [_itemBorderView setFrame:CGRectMake(2*82*XT-1*XT, -1*XT, 80*XT, 82*XT)];
 }else if (_slowIndex % 10 == 3){
 [_itemBorderView setFrame:CGRectMake(3*82*XT-1*XT, -1*XT, 80*XT, 82*XT)];
 }else if (_slowIndex % 10 == 4){
 [_itemBorderView setFrame:CGRectMake(3*82*XT-1*XT, 84*XT-1*XT, 80*XT, 82*XT)];
 }else if (_slowIndex % 10 == 5){
 [_itemBorderView setFrame:CGRectMake(3*82*XT-1*XT, 2*84*XT-1*XT, 80*XT, 82*XT)];
 }else if (_slowIndex % 10 == 6){
 [_itemBorderView setFrame:CGRectMake(2*82*XT-1*XT, 2*84*XT-1*XT, 80*XT, 82*XT)];
 }else if (_slowIndex % 10 == 7){
 [_itemBorderView setFrame:CGRectMake(82*XT-1*XT, 2*84*XT-1*XT, 80*XT, 82*XT)];
 }else if (_slowIndex % 10 == 8){
 [_itemBorderView setFrame:CGRectMake(-1*XT, 2*84*XT-1*XT, 80*XT, 82*XT)];
 }else if (_slowIndex % 10 == 9){
 [_itemBorderView setFrame:CGRectMake(-1*XT, 84*XT-1*XT, 80*XT, 82*XT)];
 }

 // 当 _slowIndex >= _selectedIndex 时选中框结束慢速旋转,开启中奖奖品界面
 if (_slowIndex >= _selectedIndex) {
 [_slowTimer invalidate];

 dispatch_time_t delayTime = dispatch_time(DISPATCH_TIME_NOW, (int64_t)(1.5/*延迟执行时间*/ * NSEC_PER_SEC));
 dispatch_after(delayTime, dispatch_get_main_queue(), ^{
  self.startButton.userInteractionEnabled = YES;
  [self showLotteryRlesultView];
 });
 }
}
以上就是本文的全部内容,希望对大家的学习有所帮助,也希望大家多多支持我们。
赞 (0)

