使用springboot aop来实现读写分离和事物配置
什么事读写分离
读写分离,基本的原理是让主数据库处理事务性增、改、删操作(INSERT、UPDATE、DELETE),而从数据库处理SELECT查询操作。数据库复制被用来把事务性操作导致的变更同步到集群中的从数据库。
为什么要实现读写分离
增加冗余
增加了机器的处理能力
对于读操作为主的应用,使用读写分离是最好的场景,因为可以确保写的服务器压力更小,而读又可以接受点时间上的延迟。
实现
本文介绍利用spring aop来动态切换数据源来实现读写分离。
先建一个maven项目,导入springBoot依赖。
<parent>
 <groupId>org.springframework.boot</groupId>
 <artifactId>spring-boot-starter-parent</artifactId>
 <version>1.5.2.RELEASE</version>
</parent>

<dependencies>
 <dependency>
  <groupId>org.springframework.boot</groupId>
  <artifactId>spring-boot-starter-web</artifactId>
 </dependency>

 <dependency>
  <groupId>org.springframework.boot</groupId>
  <artifactId>spring-boot-starter-aop</artifactId>
 </dependency>
 <!--mybatis-->
 <dependency>
  <groupId>org.mybatis.spring.boot</groupId>
  <artifactId>mybatis-spring-boot-starter</artifactId>
  <version>1.3.1</version>
 </dependency>
 <dependency>
  <groupId>org.springframework.boot</groupId>
  <artifactId>spring-boot-starter-jdbc</artifactId>
 </dependency>
 <!-- druid -->
 <dependency>
  <groupId>com.alibaba</groupId>
  <artifactId>druid</artifactId>
  <version>${druid.version}</version>
 </dependency>
 <!-- mysql connector-->
 <dependency>
  <groupId>mysql</groupId>
  <artifactId>mysql-connector-java</artifactId>
  <version>${mysql-connector.version}</version>
 </dependency>

 <!--test-->
 <dependency>
  <groupId>org.springframework.boot</groupId>
  <artifactId>spring-boot-starter-test</artifactId>
  <scope>test</scope>
 </dependency>

</dependencies>
然后在配置文件application.yml中自定义数据源配置项
server:
 port: 8080
logging:
 level:
 org.springframework: INFO
 com.qiang: DEBUG
spring:
 output:
 ansi:
  enabled: always
 datasource:
 type: com.alibaba.druid.pool.DruidDataSource
 driver-class-name: com.mysql.cj.jdbc.Driver
 url: jdbc:mysql://localhost:3306/db_area?characterEncoding=utf-8&serverTimezone=Asia/Shanghai
 username: root
 password: root
 db:
 readsize: 2
 read0:
  type: com.alibaba.druid.pool.DruidDataSource
  driver-class-name: com.mysql.cj.jdbc.Driver
  url: jdbc:mysql://localhost:3306/db_area?characterEncoding=utf-8&serverTimezone=Asia/Shanghai
  username: root
  password: root

 read1:
  type: com.alibaba.druid.pool.DruidDataSource
  driver-class-name: com.mysql.cj.jdbc.Driver
  url: jdbc:mysql://localhost:3306/db_area?characterEncoding=utf-8&serverTimezone=Asia/Shanghai
  username: root
  password: root
 aop:
 auto: true
 proxy-target-class: true
配置Druid
package com.qiang.config;

import org.slf4j.Logger;
import org.slf4j.LoggerFactory;
import org.springframework.boot.autoconfigure.jdbc.DataSourceBuilder;
import org.springframework.boot.context.properties.ConfigurationProperties;
import org.springframework.context.annotation.Bean;
import org.springframework.context.annotation.Configuration;
import org.springframework.context.annotation.Primary;

import javax.sql.DataSource;

/**
 * @author gengqiang
 * @date 2018/5/3
 */
@Configuration
public class DruidConfig {

 private Logger logger = LoggerFactory.getLogger(DruidConfig.class

 /**
  * 主据源
  * @return
  */
 @Primary
 @Bean(name = "dataSource")
 @ConfigurationProperties(prefix = "spring.datasource")
 public DataSource dataSource() {
  return DataSourceBuilder.create().type(com.alibaba.druid.pool.DruidDataSource.class).build();

 }

 /**
  * 从数据源1
  * @return
  */
 @Bean(name = "readDataSource0")
 @ConfigurationProperties(prefix = "spring.db.read0")
 public DataSource readDataSource0() {
  return DataSourceBuilder.create().type(com.alibaba.druid.pool.DruidDataSource.class).build();

 }
 /**
  * 从数据源2
  * @return
  */
 @Bean(name = "readDataSource1")
 @ConfigurationProperties(prefix = "spring.db.read1")
 public DataSource readDataSource1() {
  return DataSourceBuilder.create().type(com.alibaba.druid.pool.DruidDataSource.class).build();

 }

}
配置Mybaits
package com.qiang.config;

import com.qiang.config.db.DataSourceType;
import com.qiang.config.db.RoutingDataSource;
import org.mybatis.spring.SqlSessionFactoryBean;
import org.mybatis.spring.annotation.MapperScan;
import org.mybatis.spring.boot.autoconfigure.SpringBootVFS;
import org.springframework.beans.BeansException;
import org.springframework.beans.factory.annotation.Autowired;
import org.springframework.beans.factory.annotation.Value;
import org.springframework.boot.autoconfigure.condition.ConditionalOnMissingBean;
import org.springframework.context.ApplicationContext;
import org.springframework.context.ApplicationContextAware;
import org.springframework.context.annotation.Bean;
import org.springframework.context.annotation.Configuration;
import org.springframework.core.io.ClassPathResource;
import org.springframework.core.io.Resource;
import org.springframework.core.io.support.PathMatchingResourcePatternResolver;
import org.springframework.core.io.support.ResourcePatternResolver;
import org.springframework.jdbc.datasource.DataSourceTransactionManager;
import org.springframework.jdbc.datasource.lookup.AbstractRoutingDataSource;
import org.springframework.transaction.PlatformTransactionManager;
import org.springframework.transaction.annotation.EnableTransactionManagement;
import org.springframework.transaction.annotation.TransactionManagementConfigurer;

import javax.sql.DataSource;
import java.io.IOException;
import java.util.HashMap;
import java.util.Map;

/**
 * @author gengqiang
 * @date 2018/5/3
 */
@Configuration
@EnableTransactionManagement(order = 2)
@MapperScan(basePackages = {"com.qiang.demo.mapper"})
public class MybatisConfig implements TransactionManagementConfigurer, ApplicationContextAware {

 private static ApplicationContext context;

 /**
  * 写库数据源
  */
 @Autowired
 private DataSource dataSource;

 /**
  * 读数据源数量
  */
 @Value("${spring.db.readsize}")
 private Integer readsize;
 /**
  * 数据源路由代理
  *
  * @return
  */

 @Bean
 public AbstractRoutingDataSource routingDataSouceProxy() {
  RoutingDataSource proxy = new RoutingDataSource(readsize);
  Map<Object, Object> targetDataSources = new HashMap<>(readsize + 1);
  targetDataSources.put(DataSourceType.WRITE.getType(), dataSource);
  for (int i = 0; i < readsize; i++) {
   DataSource d = context.getBean("readDataSource" + i, DataSource.class);
   targetDataSources.put(i, d);
  }
  proxy.setDefaultTargetDataSource(dataSource);
  proxy.setTargetDataSources(targetDataSources);
  return proxy;
 }

 @Bean
 @ConditionalOnMissingBean
 public SqlSessionFactoryBean sqlSessionFactory() throws IOException {
  SqlSessionFactoryBean bean = new SqlSessionFactoryBean();
  bean.setDataSource(routingDataSouceProxy());
  bean.setVfs(SpringBootVFS.class);
  bean.setTypeAliasesPackage("com.qiang");
  Resource configResource = new ClassPathResource("/mybatis-config.xml");
  bean.setConfigLocation(configResource);
  ResourcePatternResolver mapperResource = new PathMatchingResourcePatternResolver();
  bean.setMapperLocations(mapperResource.getResources("classpath*:mapper/**/*.xml"));
  return bean;
 }

 @Override
 public PlatformTransactionManager annotationDrivenTransactionManager() {
  return new DataSourceTransactionManager(routingDataSouceProxy());
 }

 @Override
 public void setApplicationContext(ApplicationContext applicationContext) throws BeansException {
  if (context == null) {
   context = applicationContext;
  }
 }
}
其中实现数据源切换的功能就是自定义一个类扩展AbstractRoutingDataSource抽象类,就是代码中的定义的RoutingDataSource,其实该相当于数据源DataSourcer的路由中介,可以实现在项目运行时根据相应key值切换到对应的数据源DataSource上。
RoutingDataSource.class
package com.qiang.config.db;

import org.springframework.jdbc.datasource.lookup.AbstractRoutingDataSource;

import java.util.concurrent.atomic.AtomicInteger;

/**
 * 数据源路由
 *
 * @author gengqiang
 */
public class RoutingDataSource extends AbstractRoutingDataSource {

 private AtomicInteger count = new AtomicInteger(0);

 private int readsize;

 public RoutingDataSource(int readsize) {
  this.readsize = readsize;
 }

 @Override
 protected Object determineCurrentLookupKey() {
  String typeKey = DataSourceContextHolder.getJdbcType();
  if (typeKey == null) {
   logger.error("无法确定数据源");
  }
  if (typeKey.equals(DataSourceType.WRITE.getType())) {
   return DataSourceType.WRITE.getType();
  }
  //读库进行负载均衡
  int a = count.getAndAdd(1);
  int lookupkey = a % readsize;
  return lookupkey;
 }

}
其中用到了2个辅助类
package com.qiang.config.db;

import org.slf4j.Logger;
import org.slf4j.LoggerFactory;

/**
 * 全局数据源
 *
 * @author gengqiang
 */
public class DataSourceContextHolder {

 private static Logger logger = LoggerFactory.getLogger(DataSourceContextHolder.class);

 private final static ThreadLocal<String> local = new ThreadLocal<>();

 public static ThreadLocal<String> getLocal() {
  return local;
 }

 public static void read() {
  logger.debug("切换至[读]数据源");
  local.set(DataSourceType.READ.getType());
 }

 public static void write() {
  logger.debug("切换至[写]数据源");
  local.set(DataSourceType.WRITE.getType());
 }

 public static String getJdbcType() {
  return local.get();
 }

}
package com.qiang.config.db;

/**
 * @author gengqiang
 */
public enum DataSourceType {
 READ("read", "读库"), WRITE("write", "写库");
 private String type;
 private String name;

 DataSourceType(String type, String name) {
  this.type = type;
  this.name = name;
 }

 public String getType() {
  return type;
 }

 public void setType(String type) {
  this.type = type;
 }

 public String getName() {
  return name;
 }

 public void setName(String name) {
  this.name = name;
 }
}
最后通过aop设置切面,拦截读写来动态的设置数据源
package com.qiang.config.aop;

import com.qiang.config.db.DataSourceContextHolder;
import org.aspectj.lang.annotation.Aspect;
import org.aspectj.lang.annotation.Before;
import org.slf4j.Logger;
import org.slf4j.LoggerFactory;
import org.springframework.core.annotation.Order;
import org.springframework.stereotype.Component;

/**
 * 拦截数据库读写
 *
 * @author gengqiang
 */

@Aspect
@Component
@Order(1)
public class DataSourceAspect {

 Logger logger = LoggerFactory.getLogger(getClass());

 @Before("execution(* com.qiang..*.*ServiceImpl.find*(..)) " +
   "|| execution(* com.qiang..*.*ServiceImpl.count*(..))" +
   "|| execution(* com.qiang..*.*ServiceImpl.sel*(..))" +
   "|| execution(* com.qiang..*.*ServiceImpl.get*(..))"
 )
 public void setReadDataSourceType() {
  logger.debug("拦截[read]方法");
  DataSourceContextHolder.read();
 }

 @Before("execution(* com.qiang..*.*ServiceImpl.insert*(..)) " +
   "|| execution(* com.qiang..*.*ServiceImpl.save*(..))" +
   "|| execution(* com.qiang..*.*ServiceImpl.update*(..))" +
   "|| execution(* com.qiang..*.*ServiceImpl.set*(..))" +
   "|| execution(* com.qiang..*.*ServiceImpl.del*(..))")
 public void setWriteDataSourceType() {
  logger.debug("拦截[write]操作");
  DataSourceContextHolder.write();
 }

}
主要的代码就写好了,下面来测试一下是否读写分离。
写一个测试类:
package com.qiang;

import com.qiang.demo.entity.Area;
import com.qiang.demo.service.AreaService;
import org.junit.Test;
import org.junit.runner.RunWith;
import org.springframework.beans.factory.annotation.Autowired;
import org.springframework.boot.test.context.SpringBootTest;
import org.springframework.test.context.junit4.SpringRunner;

/**
 * @author gengqiang
 * @date 2018/5/4
 */

@RunWith(SpringRunner.class)
@SpringBootTest
public class TestApplication {

 @Autowired
 private AreaService areaService;

 @Test
 public void test() {
  Area area = new Area();
  area.setDistrictId("0000");
  area.setName("test");
  area.setParentId(0);
  area.setLevel(1);
  areaService.insert(area);
 }

 @Test
 public void test2() {
  areaService.selectByPrimaryKey(1);
 }
}
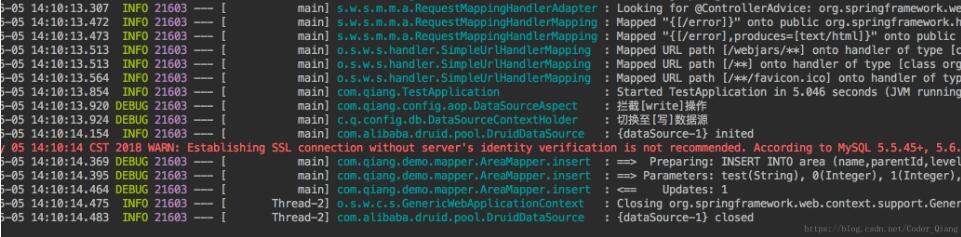
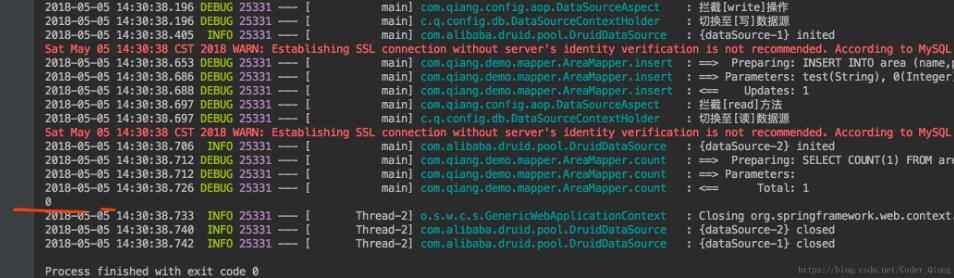
其中第一个测试插入数据,第二个测试查询。
第一测试结果:
第二个测结果:

从结果看出来第一个走的写数据源,就是主数据源,第二个的走读数据源,就是从数据源。
然后我们在测试一下事物,看遇到异常是否会滚。
测试:
 @Test
 public void contextLoads() throws Exception {
  try {
   areaService.insertBack();

  } catch (Exception e) {
//   e.printStackTrace();
  }
  System.out.println(areaService.count(new Area()));

 }
其中service:
@Override
@Transactional(rollbackFor = Exception.class)
public void insertBack() {
 Area area = new Area();
 area.setDistrictId("0000");
 area.setName("test");
 area.setParentId(0);
 area.setLevel(1);
 mapper.insert(area);
 throw new RuntimeException();
}
方法上加@Transactional,声明一个事物。
看一下运行结果,虽然运行插入的时候,sql是运行了,但最后查询的时候数量为0,说明会滚了。
配置事物

第一步需要加一个注解@EnableTransactionManagement,后面的参数是为了区分aop和事物执行的顺序。
然后在需要会滚的方法上加一个注解@Transactional。
以上这篇使用springboot aop来实现读写分离和事物配置就是小编分享给大家的全部内容了,希望能给大家一个参考,也希望大家多多支持我们。
相关推荐
-
springboot基于Mybatis mysql实现读写分离
近日工作任务较轻,有空学习学习技术,遂来研究如果实现读写分离.这里用博客记录下过程,一方面可备日后查看,同时也能分享给大家(网上的资料真的大都是抄来抄去,,还不带格式的,看的真心难受). 完整代码:https://github.com/FleyX/demo-project/tree/master/dxfl 1.背景 一个项目中数据库最基础同时也是最主流的是单机数据库,读写都在一个库中.当用户逐渐增多,单机数据库无法满足性能要求时,就会进行读写分离改造(适用于读多写少),写操作一个库,读操作多个库
-
SpringBoot整合MyCat实现读写分离的方法
MyCat一个彻底开源的,面向企业应用开发的大数据库集群.基于阿里开源的Cobar产品而研发.能满足数据库数据大量存储:提高了查询性能.文章介绍如何实现MyCat连接MySQL实现主从分离,并集成SpringBoot实现读写分离. MySQL配置主从关系 说明 192.168.0.105 Linux 数据库作为主master数据库 127.0.0.1 Window 作为从slave数据库 master主数据库配置 binlog是Mysql sever层维护的一种二进制日志,主要是用来记录对Mys
-
Spring Boot配置AOP打印日志的全过程
前言 在项目开发中,日志系统是必不可少的,用AOP在Web的请求做入参和出参的参数打印,同时对异常进行日志打印,避免重复的手写日志,完整案例见文末源码. 一.Spring AOP AOP(Aspect-Oriented Programming,面向切面编程),它利用一种"横切"的技术,将那些多个类的共同行为封装到一个可重用的模块.便于减少系统的重复代码,降低模块之间的耦合度,并有利于未来的可操作性和可维护性. AOP中有以下概念: Aspect(切面):声明类似于Java中的类声明,在
-
Springboot + Mysql8实现读写分离功能
在实际的生产环境中,为了确保数据库的稳定性,我们一般会给数据库配置双机热备机制,这样在master数据库崩溃后,slave数据库可以立即切换成主数据库,通过主从复制的方式将数据从主库同步至从库,在业务代码中编写代码实现读写分离(让主数据库处理 事务性增.改.删操作,而从数据库处理查询操作)来提升数据库的并发负载能力. 下面我们使用最新版本的Mysql数据库(8.0.16)结合SpringBoot实现这一完整步骤(一主一从). 安装配置mysql 从 https://dev.mysql.com/d
-
使用springboot aop来实现读写分离和事物配置
什么事读写分离 读写分离,基本的原理是让主数据库处理事务性增.改.删操作(INSERT.UPDATE.DELETE),而从数据库处理SELECT查询操作.数据库复制被用来把事务性操作导致的变更同步到集群中的从数据库. 为什么要实现读写分离 增加冗余 增加了机器的处理能力 对于读操作为主的应用,使用读写分离是最好的场景,因为可以确保写的服务器压力更小,而读又可以接受点时间上的延迟. 实现 本文介绍利用spring aop来动态切换数据源来实现读写分离. 先建一个maven项目,导入springBo
-

SpringBoot+Mybatis-Plus实现mysql读写分离方案的示例代码
1. 引入mybatis-plus相关包,pom.xml文件 2. 配置文件application.property增加多库配置 mysql 数据源配置 spring.datasource.primary.jdbc-url=jdbc:mysql://xx.xx.xx.xx:3306/portal?useUnicode=true&useJDBCCompliantTimezoneShift=true&useLegacyDatetimeCode=false&serverTimezone=
-
SpringBoot自定义注解使用读写分离Mysql数据库的实例教程
需求场景 为了防止代码中有的SQL慢查询,影响我们线上主数据库的性能.我们需要将sql查询操作切换到从库中进行.为了使用方便,将自定义注解的形式使用. mysql导入的依赖 <dependency> <groupId>mysql</groupId> <artifactId>mysql-connector-java</artifactId> <version>8.0.16</version> </dependency&
-
最新MySql8.27主从复制及SpringBoot项目中的读写分离实战教程
目录 最新MySql8.27主从复制以及SpringBoot项目中的读写分离实战 1.MySql主从复制 2.配置-主库Master 3.配置-从库Slave 3.主从复制测试 4.读写分离案例 4.1.Sharding-JDBC框架介绍 最新MySql8.27主从复制以及SpringBoot项目中的读写分离实战 1.MySql主从复制 MySQL主从复制是一个异步的复制过程,底层是基于MySQL1数据库自带的二进制日志功能.就是一台或多台MySQL数据库(slave,即从库)从另一台ySQL数
-
详解Spring AOP 实现主从读写分离
深刻讨论为什么要读写分离? 为了服务器承载更多的用户?提升了网站的响应速度?分摊数据库服务器的压力?就是为了双机热备又不想浪费备份服务器?上面这些回答,我认为都不是错误的,但也都不是完全正确的.「读写分离」并不是多么神奇的东西,也带不来多么大的性能提升,也许更多的作用的就是数据安全的备份吧. 从一个库到读写分离,从理论上对服务器压力来说是会带来一倍的性能提升,但你仔细思考一下,你的应用服务器真的很需要这一倍的提升么?那倒不如你去试着在服务器使用一下缓存系统,如 Memcached.Redis 这
-
mysql+spring+mybatis实现数据库读写分离的代码配置
场景:一个读数据源一个读写数据源. 原理:借助spring的[org.springframework.jdbc.datasource.lookup.AbstractRoutingDataSource]这个抽象类实现,看名字可以了解到是一个路由数据源的东西,这个类中有一个方法 /** * Determine the current lookup key. This will typically be * implemented to check a thread-bound transaction
-
SpringBoot+MyBatis+AOP实现读写分离的示例代码
目录 一. MySQL 读写分离 1.1.如何实现 MySQL 的读写分离? 1.2.MySQL 主从复制原理? 1.3.MySQL 主从同步延时问题(精华) 二.SpringBoot+AOP+MyBatis实现MySQL读写分离 2.1.AbstractRoutingDataSource 2.2.如何切换数据源 2.3.如何选择数据源 三 .代码实现 3.0.工程目录结构 3.1.引入Maven依赖 3.2.编写配置文件,配置主从数据源 3.3.Enum类,定义主库从库 3.4.ThreadL