C#创建控制Windows服务
需求
针对一种特殊的应用, 不需要显示GUI, 希望常驻在Windows服务当中,在必要的时候我们可以进行启动或开机启动。
这个时候我们就可以创建WindowsService 来实现。
创建WindowsService
下面演示了使用VisualStudio2019创建一个基于.NetFramework的Windows服务
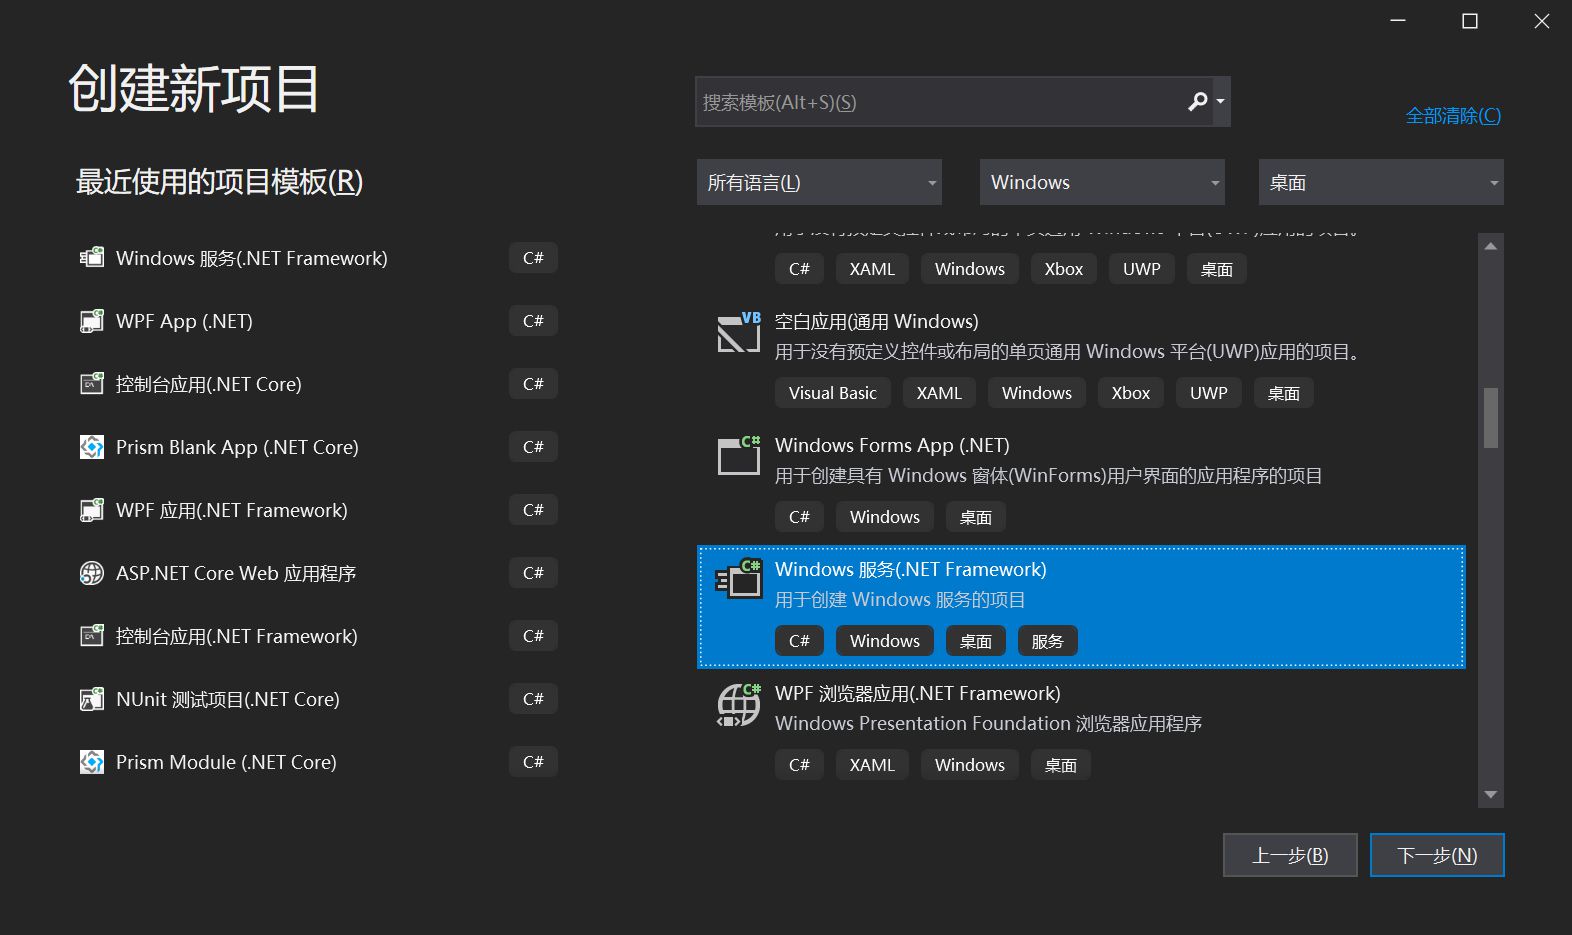
项目结构如下所示:
包含了一个启动项以及一个服务类

右键查看 Service1代码, 如下所示, 包含了重写OnStart方法以及OnStop方法:
     public partial class Service1 : ServiceBase
    {
        public Service1()
        {
            InitializeComponent();
        }

        protected override void OnStart(string[] args)
        {
        }

        protected override void OnStop()
        {
        }
    }
当服务被启动, 即启动OnStart方法内执行的代码, 而在ServiceBase当中, 同样提供了多种类型的方法被重写。

当我们写完了该服务的执行代码之后, 下一步我们要为其添加一个安装程序。
双击Service1.cs, 然后右键添加安装程序,如下所示:

此时, 项目结构当中新增了一个默认名:ProjectInstaller.cs类, 而对应的设计页面如下所示:
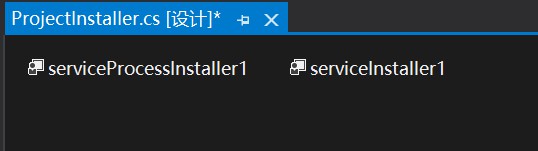
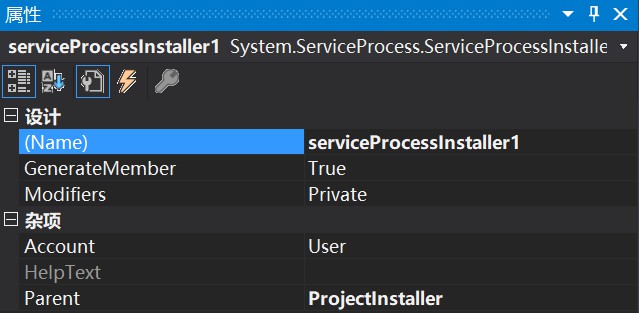
serviceProcessInstaller1:
查看该类的属性,如下所示:
说明:
Account: 默认设置为User, 当 Account 属性为时 User , Username 和 Password 属性用于定义用于运行服务应用程序的帐户。
Username和 Password 对允许服务在除系统帐户之外的其他帐户下运行。 例如,如果没有用户登录,则可以允许服务在重新启动时自动启动。 如果保留 Username 或 Password 为空,并且将设置 Account 为 User ,则在安装时系统将提示您输入有效的用户名和密码。
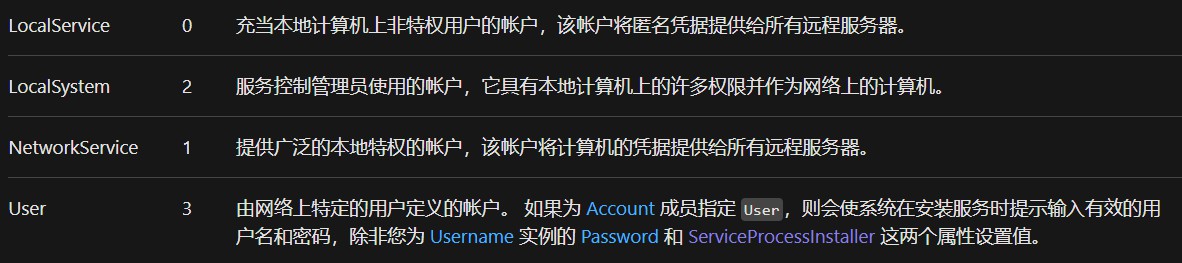
还可以指定服务在本地系统帐户下运行,或以本地或网络服务运行。 ServiceAccount有关帐户类型的详细信息,请参阅枚举:
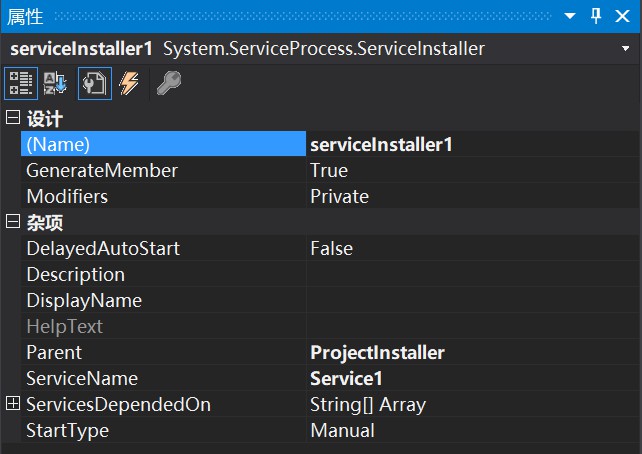
serviceInstaller1:
查看该类的属性,如下所示:
注: 该类扩展 ServiceBase 来实现服务。 在安装服务应用程序时由安装实用工具调用该类。
说明:
- DelayedAutoStart : 若要延迟该服务的自动启动,则为 true;否则为 false。 默认值为 false。
- Description : 服务的说明。 默认值为空字符串("")。
- DisplayName : 与服务关联的名称,常用于交互工具。
- ServiceName: 要安装的服务的名称。 该值必须在安装实用工具尝试安装服务以前进行设置。
- ServicesDependedOn : 在与该安装程序关联的服务运行以前必须运行的一组服务。
- StartType : 表示服务的启动方式。 默认值为 Manual,指定在计算机重新启动后服务将不会自动启动。
控制WindowsService
创建完成服务之后, 接下来就是针对服务进行控制, 现在,可以使用 ServiceController 类来连接和控制现有服务的行为。
ServiceController: 表示 Windows 服务并允许连接到正在运行或者已停止的服务、对其进行操作或获取有关它的信息。
通过ServiceController,我们可以获取本机的Service服务,以及启动、暂停、延续、挂起、关闭、刷新等动作, 如下所示:
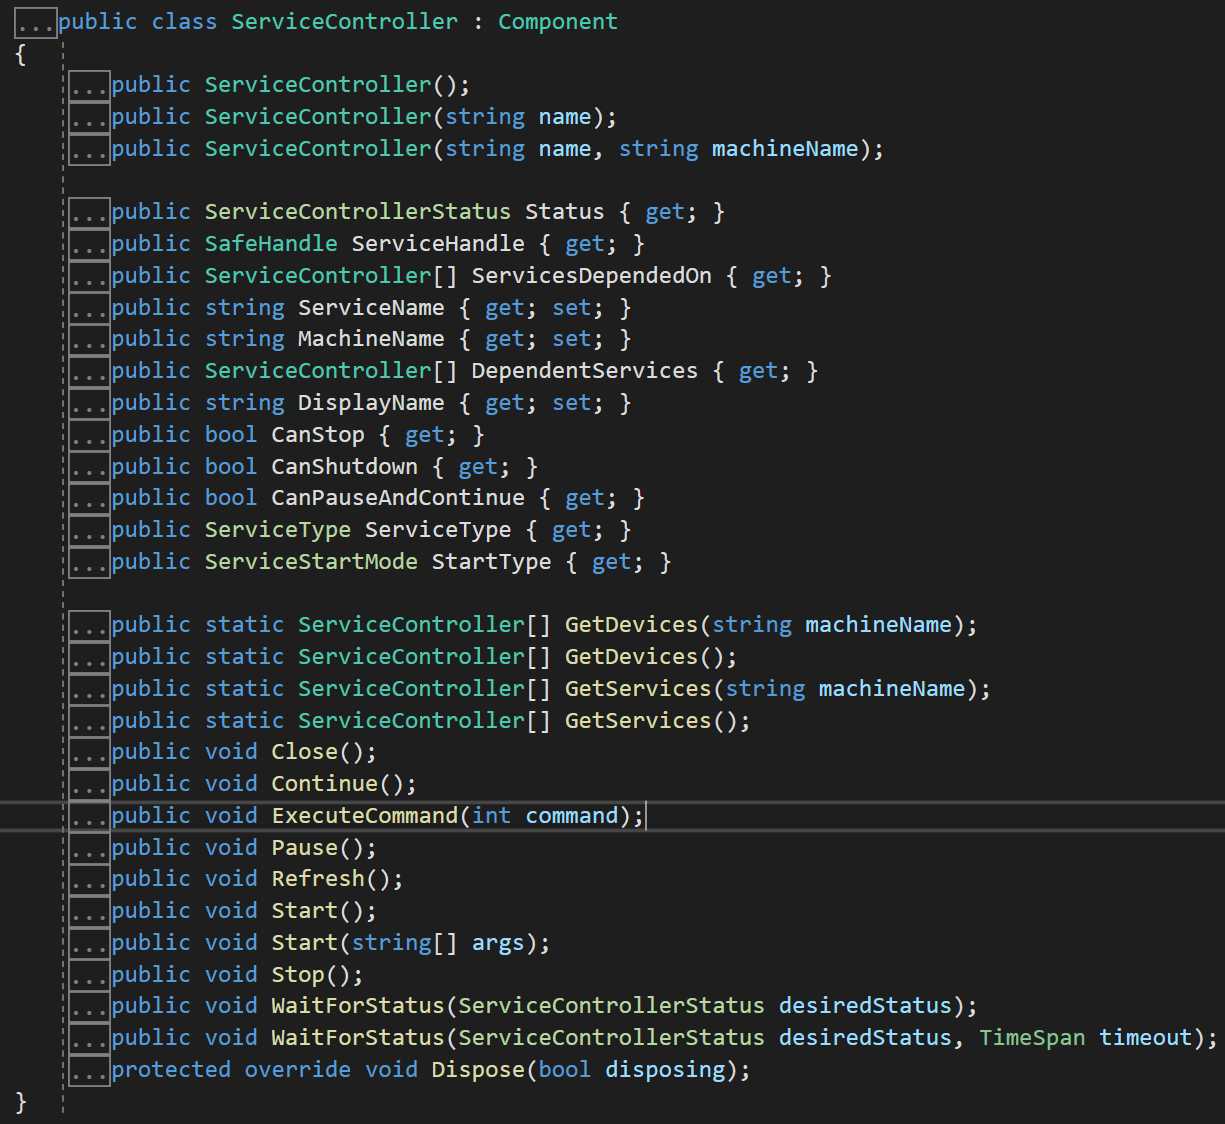
下面的示例演示如何使用 ServiceController 类来控制 Service1 服务示例。
using System;
using System.ServiceProcess;
using System.Diagnostics;
using System.Threading;

namespace ServiceControllerSample
{
    class Program
    {
        public enum SimpleServiceCustomCommands
        { StopWorker = 128, RestartWorker, CheckWorker };
        static void Main(string[] args)
        {
            ServiceController[] scServices;
            scServices = ServiceController.GetServices();

            foreach (ServiceController scTemp in scServices)
            {

                if (scTemp.ServiceName == "Service1")
                {
                    // Display properties for the Simple Service sample
                    // from the ServiceBase example.
                    ServiceController sc = new ServiceController("Simple Service");
                    Console.WriteLine("Status = " + sc.Status);
                    Console.WriteLine("Can Pause and Continue = " + sc.CanPauseAndContinue);
                    Console.WriteLine("Can ShutDown = " + sc.CanShutdown);
                    Console.WriteLine("Can Stop = " + sc.CanStop);
                    if (sc.Status == ServiceControllerStatus.Stopped)
                    {
                        sc.Start();
                        while (sc.Status == ServiceControllerStatus.Stopped)
                        {
                            Thread.Sleep(1000);
                            sc.Refresh();
                        }
                    }
                    // Issue custom commands to the service
                    // enum SimpleServiceCustomCommands
                    //    { StopWorker = 128, RestartWorker, CheckWorker };
                    sc.ExecuteCommand((int)SimpleServiceCustomCommands.StopWorker);
                    sc.ExecuteCommand((int)SimpleServiceCustomCommands.RestartWorker);
                    sc.Pause();
                    while (sc.Status != ServiceControllerStatus.Paused)
                    {
                        Thread.Sleep(1000);
                        sc.Refresh();
                    }
                    Console.WriteLine("Status = " + sc.Status);
                    sc.Continue();
                    while (sc.Status == ServiceControllerStatus.Paused)
                    {
                        Thread.Sleep(1000);
                        sc.Refresh();
                    }
                    Console.WriteLine("Status = " + sc.Status);
                    sc.Stop();
                    while (sc.Status != ServiceControllerStatus.Stopped)
                    {
                        Thread.Sleep(1000);
                        sc.Refresh();
                    }
                    Console.WriteLine("Status = " + sc.Status);
                    String[] argArray = new string[] { "ServiceController arg1", "ServiceController arg2" };
                    sc.Start(argArray);
                    while (sc.Status == ServiceControllerStatus.Stopped)
                    {
                        Thread.Sleep(1000);
                        sc.Refresh();
                    }
                    Console.WriteLine("Status = " + sc.Status);
                    // Display the event log entries for the custom commands
                    // and the start arguments.
                    EventLog el = new EventLog("Application");
                    EventLogEntryCollection elec = el.Entries;
                    foreach (EventLogEntry ele in elec)
                    {
                        if (ele.Source.IndexOf("Service1.OnCustomCommand") >= 0 |
                            ele.Source.IndexOf("Service1.Arguments") >= 0)
                            Console.WriteLine(ele.Message);
                    }
                }
            }
        }
    }
}
//This sample displays the following output if the Simple Service
//sample is running:
//Status = Running
//Can Pause and Continue = True
//Can ShutDown = True
//Can Stop = True
//Status = Paused
//Status = Running
//Status = Stopped
//Status = Running
//4:14:49 PM - Custom command received: 128
//4:14:49 PM - Custom command received: 129
//ServiceController arg1
//ServiceController arg2
安装WindowsService
能够控制我们创建的服务的前提是, 该服务已安装在我们调试的设备上, 我们可以通过AssemblyInstaller 类来进行安装。
安装示例
在下面的示例中, AssemblyInstaller 通过调用 AssemblyInstaller 构造函数来创建。 设置此对象的属性,并 Install Commit 调用和方法以安装 MyAssembly.exe 程序集。
using System;
using System.Configuration.Install;
using System.Collections;
using System.Collections.Specialized;

class AssemblyInstaller_Example
{
   static void Main()
   {
      IDictionary mySavedState = new Hashtable();

      Console.WriteLine( "" );

      try
      {
         // Set the commandline argument array for 'logfile'.
         string[] commandLineOptions = new string[ 1 ] {"/LogFile=example.log"};

         // Create an object of the 'AssemblyInstaller' class.
         AssemblyInstaller myAssemblyInstaller = new
                     AssemblyInstaller( "MyAssembly.exe" , commandLineOptions );

         myAssemblyInstaller.UseNewContext = true;

         // Install the 'MyAssembly' assembly.
         myAssemblyInstaller.Install( mySavedState );

         // Commit the 'MyAssembly' assembly.
         myAssemblyInstaller.Commit( mySavedState );
      }
      catch (Exception e)
      {
         Console.WriteLine( e.Message );
      }
   }
}
卸载示例
下面的示例演示的 Uninstall 方法 Installer 。 Uninstall方法在的派生类中被重写 Installer 。
// Override 'Uninstall' method of Installer class.
public override void Uninstall( IDictionary mySavedState )
{
   if (mySavedState == null)
   {
      Console.WriteLine("Uninstallation Error !");
   }
   else
   {
      base.Uninstall( mySavedState );
      Console.WriteLine( "The Uninstall method of 'MyInstallerSample' has been called" );
   }
}
到此这篇关于C#创建控制Windows服务的文章就介绍到这了。希望对大家的学习有所帮助,也希望大家多多支持我们。
相关推荐
-

使用C#创建Windows服务的实例代码
本文介绍了使用C#创建Windows服务的实例代码,分享给大家 一.开发环境 操作系统:Windows 10 X64 开发环境:VS2015 编程语言:C# .NET版本:.NET Framework 4.0 目标平台:X86 二.创建Windows Service 1.新建一个Windows Service,并将项目名称改为"MyWindowsService",如下图所示: 2.在解决方案资源管理器内将Service1.cs改为MyService1.cs后并点击"查看代码&
-
C#编写Windows服务实例代码
Microsoft Windows 服务(即,以前的 NT 服务)使您能够创建在它们自己的 Windows 会话中可长时间运行的可执行应用程序.这些服务可以在计算机启动时自动启动,可以暂停和重新启动而且不显示任何用户界面.这使服务非常适合在服务器上使用,或任何时候,为了不影响在同一台计算机上工作的其他用户,需要长时间运行功能时使用.还可以在不同于登录用户的特定用户帐户或默认计算机帐户的安全上下文中运行服务. 使用Microsoft Visual Studio2012可以很方便的创建一个Windo
-
c#创建windows服务入门教程实例
用c#中创建一个windows服务非常简单,与windows服务相关的类都在System.ServiceProcess命名空间下. 每个服务都需要继承自ServiceBase类,并重写相应的启动.暂停.停止等方法. windows服务的相关信息是存放与注册表中的,所以他可以在不需要用户登录的情况下自动运行,在c#中你不需要再直接向注册表中添加信息了,c#提供了服务安装类 ServiceProcessInstaller和ServiceInstaller来实现服务的安装. 首先,用vs创建一个win
-
C#创建Windows服务的实现方法
Microsoft Windows 服务能够创建在它们自己的 Windows 会话中可长时间运行的可执行应用程序.这些服务可以在计算机启动时自动启动,可以暂停和重新启动而且不显示任何用户界面.这使服务非常适合在服务器上使用,或任何时候,为了不影响在同一台计算机上工作的其他用户,需要长时间运行功能时使用.还可以在不同于登录用户的特定用户帐户或默认计算机帐户的安全上下文中运行服务. 一.创建Windows 服务 1.新建一个Windows 服务,并将项目名称改为"WindowsServiceDemo
-
C#实现操作windows系统服务(service)的方法
本文实例讲述了C#实现操作windows系统服务(service)的方法.分享给大家供大家参考.具体如下: 这段C#代码可以控制启动和停止系统服务 /// <summary> /// 停止服务 /// </summary> private bool StopService(string StopServiceName) { ServiceController service = new ServiceController(StopServiceName); try { servic
-
C#通过创建Windows服务启动程序的方法详解
本文实例讲述了C#通过创建Windows服务启动程序的方法.分享给大家供大家参考,具体如下: 1. 新建一个Windows服务应用程序 创建项目-->Visual C# 左侧的"+"-->Windows -->Windows 服务(右侧模板)-->输入名称,确定创建项目 2. 设置Windows服务的属性(Windows服务里没有窗体,所以点击左侧设计器里空白的地方即可在右侧属性栏里看到属性) 这里属性是控制服务器是否可以停止,暂停,继续等等的操作.根据需要选择
-
基于C#实现Windows服务状态启动和停止服务的方法
本文以实例形式展示了基于C#实现Windows服务状态启动和停止服务的方法.非常实用.分享给大家供大家参考之用.具体方法如下: 首先先引用: System.ServiceProcess.dll 然后在引用命名空间: using System.ServiceProcess; 建立服务对象: ServiceController sc = new ServiceController("Server"); 服务运行则停止服务: if (sc.Status.Equals(ServiceContr
-
c#创建windows服务(Windows Services)详细步骤
Windows服务在Visual Studio 以前的版本中叫NT服务,在VS.net启用了新的名称.用Visual C# 创建Windows服务不是一件困难的事,本文就将指导你一步一步创建一个Windows服务并使用它.这个服务在启动和停止时,向一个文本文件中写入一些文字信息. 第一步:创建服务框架 要创建一个新的 Windows 服务,可以从Visual C# 工程中选取 Windows 服务(Windows Service)选项,给工程一个新文件名,然后点击 确定.你可以看到,向导向工程文
-
C#版Windows服务安装卸载小工具
前言 在我们的工作中,经常遇到Windows服务的安装和卸载,在之前公司也普写过一个WinForm程序选择安装路径,这次再来个小巧灵活的控制台程序,不用再选择,只需放到需要安装服务的目录中运行就可以实现安装或卸载. 开发思路 1.由于系统的权限限制,在运行程序时需要以管理员身份运行 2.因为需要实现安装和卸载两个功能,在程序运行时提示本次操作是安装还是卸载 需要输入 1 或 2 3.接下来程序会查找当前目录中的可执行文件并过滤程序本身和有时我们复制进来的带有vhost的文件,并列出列表让操
-
C#对Windows服务组的启动与停止操作
Windows服务大家都不陌生,Windows服务组的概念,貌似MS并没有这个说法. 作为一名软件开发者,我们的机器上安装有各种开发工具,伴随着各种相关服务. Visual Studio可以不打开,SqlServer Management Studio可以不打开,但是SqlServer服务却默认开启了.下班后,我的计算机想用于生活.娱乐,不需要数据库服务这些东西,尤其是在安装了Oracle数据库后,我感觉机器吃力的很. 每次开机后去依次关闭服务,或者设置手动开启模式,每次工作使用时依次去开启服务
-
C#编写Windows服务程序详细步骤详解(图文)
一.创建一个Windows Service 1)创建Windows Service项目 2)对Service重命名 将Service1重命名为你服务名称,这里我们命名为ServiceTest. 二.创建服务安装程序 1)添加安装程序 之后我们可以看到上图,自动为我们创建了ProjectInstaller.cs以及2个安装的组件. 2)修改安装服务名 右键serviceInsraller1,选择属性,将ServiceName的值改为ServiceTest. 3)修改安装权限 右键servicePr
-
C#启动windows服务方法的相关问题分析
C#启动windows服务的方法都是什么呢?C#启动服务类型为Disabled的windows服务会遇到什么样的问题呢?那么本文就向你介绍C#启动windows服务的方法的相关内容. C#启动windows服务的方法是什么呢?来让我们开始吧: C#启动windows服务的由来:我们知道, 在C#代码中启动一个已经存在的windows服务,我们可以用这样的代码来完成: 复制代码 代码如下: //ACPI is an example of service name System.ServicePro