iOS的客户端菜单功能仿百度糯米/美团二级菜单
我刚好最近在开发一个商城项目,实现了一个简单的控件,就和大家一起分享一下。
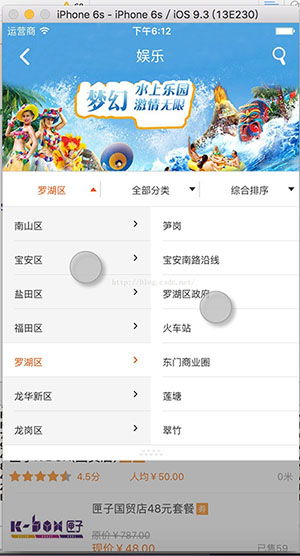
控件的效果就是类似百度糯米或者美团的二级菜单,我开发iOS的客户端菜单功能,直接参考了git一个项目,对应的UI效果:

其实效果看起来还不错。iOS开发完成以后,又要准备开发Android,发现对应网上的案例还是很少的,或者不是想要的效果。我想参考了别人的项目代码,也为开源项目做点贡献,准备自己开发一个Android的menu项目;
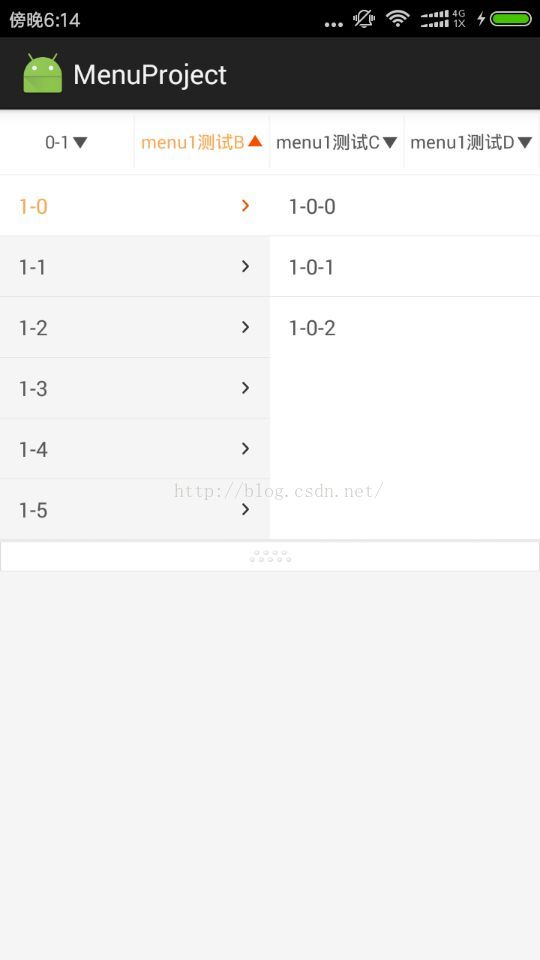
折腾了大概三个小时,终于搞定了,效果如下:

从图片不难看出,这是一个多级菜单,控制者填充数据源,所以实现的时候,尽量封装的使用,使用者最好是能两三行代码搞定。
具体实现思路:
1、MenuView,实现了第一级菜单的封装
①、view初始化和数据源定义;
②、绘制一级菜单;
③、控制子菜单的PopupWindow弹出框
代码具体如下:
package com.spring.sky.menuproject.view;
import android.content.Context;
import android.util.AttributeSet;
import android.view.Gravity;
import android.view.View;
import android.view.ViewGroup;
import android.widget.LinearLayout;
import android.widget.TextView;
import com.spring.sky.menuproject.AppInfoUtils;
import com.spring.sky.menuproject.R;
import java.util.List;
/**
* Created by springsky on 16/10/24.
*/
public class MenuView extends LinearLayout implements View.OnClickListener, MenuPopupWindow.OnMenuListener {
private String[] hintTexts;
public List[] dataSource;
public TextView[] textViews;
private int textColor = R.color.gray_80;
private int textColorSelected = R.color.orange;
private int textSize;
private int lineHeight ;
private MenuPopupWindow menuPopupWindow;
private OnMenuListener onMenuListener;
View lineView;
TextView lastTv;
private IndexPath[] indexPaths;
public MenuView(Context context) {
super(context);
init(context);
}
public MenuView(Context context, AttributeSet attrs) {
super(context, attrs);
init(context);
}
public MenuView(Context context, AttributeSet attrs, int defStyleAttr) {
super(context, attrs, defStyleAttr);
init(context);
}
public void setHintTexts(String[] hintTexts) {
this.hintTexts = hintTexts;
}
public void setDataSource(List[] dataSource) {
this.dataSource = dataSource;
reloadData();
}
/***
* 设置当前选中的数据
* @param indexPath
*/
public void setIndexPath(IndexPath indexPath) {
setIndexPath(indexPath, false);
}
/***
* 设置当前选中的内容
* @param indexPath
* @param actionMenu 是否通知监听器
*/
public void setIndexPath(IndexPath indexPath, boolean actionMenu) {
indexPaths[indexPath.column] = indexPath;
if (actionMenu) {
TextView lastTv = textViews[indexPath.column];
List<MenuModel> list = dataSource[indexPath.column];
if(list == null || indexPath.row >= list.size()){
return;
}
MenuModel left = list.get(indexPath.row);
MenuModel menuModel = null;
if (indexPath.item < 0) {
menuModel = left;
} else {
MenuModel right = left.chindMenu.get(indexPath.item);
menuModel = right;
}
lastTv.setText(menuModel.value);
if (onMenuListener != null) {
onMenuListener.onMenu(indexPath, menuModel);
}
}
}
public List[] getDataSource() {
return dataSource;
}
/***
* 初始化
* @param context
*/
private void init(Context context) {
menuPopupWindow = new MenuPopupWindow(context);
menuPopupWindow.setOnMenuListener(this);
AppInfoUtils.getViewHeight(this);
textSize = AppInfoUtils.spToPx(6);
lineHeight = AppInfoUtils.dipToPx(1);
}
/***
* 绘制一级菜单分类
*/
private void reloadData() {
removeAllViews();
if (dataSource == null || dataSource.length < 1) {
return;
}
int count = dataSource.length;
int height = getMeasuredHeight() - lineHeight;
setOrientation(LinearLayout.VERTICAL);
LinearLayout menuBaseView = new LinearLayout(getContext());
menuBaseView.setLayoutParams(new LayoutParams(LayoutParams.MATCH_PARENT, height));
menuBaseView.setWeightSum(count);
menuBaseView.setGravity(Gravity.CENTER);
menuBaseView.setOrientation(LinearLayout.HORIZONTAL);
indexPaths = new IndexPath[count];
textViews = new TextView[count];
for (int i = 0; i < count; i++) {
indexPaths[i] = new IndexPath(i, 0, -1);
LinearLayout tempBaseView = new LinearLayout(getContext());
tempBaseView.setLayoutParams(new LayoutParams(LayoutParams.MATCH_PARENT, height, 1));
tempBaseView.setGravity(Gravity.CENTER);
TextView tv = new TextView(getContext());
tv.setTextColor(getResources().getColor(textColor));
tv.setTextSize(textSize);
LinearLayout.LayoutParams params = new LayoutParams(LayoutParams.WRAP_CONTENT, LayoutParams.MATCH_PARENT);
tv.setGravity(Gravity.CENTER);
tv.setLayoutParams(params);
tv.setMaxLines(1);
tv.setCompoundDrawablesWithIntrinsicBounds(0, 0, R.mipmap.triangle_down, 0);
tv.setCompoundDrawablePadding(AppInfoUtils.dipToPx(2));
tv.setId(i);
tv.setOnClickListener(this);
textViews[i] = tv;
tempBaseView.addView(tv);
menuBaseView.addView(tempBaseView);
if (hintTexts != null && i < hintTexts.length) {
tv.setText(hintTexts[i]);
}
View lineView = new View(getContext());
lineView.setBackgroundColor(getResources().getColor(R.color.main_bg_in));
menuBaseView.addView(lineView, new LayoutParams(AppInfoUtils.dipToPx(1), height - AppInfoUtils.dipToPx(8)));
}
addView(menuBaseView);
lineView = new View(getContext());
lineView.setBackgroundColor(getResources().getColor(R.color.main_bg_in));
addView(lineView, new LayoutParams(ViewGroup.LayoutParams.MATCH_PARENT, lineHeight));
}
/***
* 一级菜单点击事件触发
* @param v
*/
@Override
public void onClick(View v) {
lastTv = (TextView) v;
int column = v.getId();
List<MenuModel> list = dataSource[column];
lastTv.setCompoundDrawablesWithIntrinsicBounds(0, 0, R.mipmap.triangle_up, 0);
lastTv.setTextColor(getResources().getColor(textColorSelected));
menuPopupWindow.setLeftList(column, list);
IndexPath indexPath = indexPaths[column];
menuPopupWindow.setSelect(indexPath.row, indexPath.item);
// int[] location = new int[2];
// lineView.getLocationOnScreen(location);
menuPopupWindow.showAsDropDown(lineView);
// menuPopupWindow.showAtLocation(this,Gravity.BOTTOM,0,0);
}
/***
* 弹出框点击事件处理
* @param column
* @param row
* @param item
* @param menuModel
*/
@Override
public void onMenu(int column, int row, int item, MenuModel menuModel) {
TextView lastTv = textViews[column];
lastTv.setText(menuModel.value);
IndexPath indexPath = indexPaths[column];
indexPath.row = row;
indexPath.item = item;
onMenuDismiss();
if (onMenuListener != null) {
onMenuListener.onMenu(indexPath, menuModel);
}
}
/***
* 弹出框关闭
*/
@Override
public void onMenuDismiss() {
lastTv.setTextColor(getResources().getColor(R.color.gray_80));
lastTv.setCompoundDrawablesWithIntrinsicBounds(0, 0, R.mipmap.triangle_down, 0);
}
/***
* 设置监听器
* @param onMenuListener
*/
public void setOnMenuListener(OnMenuListener onMenuListener) {
this.onMenuListener = onMenuListener;
}
public static interface OnMenuListener {
void onMenu(IndexPath indexPath, MenuModel menuModel);
}
/****
* 菜单列、行、二级子行
*/
public static class IndexPath {
public int column; //一级菜单
public int row; //left row
public int item; //right row
public IndexPath(int column, int row, int item) {
this.column = column;
this.row = row;
this.item = item;
}
}
}
2、PopupWIndow主要是实现了弹出框显示子列的一级和二级菜单的数据。
我使用了两个ListView来动态实现数据的加载。
具体代码如下:
package com.spring.sky.menuproject.view;
import android.content.Context;
import android.graphics.drawable.PaintDrawable;
import android.view.LayoutInflater;
import android.view.View;
import android.view.ViewGroup;
import android.view.animation.Animation;
import android.view.animation.AnimationUtils;
import android.widget.AdapterView;
import android.widget.LinearLayout;
import android.widget.ListView;
import android.widget.PopupWindow;
import com.spring.sky.menuproject.R;
import java.util.List;
/**
* Created by springsky on 16/10/20.
*/
public class MenuPopupWindow extends PopupWindow implements AdapterView.OnItemClickListener {
Context mContext;
private ListView leftLv,rightLv;
private OnMenuListener onMenuListener;
private List<MenuModel> leftList,rightList;
private MenuAdapter menuLeftAdapter,menuRightAdapter;
private int column;
boolean hasSecond;
/***
* 初始化
* @param context
*/
public MenuPopupWindow(Context context){
this.mContext = context;
View view = LayoutInflater.from(mContext).inflate(R.layout.menu_popup_window, null);
leftLv = (ListView) view.findViewById(R.id.leftLv);
leftLv.setChoiceMode(ListView.CHOICE_MODE_SINGLE);
rightLv = (ListView) view.findViewById(R.id.rightLv);
rightLv.setChoiceMode(ListView.CHOICE_MODE_SINGLE);
setContentView(view);
setBackgroundDrawable(new PaintDrawable());
setFocusable(true);
setWidth(ViewGroup.LayoutParams.MATCH_PARENT);
setHeight(LinearLayout.LayoutParams.WRAP_CONTENT);
setOnDismissListener(new PopupWindow.OnDismissListener() {
@Override
public void onDismiss() {
leftLv.setSelection(0);
rightLv.setSelection(0);
if( onMenuListener != null ){
onMenuListener.onMenuDismiss();
}
}
});
menuLeftAdapter = new MenuAdapter(mContext);
menuLeftAdapter.setColumn(0);
menuLeftAdapter.setList(leftList);
leftLv.setAdapter(menuLeftAdapter);
leftLv.setOnItemClickListener(this);
menuRightAdapter = new MenuAdapter(mContext);
menuRightAdapter.setColumn(1);
menuRightAdapter.setList(rightList);
rightLv.setAdapter(menuRightAdapter);
rightLv.setOnItemClickListener(this);
}
@Override
public void showAsDropDown(View anchor) {
super.showAsDropDown(anchor);
}
/***
* 加载数据
* @param column
* @param leftList
*/
public void setLeftList(int column,List<MenuModel> leftList) {
this.column = column;
this.leftList = leftList;
hasSecond = false;
for (MenuModel childModel : leftList){
if(childModel.hasChind()){
hasSecond = true;
break;
}
}
menuLeftAdapter.setList(leftList);
if(!hasSecond){
rightLv.setVisibility(View.GONE);
setRightList(null);
}else {
rightLv.setVisibility(View.VISIBLE);
}
}
/***
* 默认选中的一级和二级行
* @param row
* @param item
*/
public void setSelect(int row,int item){
if(row < 0 || leftList == null || row >= leftList.size()){
return;
}
MenuModel leftModel = leftList.get(row);
leftLv.setSelection(row);
menuLeftAdapter.setSelectPosition(row);
setRightList(leftModel.chindMenu);
if(item < 0 || rightList ==null || item >= rightList.size()){
return;
}
rightLv.setSelection(item);
menuRightAdapter.setSelectPosition(item);
}
private void setRightList(List<MenuModel> rightList) {
this.rightList = rightList;
menuRightAdapter.setList(rightList);
}
@Override
public void onItemClick(AdapterView<?> parent, View view, int position, long id) {
if(parent.getId() == leftLv.getId()){
MenuModel model = leftList.get(position);
if(leftLv.getSelectedItemPosition() == position){
return;
}
if(model.hasChind()){
menuLeftAdapter.setSelectPosition(position);
setRightList(model.chindMenu);
}else {
dismiss();
}
onMenuClick(position,0,model);
}else {
menuRightAdapter.setSelectPosition(position);
MenuModel model = rightList.get(position);
onMenuClick(menuLeftAdapter.getSelectPosition(),position,model);
dismiss();
}
}
void onMenuClick(int row,int item,MenuModel model){
if(onMenuListener != null){
onMenuListener.onMenu(column,row,item,model);
}
}
public void setOnMenuListener(OnMenuListener onMenuListener) {
this.onMenuListener = onMenuListener;
}
public static interface OnMenuListener{
void onMenu(int column, int row, int item, MenuModel menuModel);
void onMenuDismiss();
}
}
3、其他的就是MenuModel,考虑是多级层次关系,所以建议使用链结构。
package com.spring.sky.menuproject.view;
import java.util.List;
/**
* Created by springsky on 16/10/20.
*/
public class MenuModel {
public Object key; //key
public String value; //显示的内容
public List<MenuModel> chindMenu; //子列表数据
public MenuModel(){
super();
}
public MenuModel(Object key, String value, List<MenuModel> chindMenu){
super();
this.key = key;
this.value = value;
this.chindMenu = chindMenu;
}
/***
* 是否有子列表数据
* @return
*/
public boolean hasChind(){
return (chindMenu != null && chindMenu.size() > 0);
}
}
诶,生活压力大了,也不会写博客了,就简单描述一下,希望大家不要见怪。
项目的源码,我已经提交到git上了。
下载地址:https://github.com/skyfouk/AndroidMenuProject.git
以上所述是小编给大家介绍的iOS的客户端菜单功能仿百度糯米/美团二级菜单,希望对大家有所帮助,如果大家有任何疑问请给我留言,小编会及时回复大家的。在此也非常感谢大家对我们网站的支持!
赞 (0)

