ASP.NET Core集成微信登录
工具:
Visual Studio 2015 update 3
Asp.Net Core 1.0
1 准备工作
申请微信公众平台接口测试帐号,申请网址:(http://mp.weixin.qq.com/debug/cgi-bin/sandbox?t=sandbox/login)。申请接口测试号无需公众帐号,可以直接体验和测试公众平台所有高级接口。
1.1 配置接口信息

1.2 修改网页授权信息
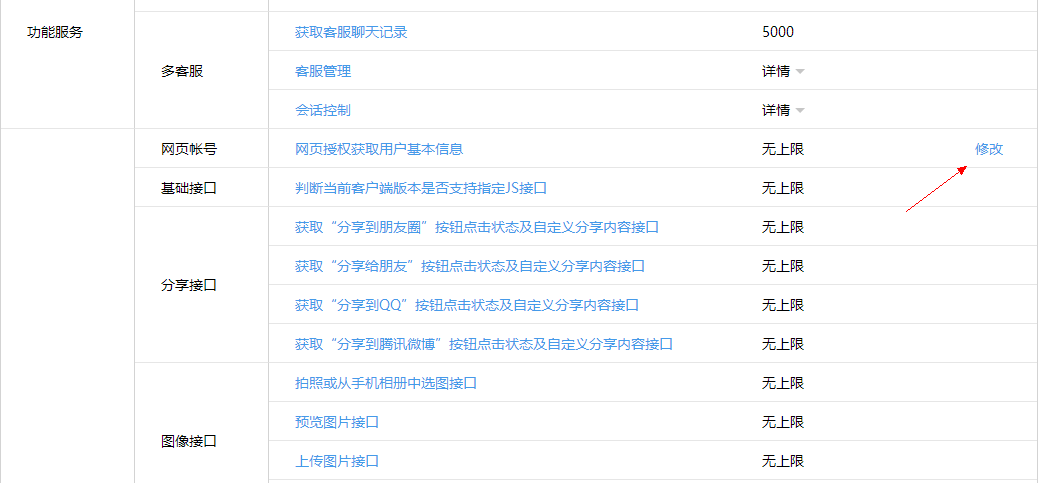
点击“修改”后在弹出页面填入你的网站域名:

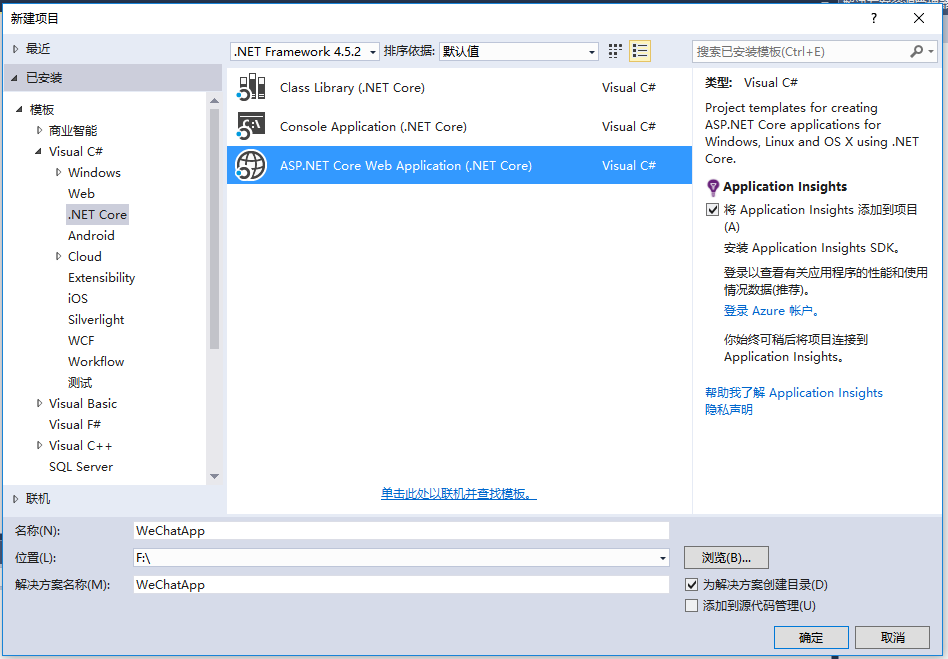
2 新建网站项目
2.1 选择ASP.NET Core Web Application 模板
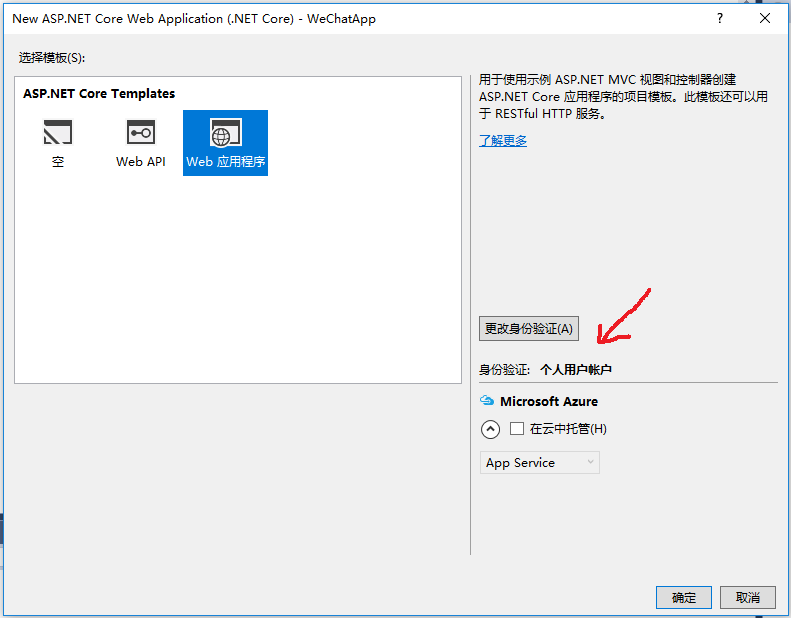
2.2 选择Web 应用程序,并更改身份验证为个人用户账户
3 集成微信登录功能
3.1添加引用
打开project.json文件,添加引用Microsoft.AspNetCore.Authentication.OAuth
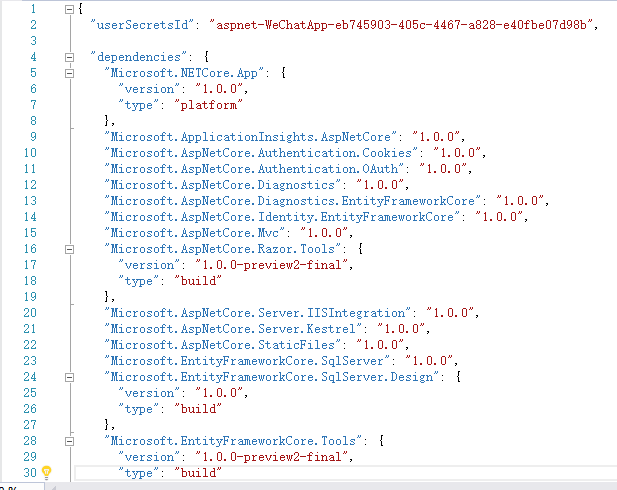
3.2 添加代码文件
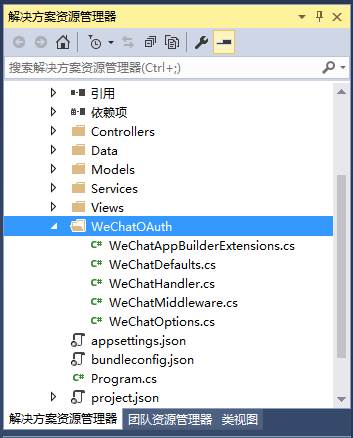
在项目中新建文件夹,命名为WeChatOAuth,并添加代码文件(本文最后附全部代码)。
3.3 注册微信登录中间件
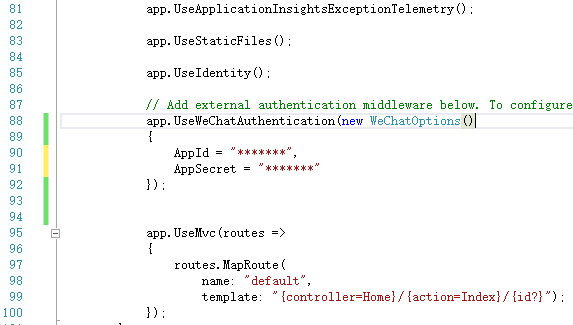
打开Startup.cs文件,在Configure中添加代码:
app.UseWeChatAuthentication(new WeChatOptions()
{

 AppId = "******",

 AppSecret = "******"

});
注意该代码的插入位置必须在app.UseIdentity()下方。
4 代码
WeChatAppBuilderExtensions.cs:
// Copyright (c) .NET Foundation. All rights reserved.
// Licensed under the Apache License, Version 2.0. See License.txt in the project root for license information.

using System;
using Microsoft.AspNetCore.Authentication.WeChat;
using Microsoft.Extensions.Options;

namespace Microsoft.AspNetCore.Builder
{
 /// <summary>
 /// Extension methods to add WeChat authentication capabilities to an HTTP application pipeline.
 /// </summary>
 public static class WeChatAppBuilderExtensions
 {
  /// <summary>
  /// Adds the <see cref="WeChatMiddleware"/> middleware to the specified <see cref="IApplicationBuilder"/>, which enables WeChat authentication capabilities.
  /// </summary>
  /// <param name="app">The <see cref="IApplicationBuilder"/> to add the middleware to.</param>
  /// <returns>A reference to this instance after the operation has completed.</returns>
  public static IApplicationBuilder UseWeChatAuthentication(this IApplicationBuilder app)
  {
   if (app == null)
   {
    throw new ArgumentNullException(nameof(app));
   }

   return app.UseMiddleware<WeChatMiddleware>();
  }

  /// <summary>
  /// Adds the <see cref="WeChatMiddleware"/> middleware to the specified <see cref="IApplicationBuilder"/>, which enables WeChat authentication capabilities.
  /// </summary>
  /// <param name="app">The <see cref="IApplicationBuilder"/> to add the middleware to.</param>
  /// <param name="options">A <see cref="WeChatOptions"/> that specifies options for the middleware.</param>
  /// <returns>A reference to this instance after the operation has completed.</returns>
  public static IApplicationBuilder UseWeChatAuthentication(this IApplicationBuilder app, WeChatOptions options)
  {
   if (app == null)
   {
    throw new ArgumentNullException(nameof(app));
   }
   if (options == null)
   {
    throw new ArgumentNullException(nameof(options));
   }

   return app.UseMiddleware<WeChatMiddleware>(Options.Create(options));
  }
 }
}
WeChatDefaults.cs:
// Copyright (c) .NET Foundation. All rights reserved.
// Licensed under the Apache License, Version 2.0. See License.txt in the project root for license information.

namespace Microsoft.AspNetCore.Authentication.WeChat
{
 public static class WeChatDefaults
 {
  public const string AuthenticationScheme = "WeChat";

  public static readonly string AuthorizationEndpoint = "https://open.weixin.qq.com/connect/oauth2/authorize";

  public static readonly string TokenEndpoint = "https://api.weixin.qq.com/sns/oauth2/access_token";

  public static readonly string UserInformationEndpoint = "https://api.weixin.qq.com/sns/userinfo";
 }
}
WeChatHandler.cs
// Copyright (c) .NET Foundation. All rights reserved.
// Licensed under the Apache License, Version 2.0. See License.txt in the project root for license information.

using Microsoft.AspNetCore.Authentication.OAuth;
using Microsoft.AspNetCore.Builder;
using Microsoft.AspNetCore.Http.Authentication;
using Microsoft.AspNetCore.Http.Extensions;
using Microsoft.Extensions.Primitives;
using Newtonsoft.Json.Linq;
using System;
using System.Collections.Generic;
using System.Net.Http;
using System.Net.Http.Headers;
using System.Security.Claims;
using System.Text;
using Microsoft.AspNetCore.Mvc;
using System.Threading.Tasks;

namespace Microsoft.AspNetCore.Authentication.WeChat
{
 internal class WeChatHandler : OAuthHandler<WeChatOptions>
 {
  public WeChatHandler(HttpClient httpClient)
   : base(httpClient)
  {
  }

  protected override async Task<AuthenticateResult> HandleRemoteAuthenticateAsync()
  {
   AuthenticationProperties properties = null;
   var query = Request.Query;

   var error = query["error"];
   if (!StringValues.IsNullOrEmpty(error))
   {
    var failureMessage = new StringBuilder();
    failureMessage.Append(error);
    var errorDescription = query["error_description"];
    if (!StringValues.IsNullOrEmpty(errorDescription))
    {
     failureMessage.Append(";Description=").Append(errorDescription);
    }
    var errorUri = query["error_uri"];
    if (!StringValues.IsNullOrEmpty(errorUri))
    {
     failureMessage.Append(";Uri=").Append(errorUri);
    }

    return AuthenticateResult.Fail(failureMessage.ToString());
   }

   var code = query["code"];
   var state = query["state"];
   var oauthState = query["oauthstate"];

   properties = Options.StateDataFormat.Unprotect(oauthState);

   if (state != Options.StateAddition || properties == null)
   {
    return AuthenticateResult.Fail("The oauth state was missing or invalid.");
   }

   // OAuth2 10.12 CSRF
   if (!ValidateCorrelationId(properties))
   {
    return AuthenticateResult.Fail("Correlation failed.");
   }

   if (StringValues.IsNullOrEmpty(code))
   {
    return AuthenticateResult.Fail("Code was not found.");
   }

   //获取tokens
   var tokens = await ExchangeCodeAsync(code, BuildRedirectUri(Options.CallbackPath));

   var identity = new ClaimsIdentity(Options.ClaimsIssuer);

   AuthenticationTicket ticket = null;

   if (Options.WeChatScope == Options.InfoScope)
   {
    //获取用户信息
    ticket = await CreateTicketAsync(identity, properties, tokens);
   }
   else
   {
    //不获取信息,只使用openid
    identity.AddClaim(new Claim(ClaimTypes.NameIdentifier, tokens.TokenType, ClaimValueTypes.String, Options.ClaimsIssuer));
    ticket = new AuthenticationTicket(new ClaimsPrincipal(identity), properties, Options.AuthenticationScheme);
   }

   if (ticket != null)
   {
    return AuthenticateResult.Success(ticket);
   }
   else
   {
    return AuthenticateResult.Fail("Failed to retrieve user information from remote server.");
   }
  }

  /// <summary>
  /// OAuth第一步,获取code
  /// </summary>
  /// <param name="properties"></param>
  /// <param name="redirectUri"></param>
  /// <returns></returns>
  protected override string BuildChallengeUrl(AuthenticationProperties properties, string redirectUri)
  {
   //加密OAuth状态
   var oauthstate = Options.StateDataFormat.Protect(properties);

   //
   redirectUri = $"{redirectUri}?{nameof(oauthstate)}={oauthstate}";

   var queryBuilder = new QueryBuilder()
   {
    { "appid", Options.ClientId },
    { "redirect_uri", redirectUri },
    { "response_type", "code" },
    { "scope", Options.WeChatScope },
    { "state", Options.StateAddition },
   };
   return Options.AuthorizationEndpoint + queryBuilder.ToString();
  }

  /// <summary>
  /// OAuth第二步,获取token
  /// </summary>
  /// <param name="code"></param>
  /// <param name="redirectUri"></param>
  /// <returns></returns>
  protected override async Task<OAuthTokenResponse> ExchangeCodeAsync(string code, string redirectUri)
  {
   var tokenRequestParameters = new Dictionary<string, string>()
   {
    { "appid", Options.ClientId },
    { "secret", Options.ClientSecret },
    { "code", code },
    { "grant_type", "authorization_code" },
   };

   var requestContent = new FormUrlEncodedContent(tokenRequestParameters);

   var requestMessage = new HttpRequestMessage(HttpMethod.Post, Options.TokenEndpoint);
   requestMessage.Headers.Accept.Add(new MediaTypeWithQualityHeaderValue("application/json"));
   requestMessage.Content = requestContent;
   var response = await Backchannel.SendAsync(requestMessage, Context.RequestAborted);
   if (response.IsSuccessStatusCode)
   {
    var payload = JObject.Parse(await response.Content.ReadAsStringAsync());

    string ErrCode = payload.Value<string>("errcode");
    string ErrMsg = payload.Value<string>("errmsg");

    if (!string.IsNullOrEmpty(ErrCode) | !string.IsNullOrEmpty(ErrMsg))
    {
     return OAuthTokenResponse.Failed(new Exception($"ErrCode:{ErrCode},ErrMsg:{ErrMsg}"));
    }

    var tokens = OAuthTokenResponse.Success(payload);

    //借用TokenType属性保存openid
    tokens.TokenType = payload.Value<string>("openid");

    return tokens;
   }
   else
   {
    var error = "OAuth token endpoint failure";
    return OAuthTokenResponse.Failed(new Exception(error));
   }
  }

  /// <summary>
  /// OAuth第四步,获取用户信息
  /// </summary>
  /// <param name="identity"></param>
  /// <param name="properties"></param>
  /// <param name="tokens"></param>
  /// <returns></returns>
  protected override async Task<AuthenticationTicket> CreateTicketAsync(ClaimsIdentity identity, AuthenticationProperties properties, OAuthTokenResponse tokens)
  {
   var queryBuilder = new QueryBuilder()
   {
    { "access_token", tokens.AccessToken },
    { "openid", tokens.TokenType },//在第二步中,openid被存入TokenType属性
    { "lang", "zh_CN" }
   };

   var infoRequest = Options.UserInformationEndpoint + queryBuilder.ToString();

   var response = await Backchannel.GetAsync(infoRequest, Context.RequestAborted);
   if (!response.IsSuccessStatusCode)
   {
    throw new HttpRequestException($"Failed to retrieve WeChat user information ({response.StatusCode}) Please check if the authentication information is correct and the corresponding WeChat Graph API is enabled.");
   }

   var user = JObject.Parse(await response.Content.ReadAsStringAsync());
   var ticket = new AuthenticationTicket(new ClaimsPrincipal(identity), properties, Options.AuthenticationScheme);
   var context = new OAuthCreatingTicketContext(ticket, Context, Options, Backchannel, tokens, user);

   var identifier = user.Value<string>("openid");
   if (!string.IsNullOrEmpty(identifier))
   {
    identity.AddClaim(new Claim(ClaimTypes.NameIdentifier, identifier, ClaimValueTypes.String, Options.ClaimsIssuer));
   }

   var nickname = user.Value<string>("nickname");
   if (!string.IsNullOrEmpty(nickname))
   {
    identity.AddClaim(new Claim(ClaimTypes.Name, nickname, ClaimValueTypes.String, Options.ClaimsIssuer));
   }

   var sex = user.Value<string>("sex");
   if (!string.IsNullOrEmpty(sex))
   {
    identity.AddClaim(new Claim("urn:WeChat:sex", sex, ClaimValueTypes.String, Options.ClaimsIssuer));
   }

   var country = user.Value<string>("country");
   if (!string.IsNullOrEmpty(country))
   {
    identity.AddClaim(new Claim(ClaimTypes.Country, country, ClaimValueTypes.String, Options.ClaimsIssuer));
   }

   var province = user.Value<string>("province");
   if (!string.IsNullOrEmpty(province))
   {
    identity.AddClaim(new Claim(ClaimTypes.StateOrProvince, province, ClaimValueTypes.String, Options.ClaimsIssuer));
   }

   var city = user.Value<string>("city");
   if (!string.IsNullOrEmpty(city))
   {
    identity.AddClaim(new Claim("urn:WeChat:city", city, ClaimValueTypes.String, Options.ClaimsIssuer));
   }

   var headimgurl = user.Value<string>("headimgurl");
   if (!string.IsNullOrEmpty(headimgurl))
   {
    identity.AddClaim(new Claim("urn:WeChat:headimgurl", headimgurl, ClaimValueTypes.String, Options.ClaimsIssuer));
   }

   var unionid = user.Value<string>("unionid");
   if (!string.IsNullOrEmpty(unionid))
   {
    identity.AddClaim(new Claim("urn:WeChat:unionid", unionid, ClaimValueTypes.String, Options.ClaimsIssuer));
   }

   await Options.Events.CreatingTicket(context);
   return context.Ticket;
  }
 }
}
WeChatMiddleware.cs
// Copyright (c) .NET Foundation. All rights reserved.
// Licensed under the Apache License, Version 2.0. See License.txt in the project root for license information.

using System;
using System.Globalization;
using System.Text.Encodings.Web;
using Microsoft.AspNetCore.Authentication.OAuth;
using Microsoft.AspNetCore.Builder;
using Microsoft.AspNetCore.DataProtection;
using Microsoft.AspNetCore.Http;
using Microsoft.Extensions.Logging;
using Microsoft.Extensions.Options;

namespace Microsoft.AspNetCore.Authentication.WeChat
{
 /// <summary>
 /// An ASP.NET Core middleware for authenticating users using WeChat.
 /// </summary>
 public class WeChatMiddleware : OAuthMiddleware<WeChatOptions>
 {
  /// <summary>
  /// Initializes a new <see cref="WeChatMiddleware"/>.
  /// </summary>
  /// <param name="next">The next middleware in the HTTP pipeline to invoke.</param>
  /// <param name="dataProtectionProvider"></param>
  /// <param name="loggerFactory"></param>
  /// <param name="encoder"></param>
  /// <param name="sharedOptions"></param>
  /// <param name="options">Configuration options for the middleware.</param>
  public WeChatMiddleware(
   RequestDelegate next,
   IDataProtectionProvider dataProtectionProvider,
   ILoggerFactory loggerFactory,
   UrlEncoder encoder,
   IOptions<SharedAuthenticationOptions> sharedOptions,
   IOptions<WeChatOptions> options)
   : base(next, dataProtectionProvider, loggerFactory, encoder, sharedOptions, options)
  {
   if (next == null)
   {
    throw new ArgumentNullException(nameof(next));
   }

   if (dataProtectionProvider == null)
   {
    throw new ArgumentNullException(nameof(dataProtectionProvider));
   }

   if (loggerFactory == null)
   {
    throw new ArgumentNullException(nameof(loggerFactory));
   }

   if (encoder == null)
   {
    throw new ArgumentNullException(nameof(encoder));
   }

   if (sharedOptions == null)
   {
    throw new ArgumentNullException(nameof(sharedOptions));
   }

   if (options == null)
   {
    throw new ArgumentNullException(nameof(options));
   }

   if (string.IsNullOrEmpty(Options.AppId))
   {
    throw new ArgumentException(string.Format(CultureInfo.CurrentCulture, nameof(Options.AppId)));
   }

   if (string.IsNullOrEmpty(Options.AppSecret))
   {
    throw new ArgumentException(string.Format(CultureInfo.CurrentCulture, nameof(Options.AppSecret)));
   }
  }

  /// <summary>
  /// Provides the <see cref="AuthenticationHandler{T}"/> object for processing authentication-related requests.
  /// </summary>
  /// <returns>An <see cref="AuthenticationHandler{T}"/> configured with the <see cref="WeChatOptions"/> supplied to the constructor.</returns>
  protected override AuthenticationHandler<WeChatOptions> CreateHandler()
  {
   return new WeChatHandler(Backchannel);
  }
 }
}
WeChatOptions.cs
// Copyright (c) .NET Foundation. All rights reserved.
// Licensed under the Apache License, Version 2.0. See License.txt in the project root for license information.

using System.Collections.Generic;
using Microsoft.AspNetCore.Authentication.WeChat;
using Microsoft.AspNetCore.Http;
using Microsoft.AspNetCore.Identity;

namespace Microsoft.AspNetCore.Builder
{
 /// <summary>
 /// Configuration options for <see cref="WeChatMiddleware"/>.
 /// </summary>
 public class WeChatOptions : OAuthOptions
 {
  /// <summary>
  /// Initializes a new <see cref="WeChatOptions"/>.
  /// </summary>
  public WeChatOptions()
  {
   AuthenticationScheme = WeChatDefaults.AuthenticationScheme;
   DisplayName = AuthenticationScheme;
   CallbackPath = new PathString("/signin-wechat");
   StateAddition = "#wechat_redirect";
   AuthorizationEndpoint = WeChatDefaults.AuthorizationEndpoint;
   TokenEndpoint = WeChatDefaults.TokenEndpoint;
   UserInformationEndpoint = WeChatDefaults.UserInformationEndpoint;
   //SaveTokens = true;

   //BaseScope (不弹出授权页面,直接跳转,只能获取用户openid),
   //InfoScope (弹出授权页面,可通过openid拿到昵称、性别、所在地。并且,即使在未关注的情况下,只要用户授权,也能获取其信息)
   WeChatScope = InfoScope;
  }

  // WeChat uses a non-standard term for this field.
  /// <summary>
  /// Gets or sets the WeChat-assigned appId.
  /// </summary>
  public string AppId
  {
   get { return ClientId; }
   set { ClientId = value; }
  }

  // WeChat uses a non-standard term for this field.
  /// <summary>
  /// Gets or sets the WeChat-assigned app secret.
  /// </summary>
  public string AppSecret
  {
   get { return ClientSecret; }
   set { ClientSecret = value; }
  }

  public string StateAddition { get; set; }
  public string WeChatScope { get; set; }

  public string BaseScope = "snsapi_base";

  public string InfoScope = "snsapi_userinfo";
 }
}
本文已被整理到了《ASP.NET微信开发教程汇总》,欢迎大家学习阅读。
以上就是本文的全部内容,希望对大家的学习有所帮助,也希望大家多多支持我们。
赞 (0)

