详解Android布局优化
怎样才能写出优秀的Android App,是每一个程序员追求的目标。那么怎么才能写出一个优秀的App呢?相信很多初学者也会有这种迷茫。一句话来回答这个问题:细节很重要。今天我们就从最基础的XML布局来谈谈怎么提高Android性能问题吧!
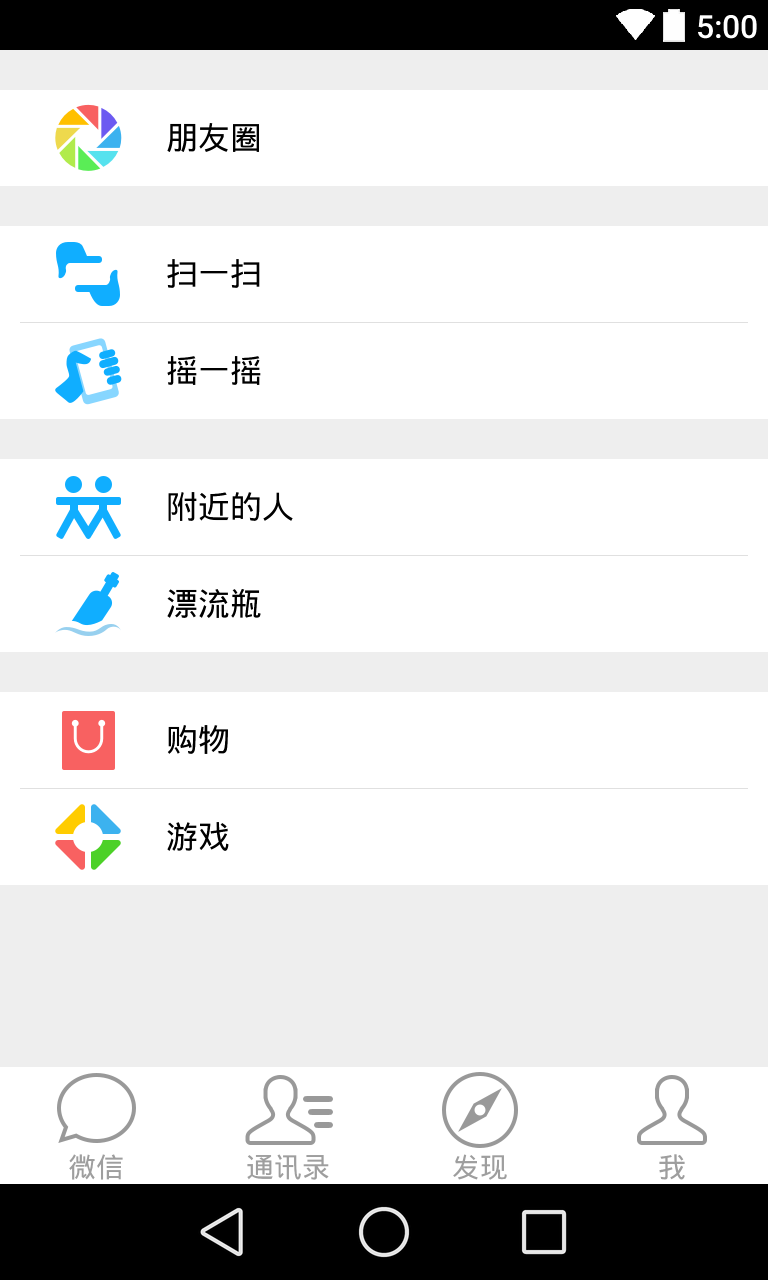
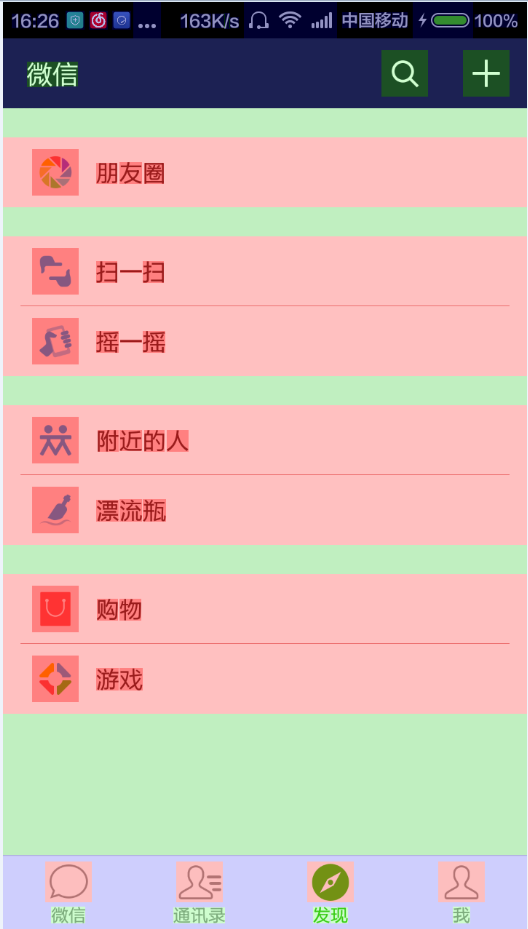
也许你经常会遇到比较复杂的布局,这种情况下,最简单的方法就是多层嵌套实现效果,但是最简单的方法是否是最优的方法呢? 这里需要打一个大大的问号?????经验告诉我们,往往简单的方法,得到的结果不是最优解,那么我们通过一个例子来研究一下怎么去优化我们的XML布局吧,下面通过经典微信中的“发现”tab页面中的布局来看看怎么实现。

上面这张图片是微信界面截图,看到这张效果图的第一眼会让开发者想到使用线性布局实现这种左边图片,右边文字,一行白色背景效果很方便。那么我们就按照一般思路写出如下布局代码:
<LinearLayout xmlns:android="http://schemas.android.com/apk/res/android"
 xmlns:tools="http://schemas.android.com/tools"
 android:layout_width="match_parent"
 android:layout_height="match_parent"
 android:background="@color/color_eeeeee"
 android:orientation="vertical"
 tools:context=".MainActivity">

 <LinearLayout
  android:layout_width="match_parent"
  android:layout_height="0dp"
  android:layout_weight="1"
  android:orientation="vertical">

  <LinearLayout
   android:layout_width="match_parent"
   android:layout_height="wrap_content"
   android:layout_marginTop="20dp"
   android:background="@drawable/item_bg_select"
   android:clickable="true"
   android:gravity="center_vertical"
   android:orientation="horizontal"
   android:paddingLeft="20dp"
   android:paddingRight="20dp">

   <ImageView
    android:layout_width="wrap_content"
    android:layout_height="wrap_content"
    android:src="@drawable/afe" />

   <TextView
    android:layout_width="wrap_content"
    android:layout_height="wrap_content"
    android:layout_marginLeft="15dp"
    android:text="@string/fiends"
    android:textColor="@android:color/black"
    android:textSize="16sp" />
  </LinearLayout>

  <LinearLayout
   android:layout_width="match_parent"
   android:layout_height="wrap_content"
   android:layout_marginTop="20dp"
   android:background="@android:color/white"
   android:orientation="vertical">

   <LinearLayout
    android:layout_width="match_parent"
    android:layout_height="wrap_content"
    android:background="@drawable/item_bg_select"
    android:clickable="true"
    android:gravity="center_vertical"
    android:orientation="horizontal"
    android:paddingLeft="20dp"
    android:paddingRight="20dp">

    <ImageView
     android:layout_width="wrap_content"
     android:layout_height="wrap_content"
     android:src="@drawable/afg" />

    <TextView
     android:layout_width="wrap_content"
     android:layout_height="wrap_content"
     android:layout_marginLeft="15dp"
     android:text="@string/scan"
     android:textColor="@android:color/black"
     android:textSize="16sp" />
   </LinearLayout>

   <View
    android:layout_width="match_parent"
    android:layout_height="0.5dp"
    android:layout_marginLeft="10dp"
    android:layout_marginRight="10dp"
    android:background="@color/color_e0e0e0"></View>

   <LinearLayout
    android:layout_width="match_parent"
    android:layout_height="wrap_content"
    android:background="@drawable/item_bg_select"
    android:clickable="true"
    android:gravity="center_vertical"
    android:orientation="horizontal"
    android:paddingLeft="20dp"
    android:paddingRight="20dp">

    <ImageView
     android:layout_width="wrap_content"
     android:layout_height="wrap_content"
     android:src="@drawable/afh" />

    <TextView
     android:layout_width="wrap_content"
     android:layout_height="wrap_content"
     android:layout_marginLeft="15dp"
     android:text="@string/shake"
     android:textColor="@android:color/black"
     android:textSize="16sp" />
   </LinearLayout>

  </LinearLayout>

  <LinearLayout
   android:layout_width="match_parent"
   android:layout_height="wrap_content"
   android:layout_marginTop="20dp"
   android:background="@android:color/white"
   android:orientation="vertical">

   <LinearLayout
    android:layout_width="match_parent"
    android:layout_height="wrap_content"
    android:background="@drawable/item_bg_select"
    android:clickable="true"
    android:gravity="center_vertical"
    android:orientation="horizontal"
    android:paddingLeft="20dp"
    android:paddingRight="20dp">

    <ImageView
     android:layout_width="wrap_content"
     android:layout_height="wrap_content"
     android:src="@drawable/afd" />

    <TextView
     android:layout_width="wrap_content"
     android:layout_height="wrap_content"
     android:layout_marginLeft="15dp"
     android:text="@string/nearby"
     android:textColor="@android:color/black"
     android:textSize="16sp" />
   </LinearLayout>

   <View
    android:layout_width="match_parent"
    android:layout_height="0.5dp"
    android:layout_marginLeft="10dp"
    android:layout_marginRight="10dp"
    android:background="@color/color_e0e0e0"></View>

   <LinearLayout
    android:layout_width="match_parent"
    android:layout_height="wrap_content"
    android:background="@drawable/item_bg_select"
    android:clickable="true"
    android:gravity="center_vertical"
    android:orientation="horizontal"
    android:paddingLeft="20dp"
    android:paddingRight="20dp">

    <ImageView
     android:layout_width="wrap_content"
     android:layout_height="wrap_content"
     android:src="@drawable/afb" />

    <TextView
     android:layout_width="wrap_content"
     android:layout_height="wrap_content"
     android:layout_marginLeft="15dp"
     android:text="@string/float_bottle"
     android:textColor="@android:color/black"
     android:textSize="16sp" />
   </LinearLayout>

  </LinearLayout>

  <LinearLayout
   android:layout_width="match_parent"
   android:layout_height="wrap_content"
   android:layout_marginTop="20dp"
   android:background="@android:color/white"
   android:orientation="vertical">

   <LinearLayout
    android:layout_width="match_parent"
    android:layout_height="wrap_content"
    android:background="@drawable/item_bg_select"
    android:clickable="true"
    android:gravity="center_vertical"
    android:orientation="horizontal"
    android:paddingLeft="20dp"
    android:paddingRight="20dp">

    <ImageView
     android:layout_width="wrap_content"
     android:layout_height="wrap_content"
     android:src="@drawable/agg" />

    <TextView
     android:layout_width="wrap_content"
     android:layout_height="wrap_content"
     android:layout_marginLeft="15dp"
     android:text="@string/shopping"
     android:textColor="@android:color/black"
     android:textSize="16sp" />
   </LinearLayout>

   <View
    android:layout_width="match_parent"
    android:layout_height="0.5dp"
    android:layout_marginLeft="10dp"
    android:layout_marginRight="10dp"
    android:background="@color/color_e0e0e0"></View>

   <LinearLayout
    android:layout_width="match_parent"
    android:layout_height="wrap_content"
    android:background="@drawable/item_bg_select"
    android:clickable="true"
    android:gravity="center_vertical"
    android:orientation="horizontal"
    android:paddingLeft="20dp"
    android:paddingRight="20dp">

    <ImageView
     android:layout_width="wrap_content"
     android:layout_height="wrap_content"
     android:src="@drawable/ak6" />

    <TextView
     android:layout_width="wrap_content"
     android:layout_height="wrap_content"
     android:layout_marginLeft="15dp"
     android:text="@string/games"
     android:textColor="@android:color/black"
     android:textSize="16sp" />
   </LinearLayout>

  </LinearLayout>
 </LinearLayout>

 <LinearLayout
  android:layout_width="match_parent"
  android:layout_height="wrap_content"
  android:background="@android:color/white"
  android:orientation="horizontal">

  <TextView
   android:layout_width="0dp"
   android:layout_height="wrap_content"
   android:layout_weight="1"
   android:drawableTop="@drawable/ala"
   android:gravity="center"
   android:text="@string/weixin"
   android:textColor="@color/color_9e9e9e" />

  <TextView
   android:layout_width="0dp"
   android:layout_height="wrap_content"
   android:layout_weight="1"
   android:drawableTop="@drawable/al9"
   android:gravity="center"
   android:text="@string/countans"
   android:textColor="@color/color_9e9e9e" />

  <TextView
   android:layout_width="0dp"
   android:layout_height="wrap_content"
   android:layout_weight="1"
   android:drawableTop="@drawable/alc"
   android:gravity="center"
   android:text="@string/finds"
   android:textColor="@color/color_9e9e9e" />

  <TextView
   android:layout_width="0dp"
   android:layout_height="wrap_content"
   android:layout_weight="1"
   android:drawableTop="@drawable/ale"
   android:gravity="center"
   android:text="@string/me"
   android:textColor="@color/color_9e9e9e" />

 </LinearLayout>

</LinearLayout>
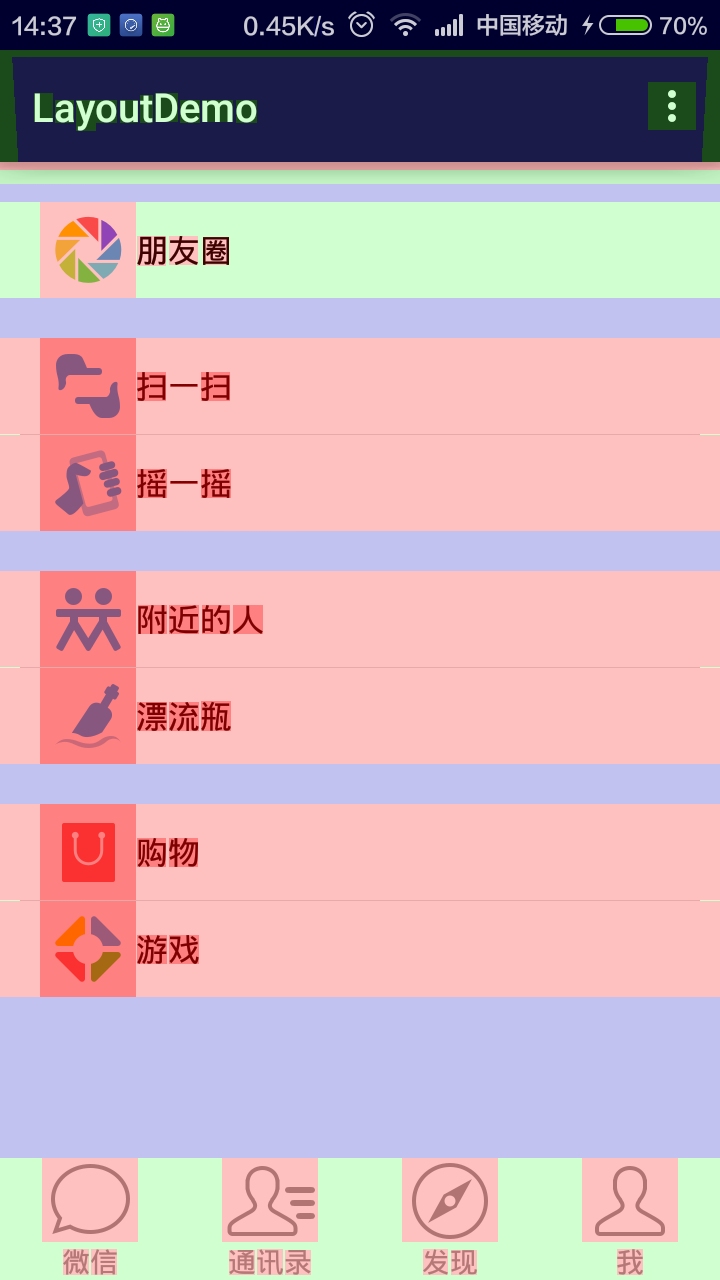
以上布局的效果图如下:
是不是差不多实现了微信一样的效果?那么我们怎么来判断以上布局是不是最优的呢?当然,我们是有工具来查看的。相信很多童鞋用过了,第一个就是 Hierarchy View,第二个就是 显示GPU过度绘制。
Hierarchy View检测布局嵌套层次
如果你是使用AS开发的话,你可以在 AS 工具栏中点击 Tools–>Android–>Android Device Monitor–>Hierarchy View。(至于Hierarchy View怎么使用这里就不仔细介绍了)你可以通过这个工具来查看当前布局的层次结构,如下图的布局的层次结构就是上面微信的布局:
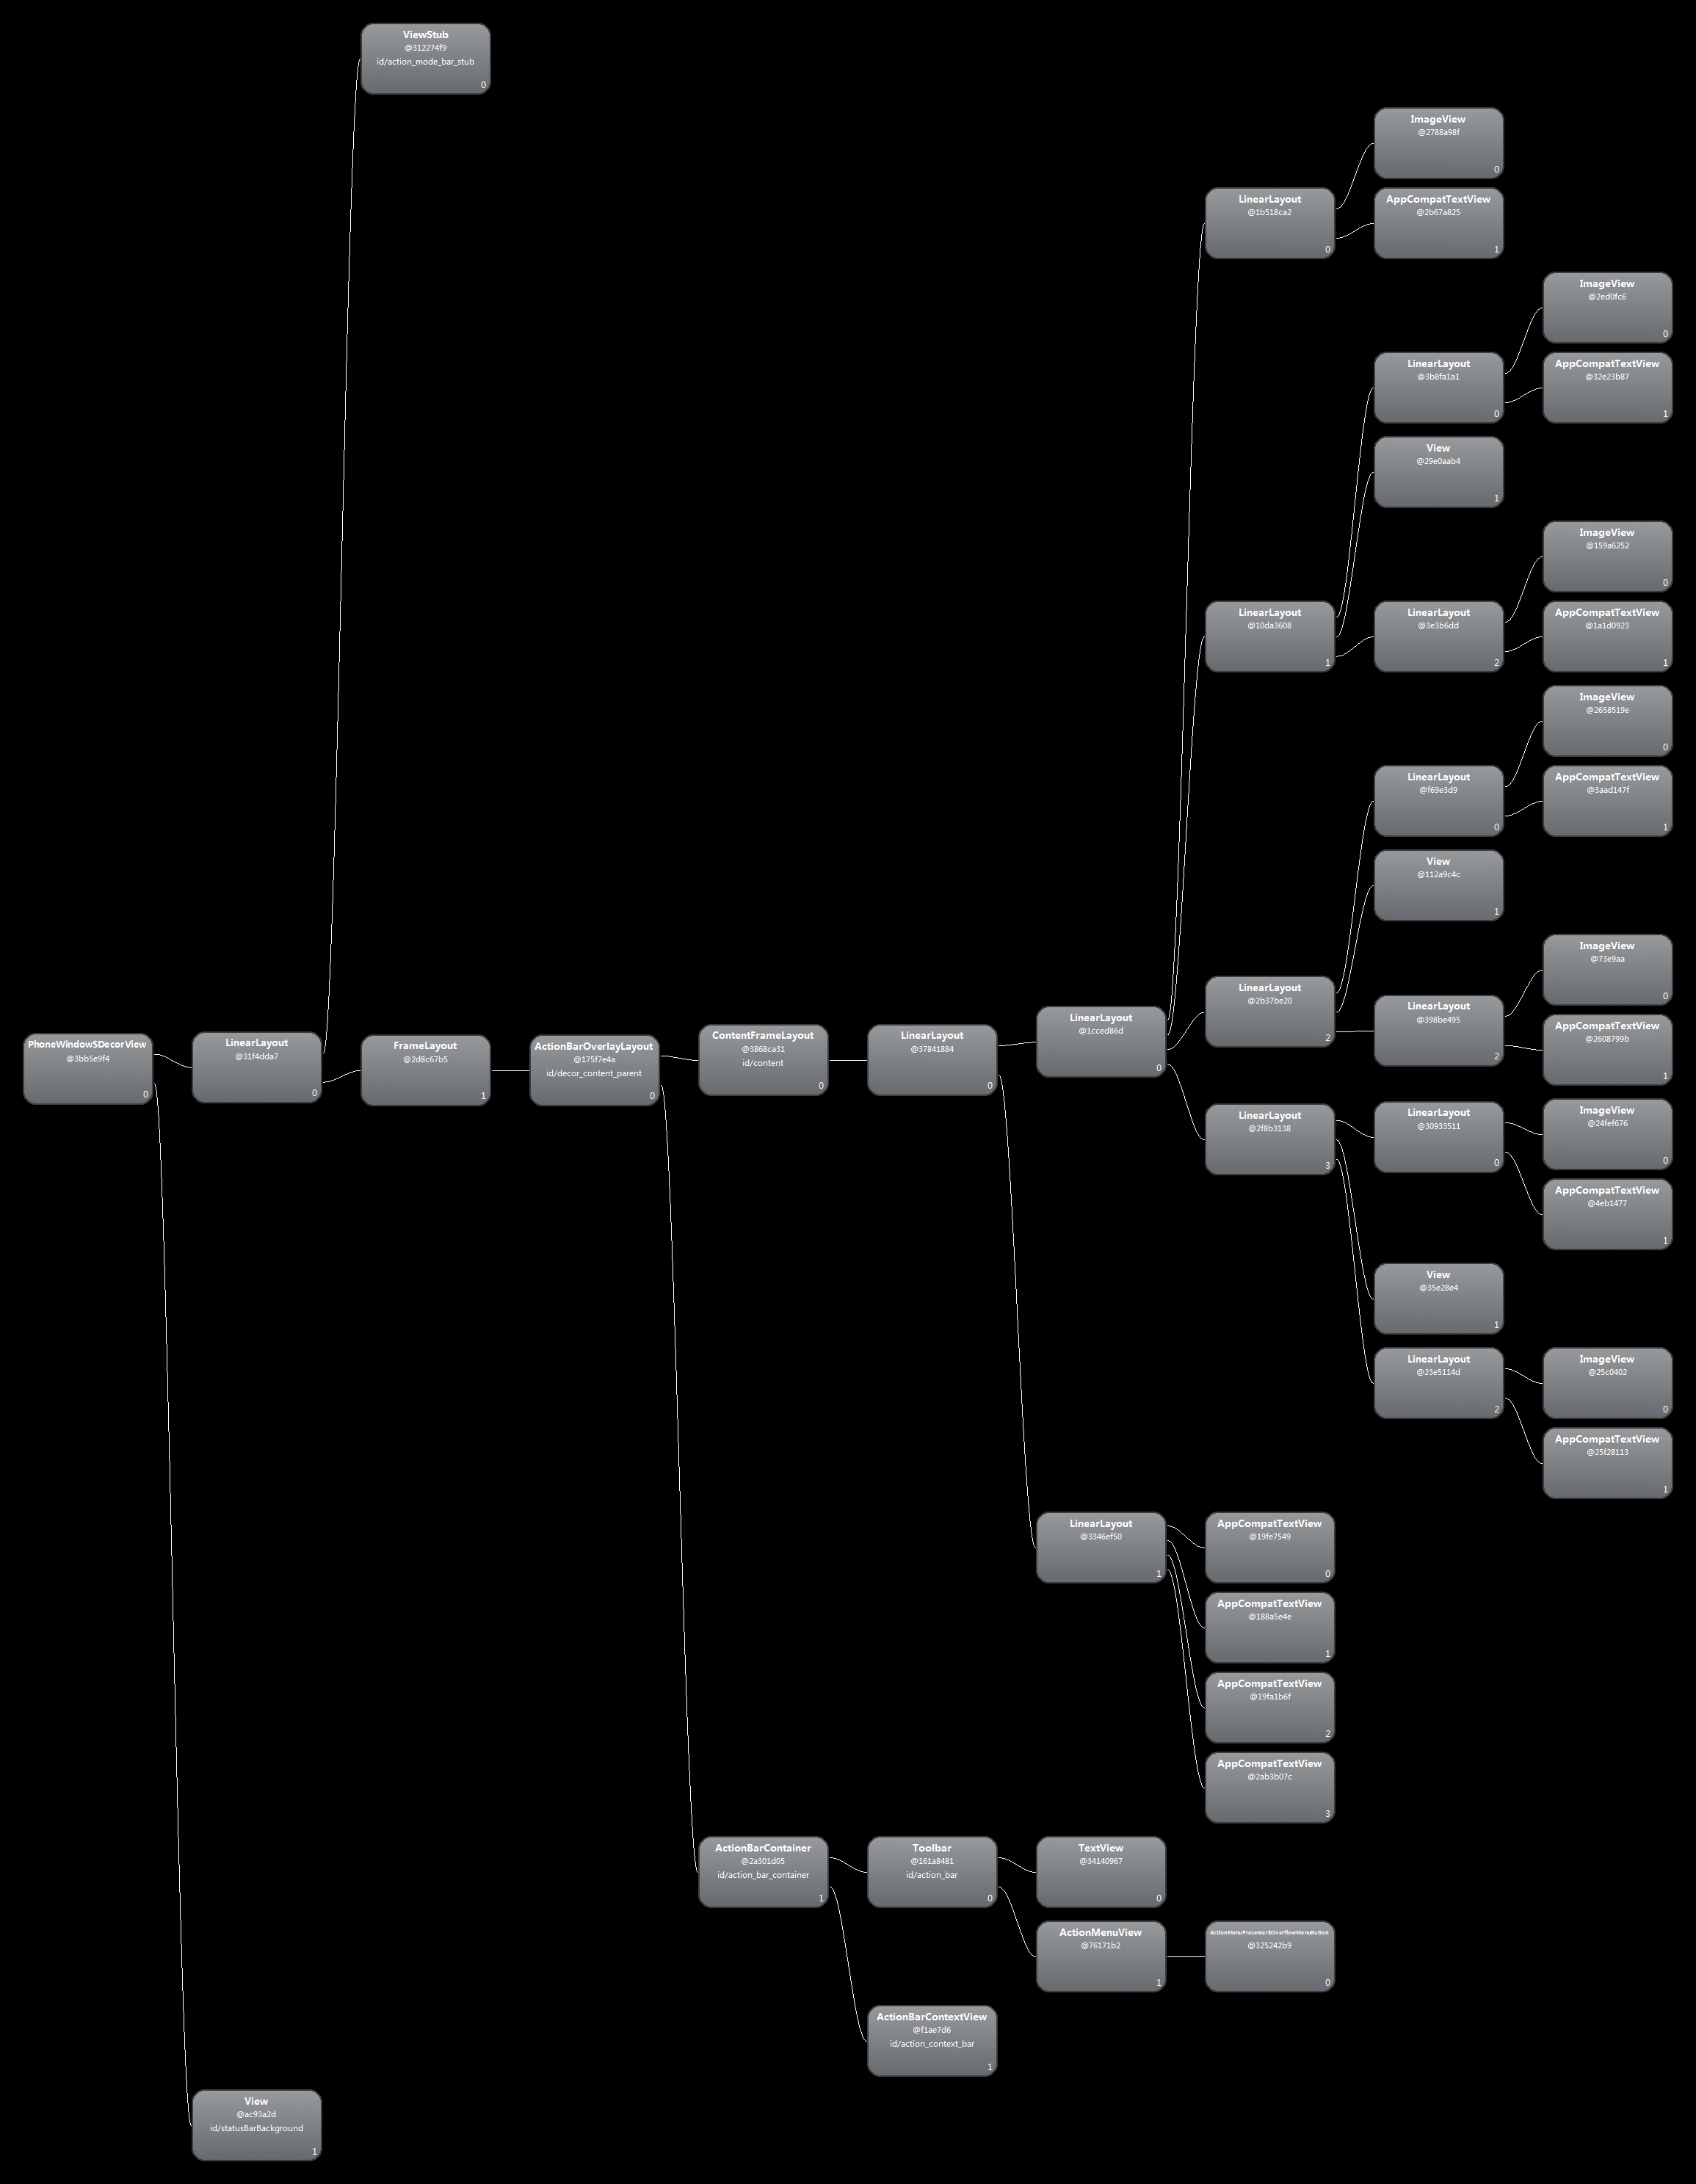
ContentFrameLayout接点之后就是我们上面XML代码的布局了,从上图可以看到,我们布局最多有 5 层,其实你从代码中也可以看到是 5 层,那么我们是否能减少以上的布局的嵌套层次呢?答案是肯定的,废话不多说,我们直接上一份我优化过的布局代码吧。
<RelativeLayout xmlns:android="http://schemas.android.com/apk/res/android"
 xmlns:app="http://schemas.android.com/apk/res-auto"
 xmlns:tools="http://schemas.android.com/tools"
 android:layout_width="match_parent"
 android:layout_height="match_parent"
 android:background="@color/color_eeeeee"
 tools:context=".MainActivity">

 <TextView
  android:id="@+id/tv_one"
  style="@style/textStyle"
  android:layout_marginTop="20dp"
  android:background="@drawable/item_bg_select"
  android:drawableLeft="@drawable/afe"
  android:text="@string/fiends" />

 <android.support.v7.widget.LinearLayoutCompat
  android:id="@+id/lv_two"
  style="@style/LinerLayoutStyle"
  android:layout_below="@+id/tv_one"
  app:divider="@drawable/lines"
  app:dividerPadding="10dp"
  app:showDividers="middle">

  <TextView
   style="@style/textStyle"
   android:background="@drawable/item_bg_select"
   android:drawableLeft="@drawable/afg"
   android:text="@string/scan" />

  <TextView
   style="@style/textStyle"
   android:background="@drawable/item_bg_select"
   android:drawableLeft="@drawable/afh"
   android:text="@string/shake" />

 </android.support.v7.widget.LinearLayoutCompat>

 <android.support.v7.widget.LinearLayoutCompat
  android:id="@+id/lv_threed"
  style="@style/LinerLayoutStyle"
  android:layout_below="@+id/lv_two"
  app:divider="@drawable/lines"
  app:dividerPadding="10dp"
  app:showDividers="middle">

  <TextView
   style="@style/textStyle"
   android:background="@drawable/item_bg_select"
   android:drawableLeft="@drawable/afd"
   android:text="@string/nearby" />

  <TextView
   style="@style/textStyle"
   android:background="@drawable/item_bg_select"
   android:drawableLeft="@drawable/afb"
   android:text="@string/float_bottle" />
 </android.support.v7.widget.LinearLayoutCompat>

 <android.support.v7.widget.LinearLayoutCompat
  style="@style/LinerLayoutStyle"
  android:layout_below="@+id/lv_threed"
  app:divider="@drawable/lines"
  app:dividerPadding="10dp"
  app:showDividers="middle">

  <TextView
   style="@style/textStyle"
   android:background="@drawable/item_bg_select"
   android:drawableLeft="@drawable/agg"
   android:text="@string/shopping" />

  <TextView
   style="@style/textStyle"
   android:background="@drawable/item_bg_select"
   android:drawableLeft="@drawable/ak6"
   android:text="@string/games" />
 </android.support.v7.widget.LinearLayoutCompat>

 <include
  layout="@layout/bottom_layout"
  android:layout_width="match_parent"
  android:layout_height="wrap_content"
  android:layout_alignParentBottom="true" />
</RelativeLayout>
哇,代码量少了很多啊,代码也简洁了许多,让人看着就很舒服,那么我们到底进行了怎样的优化呢?从以下几点总结:
使用 style 主题来定义一个通用的属性,从而重复利用代码,减少代码量。上面代码使用了两个style,一个是textStyle 和 LinerLayoutStyle ,代码如下:
<!--TextView 的通用属性-->
 <style name="textStyle">
  <item name="android:layout_width">match_parent</item>
  <item name="android:layout_height">wrap_content</item>
  <item name="android:textSize">16sp</item>
  <item name="android:textColor">@android:color/black</item>
  <item name="android:paddingRight">20dp</item>
  <item name="android:paddingLeft">20dp</item>
  <item name="android:gravity">center_vertical</item>
  <item name="android:clickable">true</item>
 </style>

 <!--LinerLayout 的通用属性-->
 <style name="LinerLayoutStyle" >
  <item name="android:layout_width">match_parent</item>
  <item name="android:layout_height">wrap_content</item>
  <item name="android:layout_marginTop">20dp</item>
  <item name="android:background">@android:color/white</item>
  <item name="android:orientation">vertical</item>
 </style>
2.减少布局嵌套的层次,上面布局使用TextView可以设置四个方向图片来直接替代LinerLayout下包裹一个ImageView 和TextView。从而这里减少了一层嵌套布局,再次利用RelativeLayout相对布局又减少了一层桥套,提高了加载布局的效率。看图:

从图中看出,不仅减少了两层嵌套布局,而且组件数目也减少,从而减少布局绘制的时间,大大提高了布局加载效率。
3.使用 LinearLayoutCompat 组件来实现线性布局元素之间的分割线,从而减少了使用View来实现分割线效果。
LinearLayoutCompat的具体内容请参考//www.jb51.net/article/137253.htm
4.使用 include 标签加载底部菜单栏布局,include 标签的目的是重复利用布局,来减少代码了。
<?xml version="1.0" encoding="utf-8"?>
<LinearLayout xmlns:android="http://schemas.android.com/apk/res/android"
 android:layout_width="match_parent"
 android:layout_height="wrap_content"
 android:background="@android:color/white"
 android:orientation="horizontal">

 <TextView
  android:layout_width="0dp"
  android:layout_height="wrap_content"
  android:layout_weight="1"
  android:drawableTop="@drawable/ala"
  android:gravity="center"
  android:text="@string/weixin"
  android:textColor="@color/color_9e9e9e"
   />

 <TextView
  android:layout_width="0dp"
  android:layout_height="wrap_content"
  android:layout_weight="1"
  android:drawableTop="@drawable/al9"
  android:gravity="center"
  android:text="@string/countans"
  android:textColor="@color/color_9e9e9e" />

 <TextView
  android:layout_width="0dp"
  android:layout_height="wrap_content"
  android:layout_weight="1"
  android:drawableTop="@drawable/alc"
  android:gravity="center"
  android:text="@string/finds"
  android:textColor="@color/color_9e9e9e" />

 <TextView
  android:layout_width="0dp"
  android:layout_height="wrap_content"
  android:layout_weight="1"
  android:drawableTop="@drawable/ale"
  android:gravity="center"
  android:text="@string/me"
  android:textColor="@color/color_9e9e9e" />

</LinearLayout>
5.使用merge减少布局嵌套层次。
使用merge的前提条件就是merge标签必须是当前xml布局的根标签,例如:
<merge xmlns:android="http://schemas.android.com/apk/res/android">
........
</merge>
也就是merge标签必须是当前布局的父布局。一般merge标签和include结合使用来减少布局嵌套层次。例如有如下布局:两个Button,以上一下。
<?xml version="1.0" encoding="utf-8"?>
<RelativeLayout xmlns:android="http://schemas.android.com/apk/res/android"
    android:layout_width="match_parent"
    android:layout_height="match_parent">

 <RelativeLayout
  android:layout_width="match_parent"
  android:layout_height="match_parent">

  <Button
   android:id="@+id/button1"
   android:layout_width="wrap_content"
   android:layout_height="wrap_content"
   android:text="text1"/>

  <Button
   android:id="@+id/button2"
   android:layout_width="wrap_content"
   android:layout_height="wrap_content"
   android:layout_below="@+id/button1"
   android:text="text2"/>
 </RelativeLayout>

</RelativeLayout>
该布局层次如下:
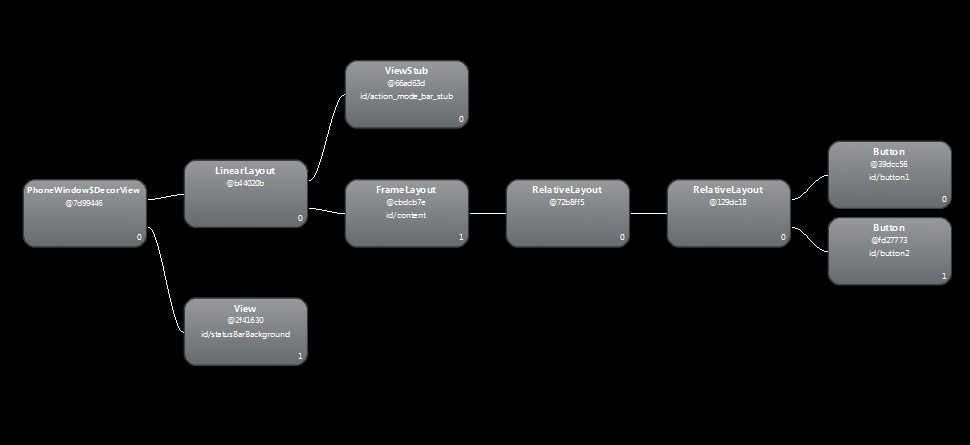
由上图看出除了根布局,我们自己写的布局有三层,两层都是RelativeLayout。那么能否优化呢?
(1)首先我们可以利用include标签简化xml布局。结果变成如下:
<?xml version="1.0" encoding="utf-8"?>
<RelativeLayout xmlns:android="http://schemas.android.com/apk/res/android"
    android:layout_width="match_parent"
    android:layout_height="match_parent">

 <include layout="@layout/layout_item"></include>

</RelativeLayout>
代码很清爽有木有,一目了然。然后layout_item布局如下:
<?xml version="1.0" encoding="utf-8"?>
<RelativeLayout xmlns:android="http://schemas.android.com/apk/res/android"
    android:layout_width="match_parent"
    android:layout_height="match_parent">

 <Button
  android:id="@+id/button1"
  android:layout_width="wrap_content"
  android:layout_height="wrap_content"
  android:text="text1"/>

 <Button
  android:id="@+id/button2"
  android:layout_width="wrap_content"
  android:layout_height="wrap_content"
  android:layout_below="@+id/button1"
  android:text="text2"/>

</RelativeLayout>
到此,其实布局的嵌套层次和上面一样没有任何改变。那么我们利用merge标签来试试看结果怎样?merge标签代码如下:
<?xml version="1.0" encoding="utf-8"?>
<merge xmlns:android="http://schemas.android.com/apk/res/android"
    android:layout_width="match_parent"
    android:layout_height="match_parent">

 <Button
  android:id="@+id/button1"
  android:layout_width="wrap_content"
  android:layout_height="wrap_content"
  android:text="text1"/>

 <Button
  android:id="@+id/button2"
  android:layout_width="wrap_content"
  android:layout_height="wrap_content"
  android:layout_below="@+id/button1"
  android:text="text2"/>

</merge>
此处仅仅把RelativeLayout标签换成merge标签,效果却大有不同。
利用merge标签以后的布局层次如下:
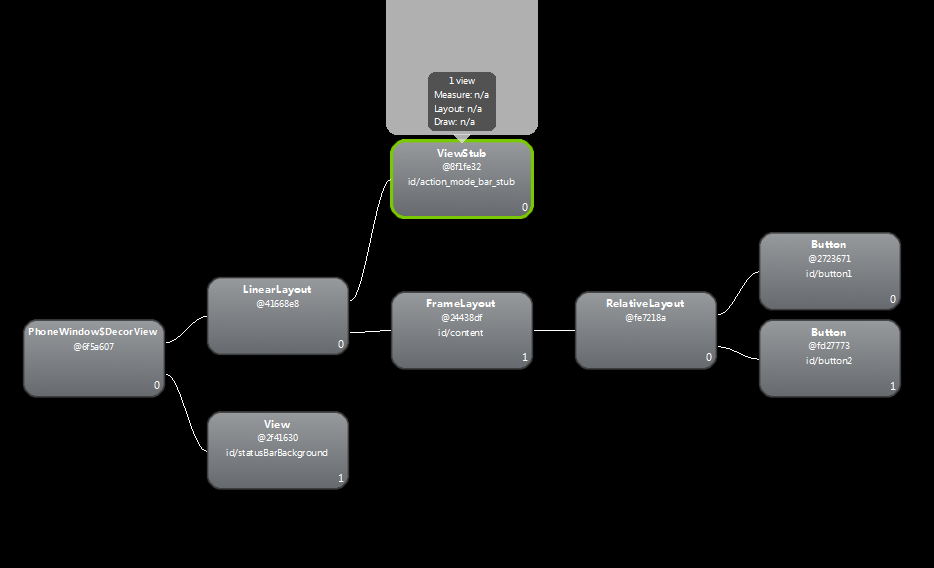
很明显减少了一层RelativeLayout布局,从而优化了布局。
总结:当父布局和子布局的根布局是同一种布局时,可以利用merge标签来减少一层嵌套布局。比如:你父布局是LinerLayout,此时子布局也是LinerLayout,就可以考虑使用merge来减少布局嵌套层次。
显示GPU过度绘制
你可以在手机打开 设置—->开发者选项—->显示GPU过度绘制,这个开关的作用是按不同颜色值来显示布局的过度绘制,绘制的层次从最优到最差:蓝,绿,淡红,红。给出一张直观的形象图片来表示吧

图片从上到下代表不同层次的OverDraw,我们在布局时候,尽量减少红色 Overdraw,看到更多的蓝色区域。来看看微信的 Overdraw图和我们自定义的布局Overdraw图吧
第一张图是 腾讯微信的Overdraw 图,第二张图片是我们自定义的 Overdraw 图片。从上面两张图片看出,我们自己的布局和微信原版的布局 Overdraw 过度绘制情况差不多,没啥区别。那么我们能不能去减少红色部分的过度绘制呢?试试吧!
我们先去掉最顶端布局RelativeLayout的背景
android:background="@color/color_eeeeee"
然后修改每个item选择资源 selector
android:background="@drawable/item_bg_select1"
之前的 item_bg_select.xml 资源是如下代码:
<?xml version="1.0" encoding="utf-8"?>
<selector xmlns:android="http://schemas.android.com/apk/res/android">

 <item android:drawable="@color/color_e0e0e0" android:state_pressed="true"></item>

 <item android:drawable="@android:color/white"></item>

</selector>
修改之后的 item_bg_select1.xml资源代码如下:
<?xml version="1.0" encoding="utf-8"?>
<selector xmlns:android="http://schemas.android.com/apk/res/android">

 <item android:drawable="@color/color_e0e0e0" android:state_pressed="true"></item>

</selector>
我们发现,新的 selector资源去除了
<item android:drawable="@android:color/white"></item>
因为整个背景是白色的,无需重复设置正常情况下item的背景颜色。
修改之后的效果图如下:

看出,基本没有红色区域,从而提高布局的绘制效率。
总结:现在看来,我们通过减少背景颜色的设置来减少Overdraw的情况。我们自己布局过度绘制的情况比微信本身的情况有很大的改善,是不是感觉很nice~~。
懒加载布局 ViewStub
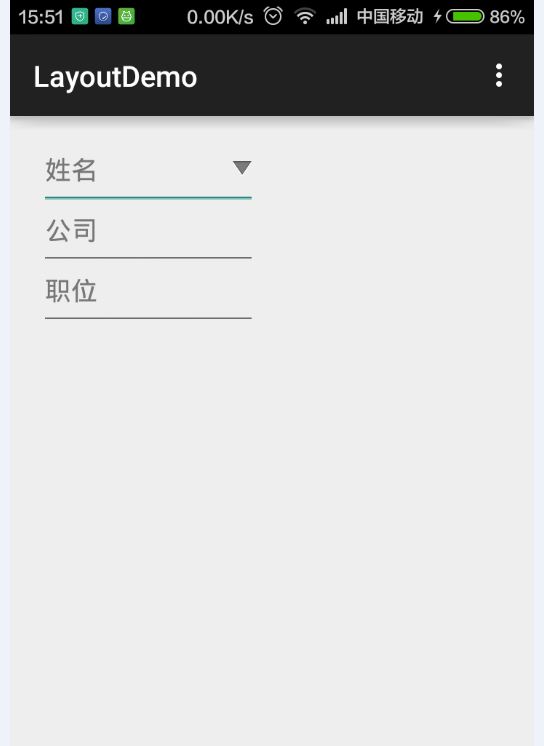
除了以上两种方法来优化布局,还有其他办法来继续优化布局,在某些情况下,有些布局是仅在需要时才加载,比如小米手机的添加联系人功能就有在编辑姓名的时候有一个下拉按钮显示更多输入信息,看图
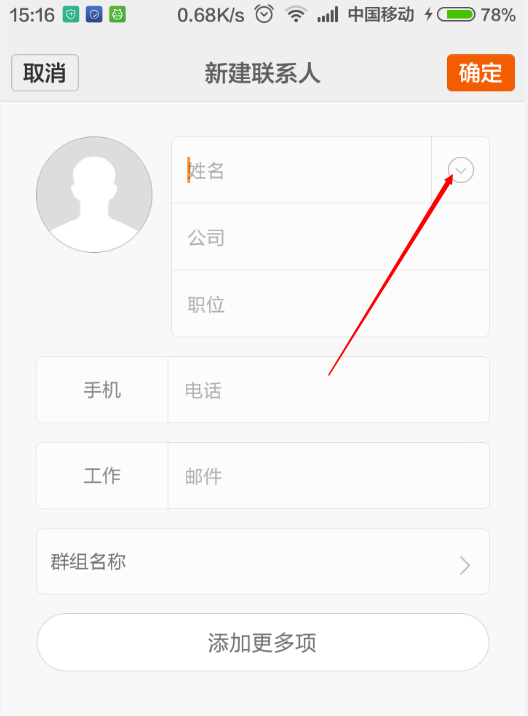
遇到这种情况,我们首先想到的 就是将不常用的元素使用INVISIBLE或者GONE进行隐藏,这样是否真的好呢?是否达到了 布局优化的最终效果呢?利用 INVISIBLE只是隐藏布局,但是布局还是占居当前位置,且系统在加载布局的时候这一部分还是会绘制出来,同样花费绘制时间。那么有没有好的办法来解决这一问题呢?不言而喻,我们可以使用懒加载布局 ViewStub。
ViewStub是Android为此提供了一种非常轻量级的控件。ViewStub虽说也是View的一种,但是它没有大小,没有绘制功能,也不参与布局,资源消耗非常低,将它放置在布局当中基本可以认为是完全不会影响性能的。
下面我们来学习一下 ViewStub的使用方法吧!
<?xml version="1.0" encoding="utf-8"?>
<LinearLayout xmlns:android="http://schemas.android.com/apk/res/android"
 android:layout_width="match_parent"
 android:layout_height="match_parent"
 android:orientation="vertical"
 android:padding="20dp">

 <EditText
  android:id="@+id/et_name"
  android:layout_width="150dp"
  android:drawableRight="@drawable/a0e"
  android:layout_height="wrap_content"
  android:hint="@string/name" />

 <ViewStub
  android:id="@+id/view_stub"
  android:layout_width="wrap_content"
  android:layout_height="wrap_content"
  android:layout="@layout/item_name" />

 <EditText
  android:layout_width="150dp"
  android:layout_height="wrap_content"
  android:hint="@string/comp" />

 <EditText
  android:layout_width="150dp"
  android:layout_height="wrap_content"
  android:hint="@string/lead" />

</LinearLayout>
item_name.xml 布局如下:
<?xml version="1.0" encoding="utf-8"?>
<LinearLayout xmlns:android="http://schemas.android.com/apk/res/android"
 android:layout_width="match_parent"
 android:layout_height="match_parent"
 android:orientation="vertical">

 <EditText
  android:id="@+id/et_name1"
  android:layout_width="150dp"
  android:layout_height="wrap_content"
  android:hint="@string/name1" />

 <EditText
  android:id="@+id/et_name2"
  android:layout_width="150dp"
  android:layout_height="wrap_content"
  android:hint="@string/name2" />

 <EditText
  android:id="@+id/et_name3"
  android:layout_width="150dp"
  android:layout_height="wrap_content"
  android:hint="@string/name3" />

 <EditText
  android:id="@+id/et_name4"
  android:layout_width="150dp"
  android:layout_height="wrap_content"
  android:hint="@string/name4" />

</LinearLayout>
然后你在代码中这么使用即可
findViewById(R.id.et_name).setOnClickListener(new View.OnClickListener() {
   @Override
   public void onClick(View v) {
    ViewStub viewStub = (ViewStub) findViewById(R.id.view_stub);
    if (null != viewStub) {
     //主要是这一句显示更多布局
     View view = viewStub.inflate();
     EditText name1 = (EditText) view.findViewById(R.id.et_name1);
     EditText name2 = (EditText) view.findViewById(R.id.et_name2);
     EditText name3 = (EditText) view.findViewById(R.id.et_name3);
     EditText name4 = (EditText) view.findViewById(R.id.et_name4);
    }
   }
  });
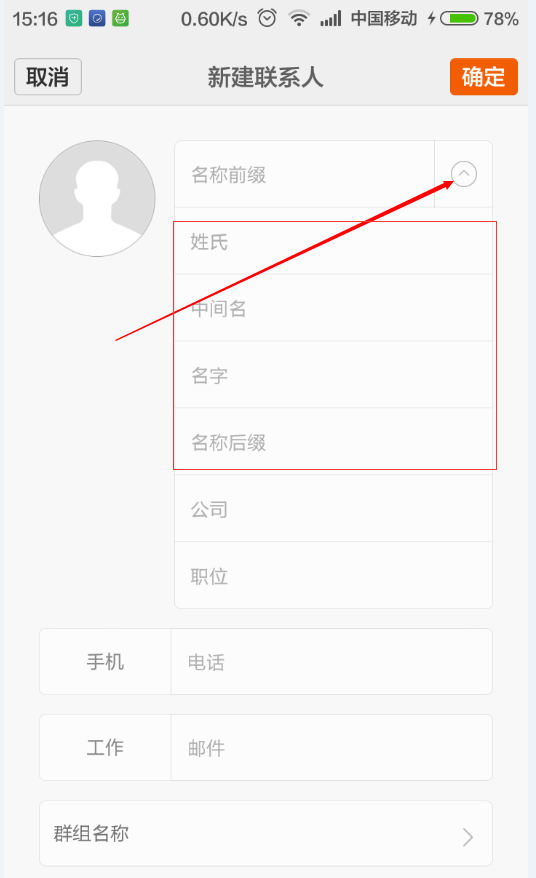
效果图如下:
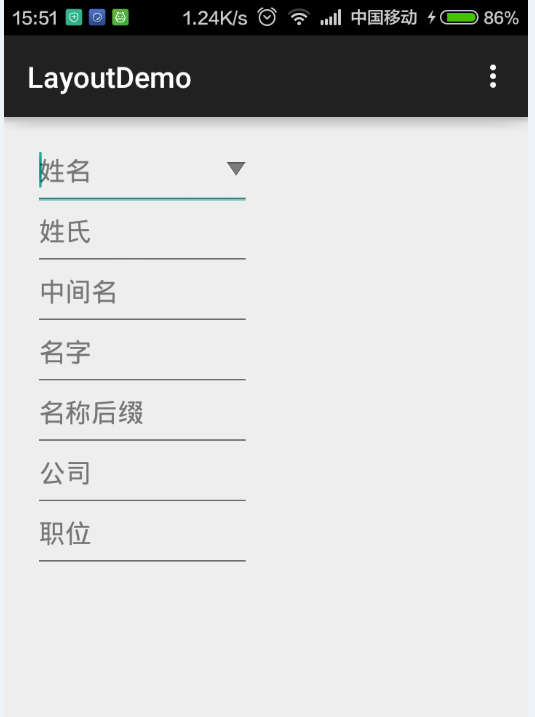
从效果图可以看出,当用户点击姓名下拉按钮时,其他关于姓名的布局就加载出来了,而且原来的布局是显示在ViewStub布局之下的,位置显示没有任何异常。当然你可以通过 setVisibility(View.VISIBLE)或者viewStub.inflate()方来来让其显示,通过setVisibility(View.INVISIBLE)来隐藏 ViewStub。
Android Lint 工具
这里不展开介绍 Lint 工具,感兴趣的童鞋可以自己网上搜索一把,这个工具主要是用来检查工程中代码的不合理,布局不合理,资源重复,图片重复,等,让开发者进一步优化自己的应用。如果你是AS 用户,你可以在工具栏 Analyze—>Inspect Code 打开此工具使用。
相关推荐
-
android 之listview 优化方法
这个东西做android是必备的,我相信你一定也会,但是我写下来的目的就是记录一下. 这个东西面试也很多会问到的,那么我们怎么回答那? 首先我认为有这么几点: 1.listview在定义的时候宽和高最好固定一下,这样可以减少listview测量次数,避免每次加载的时候都要去进行测量. 2.分页加载,这也是优化之一,优化内存,还有体验感,有兴趣的可以试试大数据加载: 3.convertView 就是布局的复用: 4.ViewHolder的使用 目的减少findviewByID的次数: 下面代码验证
-
Android图片性能优化详解
1. 图片的格式 目前移动端Android平台原生支持的图片格式主要有:JPEG.PNG.GIF.BMP.和WebP(自从Android 4.0开始支持),但是在Android应用开发中能够使用的编解码格式只有三种:JPEG.PNG.WebP,图片格式可以通过查看Bitmap类的CompressFormat枚举值来确定. public static enum CompressFormat { JPEG. PNG. WebP; private CompressFormat() { } } 如果要在
-
Android端TCP长连接的性能优化教程分享
前言 大家应该都知道,在Android端实现TCP长连接场景其实不多,我们最熟悉的不过推送和HTTP协议的实现(OkHttp),本文讨论的是在实现推送长连接的情况下怎么来做性能优化,下文只是我的一点拙见,有不妥之处还望指出,下面话不多说了,来一起看看详细的介绍吧. 推送长连接 可以说大部分APP是离不开推送(push)这个功能的,不过平常我们都是接入第三方SDK(极光.个推等)居多,因为要做一个推送服务,不光客户端要编写相应的Socket通信代码,服务器端更是麻烦,要处理大规模的长连接服务,消息
-
Android优化之电量优化的实现
Android 5.0 后用 Battery Historian 工具分析电量. 耗电因素 移动网络请求 手机通过内置的射频模块和基站联系,从而链接上网的,而这个射频模块(radio)是非常耗电的,为了控制这个射频模块的耗电,硬件驱动及 Android RIL 层做了很多处理.例如可以单独关闭 radio(飞行模式),间歇性假休眠 radio(有数据发生时才上电,保持一个频率的与基站交互)等等.如今的 App 都是移动互联网 App,不可避免的会有大量的网络请求,会导致 radio 一直处于活跃
-
Android 优化之卡顿优化的实现
Android 系统每隔 16ms 会发出 VSYNC 信号重绘界面(Activity).之所以是 16ms,是因为 Android 设定的刷新率是 60FPS(Frame Per Second),也就是每秒 60 帧的刷新率,约合 16ms 刷新一次. 这就意味着,我们需要在 16ms 内完成下一次要刷新的界面的相关运算,以便界面刷新更新. 假设我们更新屏幕的背景图片需要 24ms 来做这次运算,当系统在第一个 16ms 时刷新界面,由于运算还没有结束,无法绘出图片.当系统隔 16ms 再发一
-
Android 优化之app启动优化的实现
App 启动方式 冷启动 App 没有启动过或 App 进程被杀,系统中不存在该 App 进程,此时启动即为冷启动.需要创建 App 进程,加载相关资源,启动 Main Thread,初始化首屏 Activity 等.在这个过程中,屏幕会显示一个空白的窗口(颜色基于主题),直至首屏 Activity 完全启动. 热启动 热启动意味着 App 进程只是处于后台,系统只是将其从后台带到前台展示给用户.类同与冷启动,在这个过程中,屏幕会显示一个空白的窗口(颜色基于主题),直至 activity 渲染完
-
Android实战APP启动速度优化
APP启动速度非常重要,APP启动速度慢,可能会造成用户体验不良好,尤其是在最近用Android studio之后,如果长时间不打开app,启动速度就会特别的慢,下面我们一起探讨一下影响app启动速度的原因,以及解决方案. 检测启动时间 首先我们要知道app的启动时间,然后你也可以凭着感觉来,这里我教大家一个装逼的方法: adb shell am start -W [packageName]/[.MainActivity] 用adb命令可以检测启动时间,示例如下: ./adb shell am
-
详解Android布局优化
怎样才能写出优秀的Android App,是每一个程序员追求的目标.那么怎么才能写出一个优秀的App呢?相信很多初学者也会有这种迷茫.一句话来回答这个问题:细节很重要.今天我们就从最基础的XML布局来谈谈怎么提高Android性能问题吧! 也许你经常会遇到比较复杂的布局,这种情况下,最简单的方法就是多层嵌套实现效果,但是最简单的方法是否是最优的方法呢? 这里需要打一个大大的问号?????经验告诉我们,往往简单的方法,得到的结果不是最优解,那么我们通过一个例子来研究一下怎么去优化我们的XML布局吧
-

详解Android布局加载流程源码
一.首先看布局层次 看这么几张图 我们会发现DecorView里面包裹的内容可能会随着不同的情况而变化,但是在Decor之前的层次关系都是固定的.即Activity包裹PhoneWindow,PhoneWindow包裹DecorView.接下来我们首先看一下三者分别是如何创建的. 二.Activity是如何创建的 首先看到入口类ActivityThread的performLaunchActivity方法: private Activity performLaunchActivity(Activi
-
详解Android性能优化之启动优化
1.为什么要进行启动优化 网上流行一种说法,就是8秒定律,意思是说,如果用户在打开一个页面,在8秒的时间内还没有打开,那么用户大概的会放弃掉,意味着一个用户的流失.从这里就可以看出,启动优化的重要性了. 2.启动的分类 2.1 冷启动 先来看看冷启动的流程图 从图中可以看出,APP启动的过程是:ActivityManagerProxy 通过IPC来调用AMS(ActivityManagerService),AMS通过IPC启动一个APP进程,ApplicationThread通过反射来创建App
-
详解Android内存优化策略
目录 前言 一.内存优化策略 二.具体优化的点 1.避免内存泄漏 2.Bitmap等大对象的优化策略 (1) 优化Bitmap分辨率 (2) 优化单个像素点内存 (3) Bitmap的缓存策略 (4) drawable资源选择合适的drawable文件夹存放 (5) 其他大对象的优化 (6) 避免内存抖动 3.原生API回调释放内存 4.内存排查工具 (1)LeakCanary监测内存泄漏 (2)通过Proflier监控内存 (3)通过MAT工具排查内存泄漏 总结 前言 在开始之前需要先搞明白一
-
详解Android性能优化之内存泄漏
综述 内存泄漏(memory leak)是指由于疏忽或错误造成程序未能释放已经不再使用的内存.那么在Android中,当一个对象持有Activity的引用,如果该对象不能被系统回收,那么当这个Activity不再使用时,这个Activity也不会被系统回收,那这么以来便出现了内存泄漏的情况.在应用中内出现一次两次的内存泄漏获取不会出现什么影响,但是在应用长时间使用以后,若是存在大量的Activity无法被GC回收的话,最终会导致OOM的出现.那么我们在这就来分析一下导致内存泄漏的常见因素并且如何
-
详解Android内存泄露及优化方案
目录 一.常见的内存泄露应用场景? 1.单例的不恰当使用 2.静态变量导致内存泄露 3.非静态内部类导致内存泄露 4.未取消注册或回调导致内存泄露 5.定时器Timer 和 TimerTask 导致内存泄露 6.集合中的对象未清理造成内存泄露 7.资源未关闭或释放导致内存泄露 8.动画造成内存泄露 9.WebView 造成内存泄露 总结 一.常见的内存泄露应用场景? 1.单例的不恰当使用 单例是我们开发中最常见和使用最频繁的设计模式之一,所以如果使用不当就会导致内存泄露.因为单例的静态特性使得它
-
详解Android 硬布局item的高级写法
本文主要介绍了Android 硬布局item的高级写法,分享给大家,具体如下: 效果: 这种布局应该是非常常见了,且写的比较多. 今天简单探讨一下效果图中上下两种布局的写法. 比较 上下效果一致 行数 层级 上部分 121 3 下部分 55 2 下部分继续精简 28 2 可以看出,对比还是很明显的,精简到最后只有最开始的四分之一. 上部分 先看常规item写法,横向的LinearLayout嵌套三个子View,分别是 左边的ImageView, 中间的TextView, 和右边的ImageVie
-
详解Android内存泄露及优化方案一
目录 一.常见的内存泄露应用场景? 1.单例的不恰当使用 2.静态变量导致内存泄露 3.非静态内部类导致内存泄露 4.未取消注册或回调导致内存泄露 5.定时器Timer 和 TimerTask 导致内存泄露 6.集合中的对象未清理造成内存泄露 7.资源未关闭或释放导致内存泄露 8.动画造成内存泄露 9.WebView 造成内存泄露 总结 一.常见的内存泄露应用场景? 1.单例的不恰当使用 单例是我们开发中最常见和使用最频繁的设计模式之一,所以如果使用不当就会导致内存泄露.因为单例的静态特性使得它
-
详解Android 多级联动控件实现思路讨论
最近有一个需求是选择多级联动数据,数据级别不固定,可能是五级,可能是两级,具体看用户等级. 所以就需要一个多级联动选择控件 ,在网上一番搜索或找到了这个控件, Android-PickerView 这个控件在三级以内的的联动都没有问题,但是最多只能到三级. 我在原有的基础上做了一些扩展,主要是添加了两个 picker MultiWheelPickerView 可以根据数据动态生成多个滚轮,不再局限于两个三个选项 DynamicWheelPickerView 也是动态生成,但可以一级一级的加载数据
-
详解Android Lint的原理及其使用
Android Lint 原理及使用详解 Android Lint 是 ADT 16中引入的新工具,用于扫描 Android 项目源中的潜在错误. Lint 是 Android 提供的一个强大的,用于静态扫描应用源码并找出其中的潜在问题的实用工具.lint 工具可以检查你的 Android 项目源文件是否有潜在的错误,以及在正确性.安全性.性能.易用性.无障碍性和国际化方面是否需要优化改进. Lint 既可以用作命令行工具,也可以与 Eclipse 和 IntelliJ 集成在一起.它被设计成独