Bootstrap 实现表格样式、表单布局的实例代码

1. 表格的一些样式

举例:

<!DOCTYPE html>
<html>
<head>
<meta http-equiv="Content-Type" content="text/html; charset=utf-8"/>
<title>My Test bootstrap</title>
  <link rel="stylesheet" href="./css/bootstrap.min.css">
  <script type="text/javascript" src="./js/bootstrap.min.js"></script>
</head>
<body>
 <table class="table table-striped">
 <caption>这是一个测试表格</caption>
 <thead>
  <tr>
   <th>姓名</th>
   <th>年龄</th>
   <th>地区</th>
  </tr>
 </thead>
 <tbody>
  <tr>
   <td>小胡子</td>
   <td>26</td>
   <td>陕西</td>
  </tr>
  <tr>
   <td>大胡子</td>
   <td>26</td>
   <td>北京</td>
  </tr>
  </tbody>
</table>
</body>
</html>

页面效果:

2. 表格行或单元格的样式
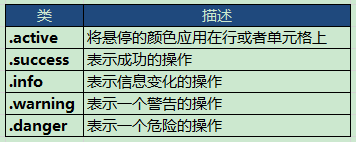
举例:

<!DOCTYPE html>
<html>
<head>
<meta http-equiv="Content-Type" content="text/html; charset=utf-8"/>
<title>My Test bootstrap</title>
  <link rel="stylesheet" href="./css/bootstrap.min.css">
  <script type="text/javascript" src="./js/bootstrap.min.js"></script>
</head>
<body>
 <table class="table table-striped">
 <caption>这是一个测试表格</caption>
 <thead>
  <tr>
   <th>姓名</th>
   <th>年龄</th>
   <th>地区</th>
  </tr>
 </thead>
 <tbody>
  <tr class="info">
   <td>小胡子</td>
   <td>26</td>
   <td>陕西</td>
  </tr>
  <tr class="warning">
   <td>大胡子</td>
   <td>26</td>
   <td>北京</td>
  </tr>
  </tbody>
</table>
</body>
</html>

页面效果:

3. 表单布局

(1)垂直表单:

<!DOCTYPE html>
<html>
<head>
<meta http-equiv="Content-Type" content="text/html; charset=utf-8"/>
<title>My Test bootstrap</title>
  <link rel="stylesheet" href="./css/bootstrap.min.css">
  <script type="text/javascript" src="./js/bootstrap.min.js"></script>
</head>
<body>
<form role="form">
 <div class="form-group">
  <label for="name">姓名</label>
  <input type="text" class="form-control" id="name" placeholder="请输入姓名">
 </div>
 <div class="form-group">
  <label for="inputfile">选择文件</label>
  <input type="file" id="inputfile">
 </div>
 <button type="submit" class="btn btn-default">提交</button>
</form>
</body>
</html>

效果:

(2)内联表单:它的所有元素是内联的,向左对齐的,标签是并排的

<!DOCTYPE html>
<html>
<head>
<meta http-equiv="Content-Type" content="text/html; charset=utf-8"/>
<title>My Test bootstrap</title>
  <link rel="stylesheet" href="./css/bootstrap.min.css">
  <script type="text/javascript" src="./js/bootstrap.min.js"></script>
</head>
<body>
<form role="form" class="form-inline">
 <div class="form-group">
  <label for="name">姓名</label>
  <input type="text" class="form-control" id="name" placeholder="请输入姓名">
 </div>
 <div class="form-group">
  <label for="inputfile">选择文件</label>
  <input type="file" id="inputfile">
 </div>
 <button type="submit" class="btn btn-default">提交</button>
</form>
</body>
</html>

效果:

(3)水平表单:水平表单与其他表单不仅标记的数量上不同,而且表单的呈现形式也不同

<!DOCTYPE html>
<html>
<head>
<meta http-equiv="Content-Type" content="text/html; charset=utf-8"/>
<title>My Test bootstrap</title>
  <link rel="stylesheet" href="./css/bootstrap.min.css">
  <script type="text/javascript" src="./js/bootstrap.min.js"></script>
</head>
<body>
<form role="form" class="form-horizontal">
 <div class="form-group">
    <label for="name" class="col-sm-2 control-label">姓名</label>
    <div class="col-sm-10">
      <input type="text" class="form-control" id="name" placeholder="请输入姓名">
    </div>
 </div>
 <div class="form-group">
    <label for="inputfile" class="col-sm-2 control-label">选择文件</label>
    <div class="col-sm-10">
      <input type="file" id="inputfile">
    <div>
 </div>
 <div class="form-group">
   <div class="col-sm-12">
    <button type="submit" class="btn btn-default">提交</button>
   </div>
 </div>
</form>
</body>
</html>

效果:

总结

以上所述是小编给大家介绍的Bootstrap 实现表格样式、表单布局的实例代码,希望对大家有所帮助,如果大家有任何疑问请给我留言,小编会及时回复大家的。在此也非常感谢大家对我们网站的支持!

(0)

相关推荐

  • Bootstrap表单布局

    Bootstrap 提供了下列类型的表单布局: •垂直表单(默认) -> 这个不好看,都是手机版了,PC版占一排不好看: •内联表单 -> 我相信这个才是你想要的,PC版响应横排,手机版响应竖排. •水平表单 -> 用栅格系统控制显示 一.垂直表单 垂直表单使用的标准步骤 1.<form> 元素添加 role="form". 2.把标签和控件放在一个带有"form-group"的<div> 中,获取最佳间距. 3.向所有的文

  • 第七篇Bootstrap表单布局实例代码详解(三种表单布局)

    Bootstrap提供了三种表单布局:垂直表单,内联表单和水平表单.下面逐一给大家介绍,有兴趣的朋友一起学习吧. 创建垂直或基本表单: •·向父 <form> 元素添加 role="form". •·把标签和控件放在一个带有 class .form-group 的 <div> 中.这是获取最佳间距所必需的. •·向所有的文本元素 <input>.<textarea> 和 <select> 添加 class .form-cont

  • BootStrap CSS全局样式和表格样式源码解析

    CSS全局样式 1.布局容器类样式:.container 和 .container-fluid .container 固定宽度并且具有响应式. .container-fluid 自由宽度(100%宽度). 这2个class是直接在body标签下建立一个div标签,class等于这2个中的一个. 然后其他内容全部写在这个div标签中即可! 例如: <!DOCTYPE html> <html> <head> <title>BootStrap基础入门</ti

  • Bootstrap表单布局样式代码

    废话不多说了,直接给大家贴代码了. <form class="form-horizontal" role="form"> <fieldset> <legend>配置数据源</legend> <div class="form-group"> <label class="col-sm-2 control-label" for="ds_host"&

  • 第六篇Bootstrap表格样式介绍

    基本表格: <table> <tr><td>用户名</td><td>密码</td></tr> <tr><td>啊啊啊</td><td>1111</td></tr> </table> 在<table>标签添加.table类可以为其赋予基本的样式 ,少量的内补(padding)和水平方向的分隔线. 显示效果如下: 条纹状表格: 在t

  • Bootstrap表单布局样式源代码

    Bootstrap提供了三种表单布局:垂直表单,内联表单和水平表单 创建垂直或基本表单: •·向父 <form> 元素添加 role="form". •·把标签和控件放在一个带有 class .form-group 的 <div> 中.这是获取最佳间距所必需的. •·向所有的文本元素 <input>.<textarea> 和 <select> 添加 class .form-control 内联表单: 内联表单中所有元素都向左对

  • Bootstrap三种表单布局的使用方法

    Bootstrap提供了三种表单布局:垂直表单,内联表单和水平表单  创建垂直或基本表单:  •·向父 <form> 元素添加 role="form".  •·把标签和控件放在一个带有 class .form-group 的 <div> 中.这是获取最佳间距所必需的.  •·向所有的文本元素 <input>.<textarea> 和 <select> 添加 class .form-control <form role=&

  • BootStrap智能表单实战系列(四)表单布局介绍

    什么是 Bootstrap? Bootstrap 是一个用于快速开发 Web 应用程序和网站的前端框架.Bootstrap 是基于 HTML.CSS.JAVASCRIPT 的. 表单的布局分为自动布局和自定义布局两种: 自动布局就是根据配置项中第二级配置项中数组的长度来自动使用不同的bootstrap栅格,通过设置autoLayout为true可以实现自动布局 自动以布局就是根据autoLayout来决定使用的栅格,通过设置autoLayout:'1,2,1,2,2,4' 表示 第一.二列占3格

  • Bootstrap 实现表格样式、表单布局的实例代码

    1. 表格的一些样式 举例: <!DOCTYPE html> <html> <head> <meta http-equiv="Content-Type" content="text/html; charset=utf-8"/> <title>My Test bootstrap</title> <link rel="stylesheet" href="./css

  • 分享Bootstrap简单表格、表单、登录页面

    1.表格 <!doctype html> <html> <head> <meta charset="utf-8"> <title>表格</title> <meta name="viewport" content="width=device-width, initial-scale=1"> <link href="css/bootstrap.css&

  • AngularJs表单校验功能实例代码

    废话不多说了,具体代码如下所示: <!DOCTYPE html> <html ng-app="angularFormCheckModule"> <head> <meta charset="UTF-8"> <title>angular表单校验</title> <link rel="stylesheet" href="../css/bootstrap.min.cs

  • jQuery完成表单验证的实例代码(纯代码)

    废话不多说了,直接给大家贴代码了,具体代码如下所示: <!doctype html> <head> <meta charset=utf-8" /> <title>表单验证</title> <link href="css/style1.css" rel="external nofollow" rel="stylesheet" type="text/css"

  • 表单验证正则表达式实例代码详解

    表单验证正则表达式具体内容如下所示: 首先给大家解释一些符号相关的意义 1.  /^$/ 这个是个通用的格式. ^ 匹配输入字符串的开始位置:$匹配输入字符串的结束位置 2. 里面输入需要实现的功能. * 匹配前面的子表达式零次或多次:        + 匹配前面的子表达式一次或多次:        ?匹配前面的子表达式零次或一次:        \d  匹配一个数字字符,等价于[0-9] 下面通过一段代码给大家分析表单验证正则表达式,具体代码如下: <!DOCTYPE html> <h

  • Vue表单绑定的实例代码(单选按钮,选择框(单选时,多选时,用 v-for 渲染的动态选项)

    <!DOCTYPE html> <html> <head> <meta charset="utf-8"> <title>Vue表单绑定(单选按钮,选择框(单选时,多选时)</title> </head> <body> <!-- 单选按钮 --> <div id="app"> <input type="radio" valu

  • vue中使用element-ui进行表单验证的实例代码

    element-ui 中验证 一.简单逻辑验证(直接使用rules) 实现思路 •html中给el-form增加 :rules="rules" •html中在el-form-item 中增加属性 prop="名称" •js中直接在data中定义rules:{} •html部分 <el-form ref="form" :rules="rules" :model="form" label-width=&q

  • React中使用async validator进行表单验证的实例代码

    react中进行表单验证毫无疑问是繁琐的,尤其对于动态添加或删除的表单,其验证逻辑更为复杂, 目前UI框架使用material ui ,但其表单处理不太理想,而后研究了一下另一个UI 框架 ant design, 其对表单的处理大大方便了逻辑的编写, 它使用async-validator处理验证逻辑 目前更换框架毫无疑问是不现实的,于是就想直接引入async-validator,下面描述一个简单的使用,具体信息可以去github上查看 validate.js import Schema from

  • Bootstrap所支持的表单控件实例详解

    Bootstrap所支持的表单控件如下所示: Bootstrap 支持最常见的表单控件,主要是 input.textarea.checkbox.radio 和 select. 输入框(Input) 最常见的表单文本字段是输入框 input.用户可以在其中输入大多数必要的表单数据.Bootstrap 提供了对所有原生的 HTML5 的 input 类型的支持,包括:text.password.datetime.datetime-local.date.month.time.week.number.e

  • 基于react hooks,zarm组件库配置开发h5表单页面的实例代码

    最近使用React Hooks结合zarm组件库,基于js对象配置方式开发了大量的h5表单页面.大家都知道h5表单功能无非就是表单数据的收集,验证,提交,回显编辑,通常排列方式也是自上向下一行一列的方式显示 , 所以一开始就考虑封装一个配置化的页面生成方案,目前已经有多个项目基于此方式配置开发上线,思路和实现分享一下. 使用场景 任意包含表单的h5页面(使用zarm库,或自行适配自己的库) 目标 代码实现简单和简洁 基于配置 新手上手快,无学习成本 老手易扩展和维护 写之前参考了市面上的一些方案

随机推荐