iOS实现底部弹出PopupWindow效果 iOS改变背景透明效果
底部弹出PopupWindow,背景变为半透明效果,采用两种方式实现
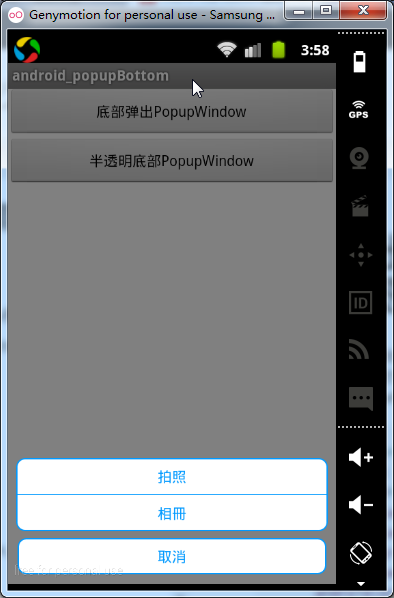
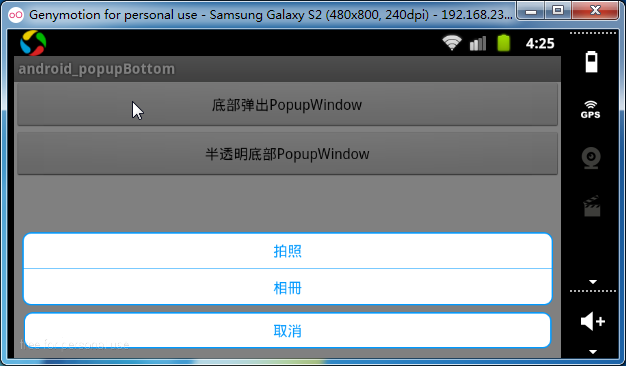
先来看看运行效果图


[方式一]实现从底部弹出PopupWindow
原理:定义一个高度为wrap_content的PopupWindow布局文件,根据屏幕底部的位置显示在Bottom
1.首先定义一个高度为wrap_content的PopupWindow布局文件
<?xml version="1.0" encoding="utf-8"?>
<LinearLayout xmlns:android="http://schemas.android.com/apk/res/android"
  android:layout_width="match_parent"
  android:layout_height="wrap_content"
  android:gravity="center"
  android:padding="8dp"
  android:orientation="vertical" >

  <LinearLayout
    android:layout_width="match_parent"
    android:layout_height="wrap_content"
    android:gravity="center"
    android:orientation="vertical"
    android:background="@drawable/shape_info_bg">
    <TextView android:layout_width="match_parent"
      android:layout_height="wrap_content"
      android:padding="8dp"
      android:gravity="center"
      android:textColor="@color/theme_blue"
      android:text="拍照"/>
    <View android:layout_width="match_parent"
      android:layout_height="0.2dp"
      android:background="@color/theme_blue"/>
    <TextView android:layout_width="match_parent"
      android:layout_height="wrap_content"
      android:padding="8dp"
      android:gravity="center"
      android:textColor="@color/theme_blue"
      android:text="相冊"/>
  </LinearLayout>

  <RelativeLayout
    android:layout_width="match_parent"
    android:layout_height="wrap_content"
    android:layout_marginTop="5dp"
    android:padding="1dp">
    <Button
      android:id="@+id/btn_cancle"
      android:layout_width="match_parent"
      android:layout_height="wrap_content"
      android:gravity="center"
      android:padding="8dp"
      android:textColor="@color/theme_blue"
      android:background="@drawable/shape_info_bg"
      android:text="取消" />
  </RelativeLayout>
</LinearLayout>
2.在PopupWindow所在的Activity根布局中声明id(在弹出PopupWindow作为位置参考的相对View)
<?xml version="1.0" encoding="utf-8"?>
<LinearLayout xmlns:android="http://schemas.android.com/apk/res/android"
  android:id="@+id/root_main"
  android:layout_width="match_parent"
  android:layout_height="match_parent"
  android:orientation="vertical"
  android:background="@color/white">

  <Button android:layout_width="match_parent"
    android:layout_height="wrap_content"
    android:text="底部弹出PopupWindow"
    android:onClick="openPop"/>

   <Button android:layout_width="match_parent"
    android:layout_height="wrap_content"
    android:text="半透明底部PopupWindow"
    android:onClick="openPop2"/>
</LinearLayout>
3.MainActivity中点击按钮弹出PopupWindow
/** 弹出底部对话框 */
public void openPop(View view) {
  View popView = LayoutInflater.from(mContext).inflate(
      R.layout.pop_bottom, null);
  View rootView = findViewById(R.id.root_main); // 當前頁面的根佈局
  final PopupWindow popupWindow = new PopupWindow(popView,    LayoutParams.MATCH_PARENT,LayoutParams.WRAP_CONTENT);

  setBackgroundAlpha(0.5f);//设置屏幕透明度

  popupWindow.setBackgroundDrawable(new BitmapDrawable());
  popupWindow.setFocusable(true);// 点击空白处时,隐藏掉pop窗口
  // 顯示在根佈局的底部
  popupWindow.showAtLocation(rootView, Gravity.BOTTOM | Gravity.LEFT, 0,
      0);

}
4.设置背景变为半透明效果,由于PopupWindow中并未设置背景色,所以弹出时PopupWindow以外的部分显示当前Acitivity的内容,设置背景色原理通过设置当前Activity所在屏幕的透明度来达到背景透明的效果!在退出时popupWindow时,需要恢复屏幕原有透明度
popupWindow.setOnDismissListener(new OnDismissListener() {
      @Override
      public void onDismiss() {
        // popupWindow隐藏时恢复屏幕正常透明度
        setBackgroundAlpha(1.0f);
      }
    });
/**
 * 设置添加屏幕的背景透明度
 *
 * @param bgAlpha
 *      屏幕透明度0.0-1.0 1表示完全不透明
 */
public void setBackgroundAlpha(float bgAlpha) {
  WindowManager.LayoutParams lp = ((Activity) mContext).getWindow()
      .getAttributes();
  lp.alpha = bgAlpha;
  ((Activity) mContext).getWindow().setAttributes(lp);
}
[方式二]全屏PopupWindow实现底部弹出,背景半透明
原理:弹出一个全屏popupWindow,高度为match_parent,将根布局的Gravity属性设置bottom,根布局背景设置为一个半透明的颜色#36000000, 弹出时全屏的popupWindow半透明效果背景覆盖了在Activity之上 给人感觉上是popupWindow弹出后,背景变成半透明
布局文件
<?xml version="1.0" encoding="utf-8"?>
<LinearLayout xmlns:android="http://schemas.android.com/apk/res/android"
  android:layout_width="match_parent"
  android:layout_height="match_parent"
  android:padding="8dp"
  android:orientation="vertical"
  android:background="#36000000"
  android:gravity="bottom">

  <LinearLayout
    android:layout_width="match_parent"
    android:layout_height="wrap_content"
    android:gravity="center"
    android:orientation="vertical"
    android:background="@drawable/shape_info_bg">
    <TextView android:layout_width="match_parent"
      android:layout_height="wrap_content"
      android:padding="8dp"
      android:gravity="center"
      android:textColor="@color/theme_blue"
      android:text="拍照"/>
    <View android:layout_width="match_parent"
      android:layout_height="0.2dp"
      android:background="@color/theme_blue"/>
    <TextView android:layout_width="match_parent"
      android:layout_height="wrap_content"
      android:padding="8dp"
      android:gravity="center"
      android:textColor="@color/theme_blue"
      android:text="相冊"/>
  </LinearLayout>

  <RelativeLayout
    android:layout_width="match_parent"
    android:layout_height="wrap_content"
    android:layout_marginTop="5dp"
    android:padding="1dp">
    <Button
      android:id="@+id/btn_cancle"
      android:layout_width="match_parent"
      android:layout_height="wrap_content"
      android:gravity="center"
      android:padding="8dp"
      android:textColor="@color/theme_blue"
      android:background="@drawable/shape_info_bg"
      android:text="取消" />
  </RelativeLayout>
</LinearLayout>
弹出方法和方式一相似,不过不用再监听popupWindow的退出事件
/**
 * 弹出底部对话框,达到背景背景透明效果
 *
 * 实现原理:弹出一个全屏popupWindow,将Gravity属性设置bottom,根背景设置为一个半透明的颜色,
 * 弹出时popupWindow的半透明效果背景覆盖了在Activity之上 给人感觉上是popupWindow弹出后,背景变成半透明
 */
public void openPop2(View view) {
  View popView = LayoutInflater.from(mContext).inflate(
      R.layout.pop_bottom_alpha, null);
  View rootView = findViewById(R.id.root_main); // 當前頁面的根佈局
  final PopupWindow popupWindow = new PopupWindow(popView,
      LayoutParams.MATCH_PARENT, LayoutParams.MATCH_PARENT);

  // 设置弹出动画
  popupWindow.setAnimationStyle(R.style.AnimationFadeBottom);
  popupWindow.setBackgroundDrawable(new BitmapDrawable());
  // 顯示在根佈局的底部
  popupWindow.showAtLocation(rootView, Gravity.BOTTOM | Gravity.LEFT, 0,
      0);
}
以上就是本文的全部内容,希望对大家的学习有所帮助,也希望大家多多支持我们。
赞 (0)

