微信小程序滚动、轮播图和文本实例详解
目录
- 小程序的宿主环境 - 组件
- 1.scroll-view 组件的基本使用
- 2.swiper 和 swiper-item 组件的基本使用
- 3.text 组件的基本使用
- 4.rich-text 组件的基本使用
- 附:微信小程序轮播图单独添加图片、修改轮播图图片、单独修改某张图片
- 总结
小程序的宿主环境 - 组件
1.scroll-view 组件的基本使用
实现如图的纵向滚动效果
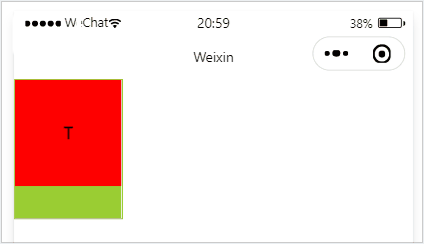
<scroll-view class="container_2" scroll-y>
 <view>T</view>
<view>S</view>
<view>J</view>
</scroll-view>
.container_2 view{
width: 100px;
height: 100px;
text-align: center;
line-height: 100px;
}
.container_2 view:nth-child(1){
background-color: red;
}
.container_2 view:nth-child(2){
  background-color: yellowgreen;
}
.container_2 view:nth-child(3){
  background-color: blue;
}
.container_2{
  display: flex;
  justify-content: space-around
}

.container_2{
  border: 1px solid yellowgreen;
  height: 130px;
  width: 100px;
}
scroll-y 改成 scroll-x
实现如图的横向滚动效果:
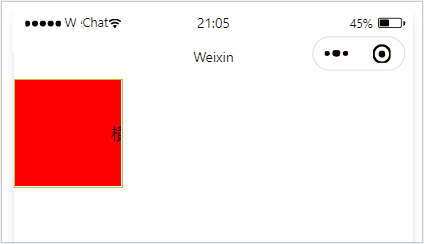
<scroll-view class="container_2" scroll-x>
 <view>横           向           滑           动           演           示</view>
</scroll-view>
.container_2 view{
width: 300px;
height: 100px;
text-align: center;
line-height: 100px;
}
.container_2 view:nth-child(1){
background-color: red;
}
.container_2{
  display: flex;
  justify-content: space-around
}

.container_2{
  border: 1px solid yellowgreen;
  height: 100px;
  width: 100px;
}
2.swiper 和 swiper-item 组件的基本使用
实现如图的轮播图效果:
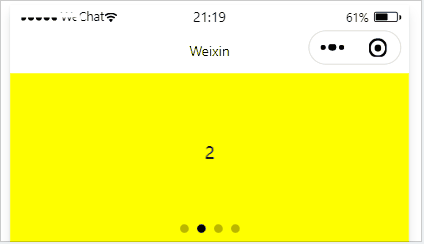
<swiper class="container_3" indicator-dots>
<swiper-item>
<view class="item">1</view>
</swiper-item>

<swiper-item>
  <view class="item">2</view>
</swiper-item>

<swiper-item>
  <view class="item">3</view>
</swiper-item>

<swiper-item>
  <view class="item">4</view>
</swiper-item>
</swiper>
.container_3{
  height: 160px;
}

.item{
  height: 100%;
  line-height: 150px;
  text-align: center;
}

swiper-item:nth-child(1) .item{
  background-color: burlywood;
}
swiper-item:nth-child(2) .item{
  background-color: yellow;
}
swiper-item:nth-child(3) .item{
  background-color: pink;
}
swiper-item:nth-child(4) .item{
  background-color: aqua;
}
.swiper 组件的常用属性
|
属性 |
类型 |
默认值 |
说明 |
|
indicator-dots |
boolean | false | 是否显示面板指示点 |
| indicator-color | color | rgba(0, 0, 0, .3) | 指示点颜色 |
| indicator-active-color | color | #000000 | 当前选中的指示点颜色 |
| autoplay | boolean | false | 是否自动切换 |
| interval | number | 5000 | 自动切换时间间隔 |
| circular | boolean | false | 是否采用衔接滑动 |
3.text 组件的基本使用
文本组件
类似于 HTML 中的 span 标签,是一个行内元素
通过 text 组件的 selectable 属性,实现长按选中文本内容的效果:
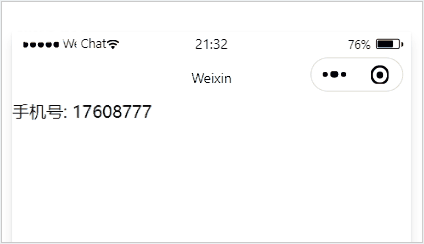
<view>
手机号:
<text selectable>17608777</text>
</view>
4.rich-text 组件的基本使用
富文本组件 支持把 HTML 字符串渲染为 WXML 结构
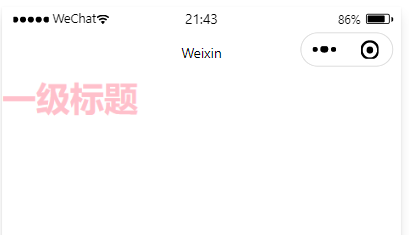
<rich-text nodes="<h1 style='color:pink;'>一级标题 <h1>"></rich-text>
附:微信小程序轮播图单独添加图片、修改轮播图图片、单独修改某张图片
<!--pages/swiper/swiper.wxml-->
<text>pages/swiper/swiper.wxml</text>
<!-- 滑块视图 先添加一个滑块容器 -->
<!-- 是否自动播放 ,增加提示点 ,是否衔接滑动(例如从最后一张到第一张),提示点颜色 -->
<swiper
autoplay="{{false}}"
indicator-dots
circular
indicator-color="rgba(0,0,0,1)">
<!-- 添加一个内容  更改轮播图图片 -->
<block wx:for="{{image}}" wx:key="this" wx:for-index="ind1">
<!-- 将该for的下标Index命名为ind1  可以不用block,可以直接在swiper-item使用wx:for-->
<swiper-item  >
<image src="{{item}}" data-ccc="ind1" ></image>
<!-- 将下标给到本地数据库data,并且命名ccc -->
</swiper-item >
</block>
</swiper>
<button bindtap="getImg">更改轮播图的图片</button>
<button bindtap="getc">在轮播图最后面添加一个图片</button>

<!-- 单独换图片 -->
<swiper indicator-dots
indicator-color="rgba(20,0,225,1)"
next-margin="20px"
previous-margin="20px"
autoplay
bindchange="pdd">
<swiper-item wx:for="{{imgArr}}" wx:key="this" >  <!-- 循环imgArr里的内容 -->
<image src="{{item}}"   bindtap="getima"   data-cc="{{index}}" >
<!--image src="{{item}}含义: imgArr变量里的内容,如本文定义的图片地址 -->
<!-- 将下标给到本地数据库data,并且命名cc -->
 </image>
</swiper-item >
</swiper>
Page({

    /**
     * 页面的初始数据
     */
    data: {
        image: ["/images/0.jpg", "/images/1.jpg", "/images/2.jpeg"],

        imgArr:["/images/0.jpg", "/images/1.jpg", "/images/2.jpeg"],
        pdd:0,
    },
    getImg() {
        var _this = this;
        wx.chooseImage({
            count: 3, //选择1张,最多选择9张
            sizeType: ['original', 'compressed'], //是否原图
            sourceType: ['album', 'camera'], //是否用相机还是相册

            success(res) {
                // tempFilePath可以作为img标签的src属性显示图片
                const tempFilePaths = res.tempFilePaths
                _this.setData({
                    image: res.tempFilePaths,
                })
            }
        })
    },
getc() {
        var acc=this;
        wx.chooseImage({
            count: 1, //选择1张,最多选择9张
            sizeType: ['original', 'compressed'], //是否原图
            sourceType: ['album', 'camera'], //是否用相机还是相册
            success(res) {
                // tempFilePath可以作为img标签的src属性显示图片
                const tempFilePaths = res.tempFilePaths
                console.log(tempFilePaths);
                acc.data.image.push([tempFilePaths.toString()])
                // 在数组image后面增加图片
                console.log(acc.data.image);
                acc.setData({
                    image:acc.data.image
                })
            }
        })
    },
    getima(e){
        var _this=this;
        //1.拿到我点击的图片下标
         console.log(e);
        // //2.把下标赋值给ac
        var ac=parseInt(e.currentTarget.dataset.cc);
        // console.log(ac);
        // console.log(this.data.pdd);

        wx.chooseImage({
           count: 3, //选择1张,最多选择9张
             sizeType: ['original', 'compressed'], //是否原图
             sourceType: ['album', 'camera'], //是否用相机还是相册

            success(res) {
                // tempFilePath可以作为img标签的src属性显示图片
                const tempFilePaths = res.tempFilePaths

                // 3.将选择的图片的路径,赋值给imgArr
                 _this.data.imgArr[ac]=res.tempFilePaths[0]
                // _this.data.imgArr[_this.data.pdd]=res.tempFilePaths[0]

                _this.setData({
                    //4.将存在_this.data.imgArr的路径,赋值到imgArr
                     imgArr: _this.data.imgArr,

                })
            }
        })
    },

    pdd(e){
        // console.log(e.detail.current);
        this.setData({
            pdd:e.detail.current
        })

    }
})
这里pdd(e)使用的是第二种方法(不需要可以删除),将所要修改的图片信息赋值给data:{}定义的pdd,此时_this.data.imgArr[_this.data.pdd]=res.tempFilePaths[0]这行里的_this.data.pdd为轮播图里的第几个图片,将要替换的图片的数据,替换近imArr[]里的第几个(_this.data.pdd)图片,最后_this.setData进行替换

通过console.log输出的数据,看到将下标写入了本地数据,并且命名为cc
总结
到此这篇关于微信小程序滚动、轮播图和文本的文章就介绍到这了,更多相关微信小程序滚动 轮播图 文本内容请搜索我们以前的文章或继续浏览下面的相关文章希望大家以后多多支持我们!
相关推荐
-

微信小程序 swiper组件轮播图详解及实例
微信小程序 swiper组件轮播图 照着开发文档尝试,总是能有所收获.之前做Android开发,做个轮播图并不简单,用上viewpage再设置圆点,折腾一通之后还一堆bug.今天尝试微信小程序开发做轮播图,真是感动的泪流满面.废话说完了,上图. 上图就是一个简易的轮播图,是不是很简易.23333 主要是代码也很简单. 1.index.wxml <!--index.wxml--> <swiper class="swiper" indicator-dots="t
-
微信小程序 scroll-view隐藏滚动条详解
一:scroll-view隐藏滚动条 在书写网页的时候,往往会为了页面的美观,而选择去掉滚动区域默认的滚动条,而在这里,就是为小程序去掉滚动条的其中的一种方法: scroll-view.wxml: scroll-view.wxss scroll-view.js 最终显示效果如下; 注意: (1)不能在scroll-view中使用textarea,mao,canvas,video组件 (2)scroll-init-view的优先级高于scroll-top (3)onPullDownRefresh事
-
微信小程序实现聊天对话(文本、图片)功能
本文实例为大家分享了微信小程序实现聊天对话功能的具体代码,供大家参考,具体内容如下 这是我实际项目线上的代码, 或许有些不足 || 和你的需求不符合. 上图: to_news.wxml <!--pages/index/to_news/to_news.wxml--> <view class='tab'> <view class='lan'>{{tabdata.title}}</view> <view class='tent'> <text&g
-
微信小程序之swiper轮播图中的图片自适应高度的方法
小程序中的轮播图很简单,官方都有例子的,但是唯一的缺陷就是swiper是固定死的150px高度,这样如果传入的图片大于这个高度就会被隐藏.辣么,怎样让图片自适应不同分辨率捏. 我的思路是:获取屏幕宽度,获取图片的宽高,然后等比设置当前屏幕宽度下swiper的高度. 1.结构 <swiper indicator-dots="{{indicatorDots}}" autoplay="{{autoplay}}" interval="{{interval}}
-
微信小程序在text文本实现多种字体样式
这篇文章主要介绍了微信小程序在text文本实现多种字体样式,文中通过示例代码介绍的非常详细,对大家的学习或者工作具有一定的参考学习价值,需要的朋友可以参考下 微信小程序比较特别,它的wxml只允许用自己家的标签,像那些span.div什么的统统不可以用,那如何在text文本加入不同的样式呢,在html里面我们可以添加一个span,再给那些span添加不同的class或者style就可以了,但小程序不可以,在text里面只允许在加入text,不可以加view等东西,所以我们可以按照它提供的,再加一
-
微信小程序实现轮播图效果
微信小程序实现轮播图,和网站,APP的效果差不多,代码少,效率高. 先来看看效果图: 主要用swiper + swiper-item来实现 <view class='swiper'>滑块视图容器</view> <!-- indicator-dots='true' 是否显示指示点 默认 false indicator-color:指示点颜色 indicator-active-color:选中的指示点颜色 autoplay:是否自动切换 默认:false interval:自动切
-
详解微信小程序scroll-view横向滚动的实践踩坑及隐藏其滚动条的实现
一.实践踩坑 项目使用mpvue开发 1. scroll-view默认是不滚动的..所以要先设置scroll-x="true"或者scroll-y="true" 2. 在scroll-view里面添加定宽元素,超过scroll-view宽度(设置了100%,即屏幕宽度)后,它竟然换行了.所以要scroll-view的样式要这样设置: scroll-view { width: 100%; white-space: nowrap; // 不让它换行 } 3. 然后在定宽
-
微信小程序视图容器(swiper)组件创建轮播图
本文为大家分享了微信小程序swiper组件创建轮播图的具体代码,供大家参考,具体内容如下 一.视图容器(Swiper) 1.swiper:滑块视图容器 微信官方文档 二.swiper应用 1.页面逻辑(index.js) Page({ data: { imgUrls: [ { link: '/pages/index/index', url: '/images/001.jpg' }, { link: '/pages/list/list', url: '/images/002.jpg' }, { l
-
微信小程序scroll-view组件实现滚动动画
本文实例为大家分享了scroll-view组件实现索引列表滚动动画效果,供大家参考,具体内容如下 效果图 实现原理 利用scroll-view的scroll-into-view属性进行定位: 利用scroll-view的scroll-with-animation属性实现滚动动画过度. WXML <view class="right-nav"> <view bindtap="getCurrentCode" class="{{chooseIn
-
微信小程序页面上下滚动效果
本文实例为大家分享了微信小程序页面上下滚动的具体代码,供大家参考,具体内容如下 看图 源码 <view class="container container-fill"> <view class="scroll-fullpage" bindtouchstart="scrollTouchstart" bindtouchmove="scrollTouchmove" bindtouchend="scrol