pytorch使用-tensor的基本操作解读
目录
- 一、tensor加减乘除
- 二、tensor矩阵运算
- 四、tensor切片操作
- 五、tensor改变形状
- 六、tensor 和 numpy.array相互转换
- 七、tensor 转到GPU上
- 总结
一、tensor加减乘除
加法操作
import torch

x = torch.randn(2, 3)
y = torch.randn(2, 3)

z = x + y
print(z)

z = torch.add(x, y)
print(z)

y.add_(x)
print(y)

其他操作类似:减法:sub(-), 乘法:mul(*), 除法:div(/)
二、tensor矩阵运算
# 二维矩阵相乘
a = torch.full([2, 2], 3, dtype=torch.long)
b = torch.ones(2, 2, dtype=torch.long)

print(a)
print(b)
print(torch.mm(a, b))

#  matmul 和 @ 可以用于二维矩阵计算,也可以是多维
# 四维,计算的时候就是前两维不变,后两维进行计算。
a = torch.rand(1, 1, 3, 2)
b = torch.rand(1, 1, 2, 4)

c = torch.matmul(a, b)
print(a)
print(b)
print(c)

pow
a = torch.full([2, 2], 6)
print(a.pow(3))

a = torch.full([2, 2], 6)
print(a**2)
sqrt: 平方根rsqrt: 平方根倒数
a = torch.full([2, 2], 1024)

print(a.sqrt())
print(a.rsqrt())
print(a**0.5)
exp log
a = torch.ones(2, 2)

print(torch.exp(a))
print(torch.log(a))
print(torch.log2(a))
.floor()——往下近似.ceil()——往上近似.trunc()——裁剪为整数部分.frac()——裁剪成小数部分
a = torch.tensor(3.1415926)

print(a.floor())
print(a.ceil())
print(a.trunc())
print(a.frac())
torch.round()——四舍五入
a = torch.tensor(3.1415926)

print(a.round())
.item() 转化为python number
x = torch.randn(1)

print(x)
print(x.item())

四、tensor切片操作
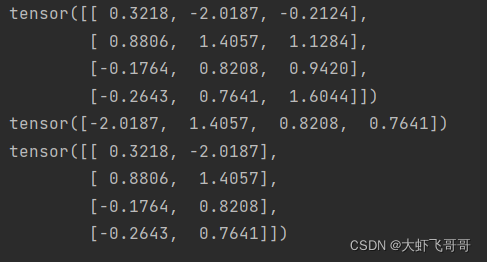
a = torch.randn(4, 3)
print(a)

# 取第二列
print(a[:, 1])

# 取前两列
print(a[:, :2])
五、tensor改变形状
x = torch.randn(4, 4)
y = x.view(16)

# -1, 自动匹配个数
z = x.view(-1, 8)

print(x)
print(y)
print(z)

六、tensor 和 numpy.array相互转换
# 底层内存共享
x = torch.ones(5)
print(x)

y = x.numpy()
print(y)

x.add_(1)
print(y)

import numpy as np
x = np.ones(5)
y = torch.from_numpy(x)
print(y)

七、tensor 转到GPU上
if torch.cuda.is_available():

    device = torch.device("cuda")
    x = torch.randn(2, 3)
    print(x)

    y = x.to(device)
    print(y)

    z = torch.randn(2, 3, device="cuda")
    print(z)

    # 同时在GPU上才能相加
    print(y + z)

    # 转换会cpu
    print(z.to("cpu"))

总结
以上为个人经验,希望能给大家一个参考,也希望大家多多支持我们。
相关推荐
-

Pytorch 和 Tensorflow v1 兼容的环境搭建方法
Github 上很多大牛的代码都是Tensorflow v1 写的,比较新的文章则喜欢用Pytorch,这导致我们复现实验或者对比实验的时候需要花费大量的时间在搭建不同的环境上.这篇文章是我经过反复实践总结出来的环境配置教程,亲测有效! 首先最基本的Python 环境配置如下: conda create -n py37 python=3.7 python版本不要设置得太高也不要太低,3.6~3.7最佳,适用绝大部分代码库.(Tensorflow v1 最高支持的python 版本也只有3.7)
-
Python tensorflow与pytorch的浮点运算数如何计算
目录 1. 引言 2. 模型结构 3. 计算模型的 FLOPs 3.1. tensorflow 1.12.0 3.2. tensorflow 2.3.1 3.3. pytorch 1.10.1+cu102 3.4. 结果对比 4. 总结 1. 引言 FLOPs 是 floating point operations 的缩写,指浮点运算数,可以用来衡量模型/算法的计算复杂度.本文主要讨论如何在 tensorflow 1.x, tensorflow 2.x 以及 pytorch 中利用相关工具计算对
-
如何计算 tensorflow 和 pytorch 模型的浮点运算数
目录 1. 引言 2. 模型结构 3. 计算模型的 FLOPs 3.1. tensorflow 1.12.0 3.2. tensorflow 2.3.1 3.3. pytorch 1.10.1+cu102 3.4. 结果对比 4. 总结 本文主要讨论如何计算 tensorflow 和 pytorch 模型的 FLOPs.如有表述不当之处欢迎批评指正.欢迎任何形式的转载,但请务必注明出处. 1. 引言 FLOPs 是 floating point operations 的缩写,指浮点运算数,可以用
-
Pytorch实现List Tensor转Tensor,reshape拼接等操作
目录 一.List Tensor转Tensor (torch.cat) 高维tensor 二.List Tensor转Tensor (torch.stack) 持续更新一些常用的Tensor操作,比如List,Numpy,Tensor之间的转换,Tensor的拼接,维度的变换等操作. 其它Tensor操作如 einsum等见:待更新. 用到两个函数: torch.cat torch.stack 一.List Tensor转Tensor (torch.cat) // An highlighted
-
Pytorch如何把Tensor转化成图像可视化
目录 Pytorch把Tensor转化成图像可视化 pytorch标准化的Tensor转图像问题 总结 Pytorch把Tensor转化成图像可视化 在调试程序的时候经常想把tensor可视化成来看看,可以这样操作: from torchvision import transforms unloader = transforms.ToPILImage() image = original_tensor.cpu().clone() # clone the tensor image = image
-
Pytorch四维Tensor转图片并保存方式(维度顺序调整)
目录 Pytorch四维Tensor转图片并保存 1.维度顺序转换 2.转为numpy数组 3.根据第一维度batch_size逐个读取中间结果,并存储到磁盘中 Pytorch中Tensor介绍 torch.Tensor或torch.tensor注意事项 创建tensor的四种主要方法 总结 Pytorch四维Tensor转图片并保存 最近在复现一篇论文代码的过程中,想要输出中间图片的结果图,通过debug发现在pytorch网络中是用Tensor存储的四维张量. 1.维度顺序转换 第一维代表的
-
pytorch使用-tensor的基本操作解读
目录 一.tensor加减乘除 二.tensor矩阵运算 四.tensor切片操作 五.tensor改变形状 六.tensor 和 numpy.array相互转换 七.tensor 转到GPU上 总结 一.tensor加减乘除 加法操作 import torch x = torch.randn(2, 3) y = torch.randn(2, 3) z = x + y print(z) z = torch.add(x, y) print(z) y.add_(x) print(y) 其他操作类似:
-
人工智能学习Pytorch教程Tensor基本操作示例详解
目录 一.tensor的创建 1.使用tensor 2.使用Tensor 3.随机初始化 4.其他数据生成 ①torch.full ②torch.arange ③linspace和logspace ④ones, zeros, eye ⑤torch.randperm 二.tensor的索引与切片 1.索引与切片使用方法 ①index_select ②... ③mask 三.tensor维度的变换 1.维度变换 ①torch.view ②squeeze/unsqueeze ③expand,repea
-
在PyTorch中Tensor的查找和筛选例子
本文源码基于版本1.0,交互界面基于0.4.1 import torch 按照指定轴上的坐标进行过滤 index_select() 沿着某tensor的一个轴dim筛选若干个坐标 >>> x = torch.randn(3, 4) # 目标矩阵 >>> x tensor([[ 0.1427, 0.0231, -0.5414, -1.0009], [-0.4664, 0.2647, -0.1228, -1.1068], [-1.1734, -0.6571, 0.7230,
-
pytorch中tensor的合并与截取方法
合并: torch.cat(inputs=(a, b), dimension=1) e.g. x = torch.cat((x,y), 0) 沿x轴合并 截取: x[:, 2:4] 以上这篇pytorch中tensor的合并与截取方法就是小编分享给大家的全部内容了,希望能给大家一个参考,也希望大家多多支持我们.
-
pytorch中tensor.expand()和tensor.expand_as()函数详解
tensor.expend()函数 >>> import torch >>> a=torch.tensor([[2],[3],[4]]) >>> print(a.size()) torch.Size([3, 1]) >>> a.expand(3,2) tensor([[2, 2], [3, 3], [4, 4]]) >>> a tensor([[2], [3], [4]]) 可以看出expand()函数括号里面为变形
-
pytorch 实现tensor与numpy数组转换
看代码,tensor转numpy: a = torch.ones(2,2) b = a.numpy() c=np.array(a) #也可以转numpy数组 print(type(a)) print(type(b)) print(a) print(b) 输出为: <class 'torch.Tensor'> <class 'numpy.ndarray'> tensor([[1., 1.], [1., 1.]]) [[1. 1.] [1. 1.]] numpy转tensor: imp
-
pytorch中tensor张量数据类型的转化方式
1.tensor张量与numpy相互转换 tensor ----->numpy import torch a=torch.ones([2,5]) tensor([[1., 1., 1., 1., 1.], [1., 1., 1., 1., 1.]]) # ********************************** b=a.numpy() array([[1., 1., 1., 1., 1.], [1., 1., 1., 1., 1.]], dtype=float32) numpy --
-
对Pytorch中Tensor的各种池化操作解析
AdaptiveAvgPool1d(N) 对一个C*H*W的三维输入Tensor, 池化输出为C*H*N, 即按照H轴逐行对W轴平均池化 >>> a = torch.ones(2,3,4) >>> a[0,1,2] = 0 >>>> a tensor([[[1., 1., 1., 1.], [1., 1., 0., 1.], [1., 1., 1., 1.]], [[1., 1., 1., 1.], [1., 1., 1., 1.], [1.,
-
pytorch 改变tensor尺寸的实现
改变Tensor尺寸的操作 1.tensor.view tensor.view方法,可以调整tensor的形状,但必须保证调整前后元素总数一致.view不会改变自身数据,返回的新的tensor与源tensor共享内存,即更改其中一个,另外一个也会跟着改变. 例: In: import torch as t a = t.arange(0, 6) a.view(2, 3) Out:tensor([[0, 1, 2], [3, 4, 5]]) In: b = a.view(-1, 3)#当某一维为-1
-
pytorch 获取tensor维度信息示例
我就废话不多说了,直接上代码吧! >>> import torch >>> from torch.autograd import Variable >>> from torch import IntTensor >>> var = Variable(IntTensor([[1,0],[0,1]])) >>> var Variable containing: 1 0 0 1 [torch.IntTensor of si