Android修行手册之ConstraintLayout布局使用详解
目录
- 实践过程
- 示例一
- 示例二
实践过程
近期创建的项目默认是带有的,如果没有去build.gradle文件中查看有没有引入
implementation 'androidx.constraintlayout:constraintlayout:2.1.4'
截止2022年8月最新版是2.1.4
示例一
想要实现这个效果:
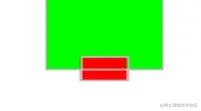
使用RelativeLayout无法实现,更不要说其他的了。哪怕红块底部对齐利用margin负数的形式做出来了,但是这就得是提前固定宽高,可固定高度又得考虑适配的事,或者干脆这个效果宽高要求是自适应,就挺难办的。而ConstraintLayout能轻松实现。
<?xml version="1.0" encoding="utf-8"?>
<androidx.constraintlayout.widget.ConstraintLayout xmlns:android="http://schemas.android.com/apk/res/android"
    xmlns:app="http://schemas.android.com/apk/res-auto"
    android:layout_width="match_parent"
    android:layout_height="match_parent">
    <TextView
        android:id="@+id/idTxtA"
        android:layout_width="100dp"
        android:layout_height="60dp"
        android:background="@color/color_00ff00"
        app:layout_constraintTop_toTopOf="parent"
        app:layout_constraintLeft_toLeftOf="parent"
        app:layout_constraintRight_toRightOf="parent" />
    <TextView
        android:id="@+id/idTxtB"
        android:layout_width="40dp"
        android:layout_height="20dp"
        android:background="@color/color_ff0000"
        app:layout_constraintBottom_toBottomOf="@+id/idTxtA"
        app:layout_constraintLeft_toLeftOf="@+id/idTxtA"
        app:layout_constraintRight_toRightOf="@+id/idTxtA"
        app:layout_constraintTop_toBottomOf="@+id/idTxtA" />
</androidx.constraintlayout.widget.ConstraintLayout>
题外话:
ConstraintLayout的渲染耗时是随着进入的页面次数而不断减少直到稳定的。那这是为啥?
其实是Android机制,Android 5.0到Anroid 7.0 是预编译成机器码直接使用所以最快,但是7.0以上是即时编译,会在手机空闲的时候才渐渐转为机器码,耗时才会逐渐减少。
示例二
<?xml version="1.0" encoding="utf-8"?>
<LinearLayout xmlns:android="http://schemas.android.com/apk/res/android"
    xmlns:app="http://schemas.android.com/apk/res-auto"
    android:layout_width="match_parent"
    android:layout_height="match_parent"
    android:orientation="vertical">
    <androidx.constraintlayout.widget.ConstraintLayout
        android:layout_width="match_parent"
        android:layout_height="0dp"
        android:layout_weight="1"
        android:background="@color/black">
        <TextView
            android:id="@+id/idTxtA"
            android:layout_width="wrap_content"
            android:layout_height="wrap_content"
            android:background="@color/color_00ff00"
            android:gravity="center"
            android:text="居中对齐"
            android:textColor="@color/white"
            android:textSize="18sp"
            app:layout_constraintLeft_toLeftOf="parent"
            app:layout_constraintRight_toRightOf="parent"
            app:layout_constraintTop_toTopOf="parent" />
        <TextView
            android:layout_width="wrap_content"
            android:layout_height="wrap_content"
            android:background="@color/color_00ff00"
            android:gravity="center"
            android:text="左上角"
            android:textColor="@color/white"
            android:textSize="18sp"
            app:layout_constraintLeft_toLeftOf="parent"
            app:layout_constraintTop_toTopOf="parent" />
        <TextView
            android:layout_width="wrap_content"
            android:layout_height="wrap_content"
            android:background="@color/color_00ff00"
            android:gravity="center"
            android:text="右上角"
            android:textColor="@color/white"
            android:textSize="18sp"
            app:layout_constraintRight_toRightOf="parent"
            app:layout_constraintTop_toTopOf="parent" />
        <TextView
            android:layout_width="wrap_content"
            android:layout_height="wrap_content"
            android:background="@color/color_00ff00"
            android:gravity="center"
            android:text="左下角"
            android:textColor="@color/white"
            android:textSize="18sp"
            app:layout_constraintBottom_toBottomOf="parent"
            app:layout_constraintLeft_toLeftOf="parent" />
        <TextView
            android:layout_width="wrap_content"
            android:layout_height="wrap_content"
            android:background="@color/color_00ff00"
            android:gravity="center"
            android:text="右下角"
            android:textColor="@color/white"
            android:textSize="18sp"
            app:layout_constraintBottom_toBottomOf="parent"
            app:layout_constraintRight_toRightOf="parent" />
        <TextView
            android:layout_width="100dp"
            android:layout_height="60dp"
            android:background="@color/color_00ff00"
            android:gravity="center"
            android:text="底部居中对齐"
            android:textColor="@color/white"
            android:textSize="18sp"
            app:layout_constraintBottom_toBottomOf="parent"
            app:layout_constraintEnd_toEndOf="parent"
            app:layout_constraintStart_toStartOf="parent" />
        <TextView
            android:id="@+id/idTxtB"
            android:layout_width="30dp"
            android:layout_height="10dp"
            android:background="@color/color_ff0000"
            app:layout_constraintBottom_toBottomOf="@+id/idTxtA"
            app:layout_constraintLeft_toLeftOf="@+id/idTxtA"
            app:layout_constraintRight_toRightOf="@+id/idTxtA"
            app:layout_constraintTop_toBottomOf="@+id/idTxtA" />
        <TextView
            android:id="@+id/idTxtC"
            android:layout_width="100dp"
            android:layout_height="80dp"
            android:background="@color/color_00ff00"
            android:gravity="center"
            android:text="A:左侧居中"
            android:textColor="@color/white"
            android:textSize="18sp"
            app:layout_constraintBottom_toBottomOf="parent"
            app:layout_constraintStart_toStartOf="parent"
            app:layout_constraintTop_toTopOf="parent" />
        <!--使用B的上边和A的上边对齐,B的下边和A的下边对齐,B的左边和A的右边对齐,B的右边和父右边对齐 来实现-->
        <TextView
            android:layout_width="0dp"
            android:layout_height="wrap_content"
            android:background="@color/color_ff0000"
            android:gravity="center"
            android:text="B:在【左侧居中】的右侧居中且填充满父宽度"
            android:textColor="@color/white"
            android:textSize="18sp"
            app:layout_constraintBottom_toBottomOf="@id/idTxtC"
            app:layout_constraintEnd_toEndOf="parent"
            app:layout_constraintStart_toEndOf="@+id/idTxtC"
            app:layout_constraintTop_toTopOf="@id/idTxtC" />
    </androidx.constraintlayout.widget.ConstraintLayout>
    <androidx.constraintlayout.widget.ConstraintLayout
        android:layout_width="match_parent"
        android:layout_height="0dp"
        android:layout_marginTop="10dp"
        android:layout_weight="1">
        <!--实现一个左侧图片,右侧两个文本的效果:E和F文本需要左侧位于D的右侧,E需要顶部位于D的顶部,底部位于F的上部(很重要)
        F底部位于D的底部,F顶部位于E的底部。虽然其他方式也能实现效果,但是当修改D图片高度的时候,其他布局实现的就可能需要调整,而这个不需要,还是会对齐-->
        <ImageView
            android:id="@+id/idTxtD"
            android:layout_width="140dp"
            android:layout_height="160dp"
            android:background="@mipmap/study_five"
            android:contentDescription="左上角"
            android:gravity="center"
            android:textColor="@color/white"
            android:textSize="18sp"
            app:layout_constraintStart_toStartOf="parent"
            app:layout_constraintTop_toTopOf="parent" />
        <TextView
            android:id="@+id/idTxtE"
            android:layout_width="wrap_content"
            android:layout_height="wrap_content"
            android:background="@color/color_0000ff"
            android:gravity="center"
            android:text="E:标题,在D的右上侧"
            android:textColor="@color/white"
            android:textSize="18sp"
            app:layout_constraintBottom_toTopOf="@id/idTxtF"
            app:layout_constraintStart_toEndOf="@id/idTxtD"
            app:layout_constraintTop_toTopOf="@id/idTxtD" />
        <TextView
            android:id="@+id/idTxtF"
            android:layout_width="wrap_content"
            android:layout_height="wrap_content"
            android:background="@color/color_0000ff"
            android:gravity="center"
            android:text="F:说明,在D的右下边,\nE的下面"
            android:textColor="@color/white"
            android:textSize="18sp"
            app:layout_constraintBottom_toBottomOf="@id/idTxtD"
            app:layout_constraintStart_toEndOf="@id/idTxtD"
            app:layout_constraintTop_toBottomOf="@id/idTxtE" />
        <TextView
            android:layout_width="0dp"
            android:layout_height="wrap_content"
            android:background="@color/color_0000ff"
            android:gravity="center"
            android:text="实现宽度铺满match_parent效果"
            android:textColor="@color/white"
            android:textSize="18sp"
            app:layout_constraintBottom_toBottomOf="parent"
            app:layout_constraintEnd_toEndOf="parent"
            app:layout_constraintStart_toStartOf="parent" />
        <TextView
            android:layout_width="wrap_content"
            android:layout_height="0dp"
            android:background="@color/color_ff0000"
            android:gravity="center"
            android:text="实\n现\n宽\n度\n铺\n满\nmatch\n_\nparent\n效\n果"
            android:textColor="@color/white"
            android:textSize="18sp"
            app:layout_constraintBottom_toBottomOf="parent"
            app:layout_constraintEnd_toEndOf="parent"
            app:layout_constraintTop_toTopOf="parent" />
    </androidx.constraintlayout.widget.ConstraintLayout>
    <androidx.constraintlayout.widget.ConstraintLayout
        android:layout_width="match_parent"
        android:layout_height="0dp"
        android:layout_marginTop="10dp"
        android:layout_weight="1">
        <TextView
            android:id="@+id/idTxtG"
            android:layout_width="60dp"
            android:layout_height="60dp"
            android:background="@color/color_0000ff"
            android:gravity="center"
            android:text="G:实现角度定位"
            android:textColor="@color/white"
            android:textSize="18sp"
            app:layout_constraintBottom_toBottomOf="parent"
            app:layout_constraintEnd_toEndOf="parent"
            app:layout_constraintStart_toStartOf="parent"
            app:layout_constraintTop_toTopOf="parent" />
        <TextView
            android:layout_width="60dp"
            android:layout_height="60dp"
            android:background="@color/color_0000ff"
            android:gravity="center"
            android:text="在右上角"
            android:textColor="@color/white"
            android:textSize="18sp"
            app:layout_constraintCircle="@id/idTxtG"
            app:layout_constraintCircleAngle="45"
            app:layout_constraintCircleRadius="84dp" />
        <TextView
            android:layout_width="60dp"
            android:layout_height="60dp"
            android:background="@color/color_0000ff"
            android:gravity="center"
            android:text="在左下角"
            android:textColor="@color/white"
            android:textSize="18sp"
            app:layout_constraintCircle="@id/idTxtG"
            app:layout_constraintCircleAngle="225"
            app:layout_constraintCircleRadius="84dp" />
        <TextView
            android:id="@+id/idTxtH"
            android:layout_width="wrap_content"
            android:layout_height="wrap_content"
            android:background="@color/color_0000ff"
            android:gravity="center"
            android:text="H:测试隐藏"
            android:textColor="@color/white"
            android:textSize="18sp"
            android:visibility="gone"
            app:layout_constraintStart_toStartOf="parent"
            app:layout_constraintTop_toTopOf="parent" />
        <!--要想实现该控件指定就需要使用layout_goneMarginTop属性,表示目标控件gone的时候该控件外边距是多少-->
        <TextView
            android:layout_width="wrap_content"
            android:layout_height="wrap_content"
            android:layout_marginTop="10dp"
            android:background="@color/color_0000ff"
            android:gravity="center"
            android:text="假设H隐藏,该控件要制定"
            android:textColor="@color/white"
            android:textSize="18sp"
            app:layout_constraintStart_toStartOf="parent"
            app:layout_constraintTop_toBottomOf="@id/idTxtH"
            app:layout_goneMarginTop="0dp" />
        <!--如果layout_constraintWidth_max和layout_constraintWidth_percent结合使用 则对应的layout_width或layout_height为0dp-->
        <TextView
            android:layout_width="0dp"
            android:layout_height="wrap_content"
            android:layout_marginTop="10dp"
            android:background="@color/color_0000ff"
            android:gravity="center"
            android:text="实现最大宽度限制大宽度限制大宽度限制大宽度限制"
            android:textColor="@color/white"
            android:textSize="18sp"
            app:layout_constraintBottom_toBottomOf="parent"
            app:layout_constraintStart_toStartOf="parent"
            app:layout_constraintWidth_max="wrap"
            app:layout_constraintWidth_percent="0.8"
            app:layout_goneMarginTop="0dp" />
    </androidx.constraintlayout.widget.ConstraintLayout>
    <androidx.constraintlayout.widget.ConstraintLayout
        android:layout_width="match_parent"
        android:layout_height="0dp"
        android:layout_marginTop="10dp"
        android:layout_weight="1">
        <TextView
            android:layout_width="0dp"
            android:layout_height="100dp"
            android:background="@color/color_0000ff"
            android:gravity="center"
            android:text="宽高比"
            android:textColor="@color/white"
            android:textSize="18sp"
            app:layout_constraintDimensionRatio="1:1"
            app:layout_constraintStart_toStartOf="parent"
            app:layout_constraintTop_toTopOf="parent" />
        <!--下方是试验链约束,layout_constraintHorizontal_chainStyle有三个值:spread是默认,spread_inside是摊开,packed是紧挨着,试验下就知道了-->
        <TextView
            android:id="@+id/idTxtI"
            android:layout_width="40dp"
            android:layout_height="40dp"
            android:background="@color/color_0000ff"
            android:gravity="center"
            android:text="I"
            android:textColor="@color/white"
            android:textSize="18sp"
            app:layout_constraintBottom_toBottomOf="parent"
            app:layout_constraintHorizontal_chainStyle="packed"
            app:layout_constraintLeft_toLeftOf="parent"
            app:layout_constraintRight_toLeftOf="@+id/idTxtJ" />
        <TextView
            android:id="@+id/idTxtJ"
            android:layout_width="40dp"
            android:layout_height="40dp"
            android:background="@color/color_0000ff"
            android:gravity="center"
            android:text="J"
            android:textColor="@color/white"
            android:textSize="18sp"
            app:layout_constraintBottom_toBottomOf="parent"
            app:layout_constraintLeft_toRightOf="@+id/idTxtI"
            app:layout_constraintRight_toLeftOf="@id/idTxtK" />
        <TextView
            android:id="@+id/idTxtK"
            android:layout_width="40dp"
            android:layout_height="40dp"
            android:background="@color/color_0000ff"
            android:gravity="center"
            android:text="K"
            android:textColor="@color/white"
            android:textSize="18sp"
            app:layout_constraintBottom_toBottomOf="parent"
            app:layout_constraintLeft_toRightOf="@id/idTxtJ"
            app:layout_constraintRight_toRightOf="parent" />
        <!--下方几个是测试权重-->
        <TextView
            android:id="@+id/idTxtL"
            android:layout_width="40dp"
            android:layout_height="0dp"
            android:background="@color/color_0000ff"
            android:gravity="center"
            android:text="测"
            android:textColor="@color/white"
            android:textSize="18sp"
            app:layout_constraintBottom_toTopOf="@id/idTxtM"
            app:layout_constraintEnd_toEndOf="parent"
            app:layout_constraintTop_toTopOf="parent"
            app:layout_constraintVertical_weight="1" />
        <TextView
            android:id="@+id/idTxtM"
            android:layout_width="40dp"
            android:layout_height="0dp"
            android:background="@color/color_0000ff"
            android:gravity="center"
            android:text="权"
            android:textColor="@color/white"
            android:textSize="18sp"
            app:layout_constraintBottom_toTopOf="@id/idTxtN"
            app:layout_constraintEnd_toEndOf="parent"
            app:layout_constraintTop_toBottomOf="@id/idTxtL"
            app:layout_constraintVertical_weight="1" />
        <TextView
            android:id="@+id/idTxtN"
            android:layout_width="40dp"
            android:layout_height="0dp"
            android:background="@color/color_0000ff"
            android:gravity="center"
            android:text="重"
            android:textColor="@color/white"
            android:textSize="18sp"
            app:layout_constraintBottom_toBottomOf="parent"
            app:layout_constraintEnd_toEndOf="parent"
            app:layout_constraintTop_toBottomOf="@id/idTxtM"
            app:layout_constraintVertical_weight="1" />
    </androidx.constraintlayout.widget.ConstraintLayout>
</LinearLayout>
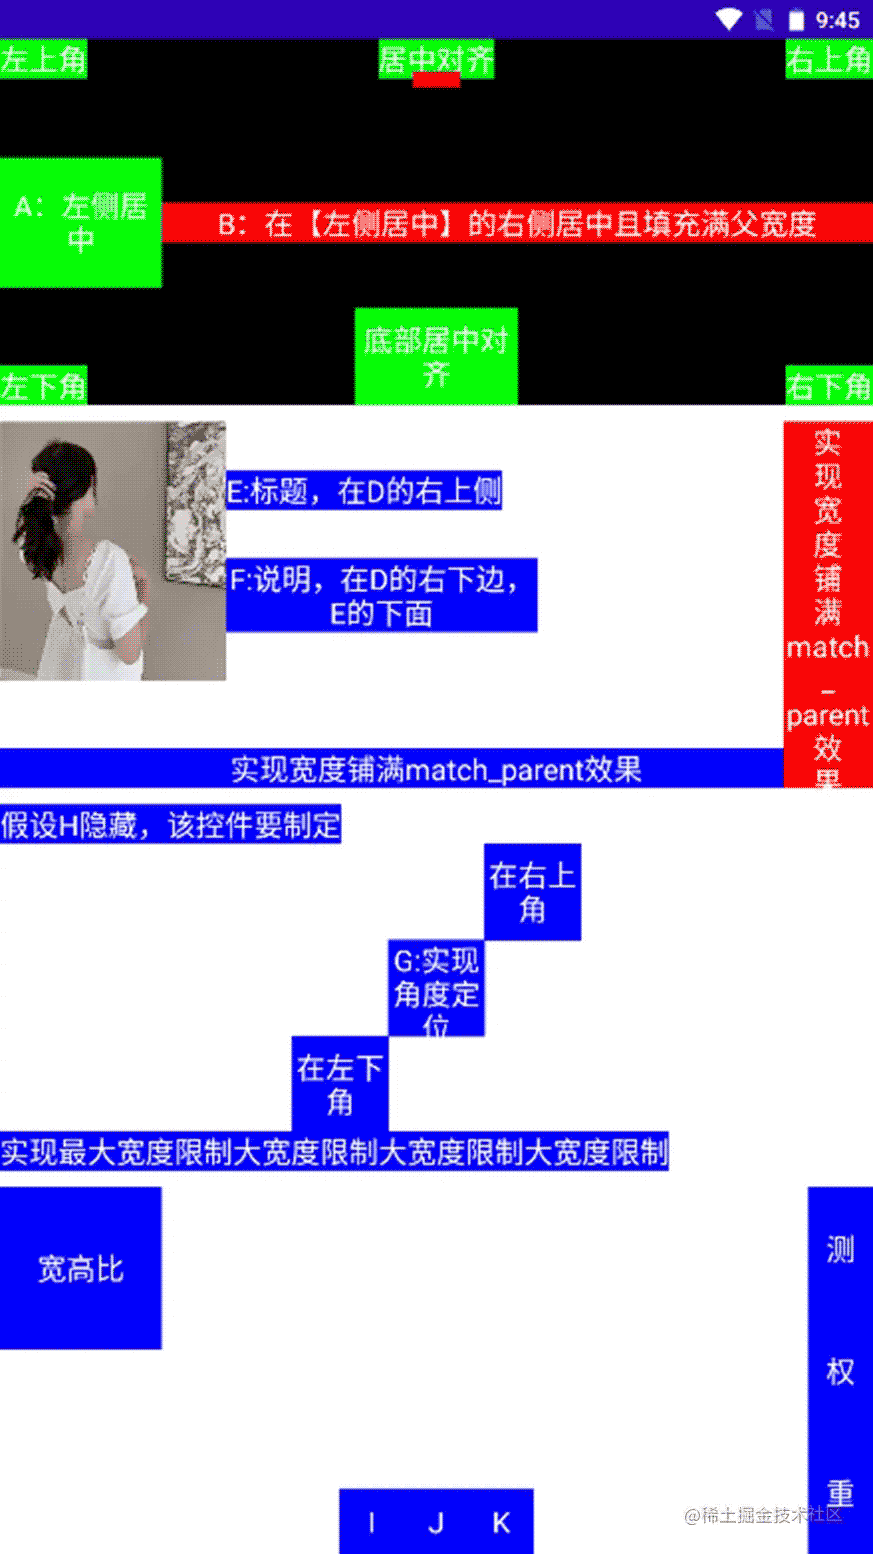
实现效果
以上就是Android修行手册之ConstraintLayout使用示例详解的详细内容,更多关于Android手册ConstraintLayout的资料请关注我们其它相关文章!
相关推荐
-

Android利用ConstraintLayout实现漂亮的动画详解
前言 最近ConstrainLayout是Android中比较火的一个东西.ConstrainLayout可以使View层级扁平化,提升性能,支持任意的边框,其目的就是修复之前layout的一些短板.其实ConstrainLayout还有一个大多数人没有注意到的特性:可以利用Constrainlayout快速构建漂亮的动画效果. 方法 我这里假设已经你已经掌握了Constrainlayout基本知识(比如:app:layout_constraintLeft_toLeftOf等).Constrai
-
Android布局ConstraintLayout代码修改约束及辅助功能
目录 实践过程 代码修改约束 辅助功能 Guideline Barrier Flow Placeholder Group和Layer 实践过程 代码修改约束 <?xml version="1.0" encoding="utf-8"?> <androidx.constraintlayout.widget.ConstraintLayout xmlns:android="http://schemas.android.com/apk/res/an
-
android 布局之ConstraintLayout的使用
其实ConstraintLayout是Android Studio 2.2中主要的新增功能之一,也是Google在2016年的I/O大会上重点宣传的一个功能.是为了android可视化编辑而做的努力.android studio 的可视化编辑个人不推荐使用,不过ConstraintLayout布局的使用还是有必要了解的. 1,要想使用ConstraintLayout需要在app的build.gradle里面引入: compile 'com.android.support.constraint:c
-
Android中ConstraintLayout约束布局的最全详细解析
目录 一.ConstraintLayout概述 二.ConstraintLayout基础篇 2.1 基础操作 2.2 控件间添加约束 2.3 约束布局xml代码实现 三.ConstraintLayout 进阶篇 3.1 Chains链 3.2 尺寸约束 3.3 百分比布局 3.4 radio属性 3.5 圆形定位 四.ConstraintLayout 高级篇 4.1 Guideline 4.2 Group 4.3 Barrier 总结 一.ConstraintLayout概述 Constrain
-
详解Android ConstraintLayout 约束布局的用法
前言 在2016年的Google I/O大会上 , Google 发布了Android Studio 2.2预览版,同时也发布了Android 新的布局方案 ConstraintLayout , 但是最近的一年也没有大规模的使用.2017年Google发布了 Android Studio 2.3 正式版,在 Android Studio 2.3 版本中新建的Module中默认的布局就是 ConstraintLayout .如下所示: <?xml version="1.0" enc
-
Android新特性ConstraintLayout完全解析
本文同步发表于我的微信公众号,在微信搜索 郭霖 即可关注,每天都有文章更新. 今天给大家带来2017年的第一篇文章,这里先祝大家新年好. 本篇文章的主题是ConstraintLayout.其实ConstraintLayout是Android Studio 2.2中主要的新增功能之一,也是Google在去年的I/O大会上重点宣传的一个功能.我们都知道,在传统的Android开发当中,界面基本都是靠编写XML代码完成的,虽然Android Studio也支持可视化的方式来编写界面,但是操作起来并不方
-
Android新布局方式ConstraintLayout快速入门教程
前言 在Android开发中,我们通常是手写布局,很少会用拖动来写布局,虽然ConstraintLayout在I/O上以拖动来展现了各种功能,我估计在以后开发中,程序员还是习惯手撸代码. 我自己试着拖着用了一下,用得不是很明白 ,而且用起来效果不是很好. 那么 直接上手撸了一下~~~ 其实很简单 Button1:app:layout_constraintBottom_toTopOf="@id/iv_head" 我们把这个属性拆开来看,constraintBottom指的本身的底部,即B
-
Android修行手册之ConstraintLayout布局使用详解
目录 实践过程 示例一 示例二 实践过程 近期创建的项目默认是带有的,如果没有去build.gradle文件中查看有没有引入 implementation 'androidx.constraintlayout:constraintlayout:2.1.4' 截止2022年8月最新版是2.1.4 示例一 想要实现这个效果: 使用RelativeLayout无法实现,更不要说其他的了.哪怕红块底部对齐利用margin负数的形式做出来了,但是这就得是提前固定宽高,可固定高度又得考虑适配的事,或者干脆这
-
Android编程动态加载布局实例详解【附demo源码】
本文实例讲述了Android编程动态加载布局的方法.分享给大家供大家参考,具体如下: 由于前段时间项目需要,需要在一个页面上加载根据不同的按钮加载不同的布局页面,当时想到用 tabhot .不过美工提供的界面图完全用不上tabhot ,所以想到了动态加载的方法来解决这一需求.在这里我整理了一下,写了一个 DEMO 希望大家以后少走点弯路. 首先,我们先把界面的框架图画出来,示意图如下: 中间白色部门是一个线性布局文件,我喜欢在画图的时候用不同的颜色将一块布局标示出来,方便查看.布局文件代码如下:
-
Android开发之基本控件和四种布局方式详解
Android中的控件的使用方式和iOS中控件的使用方式基本相同,都是事件驱动.给控件添加事件也有接口回调和委托代理的方式.今天这篇博客就总结一下Android中常用的基本控件以及布局方式.说到布局方式Android和iOS还是区别挺大的,在iOS中有Frame绝对布局和AutoLayout相对布局.而在Android中的布局方式就比较丰富了,今天博客中会介绍四种常用的布局方式.先总结一下控件,然后再搞一搞基本方式,开发环境还是用的Mac下的Android Studio.开始今天的正题, 虽然A
-
Android开发高仿课程表的布局实例详解
先说下这个demo,这是一个模仿课程表的布局文件,虽然我是个菜鸟,但我还是想留给学习的人一些例子,先看下效果 然后再来看一下我们学校的app 布局分析 先上一张划分好了的布局图 首先整个页面放在一个LinearLayout布局下面,分为上面和下面两个部分,下面一个是显示课程表的详细信息 1:这个没什么好讲的,就是直接一个LinearLayout布局,然后将控件一个TextView用来显示年份,一个View用来当作竖线,一个Spinner用来显示选择周数 2:这个是显示星期几的部件,是我自定义的V
-
Android AS创建自定义布局案例详解
先创建一个title.xml <LinearLayout xmlns:android="http://schemas.android.com/apk/res/android" xmlns:tools="http://schemas.android.com/tools" android:layout_width="match_parent" android:layout_height="match_parent" andr
-
Android开发Jetpack组件DataBinding用例详解
目录 简介 使用方式 1. build.gradle 中添加 kapt,并启用dataBinding 2.修改布局文件,添加 layout 和 data 标签 3.使用 DataBindingUtil 绑定布局 4.布局的 data 标签中添加数据变量,并使用其参数 5.BindingAdapter的使用 简介 DataBinding 是 Jetpack 组件之一,适用于 MVVM 模式开发,也是Google官方推荐使用的组件之一.使用DataBinding可以很容易的达到视图与逻辑分离,直接在
-
Android 拦截返回键事件的实例详解
Android 拦截返回键事件的实例详解 KeyEvent类 Android.View.KeyEvent类中定义了一系列的常量和方法,用来描述Android中的 按键事件和返回键有关的常量和方法有. KeyEvent.KEYCODE_BACK: 表示key类型为返回键 KeyEvent.ACTION_DOWN:表示事件为按下key,如果一直按住不放,则会不停产生此事件. KeyEvent.ACTION_UP:表示事件为为放开key,一次点击key过程只会调用一次. public final in
-
Android xmlns 的作用及其自定义实例详解
Android xmlns 的作用及其自定义实例详解 xmlns:Android="http://schemas.android.com/apk/res/android的作用是: 这个是xml的命名空间,有了他,你就可以alt+/作为提示,提示你输入什么,不该输入什么,什么是对的,什么是错的,也可以理解为语法文件.或者语法判断器什么的 这个主要作用是在运行的时候那些控件的属性都是通过它来识别的,如果上面你写错了,不会有任何问题,但是在运行的时候就会有问题,提示你没有指定宽度等什么.这个是不用联
-
Android Activity启动模式之singleTop实例详解
本文实例讲述了Android Activity启动模式之singleTop.分享给大家供大家参考,具体如下: 在前面文章<Android Activity启动模式之standard实例详解>中,我们介绍了活动的默认启动模式standard,本文继续介绍Activity的singleTop模式. singleTop模式:当Activity的活动模式设置为singleTop时,在启动活动时首先检查栈顶活动是否是该活动,如果是,在使用当前实例,否则继续创建新的实例. (1)修改AndroidMani
-
Android RecyclerView添加头部和底部实例详解
Android RecyclerView添加头部和底部实例详解 如果只是想添加头部,可是使用GitHub里面这个项目,它可以为LinearLayoutManager,GridLayoutManager ,StaggeredGridLayoutManager布局的RecyclerView添加header.使用起来也十分简单: 只需将RecyclerViewHeader布局放在RecyclerView的上层. <FrameLayout android:layout_width="match_p