openlayers 3实现车辆轨迹回放
本文实例为大家分享了openlayers 3实现车辆轨迹回放的具体代码,供大家参考,具体内容如下
先上效果:
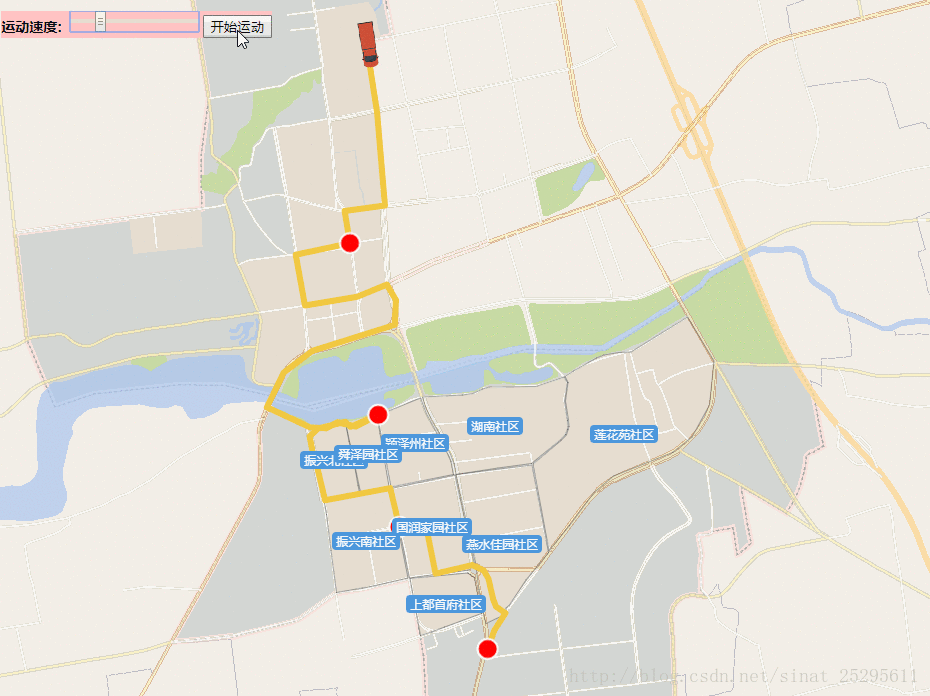
利用 openlayers 3地图的 postcompose 事件监听地图的重绘
注意:此代码是我在Vue 的methods 里面写的测试方法,并不能直接运行,请在理解的基础上测试。
vm 为vue的this对象 注释已经很丰富了,先做个备份,后期会编辑加入一点详解。
实现代码:
html:
<div id="menu">
<label for="speed" style="font-weight: bold;">
运动速度:
<input id="speed" type="range" min="1" max="20" step="1" value="10" />
</label>
<button id="start-animation">
开始运动
</button>
</div>
<!-- 注:此代码仅为上面速度条和按钮--
核心代码:
startMove:function () {
    var vm=this;
    var map=vm.map;
    vm.clearOverlayers("beijing_sq");

    //中间站
    var stops=[
     [12909554.6597,4933234.84552], //14
     [12909824.6852,4931594.7854], //43
     [12910026.8837,4930523.89946], //63
     [12910870.563,4929357.26511]  //85
    ];

    var stopMakers = new Array();

    for(var i=0;i<4;i++){
     var s = new ol.Feature({
      type: 'stop',
      geometry: new ol.geom.Point(stops[i])
     });
     stopMakers.push(s);
    }

    var Coordinates=vm.path;

    //将离散点构建成一条折线
    var route = new ol.geom.LineString(Coordinates);
    //获取直线的坐标
    var routeCoords = route.getCoordinates();
    var routeLength = routeCoords.length;

    var routeFeature = new ol.Feature({
     type: 'route',
     geometry: route
    });
    var geoMarker = new ol.Feature({
     type: 'geoMarker',
     geometry: new ol.geom.Point(routeCoords[0])
    });
    var startMarker = new ol.Feature({
     type: 'icon',
     geometry: new ol.geom.Point(routeCoords[0])
    });
    var endMarker = new ol.Feature({
     type: 'icon',
     geometry: new ol.geom.Point(routeCoords[routeLength - 1])
    });

    var styles = {
     'route': new ol.style.Style({
      stroke: new ol.style.Stroke({
       width: 6,
       color: '#F2C841'
      }),
      fill:new ol.style.Fill({
       color:"#F6E3A3"
      })
     }),
     /*'icon': new ol.style.Style({
      image: new ol.style.Icon({
       anchor: [0.5, 1],
       src: require()
      })
     }),*/
     'geoMarker': new ol.style.Style({
       /*image: new ol.style.Circle({
        radius: 7,
        snapToPixel: false,
        fill: new ol.style.Fill({ color: 'black' }),
        stroke: new ol.style.Stroke({
         color: 'white',
         width: 2
        })
       })*/
       image: new ol.style.Icon({
        src: require('../../assets/map/left_red_car.png'),
        rotateWithView: false,
        rotation: -Math.atan2(routeCoords[0][1]-routeCoords[1][1], routeCoords[0][0]-routeCoords[1][0]),
        scale:0.3,
       })
      }),
     'stop':new ol.style.Style({
      image:new ol.style.Circle({
       radius:10,
       snapToPixel:false,
       fill:new ol.style.Fill({ color:'red'}),
       stroke:new ol.style.Stroke({
        color:'white',
        width:2
       })
      })
     })
    };

    var animating = false;
    var speed, now;
    var speedInput = document.getElementById('speed');
    var startButton = document.getElementById('start-animation');

    var vectorLayer = new ol.layer.Vector({
     id:'carLayer',
     source: new ol.source.Vector({
      features: [routeFeature, geoMarker, startMarker, endMarker,stopMakers[0],stopMakers[1],stopMakers[2],stopMakers[3]]
     }),
     style: function (feature) {
      //如果动画是激活的就隐藏geoMarker
      if (animating && feature.get('type') === 'geoMarker') {
       return null;
      }
      return styles[feature.get('type')];
     }
    });

    //var center = ol.proj.fromLonLat([115.981,40.451]);

    map.addLayer(vectorLayer);

    // 要素移动
    var moveFeature = function (event) {
     var vectorContext = event.vectorContext; //HTML5 Canvas context,ol.render.canvas.Immediate的对象
     var frameState = event.frameState;  //freme 的状态
     if (animating) {
      var elapsedTime = frameState.time - now; //elapsedTime 已过时间
      //通过增加速度,来获得lineString坐标
      var index = Math.round(speed * elapsedTime / 1000); //已经走了多少个点

      //console.log("#########",routeCoords[index]);

      if (index >= routeLength) {
       stopAnimation(true);
       return;
      }

      //fixme ---------------
      if( index < 14){
       flashFeature(0);
      }
      if( index == 14){
       changeStyle(0, 1);
      }

      if(index > 14 && index <43){
       flashFeature(1);
      }
      if(index == 43){
       changeStyle(1, 2);
      }

      if(index > 43 && index <63){
       flashFeature(2);
      }
      if(index == 63){
       changeStyle(2, 3);
      }

      if(index > 63 && index <85){
       flashFeature(3);
      }
      if(index == 85){
       changeStyle(3, 3);
      }
      //fixme--------------------

      var dx,dy,rotation,carStyle;
      if(routeCoords[index] && routeCoords[index+1]){
       dx=routeCoords[index][0]-routeCoords[index+1][0];
       dy=routeCoords[index][1]-routeCoords[index+1][1];
       rotation = Math.atan2(dy,dx);
       //console.log("***********",rotation);

       carStyle= new ol.style.Style({
        image: new ol.style.Icon({
         src: require('../../assets/map/left_red_car.png'),
         rotateWithView: false,
         rotation: -rotation,
         scale:0.3,
        })
       });
       var currentPoint = new ol.geom.Point(routeCoords[index]); //当前点
       var feature = new ol.Feature(currentPoint);
       //Render a feature into the canvas.
       // Note that any zIndex on the provided style will be ignored - features are rendered immediately in the order that this method is called.
       // If you need zIndex support, you should be using an ol.layer.Vector instead
       vectorContext.drawFeature(feature, carStyle);
      }
     }
     //继续动画效果
     map.render();
    };

    function changeStyle(previous,next) {
     //console.log(stopMakers[previous]);
     stopMakers[previous].setStyle(new ol.style.Style({
      image: new ol.style.Circle({
       radius: 10,
       snapToPixel: false,
       fill: new ol.style.Fill({color: 'green'}),
       stroke: new ol.style.Stroke({
        color: 'white',
        width: 2
       })
      })
     }));
    }

    var colors=['red','green'];
    var colorIndex=0;
    function flashFeature(index) {
     var color;
     colorIndex++;
     colorIndex=colorIndex % 30;

     if(colorIndex < 15){
      color=colors[0];
     }else {
      color = colors[1];
     }
     stopMakers[index].setStyle(new ol.style.Style({
      image: new ol.style.Circle({
       radius: 10,
       snapToPixel: false,
       fill: new ol.style.Fill({
        color: color
       }),
       stroke: new ol.style.Stroke({
        color: 'white',
        width: 2
       })
      })
     }));
    }

    function startAnimation() {
     if (animating) {
      stopAnimation(false);
     } else {
      animating = true;
      now = new Date().getTime();   /** 开始时的时间*/
      speed = speedInput.value;
      startButton.textContent = '结束运动';
      //隐藏geoMarker
      geoMarker.setStyle(null);
      //设置显示范围
      //map.getView().setCenter(center);
      map.on('postcompose', moveFeature); /** postcompose事件-- 地图渲染时都会触发 */
      map.render();
     }
    }

    /**
     * @param {boolean}结束动画
     */
    function stopAnimation(ended) {
     animating = false;
     startButton.textContent = '开始运动';

     //如果动画取消就开始动画
     var coord = ended ? routeCoords[routeLength - 1] : routeCoords[0];
     /** @type {ol.geom.Point} */
     (geoMarker.getGeometry()).setCoordinates(coord);
     //移除监听
     map.un('postcompose', moveFeature); /** 解除postcompose 事件 */
    }

    startButton.addEventListener('click', startAnimation, false);
}
以上就是本文的全部内容,希望对大家的学习有所帮助,也希望大家多多支持我们。
相关推荐
-
vue使用openlayers实现移动点动画
本文实例为大家分享了vue使用openlayers实现移动点动画的具体代码,供大家参考,具体内容如下 做项目时,本来打算仿照官网的Example中动画制作,引入vue中后,发现它引用的库函数一直报错,最后我去vue中安装的依赖库中去查找这个函数,果然没有.也就是说官方例子使用的库和我安装的OL库存在一定差异. 后来我还是用笨方法去解决了,最终效果如下: 总体思路是将移动目标实例一个Overlay对象,然后将如图5个经纬度点没两点之间分割成多个(200个),之后通过定时器不断setPositon.
-
Vue+Openlayers自定义轨迹动画
本文实例为大家分享了Vue+Openlayers实现轨迹动画的具体代码,供大家参考,具体内容如下 <template> <div class="map-warp"> <h3> <a href="https://openlayers.org/en/latest/examples/feature-move-animation.html?q=polyline" target="_bank" >Openla
-
openlayers 3实现车辆轨迹回放
本文实例为大家分享了openlayers 3实现车辆轨迹回放的具体代码,供大家参考,具体内容如下 先上效果: 利用 openlayers 3地图的 postcompose 事件监听地图的重绘 注意:此代码是我在Vue 的methods 里面写的测试方法,并不能直接运行,请在理解的基础上测试. vm 为vue的this对象 注释已经很丰富了,先做个备份,后期会编辑加入一点详解. 实现代码: html: <div id="menu"> <label for="s
-

Openlayers3实现车辆轨迹回放功能
记录基于geoserver地图服务,Openlayers3在web前端实现车辆轨迹回放功能,并记录和解决过程中出现的linestring只描绘部分经纬度坐标问题. 参考Openlayers3 官网例子 html <!DOCTYPE html> <html lang="en"> <head> <title>车辆轨迹回放</title> <meta charset="UTF-8"/> <met
-
详解微信小程序轨迹回放实现及遇到的坑
微信小程序轨迹回放主要使用到polyline进行划线操作,以及使用marker去进行小车移动操作.效果图如下: 具体实现代码: trackplay.wxml文件 <!--pages/tracker/tracker.wxml--> <map id="mymap" longitude="{{mapCenter.longitude}}" latitude="{{mapCenter.latitude}}" scale="{{s
-
silverlight线程与基于事件驱动javascript引擎(实现轨迹回放功能)
案例背景: 整个功能其实就是从数据库取出数据,然后在界面上播放,简单地说就是类似网上在线看视频,听音乐,只不过我取的是字符串数据,而他们取的是流文件数据.把整体数据分成十份,十个线程同时向数据库取数据(并发提高速度)放在十个队列中,另外一个线程从队列中取数据拿出来到界面上播放,可以拖动播放进度,停止,暂停,重新播放,控制播放速度.恩,功能听起来似乎很简单,做起来也不是很难.但是后面发现的一些问题,以及顺着这些问题往下挖掘,挖掘了一些我认为值得记住的东西. 关键东西: 1. siliverligh
-
canvas轨迹回放功能实现
本文通过json机构,HTML代码以及JS代码详细给大家分析了canvas轨迹回放功能实现的过程,以下是全部内容. json结构 [ { "path": [ { "x": 82, "y": 43 }, { "x": 83, "y": 43 }, { "x": 84, "y": 45 }, { "x": 86, "y": 47 }
-
微信小程序实现轨迹回放的示例代码
在微信小程序实现轨迹回放的效果 1.wxml <map id="map" longitude="{{longitude}}" latitude="{{latitude}}" scale="16" bindcontroltap="controltap" bindmarkertap="markertap" markers="{{markers}}" polyline
-
c# wpf使用GMap.NET类库,实现地图轨迹回放
前言 实现轨迹回放,GMap.NET有对应的类GMapRoute.这个类函数很少,功能有限,只能实现简单的轨迹回放.要实现更复杂的轨迹回放,就需要自己动手了. 本文介绍一种方法,可以实现复杂的轨迹回放.有句话"功夫在诗外",GMap.NET给你提供了基本地图处理功能:但是不要让CMap.NET束缚了手脚.你需要有深刻理解地图实现原理,深入理解WPF动画的原理,才能到达随心所欲.最终的效果如下: GMap.NET 显示原理 地图就是由许多方格"瓦片"组合而来.当你移动
-
Vue 配合eiement动态路由,权限验证的方法
1.要实现动态路由,只需要在main.js中将所有路由表先规定好,如下 const routes=[ {path:'/login',component:login},/*登录*/ {path:'/home',component:home},/*首页*/ {path:'/monitor',component:monitor},/*实时监控*/ {path: "/orderQuery", component: orderQuery},/*电子围栏*/ {path: "/fence
-
C# 中SharpMap的简单使用实例详解
本文是利用ShapMap实现GIS的简单应用的小例子,以供学习分享使用.关于SharpMap的说明,网上大多是以ShapeFile为例进行简单的说明,就连官网上的例子也不多.本文是自己参考了源代码进行整理的,主要是WinForm的例子.原理方面本文也不过多论述,主要是实例演示,需要的朋友还是以SharpMap源码进行深入研究. 什么是SharpMap ? SharpMap是一个基于.net 2.0使用C#开发的Map渲染类库,可以渲染各类GIS数据(目前支持ESRI Shape和PostGIS格