python绘制云雨图raincloud plot
官方github: https://github.com/RainCloudPlots/RainCloudPlots
Raincloud 的 Python 实现是一个名为 PtitPrince 的包,它写在 seaborn 之上,这是一个 Python 绘图库,用于从 pandas 数据帧中获取漂亮的绘图。
import pandas as pd
import seaborn as sns
import os
import matplotlib.pyplot as plt
#sns.set(style="darkgrid")
#sns.set(style="whitegrid")
#sns.set_style("white")
sns.set(style="whitegrid",font_scale=2)
import matplotlib.collections as clt
import ptitprince as pt
#图片保存及输出设置
savefigs = True
figs_dir = '../figs/tutorial_python'
if savefigs:
    # Make the figures folder if it doesn't yet exist
    #如果没有找到文件夹,先创建此文件夹
    if not os.path.isdir('../figs/tutorial_python'):
        os.makedirs('../figs/tutorial_python')

def export_fig(axis,text, fname):
    if savefigs:
        axis.text()
        axis.savefig(fname, bbox_inches='tight')
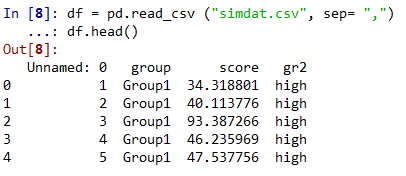
df = pd.read_csv ("simdat.csv", sep= ",")
df.head()
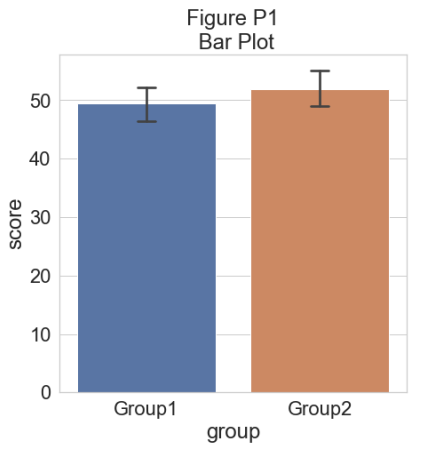
该图可以让读者初步了解数据集:哪个组的平均值更大,这种差异是否可能显着。 此图中仅显示每组分数的平均值和标准差。
f, ax = plt.subplots(figsize=(7, 7))
sns.barplot(x = "group", y = "score", data = df, capsize= .1)
plt.title("Figure P1\n Bar Plot")
if savefigs:
    plt.savefig('.\\figs\\tutorial_python\\figureP01.png', bbox_inches='tight')
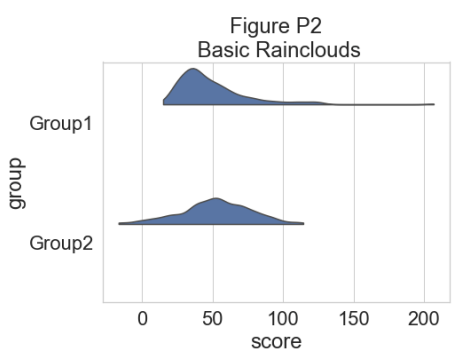
为了了解我们的数据集的分布,我们可以绘制一个“云”,即直方图的平滑版本:
# plotting the clouds
f, ax = plt.subplots(figsize=(7, 5))
dy="group"
dx="score"
ort="h"
pal = sns.color_palette(n_colors=1)
ax=pt.half_violinplot(x=dx, y=dy, data=df, palette=pal, bw=.2, cut=0., scale="area", width=.6, inner=None, orient=ort)
plt.title("Figure P2\n Basic Rainclouds")
if savefigs:
    plt.savefig('.\\figs\\tutorial_python\\figureP02.png', bbox_inches='tight')
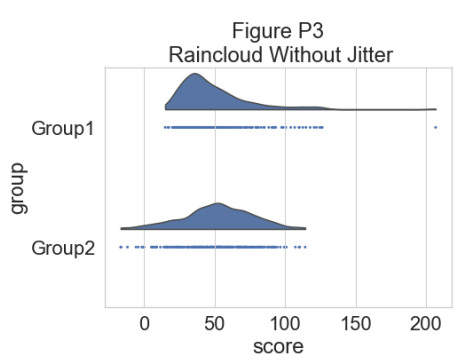
为了更精确地了解分布并说明数据中的潜在异常值或其他模式,我们现在添加“雨”,即数据点的简单单维表示:
# adding the rain
f, ax=plt.subplots(figsize=(7, 5))
ax=pt.half_violinplot(x=dx, y=dy, data=df, palette=pal, bw=.2, cut=0., scale="area", width=.6, inner=None, orient=ort)
ax=sns.stripplot(x=dx, y=dy, data=df, palette=pal, edgecolor="white", size=3, jitter=0, zorder=0, orient=ort)
plt.title("Figure P3\n Raincloud Without Jitter")
if savefigs:
    plt.savefig('.\\figs\\tutorial_python\\figureP03.png', bbox_inches='tight')
# adding jitter to the rain
f, ax =plt.subplots(figsize=(7, 5))
ax=pt.half_violinplot(x=dx, y=dy, data=df, palette=pal, bw=.2, cut=0., scale="area", width=.6, inner=None, orient=ort)
ax=sns.stripplot(x=dx, y=dy, data=df, palette=pal, edgecolor="white", size=3, jitter=1, zorder=0, orient=ort)
plt.title("Figure P4\n Raincloud with Jittered Data")
if savefigs:
    plt.savefig('.\\figs\\tutorial_python\\figureP04.png', bbox_inches='tight')
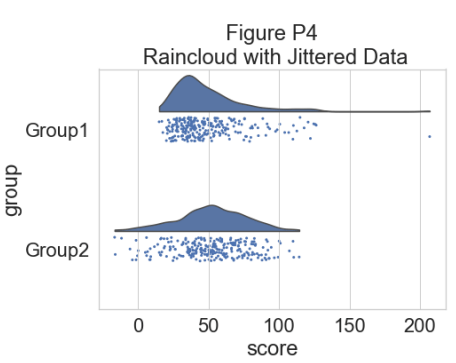
这样可以很好地了解数据点的分布情况,但中位数和四分位数并不明显,很难一目了然地确定统计差异。 因此,我们添加了一个“空”箱线图来显示中位数、四分位数和异常值:
#adding the boxplot with quartiles
f, ax=plt.subplots(figsize=(7, 5))
ax=pt.half_violinplot(x=dx, y=dy, data=df, palette=pal, bw=.2, cut=0.,
                      scale="area", width=.6, inner=None, orient=ort)
ax=sns.stripplot(x=dx, y=dy, data=df, palette=pal, edgecolor="white",
                 size=3, jitter=1, zorder=0, orient=ort)
ax=sns.boxplot(x=dx, y=dy, data=df, color="black", width=.15, zorder=10,
               showcaps=True, boxprops={'facecolor':'none',"zorder":10},
               showfliers=True, whiskerprops{'linewidth':2,"zorder":10},
               saturation=1, orient=ort)
plt.title("Figure P5\n Raincloud with Boxplot")
if savefigs:
    plt.savefig('../figs/tutorial_python/figureP05.png', bbox_inches='tight')
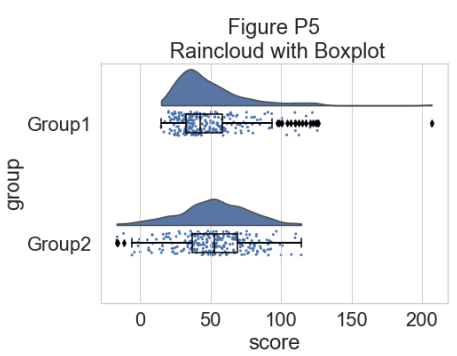
现在我们可以设置一个调色板来表征两组:
#adding color
pal="Set2"
f, ax=plt.subplots(figsize=(7, 5))
ax=pt.half_violinplot(x=dx, y=dy, data=df, palette=pal, bw=.2, cut=0.,
                      scale="area", width=.6, inner=None, orient=ort)
ax=sns.stripplot(x=dx, y=dy, data=df, palette=pal, edgecolor="white",
                 size=3, jitter=1, zorder=0, orient=ort)
ax=sns.boxplot(x=dx, y=dy, data=df, color="black", width=.15, zorder=10,
              showcaps=True, boxprops={'facecolor':'none',"zorder":10},
              showfliers=True, whiskerprops={'linewidth':2,"zorder":10},
              saturation=1, orient=ort)
plt.title("Figure P6\n Tweaking the Colour of Your Raincloud")
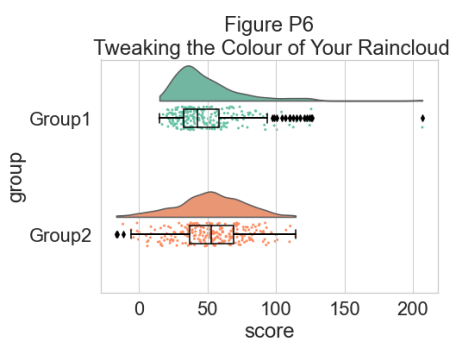
我们可以使用函数 pt.Raincloud 来添加一些自动化:
#same thing with a single command: now x **must** be the categorical value
dx="group"; dy="score"; ort="h"; pal="Set2"; sigma=.2
f, ax=plt.subplots(figsize=(7, 5))
pt.RainCloud(x=dx, y=dy, data=df, palette=pal, bw=sigma,
             width_viol = .6, ax = ax, orient = ort)
plt.title("Figure P7\n Using the pt.Raincloud function")
if savefigs:
    plt.savefig('../figs/tutorial_python/figureP07.png', bbox_inches='tight')

‘move’ 参数可用于移动箱线图下方的雨量,在某些情况下提供更好的原始数据可见性:
#moving the rain below the boxplot
dx="group"; dy="score"; ort="h"; pal="Set2"; sigma=.2
f,ax=plt.subplots(figsize=(7, 5))
ax=pt.RainCloud(x=dx, y=dy, data=df, palette=pal, bw=sigma,
                 width_viol=.6, ax=ax, orient=ort, move=.2)
plt.title("Figure P8\n Rainclouds with Shifted Rain")
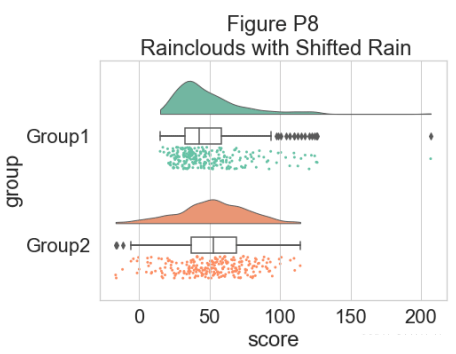
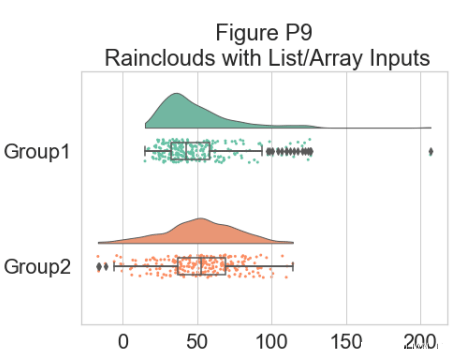
此外,raincloud 函数同样适用于列表或 np.array,如果您更喜欢使用它们而不是数据框输入:
# Usage with a list/np.array input
dx=list(df["group"]); dy=list(df["score"])
f, ax=plt.subplots(figsize=(7, 5))
ax=pt.RainCloud(x=dx, y=dy, palette=pal, bw=sigma,
                 width_viol=.6, ax=ax, orient=ort)
plt.title("Figure P9\n Rainclouds with List/Array Inputs")
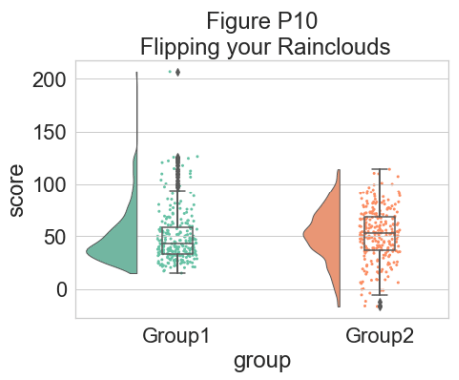
对于某些数据,您可能希望将雨云的方向翻转为“petit prince”图。 您可以使用 pt.RainCloud 函数中的 ‘orient’ 标志来执行此操作:
# Changing orientation
dx="group"; dy="score"; ort="v"; pal="Set2"; sigma=.2
f, ax=plt.subplots(figsize=(7, 5))
ax=pt.RainCloud(x=dx, y=dy, data=df, palette=pal, bw=sigma,
                 width_viol=.5, ax=ax, orient=ort)
plt.title("Figure P10\n Flipping your Rainclouds")
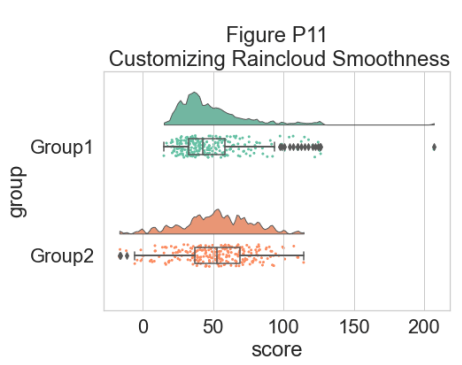
还可以更改用于生成数据概率分布函数的平滑核。 为此,您调整 sigma 参数:
#changing cloud smoothness
dx="group"; dy="score"; ort="h"; pal="Set2"; sigma=.05
f, ax=plt.subplots(figsize=(7, 5))
ax=pt.RainCloud(x=dx, y=dy, data=df, palette=pal, bw=sigma,
                 width_viol=.6, ax=ax, orient=ort)
plt.title("Figure P11\n Customizing Raincloud Smoothness")
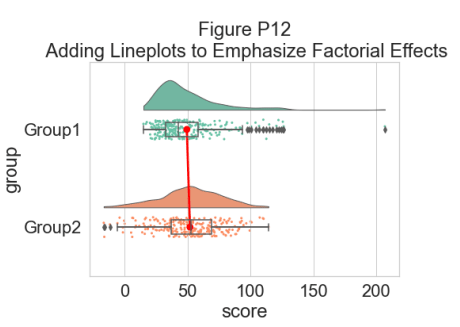
最后,使用 pointplot 标志,您可以添加一条连接组平均值的线。 这对于更复杂的数据集很有用,例如重复测量或因子数据。 下面我们通过改变各个图的色调、不透明度或闪避元素来说明使用雨云绘制此类数据的几种不同方法:
#adding a red line connecting the groups' mean value (useful for longitudinal data)
dx="group"; dy="score"; ort="h"; pal="Set2"; sigma=.2
f, ax=plt.subplots(figsize=(7, 5))
ax=pt.RainCloud(x=dx, y=dy, data=df, palette=pal, bw=sigma,
                 width_viol=.6, ax=ax, orient=ort, pointplot=True)
plt.title("Figure P12\n Adding Lineplots to Emphasize Factorial Effects")
另一个灵活的选择是使用 Facet Grids 来分隔不同的组或因子水平,
如下所示:
# Rainclouds with FacetGrid
g=sns.FacetGrid(df, col="gr2", height=6)
g=g.map_dataframe(pt.RainCloud, x="group", y="score", data=df, orient="h")
g.fig.subplots_adjust(top=0.75)
g.fig.suptitle("Figure P13\n Using FacetGrid for More Complex Designs",  fontsize=26)

作为一种替代方法,可以使用色调输入将不同的子组直接绘制在彼此之上,从而促进它们的比较:
# Hue Input for Subgroups
dx="group"; dy="score"; dhue="gr2"; ort="h"; pal="Set2"; sigma=.2
f, ax=plt.subplots(figsize=(12, 5))
ax=pt.RainCloud(x=dx, y=dy, hue=dhue, data=df, palette=pal, bw=sigma,
                 width_viol=.7, ax=ax, orient=ort)
plt.title("Figure P14\n Rainclouds with Subgroups")
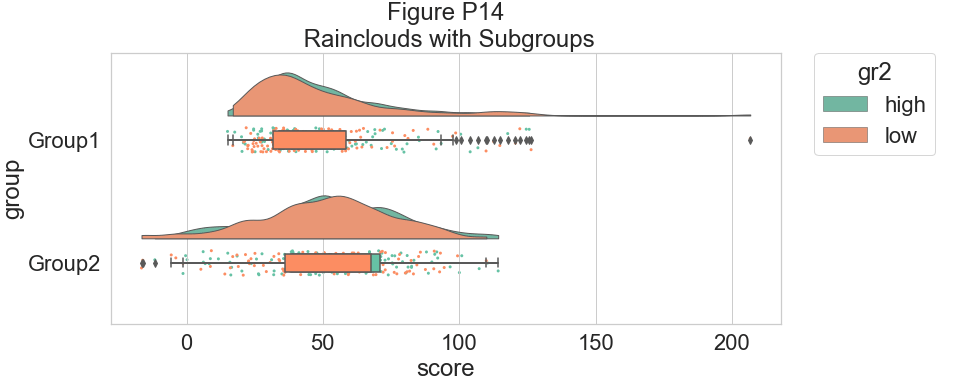
为了提高该图的可读性,我们使用相关标志(0-1 alpha 强度)调整 alpha 级别:
# Setting alpha level
f, ax=plt.subplots(figsize=(12, 5))
ax=pt.RainCloud(x=dx, y=dy, hue=dhue, data=df, palette=pal, bw=sigma,
                 width_viol=.7, ax=ax, orient=ort , alpha=.65)
plt.title("Figure P15\n Adjusting Raincloud Alpha Level")
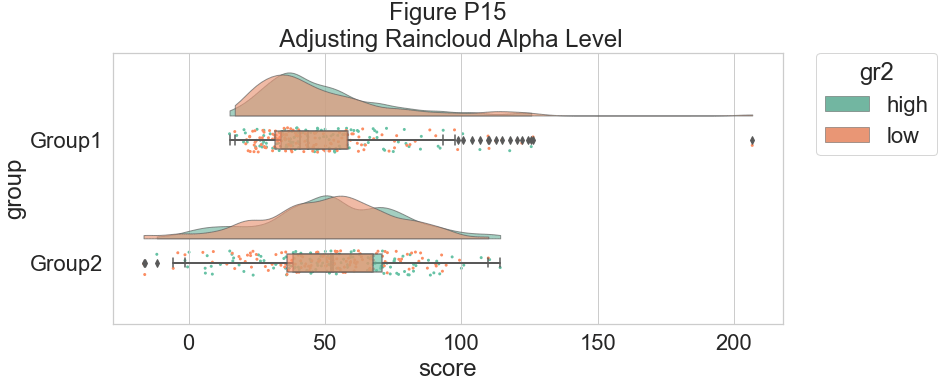
我们可以将 dodge 标志设置为 true,而不是让两个箱线图相互混淆,从而增加交互性:
#The Doge Flag
f, ax=plt.subplots(figsize=(12, 5))
ax=pt.RainCloud(x=dx, y=dy, hue=dhue, data=df, palette=pal, bw=sigma,
                 width_viol=.7, ax=ax, orient=ort , alpha=.65, dodge=True)
plt.title("Figure P16\n The Boxplot Dodge Flag")
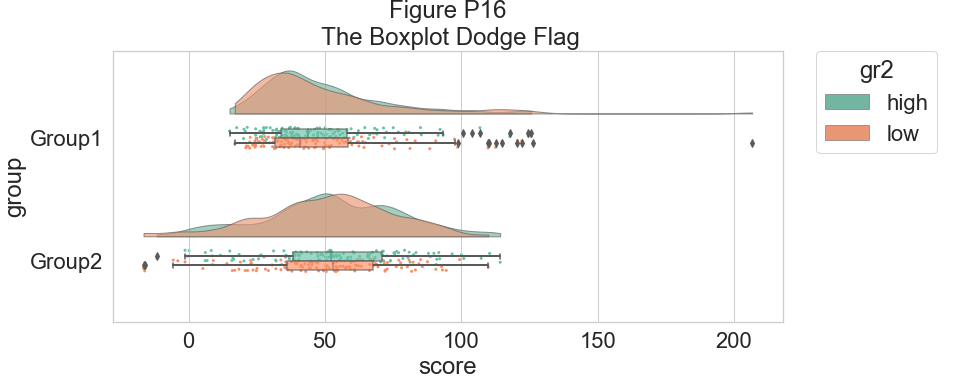
最后,我们可能希望在我们的图表中添加一个传统的线图,以帮助检测因子主效应和交互作用。
例如,我们在每个箱线图中绘制了平均值:
#same, with dodging and line
f, ax=plt.subplots(figsize=(12, 5))
ax=pt.RainCloud(x=dx, y=dy, hue=dhue, data=df, palette=pal, bw=sigma,
                width_viol=.7, ax=ax, orient=ort , alpha=.65,
                dodge=True, pointplot=True)
plt.title("Figure P17\n Dodged Boxplots with Lineplots")
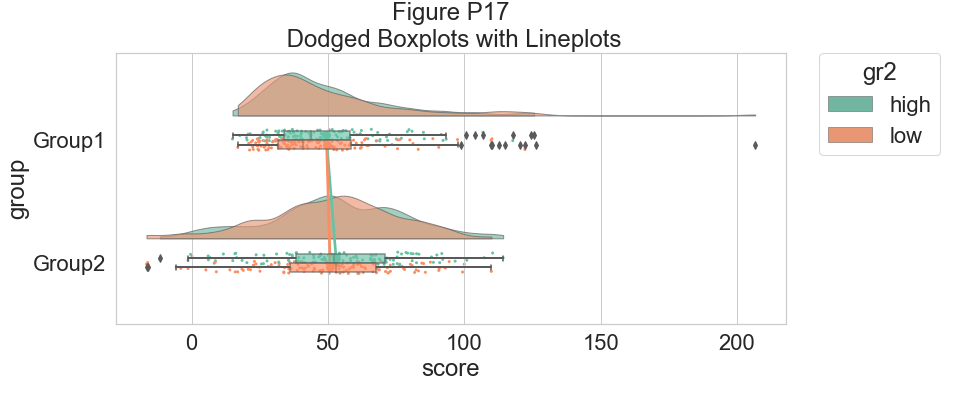
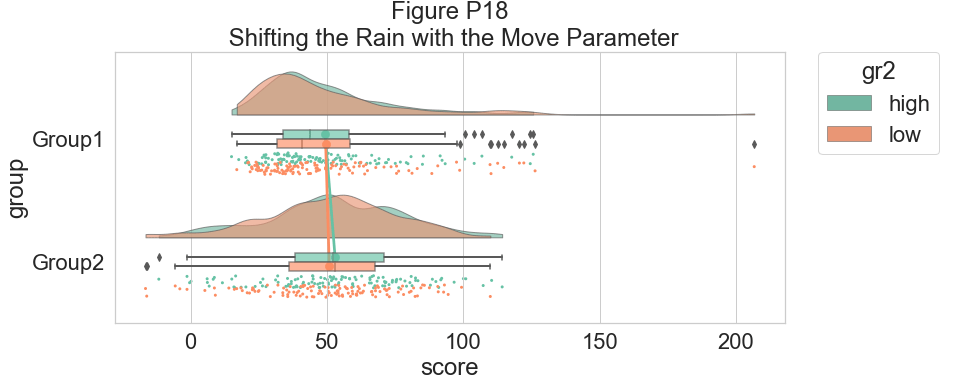
这是相同的图,但现在使用“移动”参数再次将单个观测值移动到箱线图下方:
#moving the rain under the boxplot
f, ax=plt.subplots(figsize=(12, 5))
ax=pt.RainCloud(x=dx, y=dy, hue=dhue, data=df, palette=pal, bw=sigma,
               width_viol=.7, ax=ax, orient=ort , alpha=.65, dodge=True,
               pointplot=True, move=.2)
plt.title("Figure P18\n Shifting the Rain with the Move Parameter")
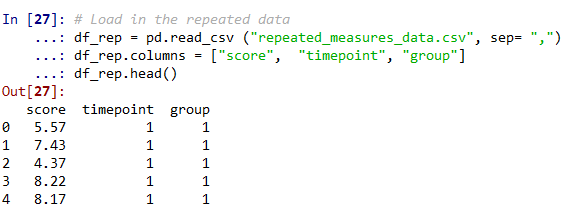
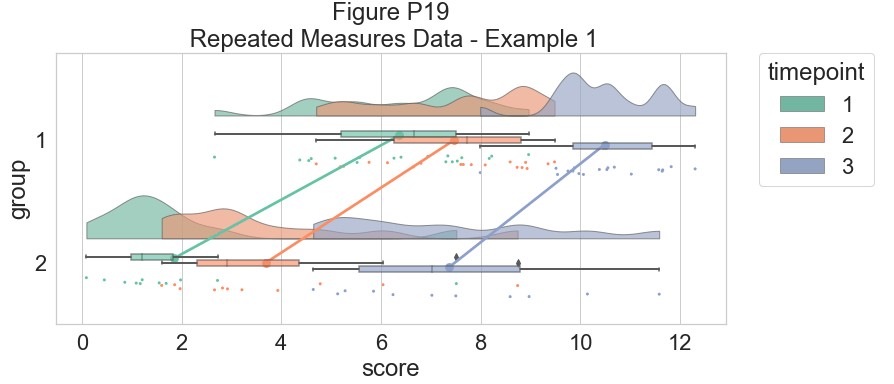
作为我们的最后一个示例,我们将考虑具有两组和三个时间点的复杂重复测量设计。 目标是说明我们复杂的相互作用和主要影响,同时保持雨云图的透明性:
# Load in the repeated data
df_rep=pd.read_csv("repeated_measures_data.csv", sep=",")
df_rep.columns=["score",  "timepoint", "group"]
df_rep.head()
# Plot the repeated measures data
dx="group"; dy="score"; dhue="timepoint"; ort="h"; pal="Set2"; sigma=.2
f, ax=plt.subplots(figsize=(12, 5))
ax=pt.RainCloud(x=dx, y=dy, hue=dhue, data=df_rep, palette=pal, bw=sigma, width_viol=.7,
               ax=ax, orient=ort , alpha=.65, dodge=True, pointplot=True, move=.2)
plt.title("Figure P19\n Repeated Measures Data - Example 1")
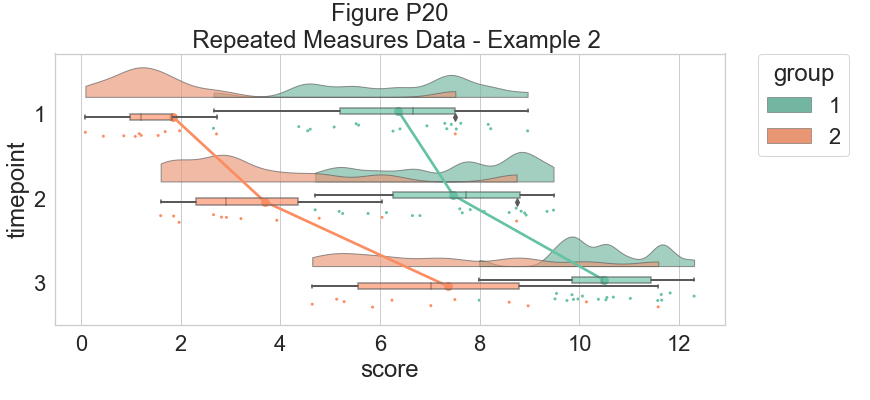
# Now with the group as hue
dx="timepoint"; dy="score"; dhue="group"
f, ax=plt.subplots(figsize=(12, 5))
ax=pt.RainCloud(x=dx, y=dy, hue=dhue, data=df_rep, palette=pal, bw=sigma, width_viol=.7,
                ax=ax, orient=ort , alpha=.65, dodge=True, pointplot=True, move=.2)
plt.title("Figure P20\n  Repeated Measures Data - Example 2")
到此这篇关于python绘制云雨图raincloud plot的文章就介绍到这了,更多相关python绘制云雨图内容请搜索我们以前的文章或继续浏览下面的相关文章希望大家以后多多支持我们!

