android实现定位与目的地的导航示例代码
今天无意中看到技术大神利用百度地图定位并实现目的地导航的Demo。觉得很不错,就转载过来一起分享,下面我们看实现效果:

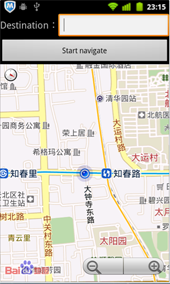
进入后首先会得到当前位置,在地图上显示出来,在输入框中输入目的地后,就会在地图上出现最佳线路,我这里设置的是距离最小的驾车线路,另外还有公交线路、步行线路,在代码中都有详细注释。另外,在控制台还输出了线路上每一个节点的信息以及起始位置和目的地的距离,信息显示的是在当前节点的导航信息。如下图:

接下来就看如何实现了,首先,注册百度开发者账号,并进入百度地图API查看相关资料百度地图API,然后就是为需要加入地图的应用注册APP KEY,注册完后,下载百度地图jar文件,新建工程,并导入即可,下面看实现具体代码,在代码中有详细注释:
public class NavigationDemoActivity extends MapActivity {
  private String mMapKey = "注册自己的key";
  private EditText destinationEditText = null;
  private Button startNaviButton = null;
  private MapView mapView = null;
  private BMapManager mMapManager = null;
  private MyLocationOverlay myLocationOverlay = null;
  //onResume时注册此listener,onPause时需要Remove,注意此listener不是Android自带的,是百度API中的
  private LocationListener locationListener;
  private MKSearch searchModel;
  GeoPoint pt;

  @Override
  public void onCreate(Bundle savedInstanceState) {
    super.onCreate(savedInstanceState);
    requestWindowFeature(Window.FEATURE_NO_TITLE);
    setContentView(R.layout.main);
    destinationEditText = (EditText) this.findViewById(R.id.et_destination);
    startNaviButton = (Button) this.findViewById(R.id.btn_navi);

    mMapManager = new BMapManager(getApplication());
    mMapManager.init(mMapKey, new MyGeneralListener());
    super.initMapActivity(mMapManager);

    mapView = (MapView) this.findViewById(R.id.bmapsView);
    //设置启用内置的缩放控件
    mapView.setBuiltInZoomControls(true);
    //设置在缩放动画过程中也显示overlay,默认为不绘制
//    mapView.setDrawOverlayWhenZooming(true);
    //获取当前位置层
    myLocationOverlay = new MyLocationOverlay(this, mapView);
    //将当前位置的层添加到地图底层中
    mapView.getOverlays().add(myLocationOverlay);

    // 注册定位事件
    locationListener = new LocationListener(){

      @Override
      public void onLocationChanged(Location location) {
        if (location != null){
          //生成GEO类型坐标并在地图上定位到该坐标标示的地点
           pt = new GeoPoint((int)(location.getLatitude()*1e6),
              (int)(location.getLongitude()*1e6));
//         System.out.println("---"+location.getLatitude() +":"+location.getLongitude());
          mapView.getController().animateTo(pt);
        }
      }
    };

    //初始化搜索模块
    searchModel = new MKSearch();
    //设置路线策略为最短距离
    searchModel.setDrivingPolicy(MKSearch.ECAR_DIS_FIRST);
    searchModel.init(mMapManager, new MKSearchListener() {
      //获取驾车路线回调方法
      @Override
      public void onGetDrivingRouteResult(MKDrivingRouteResult res, int error) {
        // 错误号可参考MKEvent中的定义
        if (error != 0 || res == null) {
          Toast.makeText(NavigationDemoActivity.this, "抱歉,未找到结果", Toast.LENGTH_SHORT).show();
          return;
        }
        RouteOverlay routeOverlay = new RouteOverlay(NavigationDemoActivity.this, mapView);

        // 此处仅展示一个方案作为示例
        MKRoute route = res.getPlan(0).getRoute(0);
        int distanceM = route.getDistance();
        String distanceKm = String.valueOf(distanceM / 1000) +"."+String.valueOf(distanceM % 1000);
        System.out.println("距离:"+distanceKm+"公里---节点数量:"+route.getNumSteps());
        for (int i = 0; i < route.getNumSteps(); i++) {
          MKStep step = route.getStep(i);
          System.out.println("节点信息:"+step.getContent());
        }
        routeOverlay.setData(route);
        mapView.getOverlays().clear();
        mapView.getOverlays().add(routeOverlay);
        mapView.invalidate();
        mapView.getController().animateTo(res.getStart().pt);
      }

      //以下两种方式和上面的驾车方案实现方法一样
      @Override
      public void onGetWalkingRouteResult(MKWalkingRouteResult res, int error) {
        //获取步行路线
      }

      @Override
      public void onGetTransitRouteResult(MKTransitRouteResult arg0, int arg1) {
        //获取公交线路
      }

      @Override
      public void onGetBusDetailResult(MKBusLineResult arg0, int arg1) {
      }
      @Override
      public void onGetAddrResult(MKAddrInfo arg0, int arg1) {
      }
      @Override
      public void onGetSuggestionResult(MKSuggestionResult arg0, int arg1) {
      }
      @Override
      public void onGetPoiResult(MKPoiResult arg0, int arg1, int arg2) {
      }
    });

    startNaviButton.setOnClickListener(new OnClickListener() {

      @Override
      public void onClick(View v) {
        String destination = destinationEditText.getText().toString();

        //设置起始地(当前位置)
        MKPlanNode startNode = new MKPlanNode();
        startNode.pt = pt;
        //设置目的地
        MKPlanNode endNode = new MKPlanNode();
        endNode.name = destination;

        //展开搜索的城市
        String city = getResources().getString(R.string.beijing);
//       System.out.println("----"+city+"---"+destination+"---"+pt);
        searchModel.drivingSearch(city, startNode, city, endNode);
        //步行路线
//       searchModel.walkingSearch(city, startNode, city, endNode);
        //公交路线
//       searchModel.transitSearch(city, startNode, endNode);
      }
    });

  }

  @Override
  protected void onResume() {
    mMapManager.getLocationManager().requestLocationUpdates(locationListener);
    myLocationOverlay.enableMyLocation();
    myLocationOverlay.enableCompass(); // 打开指南针
    mMapManager.start();
    super.onResume();
  }

  @Override
  protected void onPause() {
    mMapManager.getLocationManager().removeUpdates(locationListener);
    myLocationOverlay.disableMyLocation();//显示当前位置
    myLocationOverlay.disableCompass(); // 关闭指南针
    mMapManager.stop();
    super.onPause();
  }

  @Override
  protected boolean isRouteDisplayed() {
    // TODO Auto-generated method stub
    return false;
  }

  // 常用事件监听,用来处理通常的网络错误,授权验证错误等
  class MyGeneralListener implements MKGeneralListener {
      @Override
      public void onGetNetworkState(int iError) {
        Log.d("MyGeneralListener", "onGetNetworkState error is "+ iError);
        Toast.makeText(NavigationDemoActivity.this, "您的网络出错啦!",
            Toast.LENGTH_LONG).show();
      }

      @Override
      public void onGetPermissionState(int iError) {
        Log.d("MyGeneralListener", "onGetPermissionState error is "+ iError);
        if (iError == MKEvent.ERROR_PERMISSION_DENIED) {
          // 授权Key错误:
          Toast.makeText(NavigationDemoActivity.this,
              "请在BMapApiDemoApp.java文件输入正确的授权Key!",
              Toast.LENGTH_LONG).show();
        }
      }
    }
}
然后是布局文件:
<?xml version="1.0" encoding="utf-8"?>
<LinearLayout xmlns:android="http://schemas.android.com/apk/res/android"
  android:layout_width="fill_parent"
  android:layout_height="fill_parent"
  android:orientation="vertical" >

  <LinearLayout
    android:layout_width="fill_parent"
    android:layout_height="wrap_content"
    android:orientation="horizontal" >

    <TextView
      android:layout_width="wrap_content"
      android:layout_height="wrap_content"
      android:textSize="18sp"
      android:text="Destination:" />

    <EditText
      android:id="@+id/et_destination"
      android:layout_width="fill_parent"
      android:layout_height="wrap_content" />
  </LinearLayout>

  <Button
    android:id="@+id/btn_navi"
    android:layout_width="fill_parent"
      android:layout_height="wrap_content"
      android:text="Start navigate"/>

  <com.baidu.mapapi.MapView
    android:id="@+id/bmapsView"
    android:layout_width="fill_parent"
    android:layout_height="fill_parent"
    android:clickable="true" />

</LinearLayout>
AndroidMainifest.xml
<?xml version="1.0" encoding="utf-8"?>
<manifest xmlns:android="http://schemas.android.com/apk/res/android"
  package="com.ericssonlabs"
  android:versionCode="1"
  android:versionName="1.0" >

  <uses-sdk android:minSdkVersion="8" />

  <uses-permission android:name="android.permission.ACCESS_NETWORK_STATE"></uses-permission>
  <uses-permission android:name="android.permission.ACCESS_FINE_LOCATION"></uses-permission>
  <uses-permission android:name="android.permission.INTERNET"></uses-permission>
  <uses-permission android:name="android.permission.WRITE_EXTERNAL_STORAGE"></uses-permission>
  <uses-permission android:name="android.permission.ACCESS_WIFI_STATE"></uses-permission>
  <uses-permission android:name="android.permission.CHANGE_WIFI_STATE"></uses-permission>
  <uses-permission android:name="android.permission.READ_PHONE_STATE"></uses-permission>

  <supports-screens android:largeScreens="true"
    android:normalScreens="true" android:smallScreens="true"
    android:resizeable="true" android:anyDensity="true"/>
  <uses-sdk android:minSdkVersion="3"></uses-sdk>

  <application
    android:icon="@drawable/ic_launcher"
    android:label="@string/app_name" >
    <activity
      android:name=".NavigationDemoActivity"
      android:label="@string/app_name" >
      <intent-filter>
        <action android:name="android.intent.action.MAIN" />

        <category android:name="android.intent.category.LAUNCHER" />
      </intent-filter>
    </activity>
  </application>

</manifest>
上面就是实现百度地图定位和目的地的导航的所有代码啦,不知道是不是你们想要的呢?
以上就是本文的全部内容,希望对大家的学习有所帮助,也希望大家多多支持我们。
相关推荐
-

Android ToggleButton 详解及实例代码
Android ToggleButton 详解 在Android的开发过程中,对于ToggleButton的使用频率也是相当的高的,下面我就来说一下,这个组件的两种使用方式. 第一种是简单的使用,利用Toast的方式弹出提示语句 需要注意的是要想自定义ToggleButton的显示的内容,就需要设置其TextOn和TextOff的内容. <ToggleButton android:id="@+id/toggleButton1" android:layout_width="
-
Android控件之ToggleButton的使用方法
ToggleButton的状态只能是选中和未选中,并且需要为不同的状态设置不同的显示文本. 以下案例为ToggleButton的用法 目录结构 main.xml布局文件 复制代码 代码如下: <?xml version="1.0" encoding="utf-8"?><LinearLayout xmlns:android="http://schemas.android.com/apk/res/android" androi
-
Android之RecyclerView轻松实现下拉刷新和加载更多示例
今天研究了下RecyclerView的滑动事件,特别是下拉刷新和加载更多事件,在现在几乎所有的APP显示数据列表时都用到了.自定义RecyclerView下拉刷新和加载更多听上去很复杂,实际上并不难,只要是对滑动事件的监听和处理. 一.自定义RecyclerView实现下拉刷新和加载更多 1.如何判断RecyclerView是在上滑还是下滑 在RecyclerView的OnScrollListener滑动事件监听中有个好用的方法,就是onScrolled(RecyclerView recycle
-
Android自定义View实现随手势滑动控件
本文控件为大家分享了Android随手势滑动控件的具体代码,供大家参考,具体内容如下 1.新建自定义控件类:MyView public class MyView extends Button{ //记录上次滑动后的坐标值 private int lastX; private int lastY; public MyView(Context context) { super(context); // TODO Auto-generated constructor stub } public MyV
-
Android中Okhttp3实现上传多张图片同时传递参数
之前上传图片都是直接将图片转化为io流传给服务器,没有用框架传图片. 最近做项目,打算换个方法上传图片. Android发展到现在,Okhttp显得越来越重要,所以,这次我选择用Okhttp上传图片. Okhttp目前已经更新到Okhttp3版本了,用法跟之前相比,也有一些差别.在网上找了很多资料, 并和java后台同事反复调试,终于成功上传多张图片,同时传递一些键值对参数. 以下是我对该过程的封装: private static final MediaType MEDIA_TYPE_PNG =
-
android基本控件ToggleButton&Switch使用指南
ToggleButton(开关按钮)和Switch(开关)讲解: 一.核心属性讲解: (1)ToggleButton textOn:按钮被选中的时候文字显示 textOff:按钮没有被选中的时候文字显示 ToggleButton的状态只能是选中和未选中,并且需要为不同的状态设置不同的显示文本. 以下案例为ToggleButton的用法 目录结构 main.xml布局文件 <?xml version="1.0" encoding="utf-8"?> <
-
Android实现计步进度的环形Progress
项目中需要实现一个计步进度的环形Progress,当未达到设定目标时,绘制特定弧度((已实现步数/目标步数)*360°)的圆弧.当已实现步数大于等于目标步数时绘制整个360°圆环. 效果图: 代码实现: 设置已完成步数和目标步数: public void setStep(int stepDone, int stepGoal) { this.stepDone = stepDone; this.stepGoal = stepGoal; int progess = (stepDone * 100) /
-
Android实现微信摇骰子游戏
过年怎么可以不玩红包娱乐一下呢,微信里的摇骰子大小和石头剪刀布就是不错的游戏方式. 使用Java的Random函数很容易实现,以骰子为例: 1.骰子摇动的动画,使用animation-list帧动画实现 2.生成1~6的随机数,1 + new Random().nextInt(6) 以下是代码实现,文末提供图片资源下载: package com.zms.dicedemo; import java.util.Random; import android.app.Activity; import a
-
Android自定义谷歌风格ProgressBar
本文实例为大家分享了谷歌风格ProgressBar的具体代码,供大家参考,具体内容如下 具体代码 package zms.demo.colorprogress; import android.content.Context; import android.content.res.Resources; import android.content.res.TypedArray; import android.graphics.Canvas; import android.graphics.draw
-
Android源码解析之属性动画详解
前言 大家在日常开发中离不开动画,属性动画更为强大,我们不仅要知道如何使用,更要知道他的原理.这样,才能得心应手.那么,今天,就从最简单的来说,了解下属性动画的原理. ObjectAnimator .ofInt(mView,"width",100,500) .setDuration(1000) .start(); ObjectAnimator#ofInt 以这个为例,代码如下. public static ObjectAnimator ofInt(Object target, Stri
-
Android之侧滑菜单DrawerLayout的使用介绍
在android support.v4 中有一个抽屉视图控件DrawerLayout.使用这个控件,可以生成通过在屏幕上水平滑动打开或者关闭菜单,能给用户一个不错的体验效果. DrawerLayout分为侧边菜单和主内容区两部分,侧边菜单可以根据手势展开与隐藏,主内容区的部分可以随着菜单的点击而变化.DrawerLayout其实是一个控件,跟LinearLayout差不多,直接使用即可. DrawerLayout属性 1.drawerPosition:指定 drawer 将从屏幕的一侧滑动. 2