Android自定义View实现垂直时间轴布局
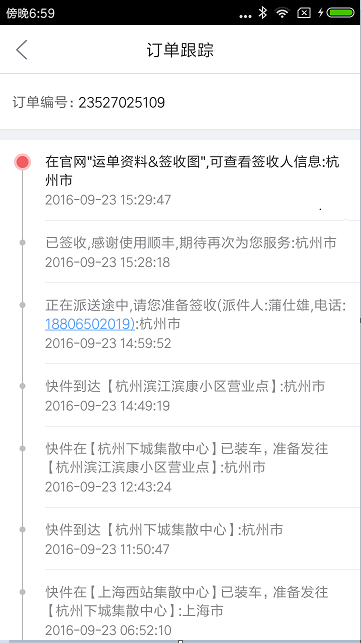
时间轴,顾名思义就是将发生的事件按照时间顺序罗列起来,给用户带来一种更加直观的体验。京东和淘宝的物流顺序就是一个时间轴,想必大家都不陌生,如下图:

分析
实现这个最常用的一个方法就是用ListView,我这里用继承LinearLayout的方式来实现。首先定义了一些自定义属性:
attrs.xml
<?xml version="1.0" encoding="utf-8"?>
<resources>
  <declare-styleable name="TimelineLayout">
    <!--时间轴左偏移值-->
    <attr name="line_margin_left" format="dimension"/>
    <!--时间轴上偏移值-->
    <attr name="line_margin_top" format="dimension"/>
    <!--线宽-->
    <attr name="line_stroke_width" format="dimension"/>
    <!--线的颜色-->
    <attr name="line_color" format="color"/>
    <!--点的大小-->
    <attr name="point_size" format="dimension"/>
    <!--点的颜色-->
    <attr name="point_color" format="color"/>
    <!--图标-->
    <attr name="icon_src" format="reference"/>
  </declare-styleable>
</resources>
TimelineLayout.java
package com.jackie.timeline;

import android.content.Context;
import android.content.res.TypedArray;
import android.graphics.Bitmap;
import android.graphics.Canvas;
import android.graphics.Paint;
import android.graphics.drawable.BitmapDrawable;
import android.support.annotation.Nullable;
import android.util.AttributeSet;
import android.view.View;
import android.widget.LinearLayout;

/**
 * Created by Jackie on 2017/3/8.
 * 时间轴控件
 */

public class TimelineLayout extends LinearLayout {
  private Context mContext;

  private int mLineMarginLeft;
  private int mLineMarginTop;
  private int mLineStrokeWidth;
  private int mLineColor;;
  private int mPointSize;
  private int mPointColor;
  private Bitmap mIcon;

  private Paint mLinePaint; //线的画笔
  private Paint mPointPaint; //点的画笔

  //第一个点的位置
  private int mFirstX;
  private int mFirstY;
  //最后一个图标的位置
  private int mLastX;
  private int mLastY;

  public TimelineLayout(Context context) {
    this(context, null);
  }

  public TimelineLayout(Context context, @Nullable AttributeSet attrs) {
    this(context, attrs, 0);
  }

  public TimelineLayout(Context context, @Nullable AttributeSet attrs, int defStyleAttr) {
    super(context, attrs, defStyleAttr);
    TypedArray ta = context.obtainStyledAttributes(attrs, R.styleable.TimelineLayout);
    mLineMarginLeft = ta.getDimensionPixelOffset(R.styleable.TimelineLayout_line_margin_left, 10);
    mLineMarginTop = ta.getDimensionPixelOffset(R.styleable.TimelineLayout_line_margin_top, 0);
    mLineStrokeWidth = ta.getDimensionPixelOffset(R.styleable.TimelineLayout_line_stroke_width, 2);
    mLineColor = ta.getColor(R.styleable.TimelineLayout_line_color, 0xff3dd1a5);
    mPointSize = ta.getDimensionPixelSize(R.styleable.TimelineLayout_point_size, 8);
    mPointColor = ta.getDimensionPixelOffset(R.styleable.TimelineLayout_point_color, 0xff3dd1a5);

    int iconRes = ta.getResourceId(R.styleable.TimelineLayout_icon_src, R.drawable.ic_ok);
    BitmapDrawable drawable = (BitmapDrawable) context.getResources().getDrawable(iconRes);
    if (drawable != null) {
      mIcon = drawable.getBitmap();
    }

    ta.recycle();

    setWillNotDraw(false);
    initView(context);
  }

  private void initView(Context context) {
    this.mContext = context;

    mLinePaint = new Paint();
    mLinePaint.setAntiAlias(true);
    mLinePaint.setDither(true);
    mLinePaint.setColor(mLineColor);
    mLinePaint.setStrokeWidth(mLineStrokeWidth);
    mLinePaint.setStyle(Paint.Style.FILL_AND_STROKE);

    mPointPaint = new Paint();
    mPointPaint.setAntiAlias(true);
    mPointPaint.setDither(true);
    mPointPaint.setColor(mPointColor);
    mPointPaint.setStyle(Paint.Style.FILL);
  }

  @Override
  protected void onDraw(Canvas canvas) {
    super.onDraw(canvas);

    drawTimeline(canvas);
  }

  private void drawTimeline(Canvas canvas) {
    int childCount = getChildCount();

    if (childCount > 0) {
      if (childCount > 1) {
        //大于1,证明至少有2个,也就是第一个和第二个之间连成线,第一个和最后一个分别有点和icon
        drawFirstPoint(canvas);
        drawLastIcon(canvas);
        drawBetweenLine(canvas);
      } else if (childCount == 1) {
        drawFirstPoint(canvas);
      }
    }
  }

  private void drawFirstPoint(Canvas canvas) {
    View child = getChildAt(0);
    if (child != null) {
      int top = child.getTop();
      mFirstX = mLineMarginLeft;
      mFirstY = top + child.getPaddingTop() + mLineMarginTop;

      //画圆
      canvas.drawCircle(mFirstX, mFirstY, mPointSize, mPointPaint);
    }
  }

  private void drawLastIcon(Canvas canvas) {
    View child = getChildAt(getChildCount() - 1);
    if (child != null) {
      int top = child.getTop();
      mLastX = mLineMarginLeft;
      mLastY = top + child.getPaddingTop() + mLineMarginTop;

      //画图
      canvas.drawBitmap(mIcon, mLastX - (mIcon.getWidth() >> 1), mLastY, null);
    }
  }

  private void drawBetweenLine(Canvas canvas) {
    //从开始的点到最后的图标之间,画一条线
    canvas.drawLine(mFirstX, mFirstY, mLastX, mLastY, mLinePaint);
    for (int i = 0; i < getChildCount() - 1; i++) {
      //画圆
      int top = getChildAt(i).getTop();
      int y = top + getChildAt(i).getPaddingTop() + mLineMarginTop;
      canvas.drawCircle(mFirstX, y, mPointSize, mPointPaint);
    }
  }

  public int getLineMarginLeft() {
    return mLineMarginLeft;
  }

  public void setLineMarginLeft(int lineMarginLeft) {
    this.mLineMarginLeft = lineMarginLeft;
    invalidate();
  }
}
从上面的代码可以看出,分三步绘制,首先绘制开始的实心圆,然后绘制结束的图标,然后在开始和结束之间先绘制一条线,然后在线上在绘制每个步骤的实心圆。
activity_main.xml
<?xml version="1.0" encoding="utf-8"?>
<LinearLayout xmlns:android="http://schemas.android.com/apk/res/android"
  xmlns:app="http://schemas.android.com/apk/res-auto"
  android:layout_width="match_parent"
  android:layout_height="match_parent"
  android:orientation="vertical">

  <LinearLayout
    android:layout_width="match_parent"
    android:layout_height="50dp"
    android:weightSum="2">

    <Button
      android:id="@+id/add_item"
      android:layout_width="0dp"
      android:layout_height="match_parent"
      android:layout_weight="1"
      android:text="add"/>

    <Button
      android:id="@+id/sub_item"
      android:layout_width="0dp"
      android:layout_height="match_parent"
      android:layout_weight="1"
      android:text="sub"/>
  </LinearLayout>

  <LinearLayout
    android:layout_width="match_parent"
    android:layout_height="wrap_content"
    android:orientation="horizontal"
    android:weightSum="2">

    <Button
      android:id="@+id/add_margin"
      android:layout_width="0dp"
      android:layout_weight="1"
      android:layout_height="wrap_content"
      android:text="+"/>

    <Button
      android:id="@+id/sub_margin"
      android:layout_width="0dp"
      android:layout_weight="1"
      android:layout_height="wrap_content"
      android:text="-"/>
  </LinearLayout>

  <TextView
    android:id="@+id/current_margin"
    android:layout_width="match_parent"
    android:layout_height="40dp"
    android:gravity="center"
    android:text="current line margin left is 25dp"/>

  <ScrollView
    android:layout_width="match_parent"
    android:layout_height="wrap_content"
    android:scrollbars="none">

    <com.jackie.timeline.TimelineLayout
      android:id="@+id/timeline_layout"
      android:layout_width="match_parent"
      android:layout_height="wrap_content"
      app:line_margin_left="25dp"
      app:line_margin_top="8dp"
      android:orientation="vertical"
      android:background="@android:color/white">
    </com.jackie.timeline.TimelineLayout>
  </ScrollView>
</LinearLayout>
MainActivity.java
package com.jackie.timeline;

import android.os.Bundle;
import android.support.v7.app.AppCompatActivity;
import android.view.LayoutInflater;
import android.view.View;
import android.widget.Button;
import android.widget.TextView;

public class MainActivity extends AppCompatActivity implements View.OnClickListener {
  private Button addItemButton;
  private Button subItemButton;
  private Button addMarginButton;
  private Button subMarginButton;
  private TextView mCurrentMargin;

  private TimelineLayout mTimelineLayout;

  @Override
  protected void onCreate(Bundle savedInstanceState) {
    super.onCreate(savedInstanceState);
    setContentView(R.layout.activity_main);

    initView();
  }

  private void initView() {
    addItemButton = (Button) findViewById(R.id.add_item);
    subItemButton = (Button) findViewById(R.id.sub_item);
    addMarginButton= (Button) findViewById(R.id.add_margin);
    subMarginButton= (Button) findViewById(R.id.sub_margin);
    mCurrentMargin= (TextView) findViewById(R.id.current_margin);
    mTimelineLayout = (TimelineLayout) findViewById(R.id.timeline_layout);

    addItemButton.setOnClickListener(this);
    subItemButton.setOnClickListener(this);
    addMarginButton.setOnClickListener(this);
    subMarginButton.setOnClickListener(this);
  }

  private int index = 0;
  private void addItem() {
    View view = LayoutInflater.from(this).inflate(R.layout.item_timeline, mTimelineLayout, false);
    ((TextView) view.findViewById(R.id.tv_action)).setText("步骤" + index);
    ((TextView) view.findViewById(R.id.tv_action_time)).setText("2017年3月8日16:55:04");
    ((TextView) view.findViewById(R.id.tv_action_status)).setText("完成");
    mTimelineLayout.addView(view);
    index++;
  }

  private void subItem() {
    if (mTimelineLayout.getChildCount() > 0) {
      mTimelineLayout.removeViews(mTimelineLayout.getChildCount() - 1, 1);
      index--;
    }
  }

  @Override
  public void onClick(View v) {
    switch (v.getId()){
      case R.id.add_item:
        addItem();
        break;
      case R.id.sub_item:
        subItem();
        break;
      case R.id.add_margin:
        int currentMargin = UIHelper.pxToDip(this, mTimelineLayout.getLineMarginLeft());
        mTimelineLayout.setLineMarginLeft(UIHelper.dipToPx(this, ++currentMargin));
        mCurrentMargin.setText("current line margin left is " + currentMargin + "dp");
        break;
      case R.id.sub_margin:
        currentMargin = UIHelper.pxToDip(this, mTimelineLayout.getLineMarginLeft());
        mTimelineLayout.setLineMarginLeft(UIHelper.dipToPx(this, --currentMargin));
        mCurrentMargin.setText("current line margin left is " + currentMargin + "dp");
        break;
      default:
        break;
    }
  }
}
item_timeline.xml
<?xml version="1.0" encoding="utf-8"?>
<RelativeLayout
  xmlns:android="http://schemas.android.com/apk/res/android"
  android:layout_width="match_parent"
  android:layout_height="wrap_content"
  android:paddingLeft="65dp"
  android:paddingTop="20dp"
  android:paddingRight="20dp"
  android:paddingBottom="20dp">

  <TextView
    android:id="@+id/tv_action"
    android:layout_width="wrap_content"
    android:layout_height="wrap_content"
    android:textSize="14sp"
    android:textColor="#1a1a1a"
    android:text="测试一"/>

  <TextView
    android:id="@+id/tv_action_time"
    android:layout_width="wrap_content"
    android:layout_height="wrap_content"
    android:textSize="12sp"
    android:textColor="#8e8e8e"
    android:layout_below="@id/tv_action"
    android:layout_marginTop="10dp"
    android:text="2017年3月8日16:49:12"/>

  <TextView
    android:id="@+id/tv_action_status"
    android:layout_width="wrap_content"
    android:layout_height="wrap_content"
    android:textSize="14sp"
    android:textColor="#3dd1a5"
    android:layout_alignParentRight="true"
    android:text="完成"/>

</RelativeLayout>
附上像素工具转化的工具类:
package com.jackie.timeline;

import android.content.Context;

/**
 * Created by Jackie on 2017/3/8.
 */
public final class UIHelper {

  private UIHelper() throws InstantiationException {
    throw new InstantiationException("This class is not for instantiation");
  }

  /**
   * dip转px
   */
  public static int dipToPx(Context context, float dip) {
    return (int) (dip * context.getResources().getDisplayMetrics().density + 0.5f);
  }

  /**
   * px转dip
   */
  public static int pxToDip(Context context, float pxValue) {
    final float scale = context.getResources().getDisplayMetrics().density;
    return (int) (pxValue / scale + 0.5f);
  }
}
效果图如下:

以上就是本文的全部内容,希望对大家的学习有所帮助,也希望大家多多支持我们。
赞 (0)

