Spring-Boot框架初步搭建
一、简介
SpringMVC是非常伟大的框架,开源,发展迅速。优秀的设计必然会划分、解耦。所以,spring有很多子项目,比如core、context、bean、mvc等。这对知根底的人来说很简单明了,然而springmvc就是为了傻瓜式的操作而发明的。对于初学springmvc的人来说,想要入手就开发需要拷贝一连串的dependency而不知道这个是干嘛,不知道是不是少了依赖。像我刚接触springmvc的时候到处百度教程而发现各有不同,于是复制了一个又一个代码却不能自己设置,根本原因是不了解各个依赖的包。
Spring-Boot 正是为了解决繁复的代码配置而产生的。Spring-Boot 也是基于java-base 开发的代码,及不用xml文件配置,所有代码都由java来完成。还可以加入Groovy的动态语言执行。
二、搭建一个基本的web-mvc 项目
2.1 Configure environment
- java 1.8+
- maven 3.3+
- spring-boot 1.3.5
- idea 15
- Thymeleaf 3
2.2 Start
在idea中,选择new-》maven创建一个空的maven项目,比如名字springboot-test。
2.2.1pom.xml
设定java版本:
<properties>

    <java.version>1.8</java.version>

</properties>
添加依赖版本管理dependencyManagement
<dependencyManagement>

    <dependencies>

      <dependency>

        <!-- Import dependency management from Spring Boot -->

        <groupId>org.springframework.boot</groupId>

        <artifactId>spring-boot-dependencies</artifactId>

        <version>1.3.5.RELEASE</version>

        <type>pom</type>

        <scope>import</scope>

      </dependency>

    </dependencies>

</dependencyManagement>
添加spring-web项目依赖
<dependencies>

    <dependency>

      <groupId>org.springframework.boot</groupId>

      <artifactId>spring-boot-starter-web</artifactId>

    </dependency>

  <dependency>

    <groupId>org.springframework.boot</groupId>

    <artifactId>spring-boot-devtools</artifactId>

    <optional>true</optional>

  </dependency>

</dependencies>
添加build-plugin
<build>

    <plugins>

      <plugin>

        <groupId>org.springframework.boot</groupId>

        <artifactId>spring-boot-maven-plugin</artifactId>

        <configuration>

          <fork>true</fork>

        </configuration>

      </plugin>

    </plugins>

</build>
如此,一个简单的restful的webservice的项目就搭建好了。如果想要支持视图渲染,即jsp、freeMark、velocity等,添加对应的依赖即可。比如,我使用Thymeleaf模板:
<dependency>

      <groupId>org.springframework.boot</groupId>

      <artifactId>spring-boot-starter-thymeleaf</artifactId>

</dependency>
2.2.2 创建java代码
如果新建项目的名字是:springboot-test. 则创建包springboot-test/src/main/java/com/test.
com
 +- example
   +- myproject
     +- Application.java
     |
     +- domain
     |  +- Customer.java
     |  +- CustomerRepository.java
     |
     +- service
     |  +- CustomerService.java
     |
     +- web
       +- CustomerController.java
com.test是我们的基本包名。下面创建配置类com.test.AppConfig。
package com.test;
import org.springframework.boot.SpringApplication;

import org.springframework.boot.autoconfigure.SpringBootApplication;

/**

 * Created by miaorf on 2016/6/19.

 */

@SpringBootApplication

public class AppConfig {

  public static void main(String[] args) {

    SpringApplication.run(AppConfig.class);

  }

}
@SpringBootApplication 标注启动配置入口,可以发现通过一个main方法启动。使用这个注解的类必须放置于最外层包中,因为默认扫描这个类以下的包。否则需要自己配置@ComponentScan。
这样,配置基本完成了。下面开发控制层controller:
创建com.test.controller.HelloController。
package com.test.controller;

import org.springframework.stereotype.Controller;

import org.springframework.ui.Model;

import org.springframework.web.bind.annotation.RequestMapping;

import org.springframework.web.bind.annotation.ResponseBody;

import java.util.HashMap;

import java.util.Map;

/**

 * Created by miaorf on 2016/6/19.

 */

@Controller

public class HelloController {

  @RequestMapping("/index")

  public String index(Model model){

    model.addAttribute("name","Ryan");

    return "index";

  }

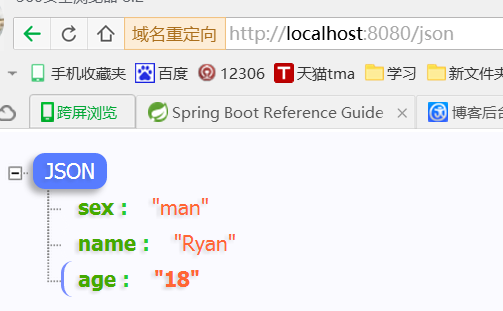
  @RequestMapping("/json")

  @ResponseBody

  public Map<String,Object> json(){

    Map<String,Object> map = new HashMap<String,Object>();

    map.put("name","Ryan");

    map.put("age","18");

    map.put("sex","man");

    return map;

  }

}
创建视图代码:
视图默认放在springboot-test\src\main\resources\templates**.
所以创建springboot-test\src\main\resources\templates\index.html
<!DOCTYPE HTML>

<html xmlns:th="http://www.thymeleaf.org">

<head>

  <title>Getting Started: Serving Web Content</title>

  <meta http-equiv="Content-Type" content="text/html; charset=UTF-8" />

</head>

<body>

<p th:text="'Hello, ' + ${name} + '!'" />

</body>

</html>
D:\workspace\springboot\springboot-test\src\main\webapp\hello.html
<!DOCTYPE HTML>

<html>

<head>

  <title>Getting Started: Serving Web Content</title>

  <meta http-equiv="Content-Type" content="text/html; charset=UTF-8" />

</head>

<body>

hello, This is static page. not resolve by server, just the html.

</body>

</html>
2.2.3 run
启动方式多种,可以启动main方法,也可以通过命令行启动:
D:\temp\springboot-test>mvn spring-boot:run
[INFO] Scanning for projects...
[WARNING]
[WARNING] Some problems were encountered while building the effective model for com.test:springboot-test:jar:1.0-SNAPSHOT
[WARNING] 'build.plugins.plugin.version' for org.springframework.boot:spring-boot-maven-plugin is missing. @ line 49, column 21
[WARNING]
[WARNING] It is highly recommended to fix these problems because they threaten the stability of your build.
[WARNING]
[WARNING] For this reason, future Maven versions might no longer support building such malformed projects.
[WARNING]
[INFO]
[INFO] ------------------------------------------------------------------------
[INFO] Building springboot-test 1.0-SNAPSHOT
[INFO] ------------------------------------------------------------------------
[INFO]
[INFO] >>> spring-boot-maven-plugin:1.3.5.RELEASE:run (default-cli) > test-compile @ springboot-test >>>
[INFO]
[INFO] --- maven-resources-plugin:2.6:resources (default-resources) @ springboot-test ---
[WARNING] Using platform encoding (GBK actually) to copy filtered resources, i.e. build is platform dependent!
[INFO] Copying 2 resources
[INFO]
[INFO] --- maven-compiler-plugin:3.1:compile (default-compile) @ springboot-test ---
[INFO] Nothing to compile - all classes are up to date
[INFO]
[INFO] --- maven-resources-plugin:2.6:testResources (default-testResources) @ springboot-test ---
[WARNING] Using platform encoding (GBK actually) to copy filtered resources, i.e. build is platform dependent!
[INFO] skip non existing resourceDirectory D:\temp\springboot-test\src\test\resources
[INFO]
[INFO] --- maven-compiler-plugin:3.1:testCompile (default-testCompile) @ springboot-test ---
[INFO] No sources to compile
[INFO]
[INFO] <<< spring-boot-maven-plugin:1.3.5.RELEASE:run (default-cli) < test-compile @ springboot-test <<<
[INFO]
[INFO] --- spring-boot-maven-plugin:1.3.5.RELEASE:run (default-cli) @ springboot-test ---
[INFO] Attaching agents: []

 .  ____     _      __ _ _
 /\\ / ___'_ __ _ _(_)_ __ __ _ \ \ \ \
( ( )\___ | '_ | '_| | '_ \/ _` | \ \ \ \
 \\/ ___)| |_)| | | | | || (_| | ) ) ) )
 ' |____| .__|_| |_|_| |_\__, | / / / /
 =========|_|==============|___/=/_/_/_/
 :: Spring Boot ::    (v1.3.5.RELEASE)
浏览器访问:localhost:8080/index


demo下载路径:springboot_jb51.rar
以上就是本文的全部内容,希望对大家的学习有所帮助,也希望大家多多支持我们。

