使用SpringBoot项目导入openfeign版本的问题
目录
- SpringBoot项目导入openfeign版本
- 版本2.1.1
- 版本2.2.2
- 被SpringBoot整合OpenFeign坑惨了
- 项目集成OpenFegin
- 解决问题
SpringBoot项目导入openfeign版本
记SpringBoot项目导入spring-cloud-starter-openfeign依赖版本问题
前几天在写项目时,需要微服务间的调用,于是决定使用openfeign。
由于我们的项目使用的是Spring-Boot,版本是2.1.6。
在初次导入openfeign时使用的版本时2.2.2,但是将依赖导入后,发现原先的项目启动报错
org.springframework.beans.factory.BeanCreationException: Error creating bean with name 'bootstrapImportSelectorConfiguration': Initialization of bean failed; nested exception is java.lang.NoClassDefFoundError: org/springframework/boot/context/properties/ConfigurationPropertiesBean
at org.springframework.beans.factory.support.AbstractAutowireCapableBeanFactory.doCreateBean(AbstractAutowireCapableBeanFactory.java:601) ~[spring-beans-5.1.8.RELEASE.jar:5.1.8.RELEASE]
at org.springframework.beans.factory.support.AbstractAutowireCapableBeanFactory.createBean(AbstractAutowireCapableBeanFactory.java:515) ~[spring-beans-5.1.8.RELEASE.jar:5.1.8.RELEASE]
at org.springframework.beans.factory.support.AbstractBeanFactory.lambda$doGetBean$0(AbstractBeanFactory.java:320) ~[spring-beans-5.1.8.RELEASE.jar:5.1.8.RELEASE]
at org.springframework.beans.factory.support.DefaultSingletonBeanRegistry.getSingleton(DefaultSingletonBeanRegistry.java:222) ~[spring-beans-5.1.8.RELEASE.jar:5.1.8.RELEASE]
at org.springframework.beans.factory.support.AbstractBeanFactory.doGetBean(AbstractBeanFactory.java:318) ~[spring-beans-5.1.8.RELEASE.jar:5.1.8.RELEASE]
at org.springframework.beans.factory.support.AbstractBeanFactory.getBean(AbstractBeanFactory.java:199) ~[spring-beans-5.1.8.RELEASE.jar:5.1.8.RELEASE]
at org.springframework.beans.factory.support.DefaultListableBeanFactory.preInstantiateSingletons(DefaultListableBeanFactory.java:845) ~[spring-beans-5.1.8.RELEASE.jar:5.1.8.RELEASE]
at org.springframework.context.support.AbstractApplicationContext.finishBeanFactoryInitialization(AbstractApplicationContext.java:877) ~[spring-context-5.1.8.RELEASE.jar:5.1.8.RELEASE]
at org.springframework.context.support.AbstractApplicationContext.refresh(AbstractApplicationContext.java:549) ~[spring-context-5.1.8.RELEASE.jar:5.1.8.RELEASE]
at org.springframework.boot.SpringApplication.refresh(SpringApplication.java:742) [spring-boot-2.1.6.RELEASE.jar:2.1.6.RELEASE]
at org.springframework.boot.SpringApplication.refreshContext(SpringApplication.java:389) [spring-boot-2.1.6.RELEASE.jar:2.1.6.RELEASE]
at org.springframework.boot.SpringApplication.run(SpringApplication.java:311) [spring-boot-2.1.6.RELEASE.jar:2.1.6.RELEASE]
at org.springframework.boot.builder.SpringApplicationBuilder.run(SpringApplicationBuilder.java:139) ~[spring-boot-2.1.6.RELEASE.jar:2.1.6.RELEASE]
at org.springframework.cloud.bootstrap.BootstrapApplicationListener.bootstrapServiceContext(BootstrapApplicationListener.java:212) ~[spring-cloud-context-2.2.2.RELEASE.jar:2.2.2.RELEASE]
at org.springframework.cloud.bootstrap.BootstrapApplicationListener.onApplicationEvent(BootstrapApplicationListener.java:117) ~[spring-cloud-context-2.2.2.RELEASE.jar:2.2.2.RELEASE]
at org.springframework.cloud.bootstrap.BootstrapApplicationListener.onApplicationEvent(BootstrapApplicationListener.java:74) ~[spring-cloud-context-2.2.2.RELEASE.jar:2.2.2.RELEASE]
at org.springframework.context.event.SimpleApplicationEventMulticaster.doInvokeListener(SimpleApplicationEventMulticaster.java:172) ~[spring-context-5.1.8.RELEASE.jar:5.1.8.RELEASE]
at org.springframework.context.event.SimpleApplicationEventMulticaster.invokeListener(SimpleApplicationEventMulticaster.java:165) ~[spring-context-5.1.8.RELEASE.jar:5.1.8.RELEASE]
at org.springframework.context.event.SimpleApplicationEventMulticaster.multicastEvent(SimpleApplicationEventMulticaster.java:139) ~[spring-context-5.1.8.RELEASE.jar:5.1.8.RELEASE]
at org.springframework.context.event.SimpleApplicationEventMulticaster.multicastEvent(SimpleApplicationEventMulticaster.java:127) ~[spring-context-5.1.8.RELEASE.jar:5.1.8.RELEASE]
at org.springframework.boot.context.event.EventPublishingRunListener.environmentPrepared(EventPublishingRunListener.java:75) ~[spring-boot-2.1.6.RELEASE.jar:2.1.6.RELEASE]
at org.springframework.boot.SpringApplicationRunListeners.environmentPrepared(SpringApplicationRunListeners.java:53) ~[spring-boot-2.1.6.RELEASE.jar:2.1.6.RELEASE]
at org.springframework.boot.SpringApplication.prepareEnvironment(SpringApplication.java:340) [spring-boot-2.1.6.RELEASE.jar:2.1.6.RELEASE]
at org.springframework.boot.SpringApplication.run(SpringApplication.java:304) [spring-boot-2.1.6.RELEASE.jar:2.1.6.RELEASE]
at org.springframework.boot.SpringApplication.run(SpringApplication.java:1213) [spring-boot-2.1.6.RELEASE.jar:2.1.6.RELEASE]
at org.springframework.boot.SpringApplication.run(SpringApplication.java:1202) [spring-boot-2.1.6.RELEASE.jar:2.1.6.RELEASE]
at com.wjs.plan.PlanApplication.main(PlanApplication.java:16) [classes/:na]
Caused by: java.lang.NoClassDefFoundError: org/springframework/boot/context/properties/ConfigurationPropertiesBean
at org.springframework.cloud.context.properties.ConfigurationPropertiesBeans.postProcessBeforeInitialization(ConfigurationPropertiesBeans.java:94) ~[spring-cloud-context-2.2.2.RELEASE.jar:2.2.2.RELEASE]
at org.springframework.beans.factory.support.AbstractAutowireCapableBeanFactory.applyBeanPostProcessorsBeforeInitialization(AbstractAutowireCapableBeanFactory.java:414) ~[spring-beans-5.1.8.RELEASE.jar:5.1.8.RELEASE]
at org.springframework.beans.factory.support.AbstractAutowireCapableBeanFactory.initializeBean(AbstractAutowireCapableBeanFactory.java:1770) ~[spring-beans-5.1.8.RELEASE.jar:5.1.8.RELEASE]
at org.springframework.beans.factory.support.AbstractAutowireCapableBeanFactory.doCreateBean(AbstractAutowireCapableBeanFactory.java:593) ~[spring-beans-5.1.8.RELEASE.jar:5.1.8.RELEASE]
... 26 common frames omitted
Caused by: java.lang.ClassNotFoundException: org.springframework.boot.context.properties.ConfigurationPropertiesBean
at java.net.URLClassLoader.findClass(URLClassLoader.java:382) ~[na:1.8.0_201]
at java.lang.ClassLoader.loadClass(ClassLoader.java:424) ~[na:1.8.0_201]
at sun.misc.Launcher$AppClassLoader.loadClass(Launcher.java:349) ~[na:1.8.0_201]
at java.lang.ClassLoader.loadClass(ClassLoader.java:357) ~[na:1.8.0_201]
... 30 common frames omitted
找了一大推资料最后将openfeign版本改成2.1.1发现项目可以正常启动了。
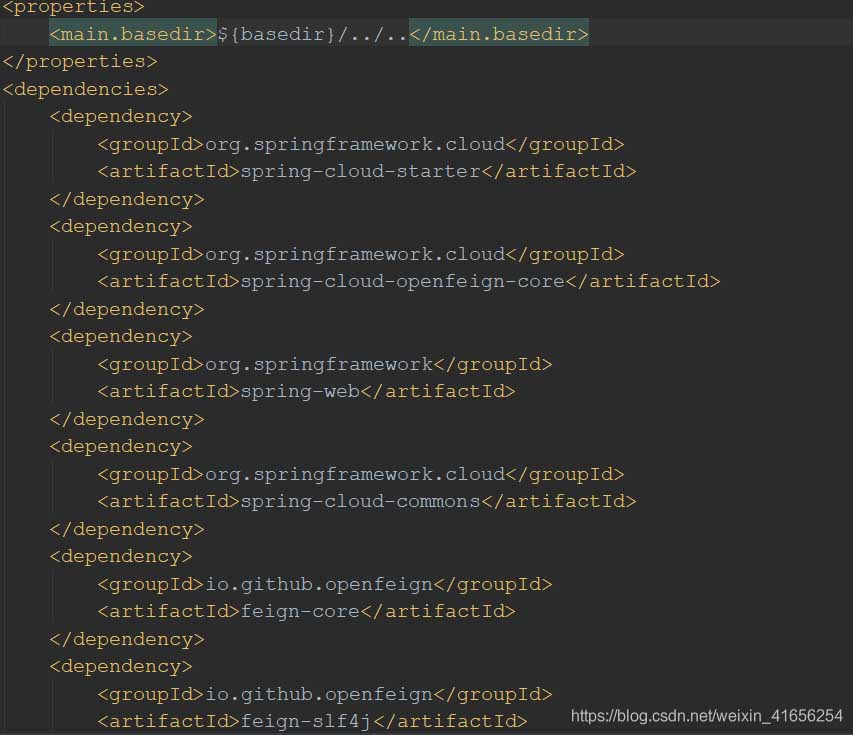
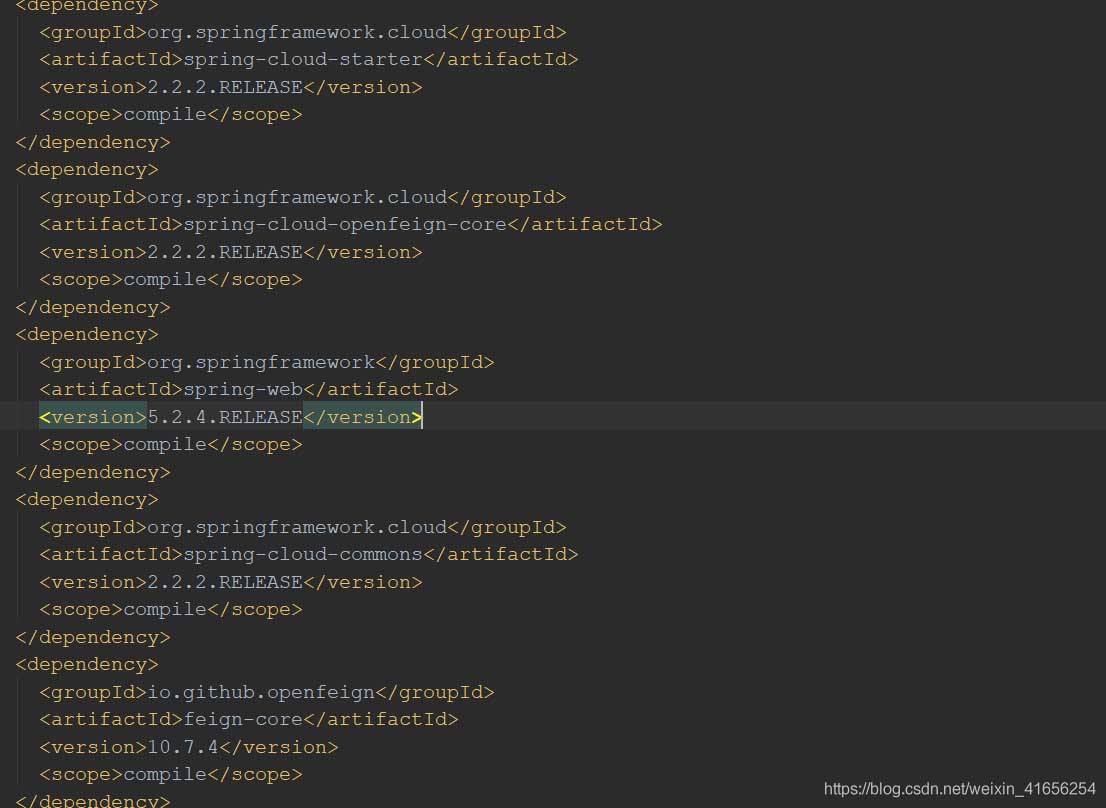
最后查看了openfengn两个版本的不同,再次贴出来。
版本2.1.1

版本2.2.2

相信在这里大佬已经看出来了,openfeign2.2.2版本中指定了每个jar包的版本,2.1.1版本则是引入了父工程的版本号。
在引入openfeign2.2.2后可以看到spring-cloud-context有2个,这就导致jar包冲突从而项目启动失败。

被SpringBoot整合OpenFeign坑惨了
最近,在使用SpringBoot+K8S开发微服务系统,既然使用了K8S,我就不想使用SpringCloud了。
为啥,因为K8S本身的就提供了非常6的服务注册与发现、限流、熔断、负载均衡等等微服务需要使用的技术,那我为啥还要接入SpringCloud呢?额,说了这么多,在真正使用SpringBoot+K8S这一套技术栈的时候,也会遇到一些问题,比如我不需要使用SpringCloud时,调用其他服务时,我使用的是原生的OpenFegin,在使用OpenFegin调用其他服务的时候,就遇到了一个大坑。
通过OpenFeign请求返回值LocalDateTime发生了异常,今天,我们就来说说这个坑!
好了,我们开始吧~~
项目集成OpenFegin
集成OpenFegin依赖
首先,我先跟大家说下项目的配置,整体项目使用的SpringBoot版本为2.2.6,原生的OpenFegin使用的是11.0,我们通过如下方式在pom.xml中引入OpenFegin。
<properties>
    <project.build.sourceEncoding>UTF-8</project.build.sourceEncoding>
    <skip_maven_deploy>false</skip_maven_deploy>
    <java.version>1.8</java.version>
    <openfegin.version>11.0</openfegin.version>
</properties>
<dependencies>
    <dependency>
        <groupId>io.github.openfeign</groupId>
        <artifactId>feign-core</artifactId>
        <version>${openfegin.version}</version>
    </dependency>
    <dependency>
        <groupId>io.github.openfeign</groupId>
        <artifactId>feign-jackson</artifactId>
        <version>${openfegin.version}</version>
    </dependency>
</dependencies>
这里,我省略了一些其他的配置项。
接下来,我就开始在我的项目中使用OpenFegin调用远程服务了。具体步骤如下。
实现远程调用
首先,创建OpenFeignConfig类,配置OpenFegin默认使用的Contract。
@Configuration
public class OpenFeignConfig {
    @Bean
    public Contract useFeignAnnotations() {
        return new Contract.Default();
    }
}
接下来,我们写一个通用的获取OpenFeign客户端的工厂类,这个类也比较简单,本质上就是以一个HashMap来缓存所有的FeginClient,这个的FeginClient本质上就是我们自定义的Fegin接口,缓存中的Key为请求连接的基础URL,缓存的Value就是我们定义的FeginClient接口。
public class FeginClientFactory {
    /**
     * 缓存所有的Fegin客户端
     */
    private volatile static Map<String, Object> feginClientCache = new HashMap<>();

    /**
     * 从Map中获取数据
     * @return
     */
    @SuppressWarnings("unchecked")
    public static <T> T getFeginClient(Class<T> clazz, String baseUrl){
        if(!feginClientCache.containsKey(baseUrl)) {
            synchronized (FeginClientFactory.class) {
                if(!feginClientCache.containsKey(baseUrl)) {
                    T feginClient = Feign.builder().decoder(new JacksonDecoder()).encoder(new JacksonEncoder()).target(clazz, baseUrl);
                    feginClientCache.put(baseUrl, feginClient);
                }
            }
        }
        return (T)feginClientCache.get(baseUrl);
    }
}
接下来,我们就定义一个FeginClient接口。
public interface FeginClientProxy {
    @Headers("Content-Type:application/json;charset=UTF-8")
    @RequestLine("POST /user/login")
    UserLoginVo login(UserLoginVo loginVo);
}
接下来,我们创建SpringBoot的测试类。
@RunWith(SpringRunner.class)
@SpringBootTest
public class IcpsWeightStarterTest {
    @Test
    public void testUserLogin() {
        ResponseMessage result = FeginClientFactory.getFeginClient(FeginClientProxy.class, "http://127.0.0.1").login(new UserLoginVo("zhangsan", "123456", 1));
        System.out.println(JsonUtils.bean2Json(result));
    }
}
一切准备就绪,运行测试。麻蛋,出问题了。主要的问题就是通过OpenFeign请求返回值LocalDateTime字段会发生异常!!!
注:此时异常时,我们在LocalDateTime字段上添加的注解如下所示。
import java.time.LocalDateTime;
import com.baomidou.mybatisplus.annotation.FieldFill;
import com.baomidou.mybatisplus.annotation.TableField;
import com.fasterxml.jackson.annotation.JsonFormat;
@TableField(value = "CREATE_TIME", fill = FieldFill.INSERT)
@JsonFormat(pattern = "yyyy-MM-dd HH:mm:ss", locale = "zh", timezone = "GMT+8")
private LocalDateTime createTime;
解决问题
问题描述
SpringBoot通过原生OpenFeign客户端调用HTTP接口,如果返回值中包含LocalDateTime类型(包括其他JSR-310中java.time包的时间类),在客户端可能会出现反序列化失败的错误。错误信息如下:
Caused by:com.fasterxml.jackson.databind.exc.InvalidDefinitionException: Cannot construct instance of `java.time.LocalDateTime` (no Creators, like default construct, exist): no String-argument constructor/factory method to deserialize from String value ('2020-10-07T11:04:32')
问题分析
从客户端调用fegin,也是相当于URL传参就相当于经过一次JSON转换,数据库取出‘2020-10-07T11:04:32’数据这时是时间类型,进过JSON之后就变成了String类型,T就变成了字符不再是一个特殊字符,因此String的字符串“2020-10-07T11:04:32”反序列化就会失败。
问题解决
在项目中增加依赖。
<dependency>
    <groupId>com.fasterxml.jackson.datatype</groupId>
    <artifactId>jackson-datatype-jsr310</artifactId>
    <version>2.9.9</version>
</dependency>
注:如果是用的是SpringBoot,并且明确指定了SpringBoot版本,引入jackson-datatype-jsr310时,可以不用指定版本号。
接下来,在POJO类的LocalDateTime类型字段增加如下注解。
import com.fasterxml.jackson.databind.annotation.JsonDeserialize;
import com.fasterxml.jackson.datatype.jsr310.deser.LocalDateTimeDeserializer;
添加后的效果如下所示。
import java.time.LocalDateTime;
import com.baomidou.mybatisplus.annotation.FieldFill;
import com.baomidou.mybatisplus.annotation.TableField;
import com.fasterxml.jackson.annotation.JsonFormat;
import com.fasterxml.jackson.databind.annotation.JsonDeserialize;
import com.fasterxml.jackson.datatype.jsr310.deser.LocalDateTimeDeserializer;
@TableField(value = "CREATE_TIME", fill = FieldFill.INSERT)
@JsonFormat(pattern = "yyyy-MM-dd HH:mm:ss", locale = "zh", timezone = "GMT+8")
@JsonDeserialize(using = LocalDateTimeDeserializer.class)
private LocalDateTime createTime;
此时,再次调用远程接口,问题解决。
以上为个人经验,希望能给大家一个参考,也希望大家多多支持我们。

