SpringBoot通知机制的实现方式
1. 快速创建maven管理的SpringBoot项目
1、访问 http://start.spring.io/
2、 选择构建工具Maven Project、
Spring Boot版本1.3.6以及一些工程基本信息点击“Switch to the full version.”java版本选择1.7;
3、点击Generate Project下载项目压缩包
4、解压后
使用eclipse,Import -> Existing Maven Projects -> Next ->选择解压后的文件夹-> Finsh,OK done!
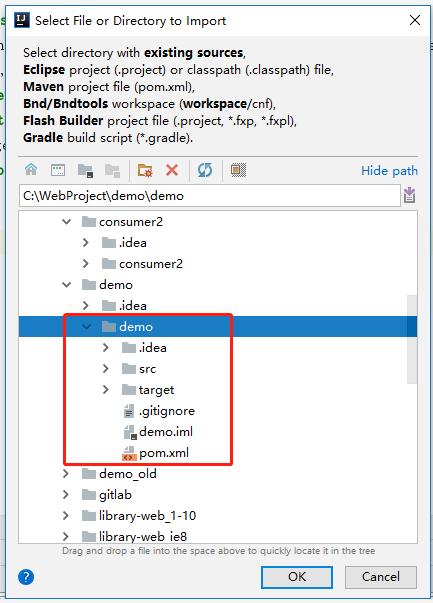
使用IDEA的话,按如下步骤导入项目: File -> New -> Project fron Existing Sourses -> 选择解压后的直接包含pom.xml文件的demo文件夹,OK -> 选第二项Import project from external model, 选maven,Next -> Next -> 勾选左下角Open Project Structure after import, Next -> Next -> Finish -> 选Yes -> OK -> 大功告成!
(记录自己踩过的坑:一定要选直接包含pom.xml的demo文件夹,一开始选择直接解压后的demo文件夹,结果找不到可以导入的maven项目。 )

5、 运行刚导入的项目
访问localhost:8080/hello, 看到页面显示Hello World。
6、 在这个demo的基础上进行开发
2. 通知机制的流程
1、客户端向server订阅通知
订阅信息包括通知类型(notificationTypes)、过滤条件(filteringCriteria)、订阅者地址(subscriberUri)和 managerId。
请求数据以json格式发送,因此在服务端用@RequestBody Map request 来处理请求中的json数据,创建JSONObject 对象,从而根据参数名获取请求中传入的参数值。
服务端代码如下:
@RequestMapping("/notifications")
    public void subscribeNotification(@RequestBody Map request, HttpServletResponse response)
            throws ServletException, IOException, JSONException {

        System.out.println("Enter localhost:8083/notifications. " );

        JSONObject jsonObject = new JSONObject(request);
        String subscriptionId = (String) jsonObject.get("subscriptionId");  // 通过JSONObject 对象获取请求中传入的参数值
        String notificationType = (String) jsonObject.get("notificationType");
        String filteringCriteria = (String) jsonObject.get("filteringCriteria");
        String managerId = (String) jsonObject.get("managerId");

        System.out.println("subscriptionId=" + subscriptionId + ", notificationType=" + notificationType + ", filteringCriteria=" + filteringCriteria + ", managerId=" + managerId );

        //  some code...   省略了存数据库的操作

        response.setHeader("Location", "http://localhost:8083/notifications/0101");  // 通过response.setHeader()方法设置响应头
        PrintWriter out = response.getWriter();
        String result = "Success to Subscribe a notification! ";
        out.write(result);
    }
服务端端口设为8083,默认是8080,可以通过在resources 下的application.properties文件里加一条语句server.port=8083 修改为其他端口号。
Postman的接口测试结果如下:

2、服务端将通知发送给客户端
请求信息包括订阅Id(subscriptionId)、通知类型(NotificationType)、发送者Id(producerId)、消息(message)。首先根据subscriptionId 从数据库查找到该订阅的通知类型、过滤条件和订阅者地址,然后判断该通知是否符合订阅条件,符合则将该通知发送给订阅者。
服务端代码如下:
@RequestMapping("/sendNotification")
    public void sendNotification(@RequestBody Map request, HttpServletResponse response)
            throws ServletException, IOException, JSONException {

        System.out.println("request:" + request);

        JSONObject jsonObject = new JSONObject(request);
        System.out.println("jsonObject:" + jsonObject);
        String subscriptionId = (String) jsonObject.get("subscriptionId");
        String notificationType = (String) jsonObject.get("notificationType");
        String producerId = (String) jsonObject.get("producerId");
        String alarmType = (String) jsonObject.getJSONObject("message").get("alarmType");
        System.out.println("subscriptionId=" + subscriptionId + ", notificationType=" + notificationType + ", producerId=" + producerId + ", alarmType=" + alarmType );

        //  some code...  查询数据库(省略)

        // 模拟数据库查询结果
        String getNotificationType = "";
        String getAlarmType = "";
        String getsubscriberUri = "";
        if(subscriptionId.equals("http://localhost:8081/notifications/0101")){
            getNotificationType = "alarm";
            getAlarmType = "01";
            getsubscriberUri = "http://localhost:8081/notifications/001";
        }
        if(subscriptionId.equals("http://localhost:8081/notifications/0102")){
            getNotificationType = "alarm";
            getAlarmType = "02";
            getsubscriberUri = "http://localhost:8082/notifications/001";
        }

        // 判断该通知是否符合订阅条件
        String subscribeURL = "";
        if(notificationType.equals(getNotificationType) && alarmType.equals(getAlarmType)){
            subscribeURL = getsubscriberUri;
        } else return;

        // 建立连接,将通知发送给订阅者
        HttpURLConnection subscribeConnection = null;
        StringBuffer responseBuffer = new StringBuffer();
        try{
            URL getsubscribeURL = new URL(subscribeURL);
            subscribeConnection = (HttpURLConnection) getsubscribeURL.openConnection();  // 建立连接
            subscribeConnection.setDoOutput(true);
            subscribeConnection.setDoInput(true);
            subscribeConnection.setRequestMethod("POST");
            subscribeConnection.setRequestProperty("Accept-Charset", "utf-8");
            subscribeConnection.setRequestProperty("Content-Type", "application/json");
            subscribeConnection.setRequestProperty("Charset", "UTF-8");
            byte[] data = (jsonObject.toString()).getBytes();
            subscribeConnection.setRequestProperty("Content-Length", String.valueOf(data.length));

            // 开始连接请求
            subscribeConnection.connect();
            OutputStream out = subscribeConnection.getOutputStream();
            // 写入请求的字符串
            out.write((jsonObject.toString()).getBytes());  // 发送json数据
            out.flush();
            out.close();
        }catch (IOException e) {
        }
        if (subscribeConnection.getResponseCode() == 200) {    // 若响应码为200,则通知订阅成功
            System.out.println("Success to send the notification." );
            String readLine;
            BufferedReader responseReader = new BufferedReader(new InputStreamReader(
                    subscribeConnection.getInputStream(), "utf-8"));
            while ((readLine = responseReader.readLine()) != null) {
                responseBuffer.append(readLine);
            }
            System.out.println("Http Response:" + responseBuffer);
            subscribeConnection.disconnect();

            PrintWriter out = response.getWriter();
            out.write(responseBuffer.toString());
        }else return;
    }
订阅者(8081端口)接收通知,代码如下:
@RequestMapping("/notifications/001")
    public void receiveNotification(@RequestBody Map request, HttpServletResponse response)
            throws ServletException, IOException{
        System.out.println("Receive a new notification." );
        System.out.println("request:" + request);

        PrintWriter out = response.getWriter();
        String result = "Success to Subscribe a notification! ";
        out.write(result);
    }
3. 运行过程及结果
首先,用Postman 向服务端(8083端口)发送通知:

服务端结果如下:

订阅者(8081端口)结果如下:

附上demo源码地址: https://github.com/bupt-lxl/SpringBoot-Notification
以上为个人经验,希望能给大家一个参考,也希望大家多多支持我们。

