FlowLayout流式布局实现搜索清空历史记录
本文实例为大家分享了FlowLayout实现搜索清空历史记录的具体代码,供大家参考,具体内容如下
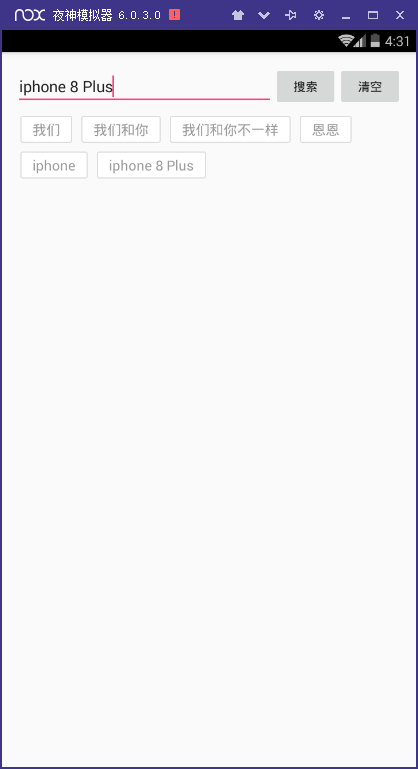
效果图:点击搜索框将搜索的历史在流式布局中展示出来,清空历史记录就会将历史清空,每次搜索后都存入sp中,每次进入页面都先判断sp里是否有值并展示
首先需要导入一个module,下载地址
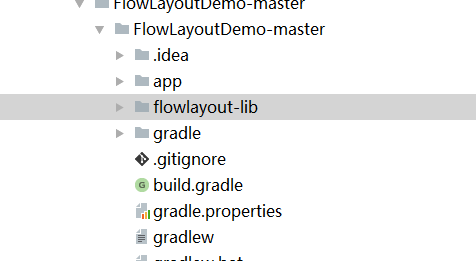
下载完这个工程后,需要将里面的flowlayout-lib导入到工程中,

导入工程的步骤:File - New - Import Module 选中这个flowlayout-lib
导入完成后,在项目的build.gradle中对导入的module进行依赖
compile project(':flowlayout-lib')
activity_main.xml
<LinearLayout xmlns:android="http://schemas.android.com/apk/res/android"
 xmlns:app="http://schemas.android.com/apk/res-auto"
 xmlns:tools="http://schemas.android.com/tools"
 android:layout_width="match_parent"
 android:layout_height="match_parent"
 android:orientation="vertical"
 android:padding="16dp"
 tools:context="com.example.searchhistory.MainActivity">

 <LinearLayout
  android:layout_width="match_parent"
  android:layout_height="wrap_content"
  android:gravity="center_vertical"
  android:orientation="horizontal">

  <EditText
   android:id="@+id/edt"
   android:layout_width="0dp"
   android:layout_height="wrap_content"
   android:layout_weight="4" />

  <Button
   android:id="@+id/btn"
   android:layout_width="0dp"
   android:layout_height="wrap_content"
   android:layout_weight="1"
   android:text="搜索" />

  <Button
   android:id="@+id/clear"
   android:layout_width="0dp"
   android:layout_height="wrap_content"
   android:layout_weight="1"
   android:text="清空" />
 </LinearLayout>

 <ScrollView
  android:layout_width="match_parent"
  android:layout_height="match_parent">

  <com.zhy.view.flowlayout.TagFlowLayout
   android:id="@+id/id_flowlayout"
   android:layout_width="fill_parent"
   android:layout_height="wrap_content"
   app:max_select="-1" />
 </ScrollView>
</LinearLayout>
tv.xml
<TextView xmlns:android="http://schemas.android.com/apk/res/android"
 android:layout_width="wrap_content"
 android:layout_height="wrap_content"
 android:layout_marginLeft="5dp"
 android:layout_marginRight="5dp"
 android:layout_marginTop="10dp"
 android:background="@drawable/tag_bg"
 android:text="Helloworld"
 android:textColor="#999999"
 android:textSize="16sp">

</TextView>
drawable下面创建
checked_bg.xml
<?xml version="1.0" encoding="utf-8"?>
<shape xmlns:android="http://schemas.android.com/apk/res/android">
 <solid android:color="#ffffff" />
 <corners android:radius="2dp" />
 <stroke
  android:width="1dp"
  android:color="#dddddd" />

 <padding
  android:bottom="5dp"
  android:left="14dp"
  android:right="14dp"
  android:top="5dp" />

</shape>
normal_bg.xml
<?xml version="1.0" encoding="utf-8"?>
<shape xmlns:android="http://schemas.android.com/apk/res/android">
 <solid android:color="#ffffff" />
 <corners android:radius="2dp" />
 <stroke
  android:width="1dp"
  android:color="#dddddd" />
 <padding
  android:bottom="5dp"
  android:left="14dp"
  android:right="14dp"
  android:top="5dp" />
</shape>
tag_bg.xml
<?xml version="1.0" encoding="utf-8"?>
<selector xmlns:android="http://schemas.android.com/apk/res/android">
 <item android:drawable="@drawable/checked_bg" android:state_checked="true">

 </item>
 <item android:drawable="@drawable/normal_bg"></item>
</selector>
text_color.xml
<?xml version="1.0" encoding="utf-8"?>
<selector xmlns:android="http://schemas.android.com/apk/res/android">

 <item android:color="#999999" android:state_checked="true" />
 <item android:color="#f692ff" />

</selector>
MainActivity
public class MainActivity extends AppCompatActivity {
 private TagFlowLayout mFlowLayout;
 private EditText editText;
 private Button button;
 private List<String> strings;
 String history="";
 int a=0;
 List<String> historylist = new ArrayList<>();
 //布局管理器
 private LayoutInflater mInflater;
 //流式布局的子布局
 private TextView tv;
 public Handler handler = new Handler() {
  @Override
  public void handleMessage(Message msg) {
   switch (msg.what) {
    case 1:
     mFlowLayout.setAdapter(new TagAdapter<String>(strings) {
      @Override
      public View getView(FlowLayout parent, int position, String s) {
       tv = (TextView) mInflater.inflate(R.layout.tv,
         mFlowLayout, false);
       tv.setVisibility(View.VISIBLE);
       tv.setText(s);
       return tv;
      }
     });
     break;

   }
   super.handleMessage(msg);
  }
 };
 private Button clearbtn;

 @RequiresApi(api = Build.VERSION_CODES.M)
 @Override
 protected void onCreate(Bundle savedInstanceState) {
  super.onCreate(savedInstanceState);
  setContentView(R.layout.activity_main);
  mInflater = LayoutInflater.from(this);
  mFlowLayout = (TagFlowLayout) findViewById(R.id.id_flowlayout);
  editText = (EditText) findViewById(R.id.edt);
  button = (Button) findViewById(R.id.btn);
  clearbtn = findViewById(R.id.clear);

  final SharedPreferences preferences = getSharedPreferences("config", 0);
  final SharedPreferences.Editor editor = preferences.edit();

  strings = new ArrayList<>();
  final String string = preferences.getString("string", " ");

  String[] split = string.split(" ");
  if (split.length>0&&!string.equals(" ")){
   for (int i=0;i<split.length;i++){
    strings.add(split[i]);
   }
   handler.sendEmptyMessageDelayed(1, 0);
  }

  clearbtn.setOnClickListener(new View.OnClickListener() {
   @Override
   public void onClick(View view) {
    history="";
    historylist.clear();
    editor.clear().commit();
    //清空下面的
    strings.clear();
    handler.sendEmptyMessageDelayed(1, 0);
   }
  });

  button.setOnClickListener(new View.OnClickListener() {
   @RequiresApi(api = Build.VERSION_CODES.M)
   @Override
   public void onClick(View v) {
    String string = preferences.getString("string", "");

    historylist.clear();

    if (!editText.getText().toString().trim().equals("")) {
     String aa = editText.getText().toString().trim();

     Set<String> set = new ArraySet<>();
     set.add(aa);
     historylist.add(aa);
     a++;
     history+= aa+" ";
     for (int i=0;i<historylist.size();i++){
      editor.putString("string",history).commit();
      strings.add(historylist.get(i));
     }
     //通知handler更新UI
     handler.sendEmptyMessageDelayed(1, 0);
    }else{
     Toast.makeText(MainActivity.this, "请输入要搜索的内容", Toast.LENGTH_SHORT).show();
    }
   }
  });
  //流式布局tag的点击方法
  mFlowLayout.setOnTagClickListener(new TagFlowLayout.OnTagClickListener() {
   @Override
   public boolean onTagClick(View view, int position, FlowLayout parent) {
    Toast.makeText(MainActivity.this, tv.getText(), Toast.LENGTH_SHORT).show();
    return true;
   }
  });
 }
}
以上就是本文的全部内容,希望对大家的学习有所帮助,也希望大家多多支持我们。
相关推荐
-

Android自定义ViewGroup之实现FlowLayout流式布局
整理总结自鸿洋的博客:http://blog.csdn.net/lmj623565791/article/details/38352503/ 一.FlowLayout介绍 所谓FlowLayout,就是控件根据ViewGroup的宽,自动的往右添加,如果当前行剩余空间不足,则自动添加到下一行.有点像所有的控件都往左飘的感觉,第一行满了,往第二行飘~所以也叫流式布局.Android并没有提供流式布局,但是某些场合中,流式布局还是非常适合使用的,比如关键字标签,搜索热词列表等,比如下图: git
-
Android流式布局FlowLayout详解
现在商城类的APP几乎都要用到流式布局来实现选择属性功能,在我的demo中是通过FlowLayout工具类实现流式布局 使用起来非常简单,十几行代码就可以实现: 在我们的项目中大部分都是单选效果,为了防止用到多选,demo中也实现了多选: FlowLayout大家不用研究怎么实现的,只要会使用就好: 就好比谷歌提供的ListView条目点击事件一样,只要会用就好,没必要研究个所以然:大家在用的时候直接从demo中复制到项目中即可: 大家可以将FlowLayout理解为一个线性布局:将准备好的一个
-
Java Swing组件布局管理器之FlowLayout(流式布局)入门教程
本文实例讲述了Java Swing组件布局管理器之FlowLayout(流式布局).分享给大家供大家参考,具体如下: FlowLayout应该是Swing布局管理器学习中最简单.最基础的一个.所谓流式,就是内部控件像水流一样,从前到后按顺序水平排列,直到达到容器的宽度时跳转到第二行.既然是水平排列,那么就存在三种基本的对齐方式:居中对齐(CENTER ).左对齐(LEFT )和右对齐(RIGHT ).然而,FlowLayout还提供两种对齐方式:LEADING,表示控件与容器方向开始边对应:TR
-
FlowLayout流式布局实现搜索清空历史记录
本文实例为大家分享了FlowLayout实现搜索清空历史记录的具体代码,供大家参考,具体内容如下 效果图:点击搜索框将搜索的历史在流式布局中展示出来,清空历史记录就会将历史清空,每次搜索后都存入sp中,每次进入页面都先判断sp里是否有值并展示 首先需要导入一个module,下载地址 下载完这个工程后,需要将里面的flowlayout-lib导入到工程中, 导入工程的步骤:File - New - Import Module 选中这个flowlayout-lib 导入完成后,在项目的build.g
-
Android FlowLayout流式布局实现详解
本文实例为大家分享了Android FlowLayout流式布局的具体代码,供大家参考,具体内容如下 最近使用APP的时候经常看到有 这种流式布局 ,今天我就跟大家一起来动手撸一个这种自定义控件. 首先说一下自定义控件的流程: 自定义控件一般要么继承View要么继承ViewGroup View的自定义流程: 继承一个View-->重写onMeasure方法-->重写onDraw方法-->定义自定义属性-->处理手势操作 ViewGroup的自定义流程: 继承一个ViewGroup-
-
JavaSwing FlowLayout 流式布局的实现
1. 概述 官方JavaDocsApi: java.awt.FlowLayout FlowLayout,流式布局管理器.按水平方向依次排列放置组件,排满一行,换下一行继续排列.排列方向(左到右 或 右到左)取决于容器的componentOrientation属性(该属性属于Component),它可能的值如下: ComponentOrientation.LEFT_TO_RIGHT(默认) ComponentOrientation.RIGHT_TO_LEFT 同一行(水平方向)的组件的对齐方式由
-
Android流式布局实现历史搜索记录功能
最近在开发项目的时候,有一个需求是展示历史搜索记录 ,展示的样式是流式布局(就是根据内容自动换行).在网上看到了一个不错的类库跟大家分享一下 首先在AndroidStudio简历一个工程项目导入module类库,我会把项目demo方法GitHub上 说一下demo中的实现方式 在 activity_main.xml中 <?xml version="1.0" encoding="utf-8"?> <LinearLayout xmlns:android
-
Java GUI进阶之流式布局管理器FlowLayout专项精讲
目录 Java GUI AWT概述 AWT中的继承关系 1.Windows 2.Panel 布局管器 FlowLayout(流式布局管理器) Java GUI GUI的全称是Graphical User Interface,即图形用户界面,是应用程序提供给用户操作的图形界面,包括窗口,菜单,按钮,工具栏和其他各种图形界面元素. AWT概述 AWT是用于创建图形用户界面的一个工具包,提供了一些用于实现图形界面的组件,,在JDK中针对每个组件都提供了对应的Java类,这些类都位于Java.awt包.
-
Android 简单实现一个流式布局的示例
本篇文章主要介绍了Android 简单实现一个流式布局的示例,分享给大家,具体如下: 流式布局应该是我们很常见的一种布局了,在很多场景下都会遇到它,例如:标签之类的功能等.用轮子不如造轮子来的爽,这里自己简单的实现下流式布局: onMeasure onLayout 通过以上两个方法我们就可以完成对流式布局的基本操作: onMeasure @Override protected void onMeasure(int widthMeasureSpec, int heightMeasureSpec)
-
Android 深入探究自定义view之流式布局FlowLayout的使用
引子 文章开始前思考个问题,view到底是如何摆放到屏幕上的?在xml布局中,我们可能用到match_parent.wrap_content或是具体的值,那我们如何转为具体的dp?对于层层嵌套的布局,他们用的都不是具体的dp,我们又该如何确定它们的尺寸? 下图是实现效果 自定义View的流程 想想自定义view我们都要做哪些事情 布局,我们要确定view的尺寸以及要摆放的位置,也就是 onMeasure() .onLayout() 两方法 显示,布局之后是怎么把它显示出来,主要用的是onDraw
-
python GUI框架pyqt5 对图片进行流式布局的方法(瀑布流flowlayout)
流式布局 流式布局,也叫做瀑布流布局,是网页中经常使用的一种页面布局方式,它的原理就是将高度固定,然后图片的宽度自适应,这样加载出来的图片看起来就像瀑布一样整齐的水流淌下来. pyqt流式布局 那么在pyqt5中我们怎么使用流式布局呢?pyqt没有这个控件,需要我们自己去封装,下面是流式布局的封装代码. class FlowLayout(QLayout): def __init__(self, parent=None, margin=0, spacing=-1): super(FlowLayou