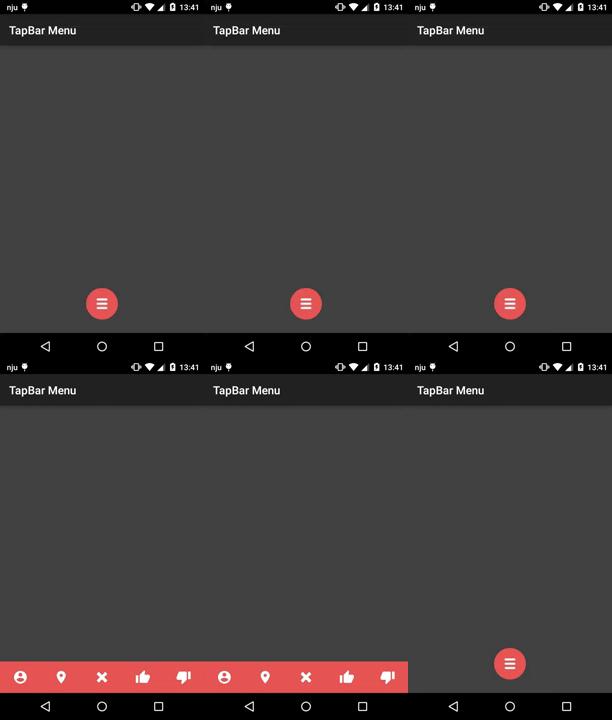
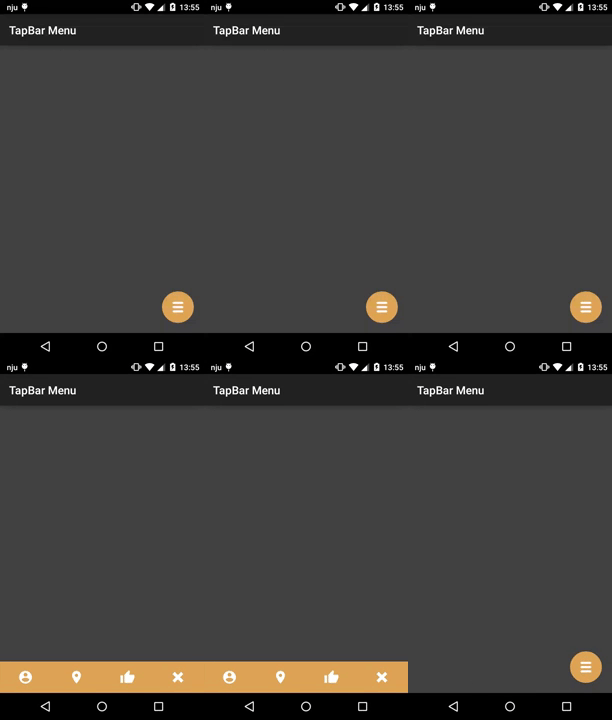
android效果TapBarMenu绘制底部导航栏的使用方式示例
其他的不多说了!我们来看看效果吧


一、实现方式一:直接引入compile方式
Add the dependency to your build.gradle:
compile ‘com.github.michaldrabik:tapbarmenu:1.0.5'
布局设计
<RelativeLayout xmlns:android="http://schemas.android.com/apk/res/android"
 xmlns:app="http://schemas.android.com/apk/res-auto"
 xmlns:tools="http://schemas.android.com/tools"
 android:layout_width="match_parent"
 android:layout_height="match_parent"
 android:background="@color/dark_gray"
 tools:context=".MainActivity">
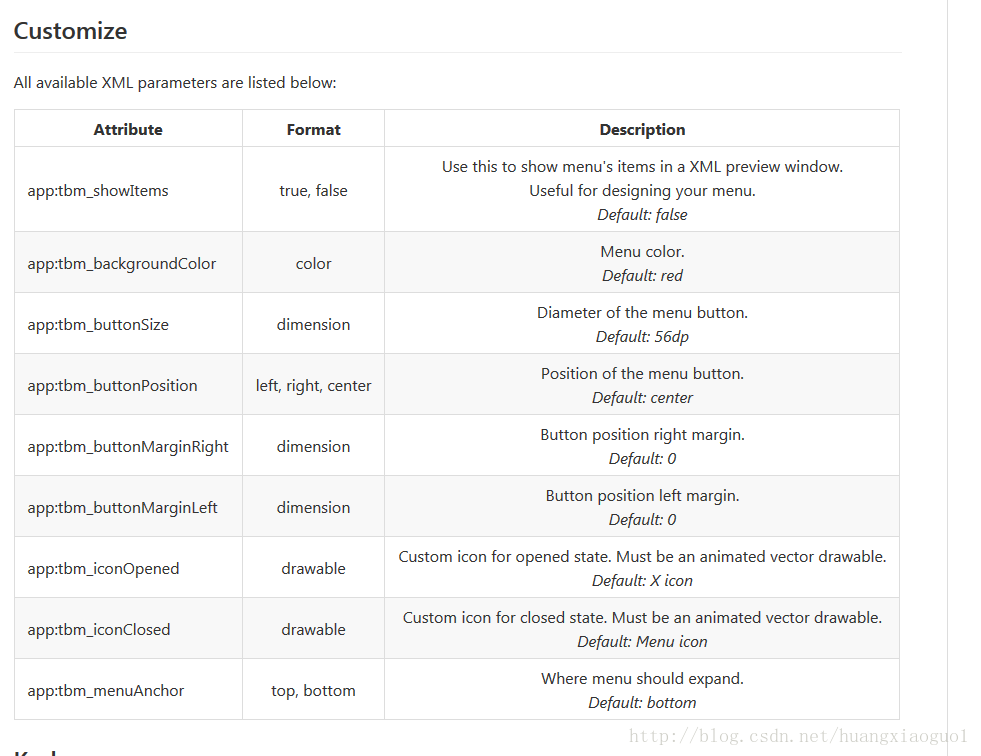
 <!--中间按钮颜色-->
 <!--app:tbm_backgroundColor="@color/red"-->

 <!--是否初始进入页面就可以看到item图片-->
 <!--app:tbm_showItems="true"-->

 <!--中间按钮大小-->
 <!--app:tbm_buttonSize="30dp"-->

 <!--中间按钮位置-->
 <!--app:tbm_buttonPosition="center"-->

 <!--中间按钮位置左边距-->
 <!--app:tbm_buttonMarginLeft="0dp"-->

 <!--中间按钮位置右边距-->
 <!--app:tbm_buttonMarginRight="0dp"-->

 <!--中间按钮自定义图标打开状态。必须是一个向量可拉的动画。-->
 <!-- app:tbm_iconOpened="@drawable/icon"-->

 <!--中间按钮自定义图标关闭状态。必须是一个向量可拉的动画。-->
 <!--app:tbm_iconOpened="@drawable/icon"-->

 <!--中间按钮打卡item显示位置-->
 <!--app:tbm_menuAnchor="bottom"-->
 <com.michaldrabik.tapbarmenulib.TapBarMenu
  android:id="@+id/tapBarMenu"
  android:layout_width="match_parent"
  android:layout_height="56dp"
  android:layout_alignParentBottom="true"
  android:layout_marginBottom="24dp"
  app:tbm_backgroundColor="@color/red"
  app:tbm_buttonMarginLeft="0dp"
  app:tbm_buttonMarginRight="0dp"
  app:tbm_buttonPosition="center"
  app:tbm_buttonSize="30dp"
  app:tbm_iconClosed="@drawable/icon"
  app:tbm_iconOpened="@drawable/icon"
  app:tbm_menuAnchor="bottom"
  app:tbm_showItems="false">

  <ImageView
   android:id="@+id/item1"
   android:layout_width="0dp"
   android:layout_height="match_parent"
   android:layout_weight="1"
   android:paddingBottom="10dp"
   android:paddingTop="10dp"
   android:src="@drawable/ic_person"
   tools:visibility="visible" />

  <ImageView
   android:id="@+id/item2"
   android:layout_width="0dp"
   android:layout_height="wrap_content"
   android:layout_weight="1"
   android:paddingBottom="10dp"
   android:paddingTop="10dp"
   android:src="@drawable/ic_location" />

  <Space
   android:layout_width="0dp"
   android:layout_height="wrap_content"
   android:layout_weight="1" />

  <ImageView
   android:id="@+id/item3"
   android:layout_width="0dp"
   android:layout_height="wrap_content"
   android:layout_weight="1"
   android:paddingBottom="10dp"
   android:paddingTop="10dp"
   android:src="@drawable/ic_thumb_up" />

  <ImageView
   android:id="@+id/item4"
   android:layout_width="0dp"
   android:layout_height="wrap_content"
   android:layout_weight="1"
   android:paddingBottom="10dp"
   android:paddingTop="10dp"
   android:src="@drawable/ic_thumb_down" />

 </com.michaldrabik.tapbarmenulib.TapBarMenu>

</RelativeLayout>

在Activity中的代码
import android.os.Bundle;
import android.support.v7.app.AppCompatActivity;
import android.util.Log;
import android.view.View;
import android.widget.Toast;

import com.michaldrabik.tapbarmenulib.TapBarMenu;

import butterknife.Bind;
import butterknife.ButterKnife;
import butterknife.OnClick;

public class MainActivity extends AppCompatActivity {

 @Bind(R.id.tapBarMenu)
 TapBarMenu tapBarMenu;

 @Override
 protected void onCreate(Bundle savedInstanceState) {
  super.onCreate(savedInstanceState);
  setContentView(R.layout.activity_main);
  ButterKnife.bind(this);
 }

 private boolean isClick = true;

 @OnClick(R.id.tapBarMenu)
 public void onMenuButtonClick() {
//  if (isClick) {
//   tapBarMenu.toggle();
//   isClick = false;
//  }
  tapBarMenu.toggle();
 }

 @OnClick({R.id.item1, R.id.item2, R.id.item3, R.id.item4})
 public void onMenuItemClick(View view) {
// tapBarMenu.close();
  switch (view.getId()) {
   case R.id.item1:
    Toast.makeText(this,"item1",Toast.LENGTH_LONG).show();
    break;
   case R.id.item2:
    Toast.makeText(this,"item2",Toast.LENGTH_LONG).show();
    break;
   case R.id.item3:
    Toast.makeText(this,"item3",Toast.LENGTH_LONG).show();
    break;
   case R.id.item4:
    Toast.makeText(this,"item4",Toast.LENGTH_LONG).show();
    break;
  }
 }
}
到这里效果就基本实现了
二、实现方式二:引入Module方式
module中记得引入
compile ‘com.wnafee:vector-compat:1.0.5'
import android.animation.Animator;
import android.animation.AnimatorListenerAdapter;
import android.animation.AnimatorSet;
import android.animation.ValueAnimator;
import android.annotation.TargetApi;
import android.content.Context;
import android.content.res.TypedArray;
import android.graphics.Canvas;
import android.graphics.Paint;
import android.graphics.Path;
import android.graphics.drawable.Animatable;
import android.graphics.drawable.Drawable;
import android.os.Build;
import android.support.annotation.NonNull;
import android.support.v4.content.ContextCompat;
import android.util.AttributeSet;
import android.view.Gravity;
import android.view.MotionEvent;
import android.view.View;
import android.view.ViewGroup;
import android.view.animation.DecelerateInterpolator;
import android.widget.LinearLayout;

import com.wnafee.vector.compat.ResourcesCompat;

/**
 * TapBar Menu Layout.
 *
 * @author Michal Drabik (michal.drabik0@gmail.com) on 2015-11-13.
 */
public class TapBarMenu extends LinearLayout {

 public static final int BUTTON_POSITION_LEFT = 0;
 public static final int BUTTON_POSITION_CENTER = 1;
 public static final int BUTTON_POSITION_RIGHT = 2;
 public static final int MENU_ANCHOR_BOTTOM = 3;
 public static final int MENU_ANCHOR_TOP = 4;
 private static final DecelerateInterpolator DECELERATE_INTERPOLATOR = new DecelerateInterpolator(2.5f);

 private enum State {
  OPENED,
  CLOSED
 }

 private static final int LEFT = 0;
 private static final int RIGHT = 1;
 private static final int TOP = 2;
 private static final int BOTTOM = 3;
 private static final int RADIUS = 4;

 private AnimatorSet animatorSet = new AnimatorSet();
 private ValueAnimator[] animator = new ValueAnimator[5];
 private float[] button = new float[5];

 private Path path = new Path();
 private State state = State.CLOSED;
 private Paint paint;
 private int animationDuration;
 private float width;
 private float height;
 private float buttonLeftInitial;
 private float buttonRightInitial;
 private float yPosition;
 private Drawable iconOpenedDrawable;
 private Drawable iconClosedDrawable;
 private OnClickListener onClickListener;

 //Custom XML Attributes
 private int backgroundColor;
 private int buttonSize;
 private int buttonPosition;
 private int buttonMarginRight;
 private int buttonMarginLeft;
 private int menuAnchor;
 private boolean showMenuItems;

 public TapBarMenu(Context context, AttributeSet attrs) {
  super(context, attrs);
  init(attrs);
 }

 public TapBarMenu(Context context, AttributeSet attrs, int defStyleAttr) {
  super(context, attrs, defStyleAttr);
  init(attrs);
 }

 private void init(AttributeSet attrs) {
  setWillNotDraw(false);
  setupAttributes(attrs);
  setGravity(Gravity.CENTER);
  setupAnimators();
  setupPaint();
 }

 private void setupAttributes(AttributeSet attrs) {
  TypedArray typedArray = getContext().obtainStyledAttributes(attrs, R.styleable.TapBarMenu, 0, 0);

  if (typedArray.hasValue(R.styleable.TapBarMenu_tbm_iconOpened)) {
   iconOpenedDrawable = typedArray.getDrawable(R.styleable.TapBarMenu_tbm_iconOpened);
  } else {
   iconOpenedDrawable = ResourcesCompat.getDrawable(getContext(), R.drawable.icon_animated);
  }

  if (typedArray.hasValue(R.styleable.TapBarMenu_tbm_iconClosed)) {
   iconClosedDrawable = typedArray.getDrawable(R.styleable.TapBarMenu_tbm_iconClosed);
  } else {
   iconClosedDrawable = ResourcesCompat.getDrawable(getContext(), R.drawable.icon_close_animated);
  }

  backgroundColor = typedArray.getColor(R.styleable.TapBarMenu_tbm_backgroundColor, ContextCompat.getColor(getContext(), R.color.red));
  buttonSize =
    typedArray.getDimensionPixelSize(R.styleable.TapBarMenu_tbm_buttonSize, getResources().getDimensionPixelSize(R.dimen.defaultButtonSize));
  buttonMarginRight = typedArray.getDimensionPixelSize(R.styleable.TapBarMenu_tbm_buttonMarginRight, 0);
  buttonMarginLeft = typedArray.getDimensionPixelSize(R.styleable.TapBarMenu_tbm_buttonMarginLeft, 0);
  buttonPosition = typedArray.getInt(R.styleable.TapBarMenu_tbm_buttonPosition, BUTTON_POSITION_CENTER);
  menuAnchor = typedArray.getInt(R.styleable.TapBarMenu_tbm_menuAnchor, MENU_ANCHOR_BOTTOM);
  showMenuItems = typedArray.getBoolean(R.styleable.TapBarMenu_tbm_showItems, false);
  typedArray.recycle();
 }

 private void setupAnimators() {
  for (int i = 0; i < 5; i++) {
   animator[i] = new ValueAnimator();
  }

  animator[LEFT].addUpdateListener(new ValueAnimator.AnimatorUpdateListener() {
   @Override
   public void onAnimationUpdate(ValueAnimator valueAnimator) {
    button[LEFT] = (float) valueAnimator.getAnimatedValue();
   }
  });
  animator[RIGHT].addUpdateListener(new ValueAnimator.AnimatorUpdateListener() {
   @Override
   public void onAnimationUpdate(ValueAnimator valueAnimator) {
    button[RIGHT] = (float) valueAnimator.getAnimatedValue();
   }
  });
  animator[TOP].addUpdateListener(new ValueAnimator.AnimatorUpdateListener() {
   @Override
   public void onAnimationUpdate(ValueAnimator valueAnimator) {
    button[TOP] = (float) valueAnimator.getAnimatedValue();
   }
  });
  animator[BOTTOM].addUpdateListener(new ValueAnimator.AnimatorUpdateListener() {
   @Override
   public void onAnimationUpdate(ValueAnimator valueAnimator) {
    button[BOTTOM] = (float) valueAnimator.getAnimatedValue();
   }
  });
  animator[RADIUS].addUpdateListener(new ValueAnimator.AnimatorUpdateListener() {
   @Override
   public void onAnimationUpdate(ValueAnimator valueAnimator) {
    button[RADIUS] = (float) valueAnimator.getAnimatedValue();
    invalidate();
   }
  });
  animationDuration = getResources().getInteger(R.integer.animationDuration);
  animatorSet.setDuration(animationDuration);
  animatorSet.setInterpolator(DECELERATE_INTERPOLATOR);
  animatorSet.playTogether(animator);
 }

 private void setupMenuItems() {
  for (int i = 0; i < getChildCount(); i++) {
   getChildAt(i).setVisibility(showMenuItems ? VISIBLE : GONE);
  }
 }

 private void setupPaint() {
  paint = new Paint();
  paint.setColor(backgroundColor);
  paint.setAntiAlias(true);
 }

 @Override
 protected void onAttachedToWindow() {
  super.onAttachedToWindow();
  setupMenuItems();
 }

 /**
  * Opens the menu if it's closed or close it if it's opened.
  */
 public void toggle() {
  if (state == State.OPENED)
   close();
  else
   open();
 }

 /**
  * Open the menu.
  */
 public void open() {
  state = State.OPENED;
  showIcons(true);

  animator[LEFT].setFloatValues(button[LEFT], 0);
  animator[RIGHT].setFloatValues(button[RIGHT], width);
  animator[RADIUS].setFloatValues(button[RADIUS], 0);
  animator[TOP].setFloatValues(button[TOP], 0);
  animator[BOTTOM].setFloatValues(button[BOTTOM], height);

  animatorSet.cancel();
  animatorSet.start();
  if (iconOpenedDrawable instanceof Animatable) {
   ((Animatable) iconOpenedDrawable).start();
  }
  ViewGroup parentView = (ViewGroup) TapBarMenu.this.getParent();
  this.animate()
    .y(menuAnchor == MENU_ANCHOR_BOTTOM ? parentView.getBottom() - height : 0)
    .setDuration(animationDuration)
    .setInterpolator(DECELERATE_INTERPOLATOR)
    .start();
 }

 /**
  * Close the menu.
  */
 public void close() {
  updateDimensions(width, height);
  state = State.CLOSED;
  showIcons(false);

  animator[LEFT].setFloatValues(0, button[LEFT]);
  animator[RIGHT].setFloatValues(width, button[RIGHT]);
  animator[RADIUS].setFloatValues(0, button[RADIUS]);
  animator[TOP].setFloatValues(0, button[TOP]);
  animator[BOTTOM].setFloatValues(height, button[BOTTOM]);

  animatorSet.cancel();
  animatorSet.start();
  if (iconClosedDrawable instanceof Animatable) {
   ((Animatable) iconClosedDrawable).start();
  }
  this.animate()
    .y(yPosition)
    .setDuration(animationDuration)
    .setInterpolator(DECELERATE_INTERPOLATOR)
    .start();
 }

 /**
  * @return True if menu is opened. False otherwise.
  */
 public boolean isOpened() {
  return state == State.OPENED;
 }

 /**
  * Sets TapBarMenu's background color from given resource.
  *
  * @param colorResId Color resource id. For example: R.color.holo_blue_light
  */
 public void setMenuBackgroundColor(int colorResId) {
  backgroundColor = ContextCompat.getColor(getContext(), colorResId);
  paint.setColor(backgroundColor);
  invalidate();
 }

 /**
  * Set position of 'Open Menu' button.
  *
  * @param position One of: {@link #BUTTON_POSITION_CENTER}, {@link #BUTTON_POSITION_LEFT}, {@link #BUTTON_POSITION_RIGHT}.
  */
 public void setButtonPosition(int position) {
  buttonPosition = position;
  invalidate();
 }

 /**
  * Sets diameter of 'Open Menu' button.
  *
  * @param size Diameter in pixels.
  */
 public void setButtonSize(int size) {
  buttonSize = size;
  invalidate();
 }

 /**
  * Sets left margin for 'Open Menu' button.
  *
  * @param margin Left margin in pixels
  */
 public void setButtonMarginLeft(int margin) {
  buttonMarginLeft = margin;
 }

 /**
  * Sets right margin for 'Open Menu' button.
  *
  * @param margin Right margin in pixels
  */
 public void setButtonMarginRight(int margin) {
  buttonMarginRight = margin;
 }

 /**
  * Set anchor point of the menu. Can be either bottom or top.
  *
  * @param anchor One of: {@link #MENU_ANCHOR_BOTTOM}, {@link #MENU_ANCHOR_TOP}.
  */
 public void setAnchor(int anchor) {
  menuAnchor = anchor;
 }

 /**
  * Sets the passed drawable as the drawable to be used in the open state.
  *
  * @param openDrawable The open state drawable
  */
 public void setIconOpenDrawable(Drawable openDrawable) {
  this.iconOpenedDrawable = openDrawable;
  invalidate();
 }

 /**
  * Sets the passed drawable as the drawable to be used in the closed state.
  *
  * @param closeDrawable The closed state drawable
  */
 public void setIconCloseDrawable(Drawable closeDrawable) {
  this.iconClosedDrawable = closeDrawable;
  invalidate();
 }

 /**
  * Sets the passed drawable as the drawable to be used in the open state.
  *
  * @param openDrawable The open state drawable
  */
 public void setIconOpenedDrawable(Drawable openDrawable) {
  this.iconOpenedDrawable = openDrawable;
  invalidate();
 }

 /**
  * Sets the passed drawable as the drawable to be used in the closed state.
  *
  * @param closeDrawable The closed state drawable
  */
 public void setIconClosedDrawable(Drawable closeDrawable) {
  this.iconClosedDrawable = closeDrawable;
  invalidate();
 }

 @Override
 public void setOnClickListener(OnClickListener listener) {
  onClickListener = listener;
 }

 @Override
 protected void onSizeChanged(int w, int h, int oldw, int oldh) {
  super.onSizeChanged(w, h, oldw, oldh);
  updateDimensions(w, h);
  yPosition = getY();
 }

 @Override
 protected void onDraw(Canvas canvas) {
  canvas.drawPath(createRoundedRectPath(button[LEFT], button[TOP], button[RIGHT], button[BOTTOM], button[RADIUS], button[RADIUS], false), paint);
  if (state == State.CLOSED) {
   iconClosedDrawable.draw(canvas);
  } else {
   iconOpenedDrawable.draw(canvas);
  }
 }

 private void updateDimensions(float w, float h) {
  int ratio;
  width = w;
  height = h;

  button[RADIUS] = buttonSize;
  setButtonPosition(width);
  if (iconClosedDrawable instanceof Animatable) {
   ratio = 3;
  } else {
   ratio = 5;
  }
  float iconLeft = button[LEFT] + buttonSize / ratio;
  float iconTop = (height - buttonSize) / 2 + buttonSize / ratio;

  float iconRight = button[RIGHT] - buttonSize / ratio;
  float iconBottom = (height + buttonSize) / 2 - buttonSize / ratio;
  iconOpenedDrawable.setBounds((int) iconLeft, (int) iconTop, (int) iconRight, (int) iconBottom);
  iconClosedDrawable.setBounds((int) iconLeft, (int) iconTop, (int) iconRight, (int) iconBottom);
 }

 private void setButtonPosition(float width) {
  if (buttonPosition == BUTTON_POSITION_CENTER) {
   button[LEFT] = ((width / 2) - (buttonSize / 2));
  } else if (buttonPosition == BUTTON_POSITION_LEFT) {
   button[LEFT] = 0;
  } else {
   button[LEFT] = width - buttonSize;
  }
  int padding = buttonMarginLeft - buttonMarginRight;
  button[LEFT] += padding;
  button[RIGHT] = button[LEFT] + buttonSize;
  button[TOP] = (height - buttonSize) / 2;
  button[BOTTOM] = (height + buttonSize) / 2;
  buttonLeftInitial = button[LEFT];
  buttonRightInitial = button[RIGHT];
 }

 private void showIcons(final boolean show) {
  for (int i = 0; i < getChildCount(); i++) {
   final View view = getChildAt(i);
   int translation = menuAnchor == MENU_ANCHOR_BOTTOM ? view.getHeight() : -view.getHeight();
   if (show){
    view.setTranslationY(Float.valueOf(translation));
   }else {
    view.setTranslationY(0f);
   }
//   view.setTranslationY(show ? translation : 0f);
   view.setScaleX(show ? 0f : 1f);
   view.setScaleY(show ? 0f : 1f);
   view.setVisibility(VISIBLE);
   view.setAlpha(show ? 0f : 1f);
   view.animate()
     .scaleX(show ? 1f : 0f)
     .scaleY(show ? 1f : 0f)
     .translationY(0f)
     .alpha(show ? 1f : 0f)
     .setInterpolator(DECELERATE_INTERPOLATOR)
     .setDuration(show ? animationDuration / 2 : animationDuration / 3)
     .setStartDelay(show ? animationDuration / 3 : 0)
     .setListener(new AnimatorListenerAdapter() {
      @Override
      public void onAnimationEnd(Animator animation) {
       super.onAnimationEnd(animation);
       view.setVisibility(show ? VISIBLE : GONE);
      }
     })
     .start();
  }
 }

 private Path createRoundedRectPath(float left, float top, float right, float bottom, float rx, float ry, boolean conformToOriginalPost) {
  path.reset();
  if (Build.VERSION.SDK_INT >= Build.VERSION_CODES.LOLLIPOP) {
   return createRoundedRectPathApi21(path, left, top, right, bottom, rx, ry, conformToOriginalPost);
  } else {
   return createRoundedRectPathPreApi21(path, left, top, right, bottom, rx, ry, conformToOriginalPost);
  }
 }

 @TargetApi(Build.VERSION_CODES.LOLLIPOP)
 private Path createRoundedRectPathApi21(Path path, float left, float top, float right, float bottom, float rx, float ry, boolean
   conformToOriginalPost) {
  if (rx < 0) rx = 0;
  if (ry < 0) ry = 0;
  float width = right - left;
  float height = bottom - top;
  if (rx > width / 2) rx = width / 2;
  if (ry > height / 2) ry = height / 2;
  float widthMinusCorners = (width - (2 * rx));
  float heightMinusCorners = (height - (2 * ry));
  path.moveTo(right, top + ry);
  path.arcTo(right - 2 * rx, top, right, top + 2 * ry, 0, -90, false);
  path.rLineTo(-widthMinusCorners, 0);
  path.arcTo(left, top, left + 2 * rx, top + 2 * ry, 270, -90, false);
  path.rLineTo(0, heightMinusCorners);
  if (conformToOriginalPost) {
   path.rLineTo(0, ry);
   path.rLineTo(width, 0);
   path.rLineTo(0, -ry);
  } else {
   path.arcTo(left, bottom - 2 * ry, left + 2 * rx, bottom, 180, -90, false);
   path.rLineTo(widthMinusCorners, 0);
   path.arcTo(right - 2 * rx, bottom - 2 * ry, right, bottom, 90, -90, false);
  }
  path.rLineTo(0, -heightMinusCorners);
  path.close();
  return path;
 }

 private Path createRoundedRectPathPreApi21(Path path, float left, float top, float right, float bottom, float rx, float ry, boolean
   conformToOriginalPost) {
  if (rx < 0) rx = 0;
  if (ry < 0) ry = 0;
  float width = right - left;
  float height = bottom - top;
  if (rx > width / 2) rx = width / 2;
  if (ry > height / 2) ry = height / 2;
  float widthMinusCorners = (width - (2 * rx));
  float heightMinusCorners = (height - (2 * ry));
  path.moveTo(right, top + ry);
  path.rQuadTo(0, -ry, -rx, -ry);
  path.rLineTo(-widthMinusCorners, 0);
  path.rQuadTo(-rx, 0, -rx, ry);
  path.rLineTo(0, heightMinusCorners);
  if (conformToOriginalPost) {
   path.rLineTo(0, ry);
   path.rLineTo(width, 0);
   path.rLineTo(0, -ry);
  } else {
   path.rQuadTo(0, ry, rx, ry);
   path.rLineTo(widthMinusCorners, 0);
   path.rQuadTo(rx, 0, rx, -ry);
  }
  path.rLineTo(0, -heightMinusCorners);
  path.close();
  return path;
 }

 @Override
 public boolean onInterceptTouchEvent(MotionEvent event) {
  return (event.getX() > buttonLeftInitial && event.getX() < buttonRightInitial);
 }

 @Override
 public boolean onTouchEvent(@NonNull MotionEvent event) {
  if ((event.getX() > buttonLeftInitial && event.getX() < buttonRightInitial) && (event.getAction() == MotionEvent.ACTION_UP)) {
   if (onClickListener != null) {
    onClickListener.onClick(this);
   }
  }
  return true;
 }

 @Override
 protected void onDetachedFromWindow() {
  onDestroy();
  super.onDetachedFromWindow();
 }

 private void onDestroy() {
  iconOpenedDrawable = null;
  iconClosedDrawable = null;
  for (int i = 0; i < 5; i++) {
   animator[i] = null;
  }
  animator = null;
  button = null;
  onClickListener = null;
 }
}
布局和代码与上面一致,module请下载:
链接:http://pan.baidu.com/s/1o8jlnpo
以上就是本文的全部内容,希望对大家的学习有所帮助,也希望大家多多支持我们。
赞 (0)

