AngularJS使用指令增强标准表单元素功能
Angular 可使用指令无缝地增强标准表单元素的功能,我们将讨论它的优点,包括:
数据绑定、建立模型属性、验证表单、验证表单后反馈信息、表单指令属性
下面我们通过案例验证他们的用法:
一、双向数据绑定(ng-model)和建立模型属性
<!DOCTYPE>
<!-- use module -->
<html ng-app="exampleApp">
<head>
 <title>Angular Directive</title>
 <meta charset="utf-8"/>
 <link rel="stylesheet" type="text/css" href="css/bootstrap.min.css">
 <link rel="stylesheet" type="text/css" href="css/bootstrap-theme.min.css">
</head>
<body>
<!-- 案例:双向数据绑定 -->
<div class="panel" ng-controller="defaultCtrl">
 <!-- 过滤complete为false的项 -->
 <h3 class="panel-header">To Do List<span class="label label-info">{{(todos | filter : {complete : 'false'}).length}}</span></h3>
 <div class="row-fluid">
 <div class="col-xs-6">
  <div class="form-group row">
  <label for="action">Action: </label>
  <!-- ng-model 双向绑定 -->
  <!-- 双向数据绑定:数据模型(Module)和视图(View)之间的双向绑定。 -->
  <!-- 当其中一方发送更替后,另一个也发生变化 -->
  <input type="text" id="action" ng-model="newToDo.action" class="form-control">
  </div>
  <div class="form-group row">
  <label for="location">Location: </label>
  <select id="location" class="form-control" ng-model="newToDo.location">
   <option>Home</option>
   <option>Office</option>
   <option>Mall</option>
  </select>
  </div>
  <!-- ng-click点击Add添加项目 -->
  <button class="btn btn-primary btn-block" ng-click="addNewItem(newToDo)">Add</button>
 </div>
 <div class="col-xs-6">
  <table class="table table-bordered table-striped">
  <thead>
   <tr><th>#</th><th>Action</th><th>Done</th></tr>
  </thead>
  <tbody>
   <tr ng-repeat="item in todos">
   <!-- $index默认为0,递增 -->
   <td>{{$index + 1}}</td>
   <td>{{item.action}}</td>
   <td>
    <input type="checkbox" ng-model="item.complete"/>
   </td>
   </tr>
  </tbody>
  </table>
 </div>
 </div>
</div>
<script type="text/javascript" src="js/angular.min.js"></script>
<script type="text/javascript">
// define a module named exampleApp
angular.module("exampleApp", [])
 // define a controller named defaultCtrl
 .controller('defaultCtrl', function ($scope) {
 // 数据模型
 $scope.todos = [
  { action : "play ball", complete : false },
  { action : "singing", complete : false },
  { action : "running", complete : true },
  { action : "dance", complete : true },
  { action : "swimming", complete : false },
  { action : "eating", complete : false },
 ];
 // 添加数据到模型
 $scope.addNewItem = function (newItem) {
  // 判断是否存在
  if (angular.isDefined(newItem) && angular.isDefined(newItem.action) && angular.isDefined(newItem.location)) {
  $scope.todos.push({
   action : newItem.action + " (" + newItem.location + ")",
   complete : false
  })
  }
 }
 })
</script>
</body>
</html>
首先定义了数据模型scope.todos和添加数据到模型的addNewItem()方法,接着使用双向数据绑定ng−model将视图中表单的action和location和模型中的 scope.todos进行绑定,
最后通过ng-click点击属性触发添加数据到模型的addNewItem()方法完成操作

二、验证表单
在我们提交表单到服务器之前,我们需要来检测一下用户提交的数据是否存在或者是说合法,否则提交无用的数据会浪费资源。
<!DOCTYPE>
<!-- use module -->
<html ng-app="exampleApp">
<head>
 <title>Angular Directive</title>
 <meta charset="utf-8"/>
 <link rel="stylesheet" type="text/css" href="css/bootstrap.min.css">
 <link rel="stylesheet" type="text/css" href="css/bootstrap-theme.min.css">
 <style>

 </style>
</head>
<body>

<div id="todoPanel" class="panel" ng-controller="defaultCtrl">
 <!-- novalidate表示抛弃浏览器自带的表单验证,用NG自己的验证 -->
 <!-- ng-submit="addUser(newUser) 当表单数据合法时,提交数据到模型 -->
 <form name="myForm" novalidate ng-submit="addUser(newUser)">
 <div class="well">
  <div class="form-group">
  <label>Name:</label>
  <!-- required 表该表单必填 -->
  <!-- ng-model="newUser.name" 双向数据绑定 -->
  <input name="userName" type="text" class="form-control" required ng-model="newUser.name">
  </div>
  <div class="form-group">
  <label>Email:</label>
  <input name="userEmail" type="email" class="form-control"required ng-model="newUser.email">
  </div>
  <div class="checkbox">
   <label>
   <input name="agreed" type="checkbox"ng-model="newUser.agreed" required>
   I agree to the terms and conditions
   </label>
  </div>
  <!-- g-disabled="myForm.$invalid" 当前面填写表单中的任意一项不合法时,该提交按钮都是不可用的 -->
  <button type="submit" class="btn btn-primary btn-block" ng-disabled="myForm.$invalid">
  OK
  </button>
 </div>
 <div class="well">
  Message: {{message}}
  <div>
  Valid: {{myForm.$valid}}
  </div>
 </div>
 </form>
</div>
<script type="text/javascript" src="js/angular.min.js"></script>
<script type="text/javascript">
angular.module("exampleApp", [])
 .controller("defaultCtrl", function ($scope) {
 // 添加用户数据到模型$scope.message
 $scope.addUser = function (userDetails) {
 $scope.message = userDetails.name
 + " (" + userDetails.email + ") (" + userDetails.agreed + ")";
 }
 // 显示验证前后的结果
 $scope.message = "Ready";
});
</script>
</body>
</html>
首先定义了数据模型scope.message和添加数据到模型的addUser()方法,接着在视图中添加表单元素validate、name属性和ng−submit属性随后使用双向数据绑定ng−model将视图中表单的action和location和模型中的 scope.todos进行绑定,且使用验证属性required和email表单
之后对提交按钮进行禁用,仅当表单数据全部合法才能用,不合法都禁用(ng-disabled=”myForm.$invalid”)
最后通过ng-submit属性提交数据到模型的addUser()方法完成操作

三、表单验证反馈信息
我们仅仅对表单进行验证是远远不够的,因为用户不知道为什么出错而感到困惑,因此我们需要反馈信息给用户,让他们明白该填写什么
先介绍一下NG中要验证的类
ng-pristine 用户没交互元素被添加到这个类
ng-dirty 用户交互过元素被添加到这个类
ng-valid 验证结果有效元素被添加到这个类
ng-invalid 验证结果无效元素被添加到这个类
<!DOCTYPE>
<!-- use module -->
<html ng-app="exampleApp">
<head>
 <title>Angular Directive</title>
 <meta charset="utf-8"/>
 <link rel="stylesheet" type="text/css" href="css/bootstrap.min.css">
 <link rel="stylesheet" type="text/css" href="css/bootstrap-theme.min.css">
 <style>
 /*交互且必填样式*/
 form.validate .ng-invalid-required.ng-dirty {
  background-color: orange;
 }
 /*交互不合法样式*/
 form .ng-invalid.ng-dirty {
  background-color: lightpink;
 }
 /*邮件不合法且交互过*/
 form.validate .ng-invalid-email.ng-dirty {
  background-color: lightgoldenrodyellow;
 }
 div.error{
  color: red;
  font-weight: bold;
 }
 div.summary.ng-valid{
  color: green;
  font-weight: bold;
 }
 div.summary.ng-invalid{
  color: red;
  font-weight: bold;
 }
 </style>
</head>
<body>

<!-- 案例:双向数据绑定 -->
<div class="panel" ng-controller="defaultCtrl">
 <!-- novalidate="novalidate" 仅仅NG表单验证 -->
 <!-- ng-submit="addUser(newUser)" 添加数据到模型 -->
 <!-- ng-class="showValidation ? 'validate' : '' 当验证合法,showValidation为true,这是触发ng-class为validate -->
 <form name="myForm" class="well" novalidate="novalidate" ng-submit="addUser(newUser)" ng-class="showValidation ? 'validate' : ''">
 <div class="form-group">
 <div class=" form-group">
  <label>Email: </label>
  <input name="email" type="email" class="form-control" required="required" ng-model="newUser.email">
  <!-- 验证提示信息 -->
  <div class="error">
  <!-- 显示反馈信息 -->
  <span ng-class="error" ng-show="showValidation">
   {{getError(myForm.email.$error)}}
  </span>
  </div>
 </div>
 <button type="submit" class="btn btn-primary btn-block" >OK</button>
 <div class="well">
  Message : {{message}}
  <!-- 当myForm.$valid验证合法,showValidation为true,这是触发ng-class为ng-valid,否则,ng-invalid -->
  <div class="summary" ng-class="myForm.$valid ? 'ng-valid' : 'ng-invalid'" >
  Valid : {{myForm.$valid}}
  </div>
 </div>
 </form>
</div>
<script type="text/javascript" src="js/angular.min.js"></script>
<script type="text/javascript">
// define a module named exampleApp
angular.module("exampleApp", [])
 // define a controller named defaultCtrl
 .controller('defaultCtrl', function ($scope) {
 // 添加数据到模型
 $scope.addUser = function (userDetails) {
  if (myForm.$valid) {
  $scope.message = userDetails.name + " (" + userDetails.email + ") (" + userDetails.agreed + ")";
  } else {
  $scope.showValidation = true;
  }
 }
 // 数据模型
 $scope.message = "Ready";
 // 错误反馈信息
 // 当没有填写信息时,提示Please enter a value
 // 当验证出错时,提示Please enter a valid email address
 $scope.getError = function (error) {
  if (angular.isDefined(error)) {
  if (error.required) {
   return "Please enter a value";
  } else if (error.email) {
   return "Please enter a valid email address";
  }
  }
 }

 })
</script>
</body>
</html>
首先在style中定义反馈信息的样式、表单验证的样式
接着在JS中写入错误时反馈的信息
最后在视图中绑定ng-class

四、表单指令属性
1.使用input元素
<!DOCTYPE>
<!-- use module -->
<html ng-app="exampleApp">
<head>
 <title>Angular Directive</title>
 <meta charset="utf-8"/>
 <link rel="stylesheet" type="text/css" href="css/bootstrap.min.css">
 <link rel="stylesheet" type="text/css" href="css/bootstrap-theme.min.css">
 <style>

 </style>
</head>
<body>

<div class="panel" id="todoPanel" ng-controller="defaultCtrl">
 <form name="myForm" novalidate="novalidate">
 <div class="well">
  <div class="form-group">
  <label>Text: </label>
  <!-- ng-required="requireValue" 通过数据绑定required值 -->
  <!-- ng-minlength="3" ng-maxlength="10" 允许最大最小字符-->
  <!-- ng-pattern="matchPattern" 正则匹配 -->
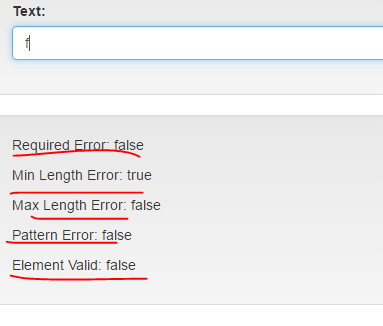
  <input name="sample" class="form-control" ng-model="inputValue" ng-required="requireValue" ng-minlength="3"
  ng-maxlength="10" ng-pattern="matchPattern">
  </div>
 </div>
 <div class="well">
  <!-- 必填 -->
  <p>Required Error: {{myForm.sample.$error.required}}</p>
  <!-- 最小最大长度 -->
  <p>Min Length Error: {{myForm.sample.$error.minlength}}</p>
  <p>Max Length Error: {{myForm.sample.$error.maxlength}}</p>
  <!-- 只匹配小写字母 -->
  <p>Pattern Error: {{myForm.sample.$error.pattern}}</p>
  <!-- 验证合法 -->
  <p>Element Valid: {{myForm.sample.$valid}}</p>
 </div>
 </form>

</div>
<script type="text/javascript" src="js/angular.min.js"></script>
<script type="text/javascript">
// define a module named exampleApp
angular.module("exampleApp", [])
 // define a controller named defaultCtrl
 .controller('defaultCtrl', function ($scope) {
 $scope.requireValue = true;
 $scope.matchPattern = new RegExp("^[a-z]");
 })
</script>
</body>
</html>

2.选择列表
<!DOCTYPE>
<!-- use module -->
<html ng-app="exampleApp">
<head>
 <title>Angular Directive</title>
 <meta charset="utf-8"/>
 <link rel="stylesheet" type="text/css" href="css/bootstrap.min.css">
 <link rel="stylesheet" type="text/css" href="css/bootstrap-theme.min.css">
 <style>

 </style>
</head>
<body>

<div class="panel" id="todoPanel" ng-controller="defaultCtrl">
 <form name="myForm" novalidate="novalidate">
 <div class="well">
  <div class="form-group">
  <label>Selection an action: </label>
  <!-- 遍历列表 按照item.place排序 item.id as item.action 改变选项值-->
  <!-- ng-options="item.id as item.action group by item.place for item in todos" -->
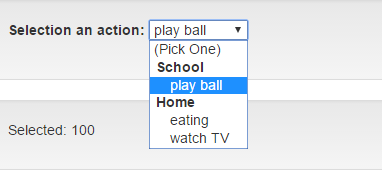
  <select ng-model="selectValue" ng-options="item.id as item.action group by item.place for item in todos">
   <option value="" class="">(Pick One)</option>
  </select>
  </div>
 </div>
 <div class="well">
  <p>Selected: {{selectValue || "None"}}</p>
 </div>
 </form>

</div>
<script type="text/javascript" src="js/angular.min.js"></script>
<script type="text/javascript">
// define a module named exampleApp
angular.module("exampleApp", [])
 // define a controller named defaultCtrl
 .controller('defaultCtrl', function ($scope) {
 // 模型数据
 $scope.todos = [
  { id : 100, place : "School", action : "play ball", complete : false },
  { id : 200, place : "Home", action : "eating", complete : false },
  { id : 300, place : "Home", action : "watch TV", complete : true }
 ];
 })
</script>
</body>
</html>

以上就是本文的全部内容,希望对大家的学习有所帮助,也希望大家多多支持我们。

