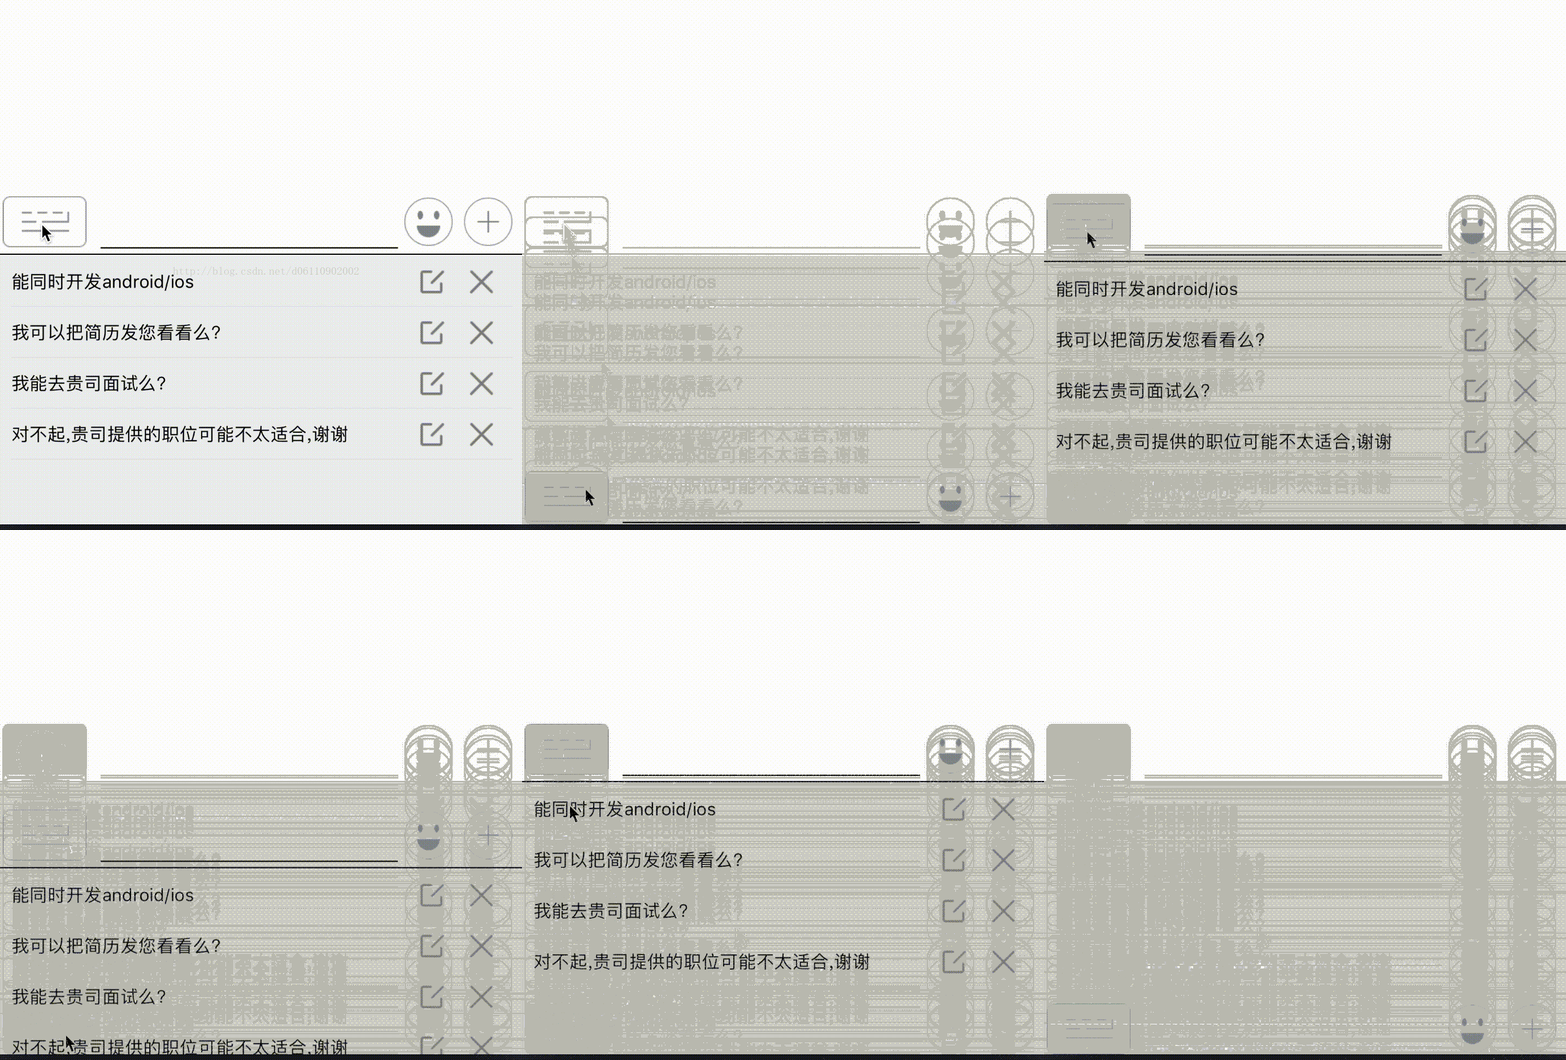
IOS实现聊天界面底部菜单栏效果
-本安全出自个人小项目仿boss直聘当中的聊天信息界面:
实现的思路主要是:约束动画。

实现较简单,这里直接上代码:
。h文件:
#import <UIKit/UIKit.h>
@protocol ShowMoreOptionListener <NSObject>
@optional
-(void) onChangListener;
@end
@class ScrollView;
/**
 底部菜单视图
 */
@interface BottomMenuView : UIView
@property(nonatomic,strong) UIView* showPartView;    //总是可见部分
@property(nonatomic,strong) UIView* hiddenPartView;   //底部隐藏部分,需要点击显示部分才能显示出来
@property(nonatomic,weak) id<ShowMoreOptionListener> delegate; //下面更多操作菜单的的状态代理器
@property(nonatomic,strong) ScrollView* emojiPanel;
-(void) buildOptionMenu;
@end
.m文件:
#import "BottomMenuView.h"
#import "Masonry.h"
#import "QuickWordsView.h"
#import "ScrollView.h"
#import "Constants.h"
static const int QuickChat = 31;
static const int Emoji = 32;
static const int AddType = 33;
static const int EmojiPanel = 34;
static const int QuickChatPanel = 34;
@implementation BottomMenuView
-(instancetype) initWithFrame:(CGRect)frame{
  if(self = [super initWithFrame:frame]){}
  return self;
}
-(void) buildOptionMenu{
  self.showPartView = [[UIView alloc] init];
  //self.showPartView.backgroundColor = [UIColor greenColor];
  [self addSubview:self.showPartView];
  //添加showPartView约束
  [self.showPartView mas_makeConstraints:^(MASConstraintMaker *make) {
    make.right.equalTo(self).offset(0);
    make.top.equalTo(self);
    make.left.equalTo(self);
    make.height.mas_equalTo(40);
  }];
  UIButton* showQuickWordsBtn = [[UIButton alloc] init];
  [showQuickWordsBtn setImage:[UIImage imageNamed:@"ic_chat_input_method"] forState:UIControlStateNormal];
  showQuickWordsBtn.imageView.contentMode = UIViewContentModeScaleAspectFit;
  showQuickWordsBtn.contentHorizontalAlignment = UIControlContentHorizontalAlignmentLeft;
  showQuickWordsBtn.imageEdgeInsets = UIEdgeInsetsMake(0, -10, 0, 0);
  showQuickWordsBtn.tag = QuickChat;
  [showQuickWordsBtn addTarget:self action:@selector(onClick:) forControlEvents:UIControlEventTouchUpInside];
  [self.showPartView addSubview:showQuickWordsBtn];
  [showQuickWordsBtn mas_makeConstraints:^(MASConstraintMaker *make) {
    make.leading.equalTo(self.showPartView).offset(0);
    make.top.equalTo(self.showPartView);
    make.size.mas_equalTo(CGSizeMake(90, 40));
  }];
  //中间编辑框
  UITextView* editText = [[UITextView alloc] init];
  [self.showPartView addSubview:editText];
  [editText mas_makeConstraints:^(MASConstraintMaker *make) {
    make.leading.equalTo(showQuickWordsBtn.mas_trailing).offset(-10);
    make.centerY.equalTo(showQuickWordsBtn.mas_centerY);
    make.height.mas_equalTo(37);
    make.trailing.equalTo(self.showPartView).offset(-100);
  }];
  //设置编辑框底部线
  UIView* editTextbottomLine = [[UIView alloc] init];
  editTextbottomLine.backgroundColor = [UIColor blackColor];
  [self.showPartView addSubview:editTextbottomLine];
  [editTextbottomLine mas_makeConstraints:^(MASConstraintMaker *make) {
    make.leading.equalTo(showQuickWordsBtn.mas_trailing).offset(-10);
    make.top.equalTo(showQuickWordsBtn.mas_bottom);
    make.height.mas_equalTo(1.0);
    make.trailing.equalTo(self.showPartView).offset(-100);
  }];
  //创建表情
  UIButton* emojiBtn = [[UIButton alloc] init];
  [emojiBtn setImage:[UIImage imageNamed:@"ic_emoji.png"] forState:UIControlStateNormal];
  emojiBtn.imageView.contentMode = UIViewContentModeScaleAspectFit;
  emojiBtn.tag = Emoji;
  [emojiBtn addTarget:self action:@selector(onClick:) forControlEvents:UIControlEventTouchUpInside];
  [self addSubview:emojiBtn];
  [emojiBtn mas_makeConstraints:^(MASConstraintMaker *make) {
    make.leading.equalTo(editText.mas_trailing).offset(5);
    make.centerY.equalTo(self.showPartView.mas_centerY);
    make.size.mas_equalTo(CGSizeMake(38, 38));
  }];
  //创建+btn
  UIButton* addBtn = [[UIButton alloc] init];
  [addBtn setImage:[UIImage imageNamed:@"ic_gallery_add.png"] forState:UIControlStateNormal];
  addBtn.imageView.contentMode = UIViewContentModeScaleAspectFit;
  addBtn.tag = AddType;
  [addBtn addTarget:self action:@selector(onClick:) forControlEvents:UIControlEventTouchUpInside];
  [self addSubview:addBtn];
  [addBtn mas_makeConstraints:^(MASConstraintMaker *make) {
    make.right.equalTo(self.showPartView).offset(-10);
    make.centerY.equalTo(self.showPartView.mas_centerY);
    make.size.mas_equalTo(CGSizeMake(38, 38));
  }];
  //设置永久显示底部线
  UIView* bottomLine = [[UIView alloc] init];
  bottomLine.backgroundColor = [UIColor blackColor];
  [self.showPartView addSubview:bottomLine];
  [bottomLine mas_makeConstraints:^(MASConstraintMaker *make) {
    make.leading.equalTo(showQuickWordsBtn);
    make.top.equalTo(self.showPartView.mas_bottom).offset(5);
    make.height.mas_equalTo(1.0);
    make.trailing.equalTo(self.showPartView.mas_trailing);
  }];
//  //下面开始处理隐藏部分,默认显示快捷消息
//  QuickWordsView* quickWordsView = [[QuickWordsView alloc] init];
//  quickWordsView.separatorInset = UIEdgeInsetsMake(0,10,0,10); //top left right down
//  quickWordsView.tableFooterView = [[UIView alloc] initWithFrame:CGRectZero]; //删除底部多余行,及分割线
//  quickWordsView.tag = 100;
//  [self addSubview:quickWordsView];
//  [quickWordsView mas_makeConstraints:^(MASConstraintMaker *make) {
//    make.leading.equalTo(self);
//    make.trailing.equalTo(self.mas_trailing);
//    make.top.equalTo(self.mas_top).offset(47);
//    make.height.mas_equalTo(210);
//
//  }];
  [self buildQuickChat];
}
-(void)onClick:(UIButton*) button{
  switch(button.tag){
    case QuickChat:{
      if(self.delegate){
        [self.delegate onChangListener];
      }
    }break;
    case Emoji:{
    }break;
    case AddType:{
    }break;
  }
}
-(void) buildQuickChat{
  //下面开始处理隐藏部分,默认显示快捷消息
  QuickWordsView* quickWordsView = [[QuickWordsView alloc] init];
  quickWordsView.separatorInset = UIEdgeInsetsMake(0,10,0,10); //top left right down
  quickWordsView.tableFooterView = [[UIView alloc] initWithFrame:CGRectZero]; //删除底部多余行,及分割线
  quickWordsView.tag = QuickChatPanel;
  [self addSubview:quickWordsView];
  [quickWordsView mas_makeConstraints:^(MASConstraintMaker *make) {
    make.leading.equalTo(self);
    make.trailing.equalTo(self.mas_trailing);
    make.top.equalTo(self.mas_top).offset(47);
    make.height.mas_equalTo(210);
  }];
}
//-------------------kvo 实现观察主题 end----------------
@end
测试代码:
-(void) testBottomMenu{
   self.menu = [[BottomMenuView alloc] init];
  self.menu.translatesAutoresizingMaskIntoConstraints = NO;
  //self.menu.backgroundColor = [UIColor redColor];
  [self.menu buildOptionMenu];
  self.menu.delegate = self;
  [self.view addSubview:self.menu];
  //使用约束来达到效果,下面开始添加约束 靠着底部
  NSLayoutConstraint* alginBottom = [NSLayoutConstraint constraintWithItem:self.menu
                                  attribute:NSLayoutAttributeBottom
                                  relatedBy:NSLayoutRelationEqual
                                   toItem:self.view
                                  attribute:NSLayoutAttributeBottom
                                 multiplier:1
                                  constant:0.0];
  [self.view addConstraint:alginBottom];
  //添加高度
  self.bottomHeightCons = [NSLayoutConstraint
               constraintWithItem:self.menu
               attribute:NSLayoutAttributeHeight
               relatedBy:NSLayoutRelationEqual
               toItem:nil
               attribute:0
               multiplier:1
               constant:260];
  [self.menu addConstraint:self.bottomHeightCons];
  //添加右边约束
  NSLayoutConstraint* rightMargin = [NSLayoutConstraint constraintWithItem:self.menu
                                  attribute:NSLayoutAttributeRight
                                  relatedBy:NSLayoutRelationEqual
                                   toItem:self.view
                                  attribute:NSLayoutAttributeRight
                                 multiplier:1
                                  constant:0.0];
  [self.view addConstraint:rightMargin];
  //添加左边约束
  NSLayoutConstraint* leftMargin = [NSLayoutConstraint constraintWithItem:self.menu
                                  attribute:NSLayoutAttributeLeft
                                  relatedBy:NSLayoutRelationEqual
                                   toItem:self.view
                                  attribute:NSLayoutAttributeLeft
                                 multiplier:1
                                  constant:0.0];
  [self.view addConstraint:leftMargin];
}
//更多操作按钮的协议监听接口
-(void)onChangListener{
  //[self.view layoutIfNeeded];
  if(self.bottomHeightCons.constant == 40){
    self.bottomHeightCons.constant = 260;
  }else{
    self.bottomHeightCons.constant = 40;
  }
  [UIView animateWithDuration:0.5 animations:^{
    [self.view layoutIfNeeded];
  }];
}
总结
以上所述是小编给大家介绍的IOS实现聊天界面底部菜单栏效果,希望对大家有所帮助,如果大家有任何疑问请给我留言,小编会及时回复大家的。在此也非常感谢大家对我们网站的支持!
赞 (0)

