Android仿QQ空间主页面的实现
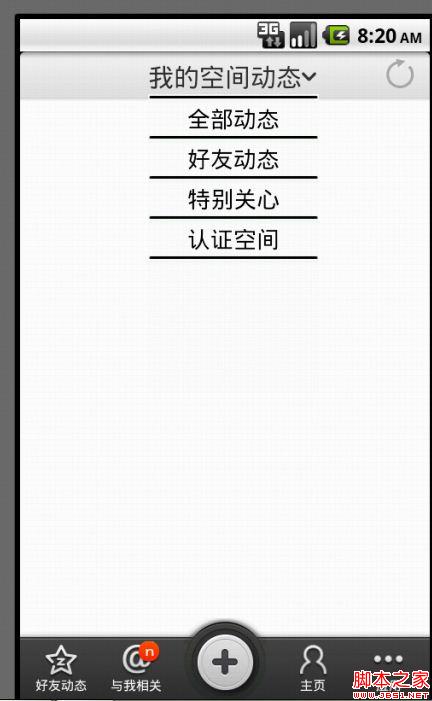
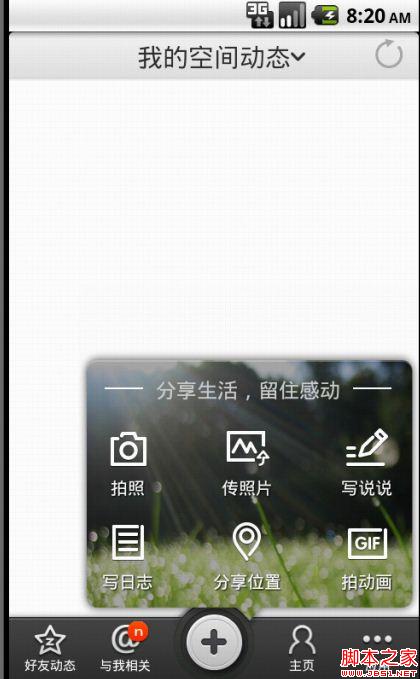
今天模仿安卓QQ空间,效果如下: 

打开程序的启动画面和导航页面我就不做了,大家可以模仿微信的那个做一下,很简单。这次主要做一下主页面的实现,下面是主页面的布局:
代码如下:
<?xml version="1.0" encoding="utf-8"?>
<LinearLayout xmlns:android="http://schemas.android.com/apk/res/android"
android:layout_width="fill_parent"
android:layout_height="fill_parent"
android:background="@android:color/white"
android:orientation="vertical" >
<include
android:id="@+id/top_layout"
layout="@layout/main" />
</LinearLayout>
里面引用了main这个布局文件,它的xml文件为:
代码如下:
<?xml version="1.0" encoding="utf-8"?>
<RelativeLayout xmlns:android="http://schemas.android.com/apk/res/android"
android:layout_width="match_parent"
android:layout_height="match_parent" >
<RelativeLayout
android:layout_width="fill_parent"
android:layout_height="40dip"
android:layout_alignParentTop="true"
android:background="@drawable/navbar_bg" >
<TextView
android:id="@+id/titltext"
android:layout_width="wrap_content"
android:layout_height="wrap_content"
android:text="我的空间动态"
android:textSize="20dp"
android:layout_centerInParent="true"
/>
<ImageView
android:layout_width="wrap_content"
android:layout_height="wrap_content"
android:layout_centerInParent="true"
android:src="@drawable/navbar_drop_down"
android:id="@+id/bytextimage1"
android:layout_toRightOf="@id/titltext"
/>
<ImageView
android:layout_width="wrap_content"
android:layout_height="wrap_content"
android:layout_centerInParent="true"
android:src="@drawable/navbar_drop_up"
android:id="@+id/bytextimage2"
android:visibility="invisible"
android:layout_toRightOf="@id/titltext"
/>
<ImageView
android:layout_width="wrap_content"
android:layout_height="wrap_content"
android:layout_alignParentRight="true"
android:layout_marginTop="5dp"
android:layout_marginRight="10dp"
android:src="@drawable/icon_refresh_none" />
</RelativeLayout>//这个RelativeLayout是最上面“我的空间动态”那一部分的布局
<FrameLayout //下面的导航栏的实现,他的背景就是灰色横条的那一部分
android:layout_width="fill_parent"
android:layout_height="65.32999dip"
android:layout_alignParentBottom="true"
android:background="@drawable/toolbar_bg" >
<LinearLayout //用来包含图片以及文字
android:layout_width="fill_parent"
android:layout_height="48.0dip"
android:layout_gravity="bottom"
android:baselineAligned="false"
android:gravity="center_horizontal"
android:orientation="horizontal" >
<FrameLayout //采用帧布局,这样图片和文字就可以一起显示了。当然也可以用相对布局,一个在上,一个在下。
android:layout_width="fill_parent"
android:layout_height="48.0dip"
android:layout_weight="1.0" >
<ImageView
android:layout_width="28.0dip"
android:layout_height="28.0dip"
android:layout_gravity="top|center"
android:layout_marginTop="1.0dip"
android:contentDescription=""
android:src="@drawable/tab_timefeed_opacity"
android:visibility="visible" />
<TextView
android:layout_width="wrap_content"
android:layout_height="wrap_content"
android:layout_gravity="bottom|center"
android:layout_marginBottom="6.0dip"
android:text="好友动态"
android:textColor="#ffffffff"
android:textSize="10.0dip"
android:visibility="visible" />
</FrameLayout>
<FrameLayout
android:layout_width="fill_parent"
android:layout_height="48.0dip"
android:layout_marginRight="10.0dip"
android:layout_weight="1.0" >
<ImageView
android:layout_width="27.0dip"
android:layout_height="27.0dip"
android:layout_gravity="top|center"
android:layout_marginTop="1.0dip"
android:src="@drawable/tab_feedback_opacity"
android:visibility="visible" />
<TextView
android:layout_width="wrap_content"
android:layout_height="wrap_content"
android:layout_gravity="bottom|center"
android:layout_marginBottom="6.0dip"
android:text="与我相关"
android:textColor="#ffffffff"
android:textSize="10.0dip"
android:visibility="visible" />
<TextView
android:layout_width="17.0dip"
android:layout_height="17.0dip"
android:layout_gravity="center_horizontal"
android:layout_marginBottom="15.0dip"
android:layout_marginLeft="10.0dip"
android:background="@drawable/myhome_visitor_number"
android:gravity="center_vertical"
android:paddingBottom="5.0dip"
android:paddingLeft="5.0dip"
android:paddingRight="0.0dip"
android:paddingTop="0.0dip"
android:text="n"
android:textColor="#ffffffff"
android:textSize="13.0dip"
android:visibility="visible" />
</FrameLayout>
<FrameLayout
android:layout_width="fill_parent"
android:layout_height="wrap_content"
android:layout_weight="1.0" />
<FrameLayout
android:layout_width="fill_parent"
android:layout_height="48.0dip"
android:layout_marginLeft="10.0dip"
android:layout_weight="1.0" >
<ImageView
android:layout_width="27.0dip"
android:layout_height="27.0dip"
android:layout_gravity="top|center"
android:layout_marginTop="1.0dip"
android:src="@drawable/tab_myzone_opacity"
android:visibility="visible" />
<TextView
android:layout_width="wrap_content"
android:layout_height="wrap_content"
android:layout_gravity="bottom|center"
android:layout_marginBottom="6.0dip"
android:text="主页"
android:textColor="#ffffffff"
android:textSize="10.0dip"
android:visibility="visible" />
</FrameLayout>
<FrameLayout
android:layout_width="fill_parent"
android:layout_height="48.0dip"
android:layout_weight="1.0" >
<ImageView
android:layout_width="27.0dip"
android:layout_height="27.0dip"
android:layout_gravity="top|center"
android:layout_marginTop="1.0dip"
android:src="@drawable/tab_applist_opacity"
android:visibility="visible" />
<TextView
android:layout_width="wrap_content"
android:layout_height="wrap_content"
android:layout_gravity="bottom|center"
android:layout_marginBottom="6.0dip"
android:text="应用"
android:textColor="#ffffffff"
android:textSize="10.0dip"
android:visibility="visible" />
</FrameLayout>
</LinearLayout>
<FrameLayout
android:layout_width="wrap_content"
android:layout_height="wrap_content"
android:layout_gravity="center_horizontal" >
<ImageView
android:layout_width="66.666595dip"
android:layout_height="65.33328dip"
android:layout_gravity="center"
android:src="@drawable/toolbar_write_bg" />
</FrameLayout>
<FrameLayout
android:id="@+id/btn_ck"
android:layout_width="65.33328dip"
android:layout_height="65.33328dip"
android:layout_gravity="center" >
<ImageView
android:id="@+id/image1"
android:layout_width="22.666595dip"
android:layout_height="22.666595dip"
android:layout_gravity="center"
android:layout_marginTop="2.0dip"
android:src="@drawable/toolbar_plus" />
</FrameLayout>
</FrameLayout>
</RelativeLayout>
上面的“我的空间动态”以及下面的圆形Button用的是PopubWindow,Activity的代码如下:
代码如下:
package com.example.imitateqqzone;
import java.util.ArrayList;
import java.util.List;
import android.os.Bundle;
import android.app.Activity;
import android.content.Context;
import android.graphics.drawable.BitmapDrawable;
import android.view.LayoutInflater;
import android.view.Menu;
import android.view.View;
import android.view.View.OnClickListener;
import android.view.Window;
import android.widget.AdapterView;
import android.widget.ImageView;
import android.widget.LinearLayout;
import android.widget.ListView;
import android.widget.PopupWindow;
import android.widget.TextView;
import android.widget.AdapterView.OnItemClickListener;
import android.widget.Toast;
public class ImitateQQZone extends Activity {
private PopupWindow popupWindow1,popupWindow2;
private ListView lv_group;
private View view, top_layout;
private TextView tvtitle;
private List<String> groups;
//private int screenWidth,screenHeight,dialgoWidth,dialgoheight;
private ImageView byTextImageView1,byTextImageView2,centerimage;
//private int[] images={R.drawable.navbar_drop_down,R.drawable.navbar_drop_up};
@Override
public void onCreate(Bundle savedInstanceState) {
super.onCreate(savedInstanceState);
this.requestWindowFeature(Window.FEATURE_NO_TITLE);
setContentView(R.layout.activity_imitate_qqzone);
top_layout = this.findViewById(R.id.top_layout);
tvtitle = (TextView) top_layout.findViewById(R.id.titltext);
byTextImageView1=(ImageView) top_layout.findViewById(R.id.bytextimage1);
byTextImageView2=(ImageView) top_layout.findViewById(R.id.bytextimage2);
centerimage=(ImageView) findViewById(R.id.image1);
/*
* android view setVisibility():
有三个参数:Parameters:visibility One of VISIBLE, INVISIBLE, or GONE,想对应的三个常量值:0、4、8
VISIBLE:0 意思是可见的
INVISIBILITY:4 意思是不可见的,但还占着原来的空间
GONE:8 意思是不可见的,不占用原来的布局空间
*/
tvtitle.setOnClickListener(new OnClickListener() {
boolean isImage=false;
public void onClick(View v) {
showWindow1(v);
if(isImage==false){
isImage=true;
byTextImageView1.setVisibility(4);
byTextImageView2.setVisibility(0);
}else{
isImage=false;
byTextImageView1.setVisibility(0);
byTextImageView2.setVisibility(4);
}
}
});
centerimage.setOnClickListener(new OnClickListener() {
public void onClick(View v) {
showWindow2(v);
}
});
}
protected void showWindow2(View v) {
if (popupWindow2 == null) {
LayoutInflater layoutInflater = (LayoutInflater) getSystemService(Context.LAYOUT_INFLATER_SERVICE);
view = layoutInflater.inflate(R.layout.pubmenu, null);
popupWindow2 = new PopupWindow(view, 400, 400);// 创建一个PopuWidow对象
}
popupWindow2.setFocusable(true); // 使其聚集
popupWindow2.setOutsideTouchable(true);// 设置允许在外点击消失
popupWindow2.setBackgroundDrawable(new BitmapDrawable());// 这个是为了点击“返回Back”也能使其消失,并且并不会影响你的背景
popupWindow2.showAsDropDown(v);
}
private void showWindow1(View parent) {
if (popupWindow1 == null) {
LayoutInflater layoutInflater = (LayoutInflater) getSystemService(Context.LAYOUT_INFLATER_SERVICE);
view = layoutInflater.inflate(R.layout.group_list, null);
lv_group = (ListView) view.findViewById(R.id.lvGroup);
// 加载数据
groups = new ArrayList<String>();
groups.add("全部动态");
groups.add("好友动态");
groups.add("特别关心");
groups.add("认证空间");
GroupAdapter groupAdapter = new GroupAdapter(this, groups);
lv_group.setAdapter(groupAdapter);
// 创建一个PopuWidow对象
popupWindow1 = new PopupWindow(view, 200, 350);
}
popupWindow1.setFocusable(true); // 使其聚集
popupWindow1.setOutsideTouchable(true);// 设置允许在外点击消失
popupWindow1.setBackgroundDrawable(new BitmapDrawable());// 这个是为了点击“返回Back”也能使其消失,并且并不会影响你的背景
//screenWidth = ImitateQQZone.this.getWindowManager().getDefaultDisplay().getWidth();
//screenHeight = ImitateQQZone.this.getWindowManager().getDefaultDisplay().getHeight();
//dialgoWidth = popupWindow.getWidth();
//dialgoheight = popupWindow.getHeight();
//int xPos =(screenWidth-dialgoWidth)/2;// 显示的位置为:屏幕的宽度的一半-PopupWindow的宽度的一半
//Log.i("coder", "xPos:" + xPos);
popupWindow1.showAsDropDown(parent);
lv_group.setOnItemClickListener(new OnItemClickListener() {
public void onItemClick(AdapterView<?> adapterView, View view,
int position, long id) {
Toast.makeText(ImitateQQZone.this, groups.get(position), 1000)
.show();
// switch (position) {
// case 0:
// Intent intent = new Intent(ImitateQQZone.this,
// PopupWindowDemo2.class);
// startActivity(intent);
// /break;
// default:
// break;
// }
if (popupWindow1 != null) {
popupWindow1.dismiss();
}
}
});
}
@Override
public boolean onCreateOptionsMenu(Menu menu) {
getMenuInflater().inflate(R.menu.activity_imitate_qqzone, menu);
return true;
}
}
其他的布局文件我就不贴出了,需要代码的可以@我或在下面留言,这只是个Demo,因为时间关系,还有很多细节没有实现。大家可以在我的基础上继续完善。

