Android自定义对话框Dialog的简单实现
本文着重研究了自定义对话框,通过一下步骤即可清晰的理解原理,通过更改界面设置和style类型,可以应用在各种各样适合自己的App中。
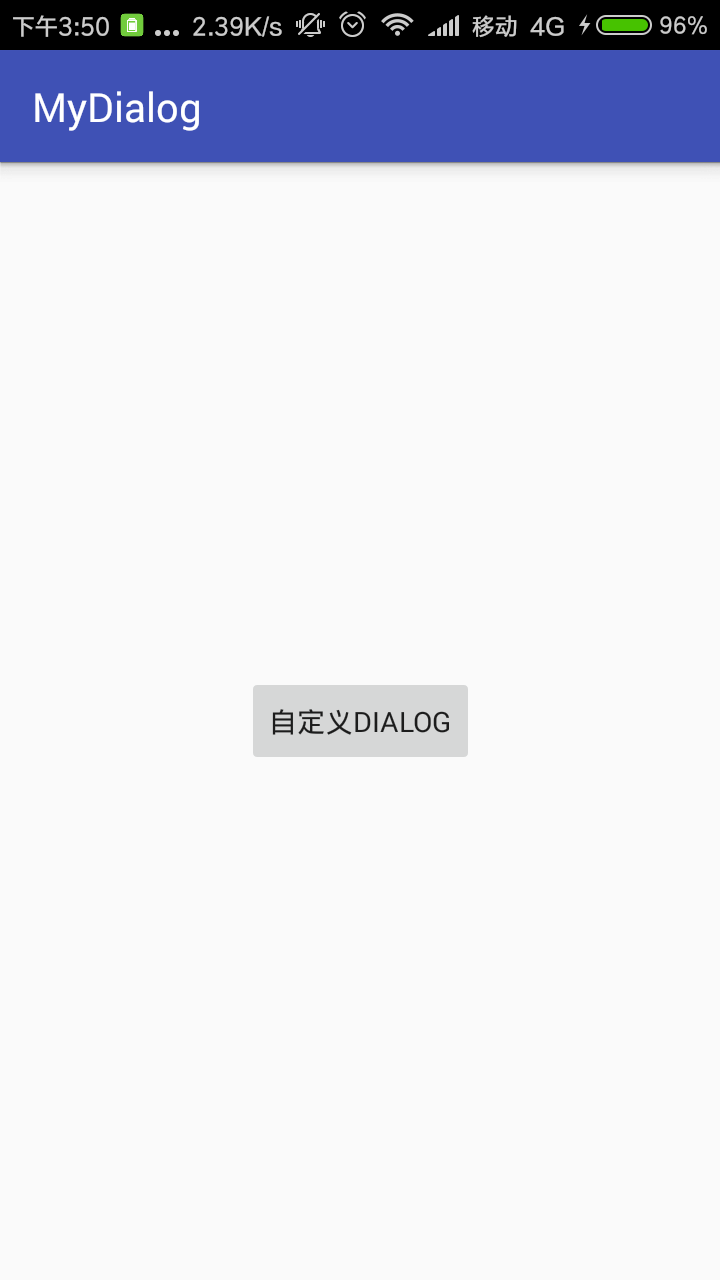
首先来看一下效果图:
首先是activity的界面
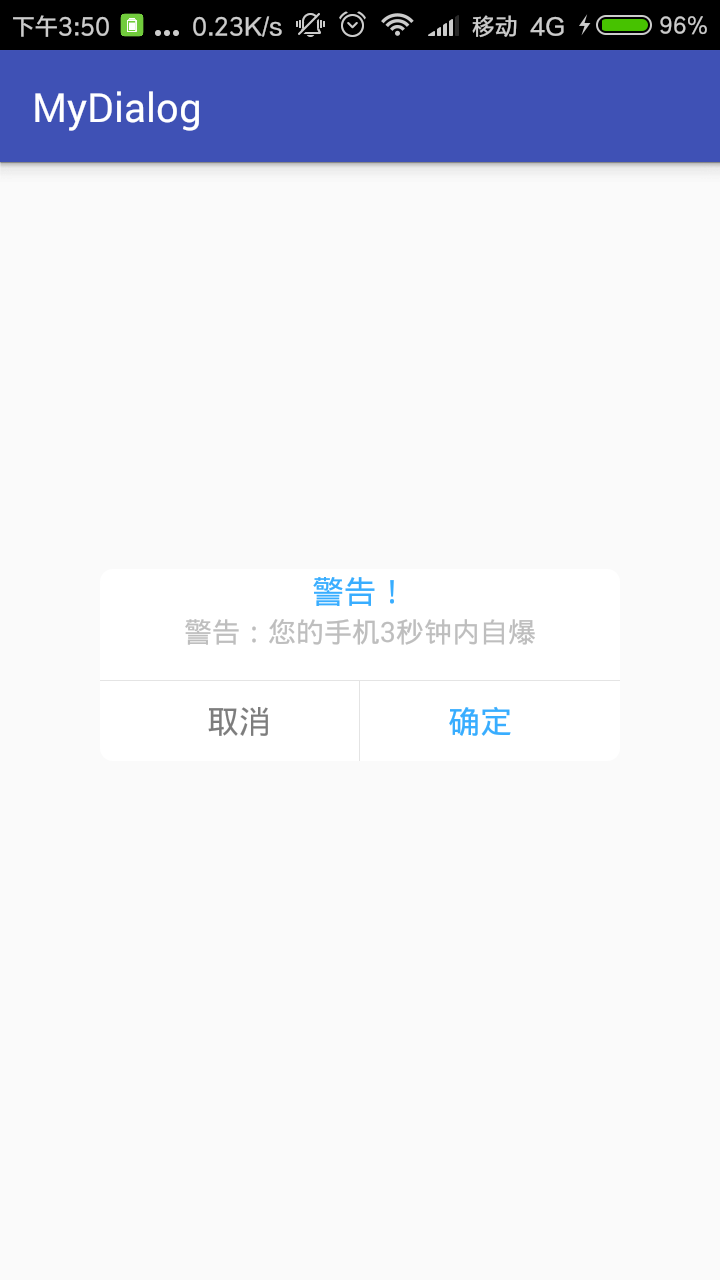
点击了上述图片的按钮后,弹出对话框:
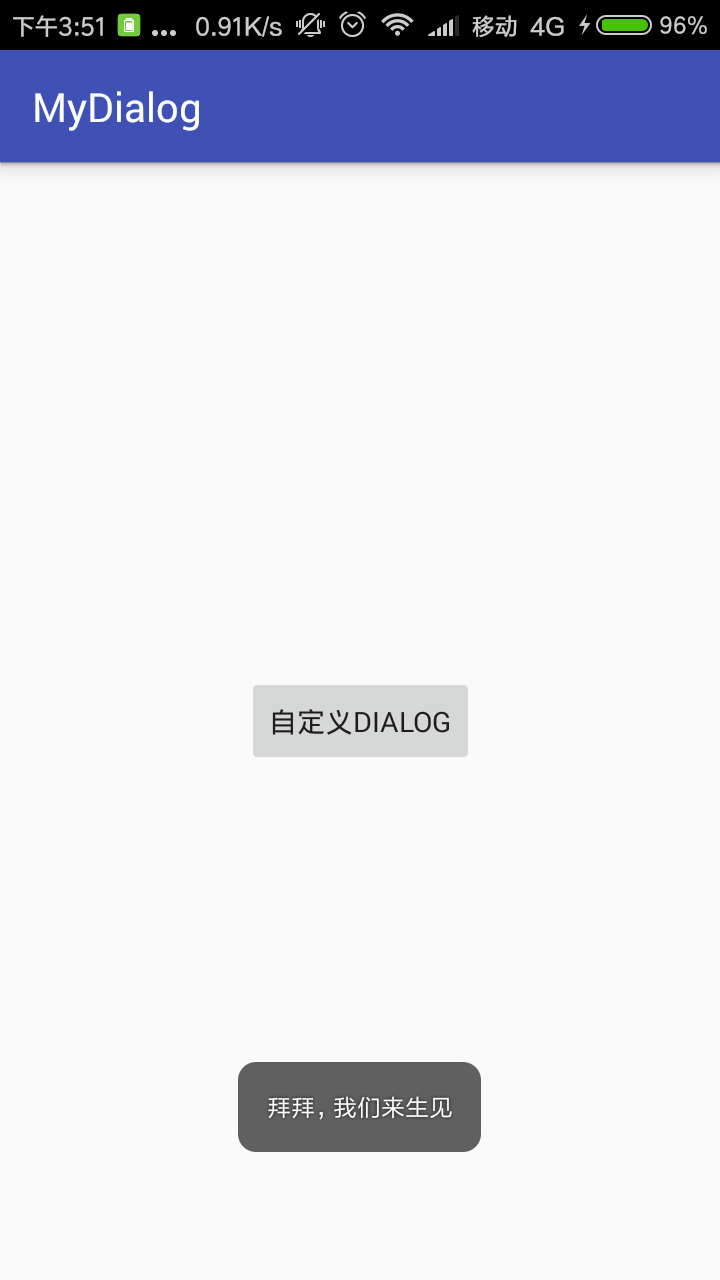
点击对话框的确定按钮:
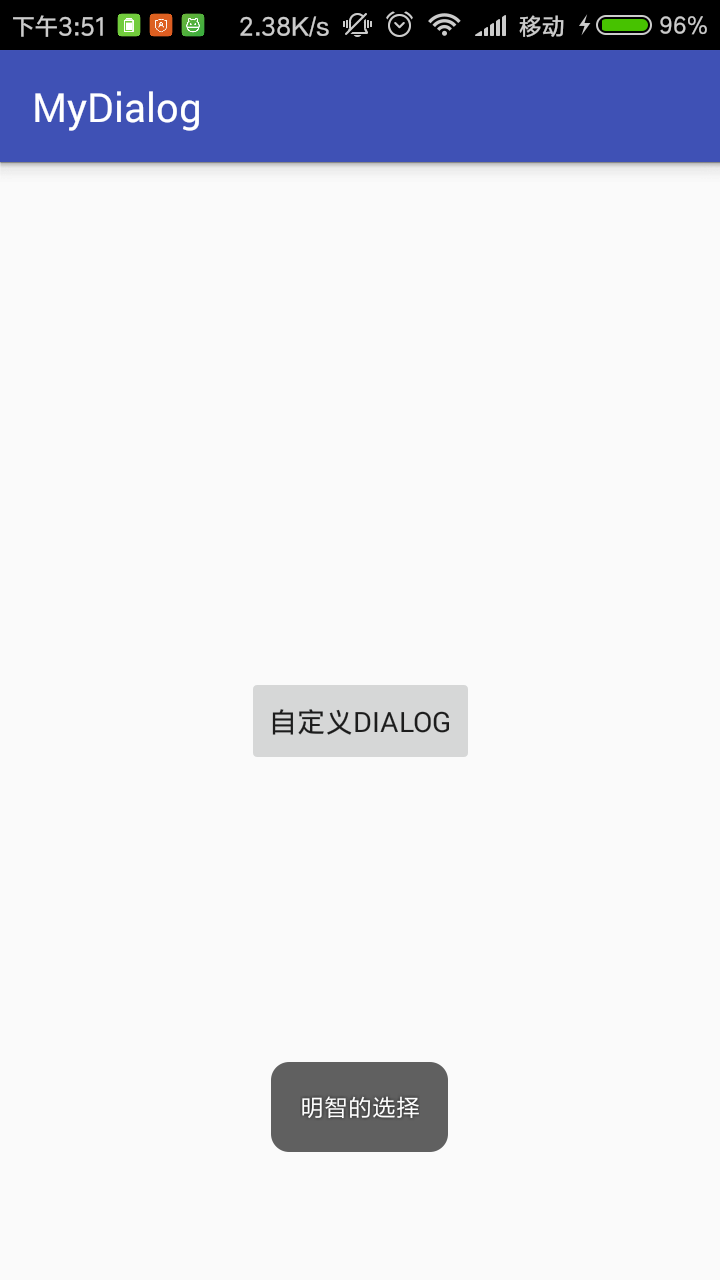
点击对话框的取消按钮:
下面来说一下具体实现步骤:
第一步:设置Dialog的样式(一般项目都可以直接拿来用):style.xml中
<!--自定义Dialog背景全透明无边框theme-->
 <style name="MyDialog" parent="android:style/Theme.Dialog">
  <!--背景颜色和透明程度-->
  <item name="android:windowBackground">@android:color/transparent</item>
  <!--是否去除标题-->
  <item name="android:windowNoTitle">true</item>
  <!--是否去除边框-->
  <item name="android:windowFrame">@null</item>
  <!--是否浮现在activity之上-->
  <item name="android:windowIsFloating">true</item>
  <!--是否模糊-->
  <item name="android:backgroundDimEnabled">false</item>
 </style>
第二步:自定义Dialog:
(1)自定义的Dialog的布局:dialog.xml
<?xml version="1.0" encoding="utf-8"?>
<RelativeLayout xmlns:android="http://schemas.android.com/apk/res/android"
 android:layout_width="match_parent"
 android:layout_height="match_parent"
 android:background="#11ffffff">
<LinearLayout
 android:layout_width="260dp"
 android:layout_height="wrap_content"
 android:layout_centerInParent="true"
 android:background="@drawable/free_dialog_bg"
 android:orientation="vertical">
<TextView
 android:id="@+id/title"
 android:layout_width="wrap_content"
 android:layout_height="wrap_content"
 android:layout_gravity="center"
 android:text="警告!!!"
 android:textColor="#38ADFF"
 android:textSize="16sp"/>
 <TextView
  android:id="@+id/message"
  android:layout_width="wrap_content"
  android:layout_height="wrap_content"
  android:layout_marginLeft="20dp"
  android:layout_marginRight="20dp"
  android:layout_gravity="center"
  android:text="您的手机马上自爆"/>
 <View
  android:layout_width="match_parent"
  android:layout_height="1px"
  android:layout_marginTop="15dp"
  android:background="#E4E4E4"/>
 <LinearLayout
  android:layout_width="match_parent"
  android:layout_height="40dp"
  android:orientation="horizontal">
  <Button
   android:id="@+id/no"
   android:layout_width="0dp"
   android:layout_height="match_parent"
   android:layout_weight="1"
   android:layout_marginLeft="10dp"
   android:background="@null"
   android:gravity="center"
   android:lines="1"
   android:text="取消"
   android:textColor="#7D7D7D"
   android:textSize="16sp"/>
  <View
   android:layout_width="1px"
   android:layout_height="match_parent"
   android:background="#E4E4E4"/>
  <Button
   android:id="@+id/yes"
   android:layout_width="0dp"
   android:layout_height="match_parent"
   android:layout_weight="1"
   android:layout_marginRight="10dp"
   android:background="@null"
   android:gravity="center"
   android:lines="1"
   android:text="确定"
   android:textColor="#38ADFF"
   android:textSize="16sp"/>
 </LinearLayout>
</LinearLayout>
</RelativeLayout>
(2)自定义Dialog布局中的背景:free_dialog_bg.xml
<?xml version="1.0" encoding="utf-8"?>
<shape xmlns:android="http://schemas.android.com/apk/res/android"
 android:layout_width="match_parent"
 android:layout_height="match_parent">
 <solid android:color="#ffffff" />
 <stroke
  android:width="0.8dp"
  android:color="#ffffff" />
 <!-- 圆角 -->
 <corners android:radius="6dp" />
</shape>
(3) 自定义的Dialog的java:MyDialog.class
package com.syah.mydialog;

import android.app.Dialog;
import android.content.Context;
import android.os.Bundle;
import android.support.annotation.NonNull;
import android.support.annotation.StyleRes;
import android.view.View;
import android.widget.Button;
import android.widget.TextView;

/**
 * 创建自定义的Dialog,主要学习实现原理
 * Created by admin on 2017/8/30.
 */

public class MyDialog extends Dialog {
 private Button yes;//确定按钮
 private Button no;//取消按钮
 private TextView titleTV;//消息标题文本
 private TextView message;//消息提示文本
 private String titleStr;//从外界设置的title文本
 private String messageStr;//从外界设置的消息文本
 //确定文本和取消文本的显示的内容
 private String yesStr, noStr;
 private onNoOnclickListener noOnclickListener;//取消按钮被点击了的监听器
 private onYesOnclickListener yesOnclickListener;//确定按钮被点击了的监听器

 public MyDialog(@NonNull Context context, @StyleRes int themeResId) {
  super(context, themeResId);
 }

 /**
  * 设置取消按钮的显示内容和监听
  *
  * @param str
  * @param onNoOnclickListener
  */
 public void setNoOnclickListener(String str, onNoOnclickListener onNoOnclickListener) {
  if (str != null) {
   noStr = str;
  }
  this.noOnclickListener = onNoOnclickListener;
 }

 /**
  * 设置确定按钮的显示内容和监听
  *
  * @param str
  * @param yesOnclickListener
  */
 public void setYesOnclickListener(String str, onYesOnclickListener yesOnclickListener) {
  if (str != null) {
   yesStr = str;
  }
  this.yesOnclickListener = yesOnclickListener;
 }

 @Override
 protected void onCreate(Bundle savedInstanceState) {
  super.onCreate(savedInstanceState);
  setContentView(R.layout.dialog);
  //空白处不能取消动画
  setCanceledOnTouchOutside(false);

  //初始化界面控件
  initView();

  //初始化界面数据
  initData();
  //初始化界面控件的事件
  initEvent();
 }

 /**
  * 初始化界面控件
  */
 private void initView() {
  yes = findViewById(R.id.yes);
  no = findViewById(R.id.no);
  titleTV = (TextView) findViewById(R.id.title);
  message = (TextView) findViewById(R.id.message);
 }

 /**
  * 初始化界面控件的显示数据
  */
 private void initData() {
  //如果用户自定了title和message
  if (titleStr != null) {
   titleTV.setText(titleStr);
  }
  if (messageStr != null) {
   message.setText(messageStr);
  }
  //如果设置按钮文字
  if (yesStr != null) {
   yes.setText(yesStr);
  }
  if (noStr != null) {
   no.setText(noStr);
  }
 }

 /**
  * 初始化界面的确定和取消监听
  */
 private void initEvent() {
  //设置确定按钮被点击后,向外界提供监听
  yes.setOnClickListener(new View.OnClickListener() {
   @Override
   public void onClick(View v) {
    if (yesOnclickListener != null) {
     yesOnclickListener.onYesOnclick();
    }
   }
  });
  //设置取消按钮被点击后,向外界提供监听
  no.setOnClickListener(new View.OnClickListener() {
   @Override
   public void onClick(View v) {
    if (noOnclickListener != null) {
     noOnclickListener.onNoClick();
    }
   }
  });
 }

 /**
  * 从外界Activity为Dialog设置标题
  *
  * @param title
  */
 public void setTitle(String title) {
  titleStr = title;
 }

 /**
  * 从外界Activity为Dialog设置message
  *
  * @param message
  */
 public void setMessage(String message) {
  messageStr = message;
 }

 public interface onNoOnclickListener {
  public void onNoClick();
 }

 public interface onYesOnclickListener {
  public void onYesOnclick();
 }
}
第三步:activity中使用自定义对话框:
(1)activity的布局文件:activity_main.xml
<?xml version="1.0" encoding="utf-8"?>
<android.support.constraint.ConstraintLayout xmlns:android="http://schemas.android.com/apk/res/android"
 xmlns:app="http://schemas.android.com/apk/res-auto"
 xmlns:tools="http://schemas.android.com/tools"
 android:layout_width="match_parent"
 android:layout_height="match_parent"
 tools:context="com.syah.mydialog.MainActivity">

 <Button
  android:id="@+id/btn"
  android:layout_width="wrap_content"
  android:layout_height="wrap_content"
  android:text="自定义dialog"
  app:layout_constraintBottom_toBottomOf="parent"
  app:layout_constraintLeft_toLeftOf="parent"
  app:layout_constraintRight_toRightOf="parent"
  app:layout_constraintTop_toTopOf="parent" />

</android.support.constraint.ConstraintLayout>
(2) MainActivity.class
package com.syah.mydialog;

import android.support.v7.app.AppCompatActivity;
import android.os.Bundle;
import android.view.View;
import android.view.Window;
import android.widget.Button;
import android.widget.Toast;

public class MainActivity extends AppCompatActivity {
 private MyDialog myDialog;
 private Button button;

 @Override
 protected void onCreate(Bundle savedInstanceState) {
  super.onCreate(savedInstanceState);
  requestWindowFeature(Window.FEATURE_NO_TITLE);
  setContentView(R.layout.activity_main);
  button = (Button) findViewById(R.id.btn);
  button.setOnClickListener(new View.OnClickListener() {
   @Override
   public void onClick(View view) {
    myDialog=new MyDialog(MainActivity.this,R.style.MyDialog);
    myDialog.setTitle("警告!");
    myDialog.setMessage("警告:您的手机3秒钟内自爆");
    myDialog.setYesOnclickListener("确定", new MyDialog.onYesOnclickListener() {
     @Override
     public void onYesOnclick() {
      Toast.makeText(getApplicationContext(),"拜拜,我们来生见",Toast.LENGTH_LONG).show();
      myDialog.dismiss();
     }
    });
    myDialog.setNoOnclickListener("取消", new MyDialog.onNoOnclickListener() {
     @Override
     public void onNoClick() {
      Toast.makeText(getApplicationContext(),"明智的选择",Toast.LENGTH_LONG).show();
      myDialog.dismiss();
     }
    });
    myDialog.show();
   }
  });
 }
}
原理:
1、通过构造方法给dialog设置一个主题 R.style.MyDialog , 主要设置dialog的显示属性,一般都是 全透明无边框 ;
2、然后在dialog的onCreate()方法中,用setContentView( R.layout.SelfDialog) 为dialog设置XML文件,我们就可以在layout文件中创建自定义的Dialog风格。这里我就自定义了xml文件格式,实现了自定义的外观风格,不受系统的主题影响。
3、然后通过设置要为外界设置一些public 公开的方法,来向自定义的dialog传递值。这里的title 和 message,都是可以通过外界传值进来,进行设置的。如下面的public 方法就是供外界activity来设置title和message的:
/**
  * 从外界Activity为Dialog设置标题
  *
  * @param title
  */
 public void setTitle(String title) {
  titleStr = title;
 }

 /**
  * 从外界Activity为Dialog设置message
  *
  * @param message
  */
 public void setMessage(String message) {
  messageStr = message;
 }
在activity通过实例化Dialog后就可以设置titile和message了。
myDialog=new MyDialog(MainActivity.this);
myDialog.setTitle("警告!");
myDialog.setMessage("警告:您的手机3秒钟内自爆");
另外在MyDialog.class中通过下面构造器可以更灵活的选择Dialog的类型
public MyDialog(@NonNull Context context, @StyleRes int themeResId) {
  super(context, themeResId);
  }
activity中使用自定义的dialog:
myDialog=new MyDialog(MainActivity.this,R.style.MyDialog);
4、最后,自定义的dialog中包含了一些按钮的时候,这个时候要想让按钮有点击事件,并且把这个点击事件能够传递给activity,让acitvity做一些事情,这里就需要设置监听接口,让button的点击事件能够让外界activity知道。如下面的代码。
/**
  * 确定按钮接口
  */
 public interface onNoOnclickListener {
  public void onNoClick();
 }

 /**
  * 取消按钮接口
  */
 public interface onYesOnclickListener {
  public void onYesOnclick();
 }
private onNoOnclickListener noOnclickListener;//取消按钮被点击了的监听器
 private onYesOnclickListener yesOnclickListener;//确定按钮被点击了的监听器

 /**
  * 设置取消按钮的显示内容和监听
  *
  * @param str
  * @param onNoOnclickListener
  */
 public void setNoOnclickListener(String str, onNoOnclickListener onNoOnclickListener) {
  if (str != null) {
   noStr = str;
  }
  this.noOnclickListener = onNoOnclickListener;
 }

 /**
  * 设置确定按钮的显示内容和监听
  *
  * @param str
  * @param yesOnclickListener
  */
 public void setYesOnclickListener(String str, onYesOnclickListener yesOnclickListener) {
  if (str != null) {
   yesStr = str;
  }
  this.yesOnclickListener = yesOnclickListener;
 }
//设置确定按钮被点击后,向外界提供监听
  yes.setOnClickListener(new View.OnClickListener() {
   @Override
   public void onClick(View v) {
    if (yesOnclickListener != null) {
     yesOnclickListener.onYesOnclick();
    }
   }
  });
  //设置取消按钮被点击后,向外界提供监听
  no.setOnClickListener(new View.OnClickListener() {
   @Override
   public void onClick(View v) {
    if (noOnclickListener != null) {
     noOnclickListener.onNoClick();
    }
   }
  });
activity就可以设置监听接口来实时获取button的点击事件如下:
myDialog.setYesOnclickListener("确定", new MyDialog.onYesOnclickListener() {
     @Override
     public void onYesOnclick() {
      Toast.makeText(getApplicationContext(),"拜拜,我们来生见",Toast.LENGTH_LONG).show();
      myDialog.dismiss();
     }
    });
    myDialog.setNoOnclickListener("取消", new MyDialog.onNoOnclickListener() {
     @Override
     public void onNoClick() {
      Toast.makeText(getApplicationContext(),"明智的选择",Toast.LENGTH_LONG).show();
      myDialog.dismiss();
     }
    });
以上就是本文的全部内容,希望对大家的学习有所帮助,也希望大家多多支持我们。
相关推荐
-

Android通过自定义Activity实现悬浮的Dialog详解
前言 其实实现悬浮的自定义窗体有很多方法,自定义Dialog,自定义layout 均可以实现.自定义activity也是可以的,今天我就介绍一下activity的实现方法.下面来看看详细的介绍: 效果图 如图可以看出,当前的窗体,第一眼其实和dialog没有什么区别,但是它是自定义activity实现.如何实现的呢? 代码如下: 新建activity @Override protected void onCreate(Bundle savedInstanceState) { super.onCr
-
Android 提交或者上传数据时的dialog弹框动画效果
效果图如下所示: 类似这种弹框里含有动画,一般我们在上传数据或者支付的时候会用到,当然,假如我们换几张图片,还可以把它当做是加载数据的时候使用,总之这是一个dialog弹框,只不过这个弹框在弹出后,上面有动画的运行. 上代码 首先是布局文件 : <RelativeLayout xmlns:android="http://schemas.android.com/apk/res/android" android:layout_height="200dp" andr
-
Android开发之基于DialogFragment创建对话框的方法示例
本文实例讲述了Android基于DialogFragment创建对话框的方法.分享给大家供大家参考,具体如下: /** * 使用DialogFragment创建对话框 * @description: * @author ldm * @date 2016-5-12 下午2:00:01 */ public class FragmentAlertDialog extends Activity { private Button button; @Override protected void onCre
-
浅析Android Dialog中setContentView()方法
概述 Dialog在Android中是一个很优秀的工具.在使用Dialog时,我们一般都会自定义要显示的内容布局.Dialog自带了三个方法来支持自定义内容布局. public void setContentView (int layoutResID); public void setContentView (View view); public void setContentView (View view, ViewGroup.LayoutParams params); 这三个方法内部的实现原
-
Android ProgressDialog的实例详解
Android ProgressDialog的实例详解 当自己做一些耗时操作时,希望给用户一些提示信息,告诉用户正在进行耗时操作,这时就可以用到ProgressDialog. 1.新建一个全局变量ProgressDialog private ProgressDialog mDialog; 2.设置ProgressDialog的相关参数: progressDialog = new ProgressDialog( ProgressDialogActivity.this); //设置进度条风格,风格为
-
Android编程实现activity dialog透明背景的方法
本文实例讲述了Android编程实现activity dialog透明背景的方法.分享给大家供大家参考,具体如下: 首先查一下window activity的关系 具体省略.... 我的理解就是 每个activity都有一个window 也就是view的最顶层容器 activity是提供给用户交互的一组View容器(window的child) 层次关系是 <window> <activity> </activity> </window> 所以说如果需要设置
-
Android 开发之Dialog中隐藏键盘的正确使用方法
Android 开发之Dialog中隐藏键盘的正确使用方法 场景:弹出一个Dialog,里面有一个EditText,用来输入内容,因为输入时,需要弹出键盘,所以当Dialog消失时,键盘要一起隐藏. 现在我们做一个自定义的Dialog MyDialog extends Dialog 一开始认为这个功能很容易实现,于是写了下面的代码 //Dialog的构造函数中写 this.setOnDismissListener(new OnDismissListener() { @Override publi
-
Android自定义对话框Dialog的简单实现
本文着重研究了自定义对话框,通过一下步骤即可清晰的理解原理,通过更改界面设置和style类型,可以应用在各种各样适合自己的App中. 首先来看一下效果图: 首先是activity的界面 点击了上述图片的按钮后,弹出对话框: 点击对话框的确定按钮: 点击对话框的取消按钮: 下面来说一下具体实现步骤: 第一步:设置Dialog的样式(一般项目都可以直接拿来用):style.xml中 <!--自定义Dialog背景全透明无边框theme--> <style name="MyDialo
-
Android自定义对话框Dialog
本文简单介绍自定义对话框Dialog的使用,代码和结构都非常简单,目的是能够快速使用自定义对话框,在本文中不具体讲解对话框的高级使用. 实现步骤 首先需要自己在我们的.xml文件中自己构建布局 布局文件做好之后,我们可以在style文件下自己定义布局的样式 前两步都做好之后,我开始在写java文件 具体实现过程 1. xml文件 <?xml version="1.0" encoding="utf-8"?> <LinearLayout xmlns
-
Android编程自定义对话框(Dialog)位置及大小的方法
本文实例讲述了Android编程自定义对话框(Dialog)位置及大小的方法.分享给大家供大家参考,具体如下: 代码: package angel.devil; import android.app.Activity; import android.app.Dialog; import android.os.Bundle; import android.view.Gravity; import android.view.Window; import android.view.WindowMana
-
Android自定义对话框的简单实现
本文实例为大家分享了Android自定义对话框的具体实现代码,供大家参考,具体内容如下 1.定义对话框的布局 <?xml version="1.0" encoding="utf-8"?> <RelativeLayout xmlns:android="http://schemas.android.com/apk/res/android" android:layout_width="match_parent&quo
-
Android 自定义对话框 showSetPwdDialog
样式如下所示: 布局: layout dialog_set_pwd.xml <?xml version="." encoding="utf-"?> <LinearLayout xmlns:android="http://schemas.android.com/apk/res/android" android:layout_width="match_parent" android:layout_height=&
-
android自定义对话框实例代码
1.实现效果 2.定义dialog.xml (res/layout/dialog.xml) <?xml version="1.0" encoding="utf-8"?> <RelativeLayout xmlns:android="http://schemas.android.com/apk/res/android" android:layout_width="match_parent" android
-
Android中自定义对话框(Dialog)的实例代码
1.修改系统默认的Dialog样式(风格.主题) 2.自定义Dialog布局文件 3.可以自己封装一个类,继承自Dialog或者直接使用Dialog类来实现,为了方便以后重复使用,建议自己封装一个Dialog类 第一步: 我们知道Android定义个控件或View的样式都是通过定义其style来实现的,查看Android框架中的主题文件,在源码中的路径:/frameworks/base/core/res/res/values/themes.xml,我们可以看到,Android为Dialog定义了
-
Androd自定义对话框Dialog视图及参数传递的实现方法
今天给大家讲讲有关自定义对话框的相关内容,前面两篇都在在利用系统提供的函数来实现对话框,但局限性太大,当我们想自己定义视图的时候,就不能利用系统函数了,就需要我们这里的自定义对话框了,有关自定义对话框的东东,以前有写过一篇<android之Dialog相关>,写的不好,今天给大家重新写一篇 一.雏形构建 先给大家看下这小节的效果图: 自定义一个对话框,内容是四个ImageView横排: 1.Dialog布局 根据上图的对话框样式,我们看一下Dialog的布局定义(custom_dialog.x
-
Android自定义UI手势密码简单版
先看看效果图: ImageLockActivity package com.example.imagelock; import com.example.view.NinePointLineView; import android.os.Bundle; import android.app.Activity; import android.view.Menu; import android.view.View; public class ImageLockActivity extends Acti
-
Android自定义View 使用PathMeasure简单模仿系统ProgressBar(四)
使用PathMeasure简单模仿系统ProgressBar,效果如下: 还蛮像的吧,有的人问了,系统自带的你闲的搞这个干嘛,当然是纯粹为了学习PathMeasure这个类. PathMeasure是用来测量Path路径的,可以截取路径中某一段路径,通过改变这段路径的起点.终点,达到类似VectorDrawable中的路径动画效果: 直接new就可以获得PathMeasure对象: PathMeasure pathMeasure = new PathMeasure(); 或者 PathMeasu