vue组件横向树实现代码
将之前的用css3+jq实现的横向树样式简单封装成组件使用到vue项目中,文件名为transverseTree.vue
代码:
<template>
 <div class="tree">
  <ul v-if="treeData && treeData.length">
   <li v-for="(column,index) in treeData">
    <span class="root">{{column.name}}</span>
    <ul v-if="column.children && column.children.length">
     <li v-for="(childrenColumn,index) in column.children">
      <span>{{childrenColumn.name}}</span>
      <ul v-if="childrenColumn.children && childrenColumn.children.length">
       <li v-for="(grandChildrenColumn,index) in childrenColumn.children">
        <span>{{grandChildrenColumn.name}}</span>
       </li>
      </ul>
     </li>
    </ul>
   </li>
  </ul>
 </div>
</template>
<script>
 export default {
 name: 'transverseTree',
 props: {
  treeData:{
   type:Array,
   default:[]
  }
 },
 methods: {
  editDom(){
   if($('.root').siblings('ul').children('li').length==1){
    let num = 26*($('.root').siblings('ul').children('li').find('li').length-1);
    $('.root').css({ 'top': num });
    $('.root').siblings('ul').children('li').css({ 'top': num });
    $('.root').siblings('ul').find('ul').css({ 'top': -num });
    if($('.root').siblings('ul').find('li').length > 1){
     $('.root').siblings('ul').children('li').children('span').addClass('hasChild');
    }
   }else{
    $('.root').css({ 'top': 26 * ($('.root').siblings('ul').children('li').length - 1) });
   }
  }
 },
 mounted() {
  this.$nextTick(()=>{
   this.editDom();
  });
 }
 };
</script>
<style scope>
.tree{
 position: relative;
 margin: -16px -16px 0;
 min-height: 400px;
 padding-left: 11px;
 overflow: auto;
}
.tree ul{
 width: 210px;
 height: 100%;
 position: absolute;
}
.tree ul ul{
 left: 226px;
 top: 0;
}
.tree li{
 float: left;
 list-style-type: none;
 position: relative;
 padding: 16px 5px 0 5px;
}
.tree li span{
 position: relative;
 display: inline-block;
 width: 200px;
 height: 36px;
 background: #F0F0F5;
 border-radius: 4px;
 text-decoration: none;
 color: #2D2D2D;
 font-size: 14px;
 line-height: 36px;
 text-align: center;
}
.tree li::before{
 box-sizing:inherit;
 content: '';
 position: absolute;
 top: 33px;
 left: -7px;
 border-top: 2px solid #D2D2D7;
 width: 12px;
}
.tree li::after{
 box-sizing:inherit;
 content: '';
 position: absolute;
 top: 8px;
 left: -9px;
 height: 100%;
 border-left: 2px solid #D2D2D7;
}
.tree li:first-child::after{
 height: 51%;
 border-left: 2px solid #D2D2D7;
 border-top: 2px solid #D2D2D7;
 top: 33px;
 width: 1px;
 border-top-left-radius: 4px;
}
.tree li:last-child::after{
 height: 25px;
 border-left: 2px solid #D2D2D7;
 border-bottom: 2px solid #D2D2D7;
 top: 8px;
 width: 1px;
 border-bottom-left-radius: 4px;
}
.tree li:only-child::after,
.tree li:only-child::before{
 display: none;
}
.tree ul ul li:only-child::before{
 display: inline-block;
}
.tree ul ul li:only-child span::before{
 display: inline-block;
}
.tree li:only-child span.root::before,.tree li:only-child span.hasChild::before{
 content: '';
 position: absolute;
 top: 17px;
 right: -14px;
 border-top: 2px solid #D2D2D7;
 width: 14px;
}
.tree ul ul ul li:only-child span::before{
 content: '';
 position: absolute;
 top: 17px;
 left: -26px;
 border-top: 2px solid #D2D2D7;
 width: 26px;
}
</style>
在父组件中使用import引入该组件:
import transverseTree from './transverseTree'
注册组件:
components: { ifbpInfolistCard,transverseTree },
在template中使用:
<transverse-tree :treeData='treeData'></transverse-tree>
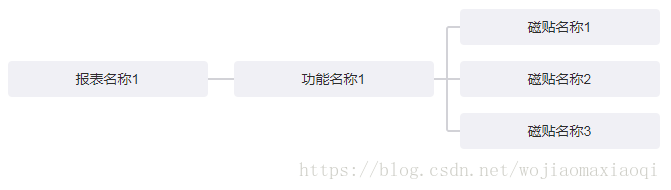
其中,treeData为一个数组,在data中给treeData一个初始值:
treeData: [
{name:'报表名称1',
children:[
{name:'功能名称1',
children:[
{name:'磁贴名称1'}
]},
{name:'功能名称2',
children:[
{name:'磁贴名称1'}
]},
{name:'功能名称3',
children:[
{name:'磁贴名称1'}
]},
]}
]
实现效果:

ps:需要特别说明的是,我目前的代码暂时只支持这两种样式,即:
1父节点-1子节点-1/多孙节点,或是1父节点-多子节点-1孙节点,样式是通过jq去判断修改的,以后有时间的话再去研究优化争取可复用性强一些。希望对大家能有所帮助。
总结
以上所述是小编给大家介绍的vue组件横向树实现代码,希望对大家有所帮助,如果大家有任何疑问请给我留言,小编会及时回复大家的。在此也非常感谢大家对我们网站的支持!
相关推荐
-

用 Vue.js 递归组件实现可折叠的树形菜单(demo)
在Vue.js中一个递归组件调用的是其本身,如: Vue.component('recursive-component', { template: `<!--Invoking myself!--> <recursive-component></recursive-component>` }); 递归组件常用于在blog上显示注释.嵌套的菜单,或者基本上是父和子相同的类型,尽管具体内容不同.例如: 现在给您演示一下如何有效地使用递归组件,我将通过建立一个可扩展/收缩的树形
-
Vue2.5 结合 Element UI 之 Table 和 Pagination 组件实现分页功能
2017年底了,总结了这一年多来的前端之路,Vue从入门到放弃,再二进宫,从 Vue1.0 持续跟踪到 Vue2.5.结合公司的一些实际项目,也封装了一些比较实用的组件. 由于现在公司管理平台主要运用Element UI,索性就结合组件Table 和 Pagination 封装了一个支持页面切换的Table组件,不啰嗦,直接上代码. 2.实现思路 2.1.Element UI 引入(整体引入) main.js // Element UI import Element from 'element-
-
vue实现验证码输入框组件
先来看波完成效果图 需求 输入4位或6位短信验证码,输入完成后收起键盘 实现步骤 第一步 布局排版 <div class="security-code-wrap"> <label for="code"> <ul class="security-code-container"> <li class="field-wrap" v-for="(item, index) in num
-
Vue.js 的移动端组件库mint-ui实现无限滚动加载更多的方法
通过多次爬坑,发现了这些监听滚动来加载更多的组件的共同点, 因为这些加载更多的方法是绑定在需要加载更多的内容的元素上的, 所以是进入页面则直接触发一次,当监听到滚动事件之后,继续加载更多, 所以对于无限滚动加载不需要写首次载入列表的函数, 代码如下: html: //父组件 <div v-infinite-scroll="loadMore" infinite-scroll-disabled="loading" infinite-scroll-distance=
-
vue组件横向树实现代码
将之前的用css3+jq实现的横向树样式简单封装成组件使用到vue项目中,文件名为transverseTree.vue 代码: <template> <div class="tree"> <ul v-if="treeData && treeData.length"> <li v-for="(column,index) in treeData"> <span class=&quo
-
测试平台开发vue组件化重构前端代码
目录 基于 springboot+vue 的测试平台开发 一.为什么重构 二.如何拆分 1. 补充对应知识 2. 合理拆分 三.关于项目 基于 springboot+vue 的测试平台开发 继续更新(人在魔都 T_T). 这期其实并不是一个详细的开发过程记录,主要还是针对本次前端重构来聊聊几个关注点. 目前重构的总进度在80%,重构完的页面没什么变化,再回顾一下. 一.为什么重构 目前项目的功能开发重点还是在接口管理这一大块,内容多,任务重,可当我着手准备继续开发新功能的时候发现了个重大的问题.
-
vue实现文字横向无缝走马灯组件效果的实例代码
marquee标签已经废弃了,只能手动实现文字走马灯样式 基于vue组件开发 <template> <div class="wrap"> // 外框,固定宽度 <div id="box"> // 内部滚动框 <div id="marquee">{{text}}</div> //展示的文字 <div id="copy"></div> // 文字副
-
使用Vue实现一个树组件的示例
HTML代码: <!DOCTYPE html> <html> <head> <title>Vue Demo</title> <meta charset="utf-8" /> <meta http-equiv="X-UA-Compatible" content="IE=edge"> <meta name="viewport" content
-
Vue组件实例间的直接访问实现代码
前面的话 有时候需要父组件访问子组件,子组件访问父组件,或者是子组件访问根组件. 在组件实例中,Vue提供了相应的属性,包括$parent.$children.$refs和$root,这些属性都挂载在组件的this上.本文将详细介绍Vue组件实例间的直接访问 $parent $parent表示父组件的实例,该属性只读 下面是一个简易实例 <div id="example"> <parent-component></parent-component>
-
vue子父组件通信的实现代码
之前在用vue写子父组件通信的时候,老是遇到问题!!! 子组件传值给父组件: 子组件:通过emit方法给父组件传值,这里的upparent是父组件要定义的方法 模板: <div v-on:click="switchViewBtn">切换视图</div> 在data中定义:switchStatus = true; 方法: switchViewBtn(){ let that=this; this.$emit("parentView",that.s
-
Vue组件模板形式实现对象数组数据循环为树形结构(实例代码)
数据结构为数组中包含对象--树形结构,用Vue组件的写法实现以下的效果: 树形列表,缩进显示层级,第5级数据加底色,数据样式显色,点击展开折叠数据.本文为用Vue实现方式,另有一篇为用knockout.js的实现方法. html代码 <div id="table-component-div"> <table-component v-for="item in data1" v-bind:list="item"></ta
-
vue组件中使用iframe元素的示例代码
本文介绍了vue组件中使用iframe元素的示例代码,分享给大家,具体如下: 需要在本页面中展示vue组件中的超链接,地址栏不改变的方法: <template> <div class="accept-container"> <div class="go-back" v-show="goBackState" @click="goBack">GoBack</div> <ul&g
-
vue 基于element-ui 分页组件封装的实例代码
具体代码如下所示: <template> <el-pagination @size-change="handleSizeChange" @current-change="handleCurrentChange" :page-sizes="[10, 20, 30, 40]" :page-size="pageSize" layout="total, sizes, prev, pager, next, j
-
vue 父组件给子组件传值子组件给父组件传值的实例代码
父组件如何给子组件传值 使用props 举个例子: 子组件:fromTest.vue,父组件 app.vue fromTest.vue <template> <h2>{{title}}</h2> //title必须是父组件传递的 </template> <script> export default (){ props:["title"] //可以是数组,也可以是对象 //如何对title进行校验 //props:{ // t