vue实现简单购物车案例

本文实例为大家分享了vue实现简单购物车的具体代码,供大家参考,具体内容如下
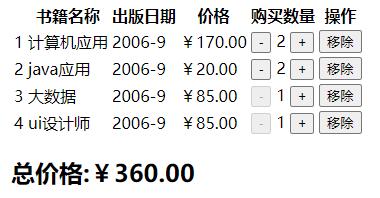
代码:

<!DOCTYPE html>
<html lang="en">

<head>
  <meta charset="UTF-8">
  <meta name="viewport" content="width=device-width, initial-scale=1.0">
  <meta http-equiv="X-UA-Compatible" content="ie=edge">
  <title>Document</title>
</head>

<body>
  <div id="app">
    <table>
      <thead>
        <tr>
          <th></th>
          <th>书籍名称</th>
          <th>出版日期</th>
          <th>价格</th>
          <th>购买数量</th>
          <th>操作</th>

        </tr>
      </thead>
      <tbody>
        <tr v-for='(item,index) in books' ::key="item">
          <td>{{item.id}}</td>
          <td>{{item.name}}</td>
          <td>{{item.date}}</td>
          <td>{{item.price*item.count | getFinalPrice}}</td>
          <td>
            <button @click='reduce(index)' :disabled='item.count <= 1'>-</button>
            {{item.count}}
            <button @click='add(index)'>+</button>

          </td>
          <td>
            <button @click='removeBtn(index)'>移除</button>
          </td>
        </tr>
      </tbody>
    </table>
    <h2 v-if='books!=""'>总价格:{{theSumOf | getFinalPrice}}</h2>
    <h2 v-else>购物车为空</h2>
  </div>
</body>
<script src="../js/vue.min.js"></script>
<script>
  var app = new Vue({
    el: '#app',
    data: {
      books: [
        {
          id: 1,
          name: '计算机应用',
          date: '2006-9',
          price: 85.00,
          count: 1

        },
        {
          id: 2,
          name: 'java应用',
          date: '2006-9',
          price: 10.00,
          count: 1

        },
        {
          id: 3,
          name: '大数据',
          date: '2006-9',
          price: 85.00,
          count: 1

        },
        {
          id: 4,
          name: 'ui设计师',
          date: '2006-9',
          price: 85.00,
          count: 1

        },
      ],
      addAnd:0

    },
    methods: {
      add(index) {
        this.books[index].count++

      },
      reduce(index) {

        this.books[index].count--

      },
      removeBtn(index) {
        this.books.splice(index, 1)

      }
    },
    components: {

    },
    computed: {

      theSumOf: function () {
      //累加计算的第一种方法
        //let sum = 0
        //this.books.forEach(item => {
        // sum += parseInt(item.price)*parseInt(item.count)
        });
        //return sum

 //累加计算的第二种方式
 //let sum = 0
 //for(let i in this.books){
  //sum += this.books[i].price*this.books[i]*count
 }
 //return sum

 //累加计算的第三种方式
 //let sum = 0
 //for(let item of this.books){
 //sum += item.price*item.count
 //}
 //return sum

 //累加计算的第四种方法
 return this.books.reduce(function(preValue,book){
 return preValue + book.price*book.count
 },0)
      }

    },
    filters: {
      getFinalPrice(price) {
        return '¥' + price.toFixed(2)
      },
    }
  });
</script>

<html>

关于vue.js的学习教程,请大家点击专题vue.js组件学习教程、Vue.js前端组件学习教程进行学习。

以上就是本文的全部内容,希望对大家的学习有所帮助,也希望大家多多支持我们。

(0)

相关推荐

  • vue+vant-UI框架实现购物车的复选框全选和反选功能

    购物车页面的设计图 商品的列表 代码: <ul v-if="shoppingListData.rows.length"> <li v-for="(item,index) in shoppingListData.rows" :key="index" > <van-checkbox :value="item.goods_id" v-model="item.isChecked" ch

  • Vue.js实现的购物车功能详解

    本文实例讲述了Vue.js实现的购物车功能.分享给大家供大家参考,具体如下: 使用计算属性,内置指令,方法等基础知识开发购物车. 需求分析:展示一个已经加入购物车的商品列表,包含商品名称.商品单价.购买数量和操作,以及最后确定是否选中商品的功能,总价格为选中商品的价格,够买数量可以增加减少,商品可以从购物车中移除.效果如图所示: --实例来自<Vue.js实战>第五章 逻辑整理:vue实例定义一个数组list存放商品信息,定义方法与减少按钮,增加按钮等联系,动态改变商品数量,通过handleR

  • vuejs手把手教你写一个完整的购物车实例代码

    由于我们公司是主营业务是海淘,所以每个项目都是类似淘宝天猫之类的商城,那么购物车就是一个重点开发功能模块.介于之前我都是用jq来写购物车的,这次就用vuejs来写一个购物车.下面我就从全选,数量控制器,运费,商品金额计算等方法来演示一下一个能用在实际场景的购物车是怎么做出来的以及记录一下这次用vuejs踩过的坑. 1.一层数据结构-全选 下面这段代码和vuejs官网里面checkbox绑定很像.不明白的可以直接上vuejs官网看看. <!DOCTYPE html> <html lang=

  • Vue实现购物车功能

    效果图: 代码如下: <!DOCTYPE html> <html> <head> <meta charset="utf-8"> <link rel="stylesheet" href="https://cdn.bootcss.com/bootstrap/3.0.2/css/bootstrap.min.css" rel="external nofollow" /> &l

  • vue 实现购物车总价计算

    效果如下所示: js <script type="text/javascript"> window.οnlοad=function () { var vm = new Vue({ el:'#huo', data:{ myList:[ { number:0, price:23 }, { number:0, price:14.5 }, { number:1, price:8 }, { number:0, price:20 } ], total:0, //总价 bestValue

  • 基于Vuejs实现购物车功能

    本文实例为大家分享了Vuejs购物车实现代码,供大家参考,具体内容如下 html: <!DOCTYPE html> <html lang="en"> <head> <meta charset="UTF-8"> <title>我的vue购物车</title> <link rel="stylesheet" href="css/bootstrap.min.css&q

  • vuex实现的简单购物车功能示例

    本文实例讲述了vuex实现的简单购物车功能.分享给大家供大家参考,具体如下: 购物车组件 <template> <div> <h1>vuex-shopCart</h1> <div class="shop-listbox"> <shop-list/> </div> <h2>已选商品</h2> <div class="shop-cartbox"> &l

  • Vuejs实现购物车功能

    开始更新前端框架Vue.JS的相关博客. 功能概述 学习了Vue.JS的一些基础知识,现在利用指令.数据绑定这些基础知识开发一个简单的购物车功能.功能要点如下: (1)展示商品的名称.单价和数量: (2)商品的数量可以增加和减少: (3)购物车的总价要实时更新,即数量发生变动,总价也要相应的改变: (4)商品可以从购物车中移除: (5)具有选择功能,只计算选中的商品的总价. 上一张截图,如下: 代码 代码分成三部分,分别是HTML.JS.CSS.关键的是HTML和JS. HTML <!DOCTY

  • vue实现购物车小案例

    本文实例为大家分享了vue实现购物车小案例的具体代码,供大家参考,具体内容如下 最终效果 HTML部分: <!doctype html> <html lang="en"> <head> <meta charset="UTF-8"> <title>shopcar.html</title> <script src="https://cdn.jsdelivr.net/npm/vue&q

  • vue实现商城购物车功能

    本文实例为大家分享了vue实现商城购物车功能的具体代码,供大家参考,具体内容如下 首先,先上最终的效果图 效果并不是很好看,但是这不是重点. 首先,我们先看下布局: <template> <div class="shopcar" id="demo04"> <div class="header-title"> <h3>购物车</h3> </div> <div class=

随机推荐