利用idea快速搭建一个spring-cloud(图文)
package com.example.consumer;

import org.springframework.boot.SpringApplication;
import org.springframework.boot.autoconfigure.SpringBootApplication;
import org.springframework.cloud.netflix.eureka.EnableEurekaClient;
import org.springframework.cloud.openfeign.EnableFeignClients;
import org.springframework.context.annotation.ComponentScan;
import org.springframework.stereotype.Component;
@SpringBootApplication

//扫描所有包
@ComponentScan("com.test")
//声明为注册服务
@EnableEurekaClient
//把调用注册子模块接口引入到Spring容器中(不加此注解会出现找不到@FeignClient修饰的接口)
@EnableFeignClients("com.test")//包路径解决启动类在别的包下问题

public class ConsumerApplication {

    public static void main(String[] args) {
        SpringApplication.run(ConsumerApplication.class, args);
    }

}
1、创建一个空的maven项目!


2、创建一个注册中心模块


3、配置注册中心

package com.example.eurekaserver;

import org.springframework.boot.SpringApplication;
import org.springframework.boot.autoconfigure.SpringBootApplication;
import org.springframework.cloud.netflix.eureka.server.EnableEurekaServer;

@SpringBootApplication
//声明为注册中心
@EnableEurekaServer
public class EurekaServerApplication {

    public static void main(String[] args) {
        SpringApplication.run(EurekaServerApplication.class, args);
    }

}
配置文件改用yml,配置如下:
server:
  #运行端口
  port: 8888
eureka:
  instance:
    #注册ip
    hostname: localhost
  client:
    #禁止自己当做服务注册
    register-with-eureka: false
    #屏蔽注册信息
    fetch-registry: false
    #注册url
    serviceUrl:
      defaultZone: http://${eureka.instance.hostname}:${server.port}/eureka/

启动成功后,访问本地+端口即可看到注册中心页面,说明成功啦!

3、创建一个服务提供者(就是常写的spring-boot)


服务提供者配置,如下:
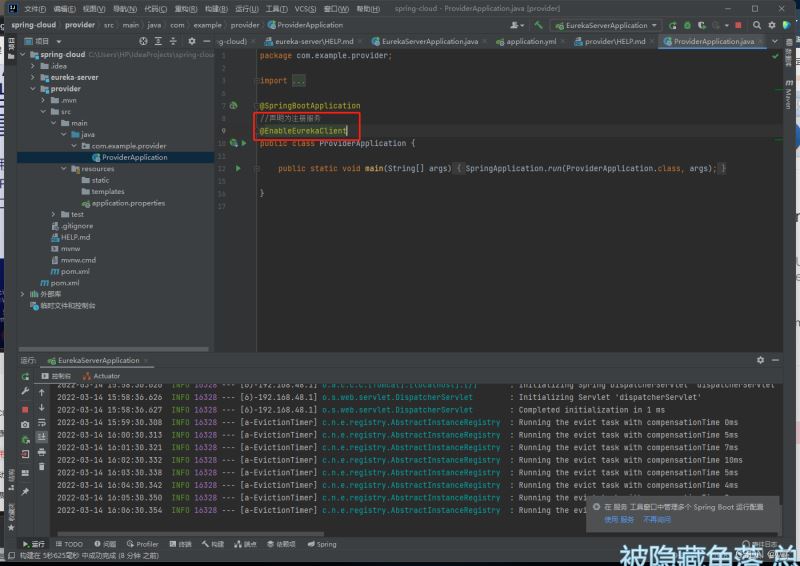
package com.example.provider;

import org.springframework.boot.SpringApplication;
import org.springframework.boot.autoconfigure.SpringBootApplication;
import org.springframework.cloud.netflix.eureka.EnableEurekaClient;

@SpringBootApplication
//声明为注册服务
@EnableEurekaClient
public class ProviderApplication {

    public static void main(String[] args) {
        SpringApplication.run(ProviderApplication.class, args);
    }

}
配置文件改用yml,配置如下:
eureka:
  client:
    serviceUrl:
      #服务注册地址
      defaultZone: http://localhost:8888/eureka/
server:
  #运行端口
  port: 8001
spring:
  application:
    #服务注册名称
    name: service-provider
按照写springboot那样写一个查库接口

package com.example.provider;

import org.mybatis.spring.annotation.MapperScan;
import org.springframework.boot.SpringApplication;
import org.springframework.boot.autoconfigure.SpringBootApplication;
import org.springframework.cloud.netflix.eureka.EnableEurekaClient;
import org.springframework.context.annotation.ComponentScan;

@SpringBootApplication
//声明为注册服务
@EnableEurekaClient
//扫描所有包
@ComponentScan("com.test")
//扫描mapper
@MapperScan("com.test.mapper")
public class ProviderApplication {

    public static void main(String[] args) {
        SpringApplication.run(ProviderApplication.class, args);
    }

}
yml配置
eureka:
  client:
    serviceUrl:
      #服务注册地址
      defaultZone: http://localhost:8888/eureka/
server:
  #运行端口
  port: 8001
spring:
  application:
    #服务注册名称
    name: service-provider
  #数据库链接
  datasource:
    username: root
    password: yh996112
    url: jdbc:mysql://localhost:3306/yanghao?useUnicode=true&characterEncoding=utf-8&useSSL=true&serverTimezone=UTC
    driver-class-name: com.mysql.cj.jdbc.Driver
#mybatis配置
mybatis:
  mapper-locations: classpath:mapper/*Mapper.xml
  type-aliases-package: com.test.doman

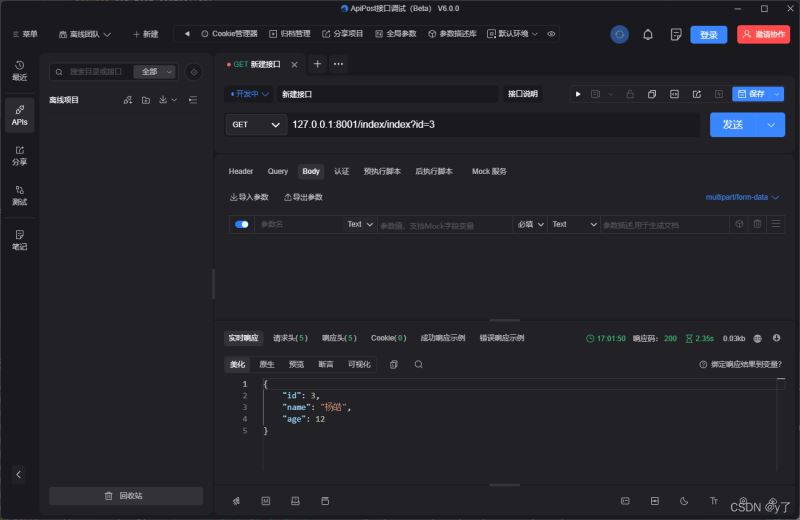
OK,查库然后接口返回数据成功!
咱们的服务也在注册中心中注册成功啦!

4、创建一个消费者服务

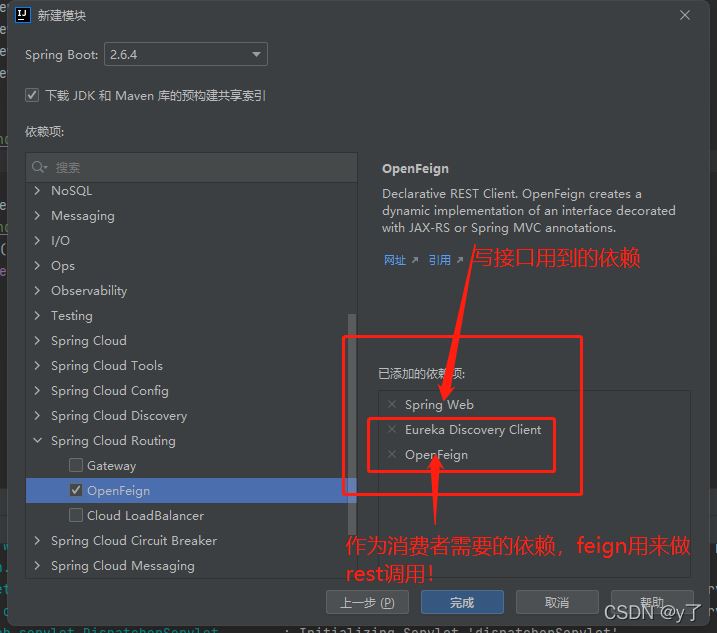
点击完成创建该模块
启动器配置

package com.example.consumer;

import org.springframework.boot.SpringApplication;
import org.springframework.boot.autoconfigure.SpringBootApplication;
import org.springframework.cloud.netflix.eureka.EnableEurekaClient;
import org.springframework.cloud.openfeign.EnableFeignClients;
import org.springframework.context.annotation.ComponentScan;
import org.springframework.stereotype.Component;

@SpringBootApplication
//声明为注册服务
@EnableEurekaClient
//把调用注册子模块接口引入到Spring容器中(不加此注解会出现找不到@FeignClient修饰的接口)
@EnableFeignClients
public class ConsumerApplication {

    public static void main(String[] args) {
        SpringApplication.run(ConsumerApplication.class, args);
    }

}
配置文件改用yml,配置如下:
eureka:
  client:
    serviceUrl:
      #服务注册地址
      defaultZone: http://localhost:8888/eureka/
server:
  #运行端口
  port: 8002
spring:
  application:
    #服务注册名称
    name: service-consumer
将服务提供者模块中的controller复制到消费者模块,如果涉及doman中文件就一并复制过去。


package com.example.consumer.service;

import com.example.consumer.doman.Test;
import org.springframework.cloud.openfeign.FeignClient;
import org.springframework.stereotype.Service;
import org.springframework.web.bind.annotation.GetMapping;
import org.springframework.web.bind.annotation.RequestParam;

/**
 * @Description:使用@FeignClient注解调用注册子模块接口方法
 * @Author :y
 */
//注册子模块名称
@FeignClient("service-provider")
public interface TestService {
    //接口访问地址
    @GetMapping("index/index")
    public Test getTest(@RequestParam("id") Integer id);
}
接口调用该service

启动消费者,进行接口测试!

访问消费者接口没有问题,成功的调用了服务提供者的接口返回了数据!!!
以上就是idea快速部署springCloud的全部过程,其中发现了一个问题,在消费者模块中启动器貌似无法使用@ComponentScan注解扫描包,使用后启动会报错???具有原因没有了解,建议不要把启动类放在别的包。
2022-03-14:该问题解决!
问题描述:

在消费者模块中,当启动类在别的包下时,使用@ComponentScan扫描包来自动javaBean
但是因为service接口中的@FeignClient注解同样不在启动类的包下,所以仅用@ComponentScan扫描包而找不到@FeignClient同样会报错的。
所以在启动类的@EnableFeignClients注解应该指定包去扫描一下!!!
消费者模块配置如下:

到此这篇关于利用idea快速搭建一个spring-cloud(图文)的文章就介绍到这了,更多相关idea搭建spring-cloud内容请搜索我们以前的文章或继续浏览下面的相关文章希望大家以后多多支持我们!
相关推荐
-

使用Idea简单快速搭建springcloud项目的图文教程
前言: 开发工具:IntelliJ IDEA 2020版 (Ultimate Edition) 框架:spring boot .spring cloud 搭建一套spring cloud微服务系统,实现服务之间的调用. 需要搭建一个父工程springcloud-test,一个服务注册中心eureka-server,两个微服务cloud-client,cloud-provider. 两个微服务均注册到服务注册中心. 一.搭建父项目 2. 3. (1)删掉src目录 (2)定义pom.xml文件 <
-
详解Idea SpringBoot搭建SpringCloud的准备工作(推荐)
1.编码设置 2.开启注解(让注解生效) 3.本项目编译运行版本 4.把不需要的文件隐藏(注意可以不用做,做了可以让项目看起来更加整洁干净清晰明了) 以上就是搭建一个SpringCloud之前的步骤. 二.SpringCloud父工程的依赖 <groupId>org.example</groupId> <artifactId>spring-cloud</artifactId> <version>1.0-SNAPSHOT</version&g
-
利用idea快速搭建一个spring-cloud(图文)
package com.example.consumer; import org.springframework.boot.SpringApplication; import org.springframework.boot.autoconfigure.SpringBootApplication; import org.springframework.cloud.netflix.eureka.EnableEurekaClient; import org.springframework.cloud
-
SpringBoot之Helloword 快速搭建一个web项目(图文)
背景: Spring Boot是由Pivotal团队提供的全新框架,其设计目的是用来简化新Spring应用的初始搭建以及开发过程.该框架使用了特定的方式来进行配置,从而使开发人员不再需要定义样板化的配置.通过这种方式,Spring Boot致力于在蓬勃发展的快速应用开发领域(rapid application development)成为领导者. Spring Boot(英文中是"引导"的意思),是用来简化Spring应用的搭建到开发的过程.应用开箱即用,只要通过 "just
-
利用5分钟快速搭建一个springboot项目的全过程
目录 前言 一.空项目 二.开始springboot之旅 三.总结 前言 现在开发中90%的人都在使用springboot进行开发,你有没有这样的苦恼,如果让你新建一个springboot开发环境的项目,总是很苦恼,需要花费很长时间去调试.今天来分享下如何快速搭建. 一.空项目 现在开发过程中大都是idea这个集成开发环境,笔者之前也是很执拗,一直使用的是eclipse,后来也是公司需要转到了idea,不得不说idea确实好用,没用过的小伙伴可以尝试.这里以idea为演示环境. 我一般都是从一个
-
微服务搭建集成Spring Cloud Turbine详解
1.概述 本文中,我将向你介绍Spring Cloud Netflix Turbine.它将多个Hystrix Metrics Streams 聚合为一个,以便显示在一个仪表板视图中. 简要介绍Hystrix . 在微服务架构中,我们有许多小应用程序相互通信以完成请求.这些下游服务有可能无法正确响应或完全失败.为了防止发生级联故障,我们为微服务设置了Hystrix回退机制. 每个实现Hystrix的微服务都可以选择公开Hystrix Metrics Streams(通过actuator端点/hy
-
IDEA 中 30 秒创建一个 Spring Cloud Alibaba 工程
如果你想使用 Spring Cloud Alibaba,那么你遇到的第一个问题一定是如何快速的创建一个脚手架工程. 近日,阿里巴巴发布了 Spring 的国内脚手架定制版 Aliyun Java Initializer,因为全中文界面和流畅速度,被广大开发者热传.Spring 脚手架为开发者提供了丰富的可选组件,并且可以选择多种打包方式,大大方便了开发人员的使用.Web 端 Spring 脚手架可以帮助用户快速上手,但很多开发者也面临一个问题:在 Web 版本 Spring 脚手架生成工程最终要
-
如何快速搭建一个自己的服务器的详细教程(java环境)
一. 服务器的购买 1. 我选择的是阿里云的服务器,学生价9.5元一个月,百度直接搜索阿里云,然后点击右上角登录,推荐大家用支付宝扫码登录,方便快捷.阿里云官网的东西比较多,登录后我找了很久也没有找到学生服务器在哪里卖,最后在咨询里找到了这个网址,https://promotion.aliyun.com/ntms/campus2017.html,购买的时候需要进行学生认证,按照他的要求一步步来就好,认证大概需要几个小时.如果你不是学生那就直接购买ecs服务器就好,首页就可以看到ecs服务器的
-
IDEA快速搭建jsp项目的图文教程
推荐教程 idea2021激活 idea2020.3最新激活 idea无限重置 IDEA搭建jsp环境 为了方便在IDEA中集成tomcat环境搭建好WEB的jsp项目 先讲解原理: 首先在IDEA中加入WEB模块 配置IDEA将WEB模块打包,运行tomcat时会编译,打包到一个文件夹路径 配置Tomcat服务器,通过IDEA将打包后的项目(编译的输出路径)部署到tomcat 第一步.去除原先的WEB模块 第二步.添加Web模块 指定正确的web.xml位置 第三步将web模块进行打包 第四步
-
快速搭建一个SpringBoot项目(纯小白搭建教程)
目录 零.环境介绍 一.手把手创建 1.创建步骤 2.启动类和测试编写 2.1 项目结构 2.2 创建启动类DemoApplication 2.3 测试 二.依赖工具创建 零.环境介绍 环境:jdk1.8及以上,maven,Win10,IDEA,网络 一.手把手创建 请求创建在启动类所在的包里面,才能顺利启动 1.创建步骤 看图,有手就行 之后得到的就是一个maven项目,目录结构如下: 之后添加依赖,springboot的核心依赖.SpringBoot提供了一个名为spring-boot-st
-
用Go+Vue.js快速搭建一个Web应用(初级demo)
Vue.js做为目前前端最热门的库之一,为快速构建并开发前端项目多了一种思维模式.本文给大家介绍用Go+Vue.js快速搭建一个Web应用(初级demo). 环境准备: 1. 安装go语言,配置go开发环境: 2. 安装node.js以及npm环境: Gin的使用: 为了快速搭建后端应用,采用了Gin作为Web框架.Gin是用Golang实现的一种Web框架,api非常友好,且拥有出色的路由性能和详细的错误提示,如果你想快速开发一个高性能的生产环境,Gin是一个不错的选择. 下载和安装Gin: