Pytorch中torch.nn.Softmax的dim参数用法说明
Pytorch中torch.nn.Softmax的dim参数使用含义
涉及到多维tensor时,对softmax的参数dim总是很迷,下面用一个例子说明
import torch.nn as nn
m = nn.Softmax(dim=0)
n = nn.Softmax(dim=1)
k = nn.Softmax(dim=2)
input = torch.randn(2, 2, 3)
print(input)
print(m(input))
print(n(input))
print(k(input))
输出:
input
tensor([[[ 0.5450, -0.6264, 1.0446],
[ 0.6324, 1.9069, 0.7158]],[[ 1.0092, 0.2421, -0.8928],
[ 0.0344, 0.9723, 0.4328]]])
dim=0
tensor([[[0.3860, 0.2956, 0.8741],
[0.6452, 0.7180, 0.5703]],[[0.6140, 0.7044, 0.1259],
[0.3548, 0.2820, 0.4297]]])
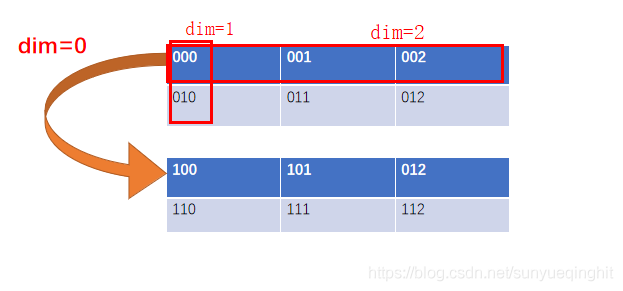
dim=0时,在第0维上sum=1,即:
[0][0][0]+[1][0][0]=0.3860+0.6140=1
[0][0][1]+[1][0][1]=0.2956+0.7044=1
… …
dim=1
tensor([[[0.4782, 0.0736, 0.5815],
[0.5218, 0.9264, 0.4185]],[[0.7261, 0.3251, 0.2099],
[0.2739, 0.6749, 0.7901]]])
dim=1时,在第1维上sum=1,即:
[0][0][0]+[0][1][0]=0.4782+0.5218=1
[0][0][1]+[0][1][1]=0.0736+0.9264=1
… …
dim=2
tensor([[[0.3381, 0.1048, 0.5572],
[0.1766, 0.6315, 0.1919]],[[0.6197, 0.2878, 0.0925],
[0.1983, 0.5065, 0.2953]]])
dim=2时,在第2维上sum=1,即:
[0][0][0]+[0][0][1]+[0][0][2]=0.3381+0.1048+0.5572=1.0001(四舍五入问题)
[0][1][0]+[0][1][1]+[0][1][2]=0.1766+0.6315+0.1919=1
… …
用图表示223的张量如下:
多分类问题torch.nn.Softmax的使用
为什么谈论这个问题呢?是因为我在工作的过程中遇到了语义分割预测输出特征图个数为16,也就是所谓的16分类问题。
因为每个通道的像素的值的大小代表了像素属于该通道的类的大小,为了在一张图上用不同的颜色显示出来,我不得不学习了torch.nn.Softmax的使用。
首先看一个简答的例子,倘若输出为(3, 4, 4),也就是3张4x4的特征图。
import torch
img = torch.rand((3,4,4))
print(img)
输出为:
tensor([[[0.0413, 0.8728, 0.8926, 0.0693],
[0.4072, 0.0302, 0.9248, 0.6676],
[0.4699, 0.9197, 0.3333, 0.4809],
[0.3877, 0.7673, 0.6132, 0.5203]],[[0.4940, 0.7996, 0.5513, 0.8016],
[0.1157, 0.8323, 0.9944, 0.2127],
[0.3055, 0.4343, 0.8123, 0.3184],
[0.8246, 0.6731, 0.3229, 0.1730]],[[0.0661, 0.1905, 0.4490, 0.7484],
[0.4013, 0.1468, 0.2145, 0.8838],
[0.0083, 0.5029, 0.0141, 0.8998],
[0.8673, 0.2308, 0.8808, 0.0532]]])
我们可以看到共三张特征图,每张特征图上对应的值越大,说明属于该特征图对应类的概率越大。
import torch.nn as nn
sogtmax = nn.Softmax(dim=0)
img = sogtmax(img)
print(img)
输出为:
tensor([[[0.2780, 0.4107, 0.4251, 0.1979],
[0.3648, 0.2297, 0.3901, 0.3477],
[0.4035, 0.4396, 0.2993, 0.2967],
[0.2402, 0.4008, 0.3273, 0.4285]],[[0.4371, 0.3817, 0.3022, 0.4117],
[0.2726, 0.5122, 0.4182, 0.2206],
[0.3423, 0.2706, 0.4832, 0.2522],
[0.3718, 0.3648, 0.2449, 0.3028]],[[0.2849, 0.2076, 0.2728, 0.3904],
[0.3627, 0.2581, 0.1917, 0.4317],
[0.2543, 0.2898, 0.2175, 0.4511],
[0.3880, 0.2344, 0.4278, 0.2686]]])
可以看到,上面的代码对每张特征图对应位置的像素值进行Softmax函数处理, 图中标红位置加和=1,同理,标蓝位置加和=1。
我们看到Softmax函数会对原特征图每个像素的值在对应维度(这里dim=0,也就是第一维)上进行计算,将其处理到0~1之间,并且大小固定不变。
print(torch.max(img,0))
输出为:
torch.return_types.max(
values=tensor([[0.4371, 0.4107, 0.4251, 0.4117],
[0.3648, 0.5122, 0.4182, 0.4317],
[0.4035, 0.4396, 0.4832, 0.4511],
[0.3880, 0.4008, 0.4278, 0.4285]]),
indices=tensor([[1, 0, 0, 1],
[0, 1, 1, 2],
[0, 0, 1, 2],
[2, 0, 2, 0]]))
可以看到这里3x4x4变成了1x4x4,而且对应位置上的值为像素对应每个通道上的最大值,并且indices是对应的分类。
清楚理解了上面的流程,那么我们就容易处理了。
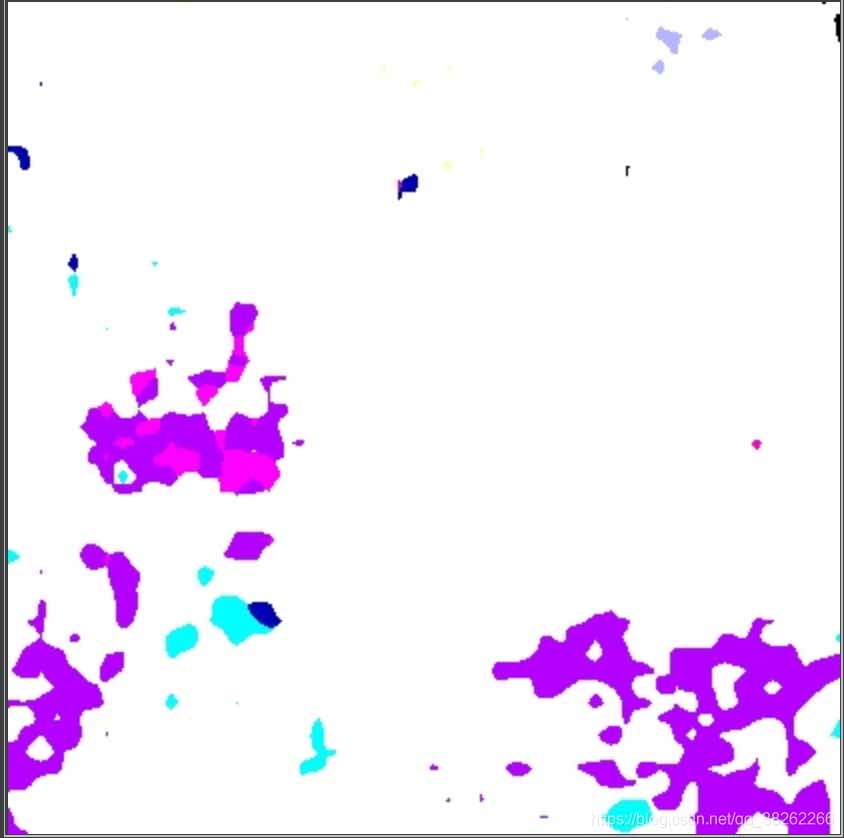
看具体案例,这里输出output的大小为:16x416x416.
output = torch.tensor(output)
sm = nn.Softmax(dim=0)
output = sm(output)
mask = torch.max(output,0).indices.numpy()

# 因为要转化为RGB彩色图,所以增加一维
rgb_img = np.zeros((output.shape[1], output.shape[2], 3))
for i in range(len(mask)):
    for j in range(len(mask[0])):
        if mask[i][j] == 0:
            rgb_img[i][j][0] = 255
            rgb_img[i][j][1] = 255
            rgb_img[i][j][2] = 255
        if mask[i][j] == 1:
            rgb_img[i][j][0] = 255
            rgb_img[i][j][1] = 180
            rgb_img[i][j][2] = 0
        if mask[i][j] == 2:
            rgb_img[i][j][0] = 255
            rgb_img[i][j][1] = 180
            rgb_img[i][j][2] = 180
        if mask[i][j] == 3:
            rgb_img[i][j][0] = 255
            rgb_img[i][j][1] = 180
            rgb_img[i][j][2] = 255
        if mask[i][j] == 4:
            rgb_img[i][j][0] = 255
            rgb_img[i][j][1] = 255
            rgb_img[i][j][2] = 180
        if mask[i][j] == 5:
            rgb_img[i][j][0] = 255
            rgb_img[i][j][1] = 255
            rgb_img[i][j][2] = 0
        if mask[i][j] == 6:
            rgb_img[i][j][0] = 255
            rgb_img[i][j][1] = 0
            rgb_img[i][j][2] = 180
        if mask[i][j] == 7:
            rgb_img[i][j][0] = 255
            rgb_img[i][j][1] = 0
            rgb_img[i][j][2] = 255
        if mask[i][j] == 8:
            rgb_img[i][j][0] = 255
            rgb_img[i][j][1] = 0
            rgb_img[i][j][2] = 0
        if mask[i][j] == 9:
            rgb_img[i][j][0] = 180
            rgb_img[i][j][1] = 0
            rgb_img[i][j][2] = 0
        if mask[i][j] == 10:
            rgb_img[i][j][0] = 180
            rgb_img[i][j][1] = 255
            rgb_img[i][j][2] = 255
        if mask[i][j] == 11:
            rgb_img[i][j][0] = 180
            rgb_img[i][j][1] = 0
            rgb_img[i][j][2] = 180
        if mask[i][j] == 12:
            rgb_img[i][j][0] = 180
            rgb_img[i][j][1] = 0
            rgb_img[i][j][2] = 255
        if mask[i][j] == 13:
            rgb_img[i][j][0] = 180
            rgb_img[i][j][1] = 255
            rgb_img[i][j][2] = 180
        if mask[i][j] == 14:
            rgb_img[i][j][0] = 0
            rgb_img[i][j][1] = 180
            rgb_img[i][j][2] = 255
        if mask[i][j] == 15:
            rgb_img[i][j][0] = 0
            rgb_img[i][j][1] = 0
            rgb_img[i][j][2] = 0

cv2.imwrite('output.jpg', rgb_img)
最后保存得到的图为:
以上为个人经验,希望能给大家一个参考,也希望大家多多支持我们。
相关推荐
-
PyTorch: Softmax多分类实战操作
多分类一种比较常用的做法是在最后一层加softmax归一化,值最大的维度所对应的位置则作为该样本对应的类.本文采用PyTorch框架,选用经典图像数据集mnist学习一波多分类. MNIST数据集 MNIST 数据集(手写数字数据集)来自美国国家标准与技术研究所, National Institute of Standards and Technology (NIST). 训练集 (training set) 由来自 250 个不同人手写的数字构成, 其中 50% 是高中学生, 50% 来自人口
-
Pytorch中Softmax和LogSoftmax的使用详解
一.函数解释 1.Softmax函数常用的用法是指定参数dim就可以: (1)dim=0:对每一列的所有元素进行softmax运算,并使得每一列所有元素和为1. (2)dim=1:对每一行的所有元素进行softmax运算,并使得每一行所有元素和为1. class Softmax(Module): r"""Applies the Softmax function to an n-dimensional input Tensor rescaling them so that th
-
浅谈pytorch中torch.max和F.softmax函数的维度解释
在利用torch.max函数和F.Ssoftmax函数时,对应该设置什么维度,总是有点懵,遂总结一下: 首先看看二维tensor的函数的例子: import torch import torch.nn.functional as F input = torch.randn(3,4) print(input) tensor([[-0.5526, -0.0194, 2.1469, -0.2567], [-0.3337, -0.9229, 0.0376, -0.0801], [ 1.4721, 0.1
-

Pytorch中torch.nn.Softmax的dim参数用法说明
Pytorch中torch.nn.Softmax的dim参数使用含义 涉及到多维tensor时,对softmax的参数dim总是很迷,下面用一个例子说明 import torch.nn as nn m = nn.Softmax(dim=0) n = nn.Softmax(dim=1) k = nn.Softmax(dim=2) input = torch.randn(2, 2, 3) print(input) print(m(input)) print(n(input)) print(k(inp
-
PyTorch中torch.nn.functional.cosine_similarity使用详解
目录 概述 按照dim=0求余弦相似: 按照dim=1求余弦相似: 总结 概述 根据官网文档的描述,其中 dim表示沿着对应的维度计算余弦相似.那么怎么理解呢? 首先,先介绍下所谓的dim: a = torch.tensor([[ [1, 2], [3, 4] ], [ [5, 6], [7, 8] ] ], dtype=torch.float) print(a.shape) """ [ [ [1, 2], [3, 4] ], [ [5, 6], [7, 8] ] ] &qu
-
PyTorch中torch.nn.Linear实例详解
目录 前言 1. nn.Linear的原理: 2. nn.Linear的使用: 3. nn.Linear的源码定义: 补充:许多细节需要声明 总结 前言 在学习transformer时,遇到过非常频繁的nn.Linear()函数,这里对nn.Linear进行一个详解.参考:https://pytorch.org/docs/stable/_modules/torch/nn/modules/linear.html 1. nn.Linear的原理: 从名称就可以看出来,nn.Linear表示的是线性变
-
pytorch中torch.max和Tensor.view函数用法详解
torch.max() 1. torch.max()简单来说是返回一个tensor中的最大值. 例如: >>> si=torch.randn(4,5) >>> print(si) tensor([[ 1.1659, -1.5195, 0.0455, 1.7610, -0.2064], [-0.3443, 2.0483, 0.6303, 0.9475, 0.4364], [-1.5268, -1.0833, 1.6847, 0.0145, -0.2088], [-0.86
-
Pytorch中torch.flatten()和torch.nn.Flatten()实例详解
torch.flatten(x)等于torch.flatten(x,0)默认将张量拉成一维的向量,也就是说从第一维开始平坦化,torch.flatten(x,1)代表从第二维开始平坦化. import torch x=torch.randn(2,4,2) print(x) z=torch.flatten(x) print(z) w=torch.flatten(x,1) print(w) 输出为: tensor([[[-0.9814, 0.8251], [ 0.8197, -1.0426], [-
-
Pytorch中实现只导入部分模型参数的方式
我们在做迁移学习,或者在分割,检测等任务想使用预训练好的模型,同时又有自己修改之后的结构,使得模型文件保存的参数,有一部分是不需要的(don't expected).我们搭建的网络对保存文件来说,有一部分参数也是没有的(missed).如果依旧使用torch.load(model.state_dict())的办法,就会出现 xxx expected,xxx missed类似的错误.那么在这种情况下,该如何导入模型呢? 好在Pytorch中的模型参数使用字典保存的,键是参数的名称,值是参数的具体数
-
pytorch1.0中torch.nn.Conv2d用法详解
Conv2d的简单使用 torch 包 nn 中 Conv2d 的用法与 tensorflow 中类似,但不完全一样. 在 torch 中,Conv2d 有几个基本的参数,分别是 in_channels 输入图像的深度 out_channels 输出图像的深度 kernel_size 卷积核大小,正方形卷积只为单个数字 stride 卷积步长,默认为1 padding 卷积是否造成尺寸丢失,1为不丢失 与tensorflow不一样的是,pytorch中的使用更加清晰化,我们可以使用这种方法定义输
-
pytorch中的nn.ZeroPad2d()零填充函数实例详解
在卷积神经网络中,有使用设置padding的参数,配合卷积步长,可以使得卷积后的特征图尺寸大小不发生改变,那么在手动实现图片或特征图的边界零填充时,常用的函数是nn.ZeroPad2d(),可以指定tensor的四个方向上的填充,比如左边添加1dim.右边添加2dim.上边添加3dim.下边添加4dim,即指定paddin参数为(1,2,3,4),本文中代码设置的是(3,4,5,6)如下: import torch.nn as nn import cv2 import torchvision f
-
python中torch.nn.identity()方法详解
目录 先看代码 看源码 应用 总结 先看代码 m = nn.Identity( 54, unused_argument1=0.1, unused_argument2=False ) input = torch.randn(128, 20) output = m(input) >>> print(output.size()) torch.Size([128, 20]) 这是官方文档中给出的代码,很明显,没有什么变化,输入的是torch,输出也是,并且给定的参数似乎并没有起到变化的效果. 看