Spring-IOC容器中的常用注解与使用方法详解
Spring是什么?
Spring是一个轻量级Java开发框架,最早有Rod Johnson创建,目的是为了解决企业级应用开发的业务逻辑层和其他各层的耦合问题。它是一个分层的JavaSE/JavaEE full-stack(一站式)轻量级开源框架,为开发Java应用程序提供全面的基础架构支持。Spring负责基础架构,因此Java开发者可以专注于应用程序的开发。
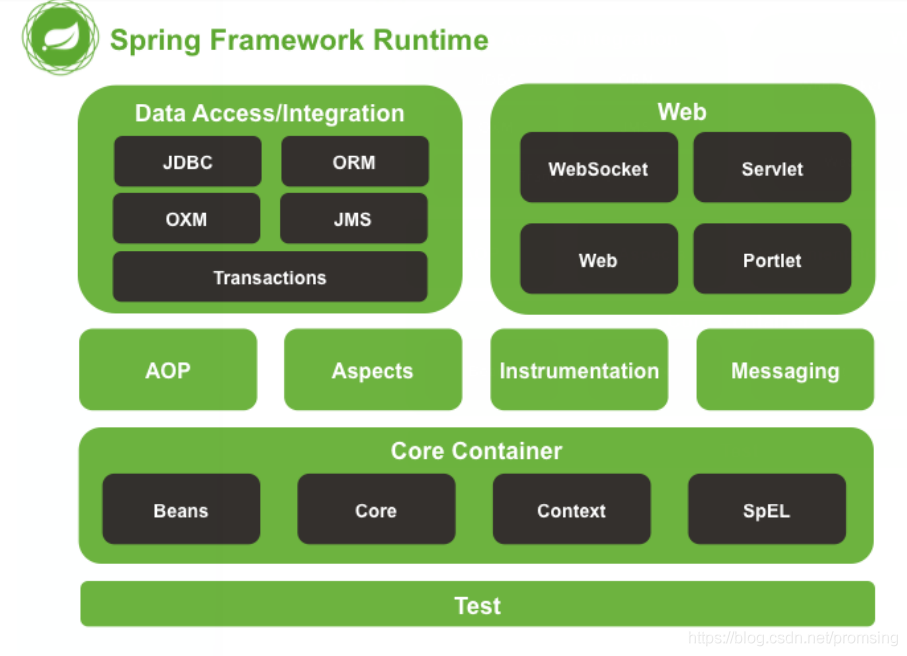
体系结构

核心容器(Core Container):Spring的核心容器是其他模块建立的基础,有Spring-core、Spring-beans、Spring-context、Spring-context-support和Spring-expression(String表达式语言)等模块组成
数据访问/集成(Data Access)层:数据访问/集成层由JDBC、ORM、OXM、JMS和事务模块组成。
Web层:Web层由Spring-web、Spring-webmvc、Spring-websocket和Portlet模块组成。
AOP(Aspect Oriented Programming)模块:提供了一个符合AOP要求的面向切面的编程实现,允许定义方法拦截器和切入点,将代码按照功能进行分离,以便干净地解耦。
植入(Instrumentation)模块:提供了类植入(Instrumentation)支持和类加载器的实现,可以在特定的应用服务器中使用。
消息传输(Messaging):Spring4.0以后新增了消息(Spring-messaging)模块,该模块提供了对消息传递体系结构和协议的支持。
测试(Test)模块:Spring-test模块支持使用JUnit或TestNG对Spring组件进行单元测试和集成测试。
引入Jar包
<dependencies>
        <!--spring的jar包 -->
        <dependency>
            <groupId>org.springframework</groupId>
            <artifactId>spring-context</artifactId>
            <version>5.0.11.RELEASE</version>
        </dependency>
        <dependency>
            <groupId>org.springframework</groupId>
            <artifactId>spring-test</artifactId>
            <version>5.0.11.RELEASE</version>
        </dependency>
        <dependency>
            <groupId>org.springframework</groupId>
            <artifactId>spring-tx</artifactId>
            <version>5.0.11.RELEASE</version>
        </dependency>
</dependencies>
导入约束
<?xml version="1.0" encoding="UTF-8"?>
<beans xmlns="http://www.springframework.org/schema/beans"
       xmlns:xsi="http://www.w3.org/2001/XMLSchema-instance"
       xmlns:context="http://www.springframework.org/schema/context"
       xsi:schemaLocation="http://www.springframework.org/schema/beans
            http://www.springframework.org/schema/beans/spring-beans.xsd
            http://www.springframework.org/schema/context
            http://www.springframework.org/schema/context/spring-context.xsd">
       <!--spring的约束 -->
    <!--把对象的创建交给Spring来管理 -->
    <!--获取容器中对象时使用id-->
   <!-- <bean id="accountServiceImpl" class="com.dynamic2.service.Impl.AccountServiceImpl"></bean>
    <bean id="accountDaoImpl" class="com.dynamic2.dao.Impl.AccountDaoImpl"></bean>-->

    <context:component-scan base-package="com.dynamic2"></context:component-scan>

</beans>
常见注解
用于创建对象
@Component:把资源让spring来管理。相当于xml中配置一个bean。value:指定bean的id,如果不指定value属性,默认bean的id是当前类的类名。首字母小写
@Controller:与@Component功能一样,一般用在表现层,便于分层
@Service:与@Component功能一样,一般用在业务层,便于分层
@Repository:与@Component功能一样,一般用于持久层,便于分层
/**
 * @Author: Promsing
 * @Date: 2021/3/19 - 11:34
 * @Description: 用于创建对象
 * @version: 1.0
 *  XML配置 <bean id="accountServiceImpl" class="com.dynamic2.service.Impl.AccountServiceImpl"></bean>
 */
@Repository("accountDao ")
public class AccountDaoImpl implements IAccountDao {
            ......
}

@Service("accountService")
public class AccountServiceImpl implements IAccountService {
            ......
}

@Component("accountServiceImpl")
@Scope("prototype")//多例
public class AccountServiceImpl2 implements IAccountService {
             ......
}
用于注入数据
@Autowired:自动按照类型注入。当使用注解注入属性时,set方法可以省略。它只能注入其他bean类型。当有多个类型匹配时。使用要注入的对象变量名称作为bean的id,在spring容器中查找,找到了注入成功,找不到就报错。
@Qualifier:在自动按照类型注入的基础上,再按照Bean的id注入。它在给字段注入时不能单独使用,必须和@Autowire一起使用;但是给方法参数注入时,可以单独使用。value属性是指定Bean的id
@Resource:直接按照Bean的id注入。它也只能注入其他Bean类型。name属性是指定Bean的id
@Value:注入基本数据类型和String类型数据
/**
 * @Author: Promsing
 * @Date: 2021/3/19 - 11:34
 * @Description: 用于创建对象
 * @version: 1.0
 *  XML配置 <bean id="accountServiceImpl" class="com.dynamic2.service.Impl.AccountServiceImpl"></bean>
 */
@Component("accountServiceImpl")
@Scope("prototype")//多例
public class AccountServiceImpl implements IAccountService {

    //注入成员变量
   /* @Autowired  自动按照类型注入--寻找类型
    @Qualifier("accountDao2")*/ //寻找id

    //以上两个注解相加的作用等于这个
    @Resource(name = "accountDao2")
    private IAccountDao accountDao2;

    @Override
    public void saveAccount() {
        accountDao2.saveAccount();
        //System.out.println("service中的saveAccount执行了~~");
    }

}
用于改变作用范围
@Scope:指定Bean的作用范围。value属性指定范围的值--singleton单例,prototype多例,request作用与web应用的请求范围,session作用与web应用的会话范围,global-session作用与集群环境中会话范围
@Component("accountServiceImpl")
@Scope("prototype")//多例
public class AccountServiceImpl implements IAccountService {

    ......

}
和生命周期相关(了解)
@PostConstruct:用于指定初始化方法
@PreDestroy:用于指定销毁方法
Spring5
@Configuration:用于指定当前类是一个spring配置类,当有容器时会从该类上加载注解。获取容器是使用AnnotationApplicationContext(有@Configuration注解的类.class)
@ComponentScan:用于指定spring在初始化容器时要扫描的包。作用和在spring的xml配置文件找那个的<context : component-sacn base-package="com.dynamic"/>
@Bean:该注解只用用在方法上,表明使用此方法创建一个对象,并且放入spring容器中
@Import:用于导入其他配置类,解耦合
/**
 * @Author: Promsing
 * @Date: 2021/3/28 - 0:36
 * @Description: Spring配置类
 * @version: 1.0
 */
@Configuration//指定当前类是一个配置类
@ComponentScan("com.dynamic_transaction_anno")//用于指定spring在初始化容器时需要扫描的包
@Import({JdbcConfig.class,TransactionConfig.class})//导入其他配置类
@EnableTransactionManagement//开启spring注解事务的支持
public class SpringConfig {

    @Bean("jdbcTemplate")
    public JdbcTemplate createJdbcTemplate(DataSource ds){
        return new JdbcTemplate(ds);
    }
    @Bean("dataSource")
    public DataSource createDataSource(){
        DriverManagerDataSource dr=new DriverManagerDataSource();
        dr.setDriverClassName("com.mysql.jdbc.Driver");//com.mysql.jdbc.Driver
        dr.setUrl("jdbc:mysql//localhost:330b/eesy");
        dr.setUsername("root");
        dr.setPassword("root");
        return dr;
    }
}
Spring整合Junit
@RunWith:替代原有的运行器
@ContextConfiguration:指定配置文件的位置
@RunWith(SpringJUnit4ClassRunner.class)//替代原有运行器
@ContextConfiguration(classes=SpringConfiguration.class)//指定配置类
public class AccountServiceTest {
    @Test
    public void testFindAll(){
       //执行测试方法

    }
}
从IOC容器中获取对象
/**
 * @Author: Promsing
 * @Date: 2021/3/21 - 11:22
 * @Description: 单元测试
 * @version: 1.0
 */
@RunWith(SpringJUnit4ClassRunner.class)
@ContextConfiguration(classes=SpringConfiguration.class)
public class AccountServiceTest {

      @Resource(name = "accountServiceImpl")
      private IAccountService accountService;
    @Test
    //从容器中获取对象
    public void test(){
        //一、获取容器
        //使用配置文件加载
        ApplicationContext ac=new ClassPathXmlApplicationContext("bean3_1.xml");
        //使用配置类加载
      ///  ApplicationContext ac=new AnnotationConfigApplicationContext(SpringConfiguration.class);
        //二、获取对象
         accountService=(IAccountService)ac.getBean("accountServiceImpl",IAccountService.class);
        //三、执行方法
        List<Account> allAccounts = accountService.findAllAccount();
        for (Account allAccount : allAccounts) {
            System.out.println(allAccount);
        }
    }
}
到此这篇关于Spring-IOC容器中的常用注解与使用方法详解的文章就介绍到这了,更多相关Spring-IOC注解使用内容请搜索我们以前的文章或继续浏览下面的相关文章希望大家以后多多支持我们!

