【图文】Blackice防火墙的下载安装与设置教程
这里为大家介绍的是一个防火墙BlackIce防火墙。。。
其实这个防火墙呢有几个方面的优点;我个人推荐blackice防火墙,blackice有两个版本,一个是单机版,一个是服务器版,这两个版本的主要区别就是在于服务器版功能多一点。。。
这款防火墙里面的设置很细,他是以安全为主的,为什么这么说呢。因为他先把要进出的端口进行了严格的控制与设置。。。
与别的防火墙不一样的地方可能就是他先封闭所有的端口,然后有需要再进行打开某个端口或是IP。否则不让通行。。
相信对于个人跟安全意识不高的人来说,这款防火墙很不错的,(唯一认为难看的可能是图标不怎么样吧)
我这里给出了这两个软件的下载地址,
软件名称 BlackICE PC Protection v3.6 coo 汉化版
地址:http://down.egogoo.com/software/5893.Html
软件名称 BlackICE PC Server v3.6 coo 汉化版
地址:http://www.crsky.com/soft/1550.html
这里我主要讲解一下软件的安装及过程中需要哪些注意的。。。
我就讲解一下服务器版的吧。因为服务器版的里面包含了专业版的功能。。。服务器版功能多了一点,所以如果服务器版能够很熟练的设置与使用,相信专业版也是一样可以用得得心应手的。。
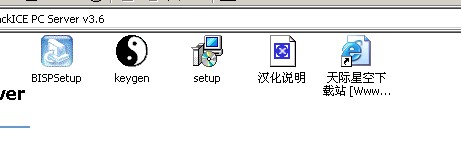
这个是我们下载下来的文件会在里面看到如图1
 screen.width*0.7) {this.resized=true; this.width=screen.width*0.7; this.alt='Click here to open new window';}" border=0>
第一个文件是就是安装软件。。第二个是个KEY,第三个是BLACKICE汉化软件。
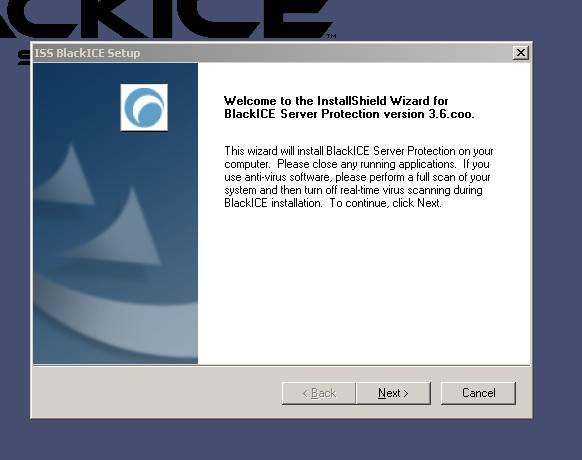
双击安装出现图2
 screen.width*0.7) {this.resized=true; this.width=screen.width*0.7; this.alt='Click here to open new window';}" border=0>
直接NEXT
这个意思是说一些欢迎的词,每个软件都有的,
出现图3
 screen.width*0.7) {this.resized=true; this.width=screen.width*0.7; this.alt='Click here to open new window';}" border=0>
我们是否同意安装,先I Accept
出现如下。。
图4
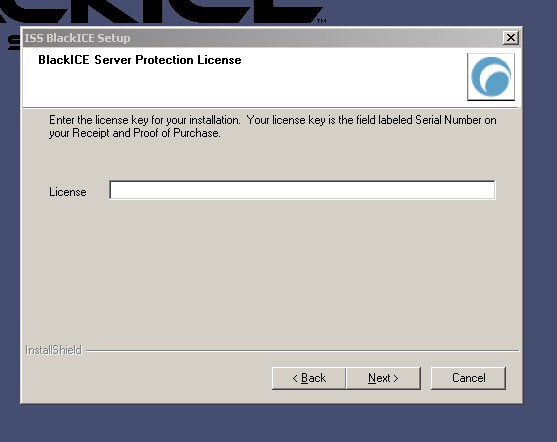 screen.width*0.7) {this.resized=true; this.width=screen.width*0.7; this.alt='Click here to open new window';}" border=0>
这里需要我们注册码:34519A2-RS-E4A0B(这个注册码单机版也可以用)
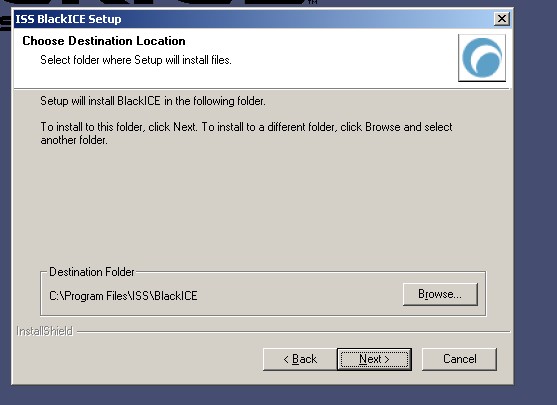
输入之后再NTXT如图5
 screen.width*0.7) {this.resized=true; this.width=screen.width*0.7; this.alt='Click here to open new window';}" border=0>
告诉我们要安装在哪个盘子里,我们就默认装在C盘下面。。
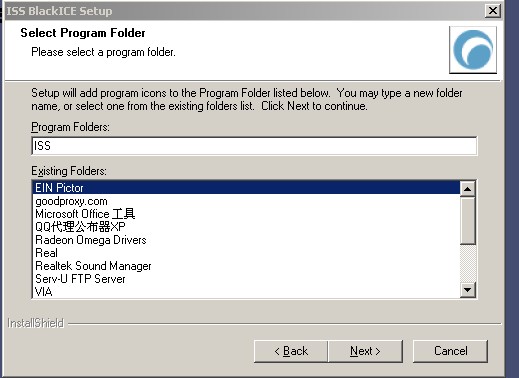
next图6
 screen.width*0.7) {this.resized=true; this.width=screen.width*0.7; this.alt='Click here to open new window';}" border=0>
这个都不去管它,因应大家都知道吧。。选择下面的程序,直接NEXT
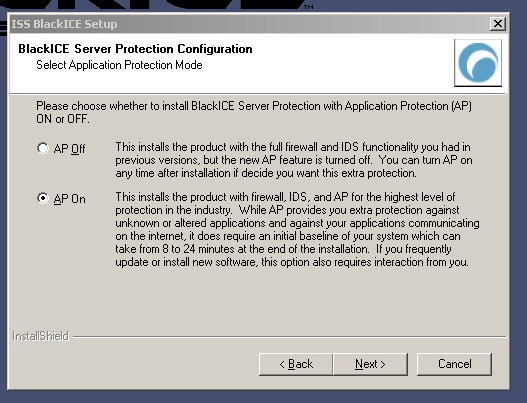
图7
 screen.width*0.7) {this.resized=true; this.width=screen.width*0.7; this.alt='Click here to open new window';}" border=0>
这里要说明一下。。。
“AP Off”和“AP On”两个选项,其中 AP On意思是应用程序控制,也就是安装后扫描系统中的所有文件,如果发现木马或是一些病毒程序即时将它杀死。因为他会找出将要Internet的程序,并对所有应用程序运行进行控制,这样可以防止木马程序访问网络。为安全起见,我们选择“AP On”。
AP Off的意思就是说不检测,直接跳过去。。
选AP ON后我们用NEXT他会对硬盘里的文件进行扫描。。。
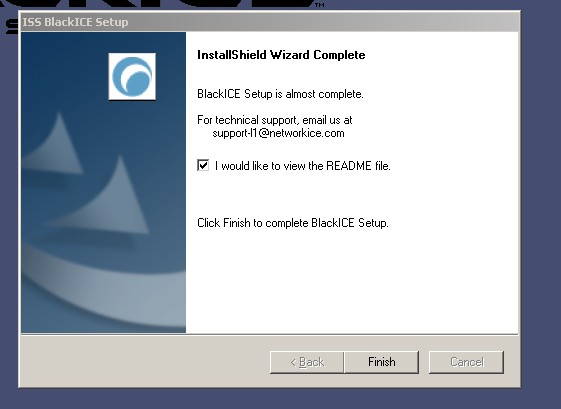
之后再next安装就完成了。。。
 screen.width*0.7) {this.resized=true; this.width=screen.width*0.7; this.alt='Click here to open new window';}" border=0>
finsh完成。。。。上面的勾的要不要读。。。我们不用直接去掉就可以了
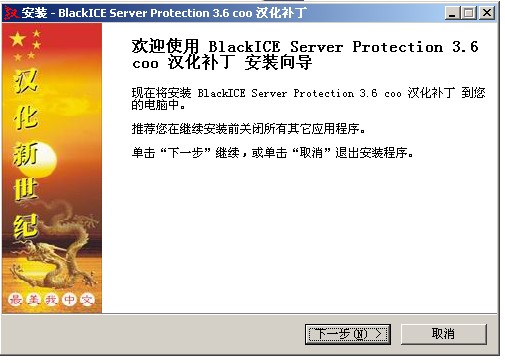
下面我们还要装一下汉化软件,这个就比较简单了
刚才我们装完之后要将右下角的小图标点右键,stop blackice engins就是先将它关了,退出来我们安装汉化软件。。。
双击SETUP出现图9
 screen.width*0.7) {this.resized=true; this.width=screen.width*0.7; this.alt='Click here to open new window';}" border=0>
next之后出现我们刚才安装的路径。。
图10
我们是装在C那么就直接NEXT
注:“的话那么路径要改一下。。 d:\program files\iss\blackice”
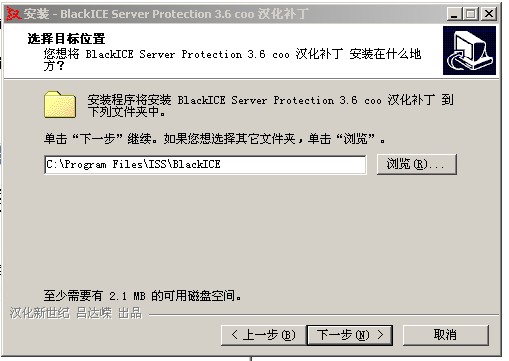 screen.width*0.7) {this.resized=true; this.width=screen.width*0.7; this.alt='Click here to open new window';}" border=0>
再下一步就可以了。。。现在这里都是中文了。。。可以看得懂了。。。
安装最后完成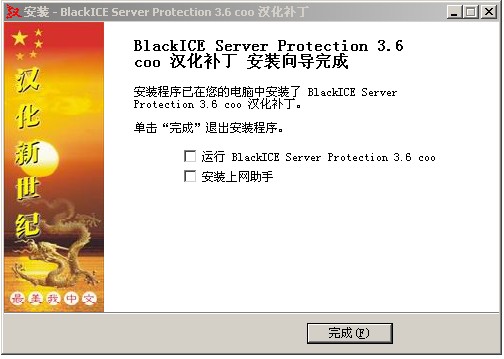 screen.width*0.7) {this.resized=true; this.width=screen.width*0.7; this.alt='Click here to open new window';}" border=0>
接下来我们重新运行Blackice 就可以了。。
安装到些基本上完成。。
刚才前面我们把Blcakice安装好了,现在我们来看一下他的设置。。。。。
右键单击任务栏中的小图标,选择“编辑Blackice 的设置
如下图1
我们这里一步步的讲解他是怎么样设置的,先看第一个防火墙。。。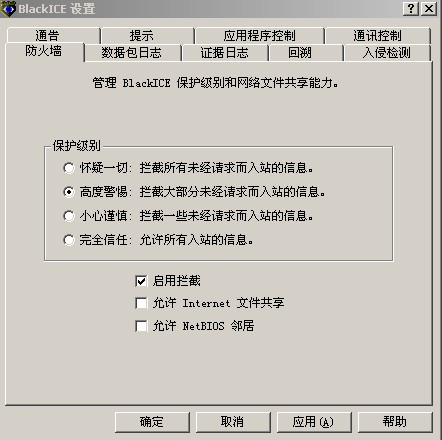 screen.width*0.7) {this.resized=true; this.width=screen.width*0.7; this.alt='Click here to open new window';}" border=0>
现在我们看到的是默认的级别。。。
默认防护级别为“完全信任”,允许所有入站信息,这个呢,设置安全级别太低了。。。一般不选这个,我也建议大家选取“高度警惕”“或是怀疑一切”,因为现在的黑客太历害了。。。特别对于一些安全意识不高的人。。。我建议先最高的{怀疑一切}。。它将拦截所有不经请求的入站信息。下面三个选项分别“启用拦截”、“允许Internet文件”,“共享允许NetBIOS网络邻居”
大家其实可以按我装的用。。。。
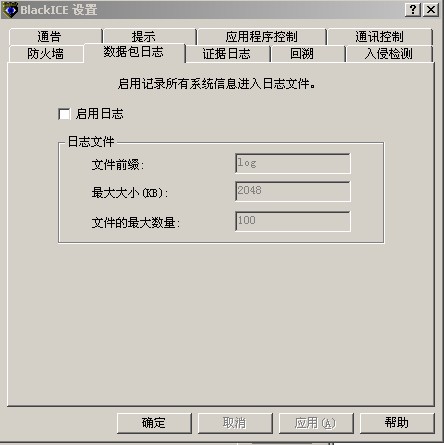
我们再来看一下第二个,数据包日志图2
 screen.width*0.7) {this.resized=true; this.width=screen.width*0.7; this.alt='Click here to open new window';}" border=0>
其实这里面要不要都没事。。。因为这个日志对于我们来说没有什么用处,
如果选的话就打勾就可以了。。
文件前缀日志一般为.log,最大大小,这个是指日志的大小,文件的最大数量,是指可以放多少个日志。
这里我是不选
接下来我们看一下图3
证据日志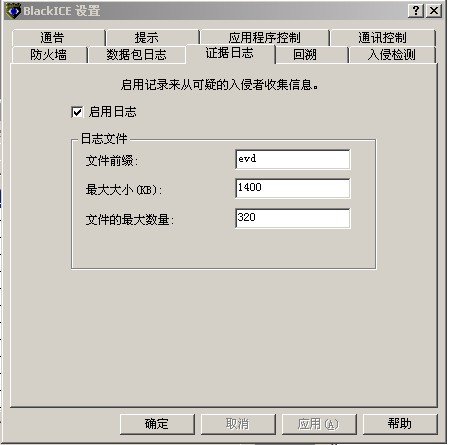 screen.width*0.7) {this.resized=true; this.width=screen.width*0.7; this.alt='Click here to open new window';}" border=0>
这里主要作用就是用来记录入侵者的信息,建议打勾,可以用来作入侵者的证句。。。这里默认就可以了
接下来我们看一下图4
回溯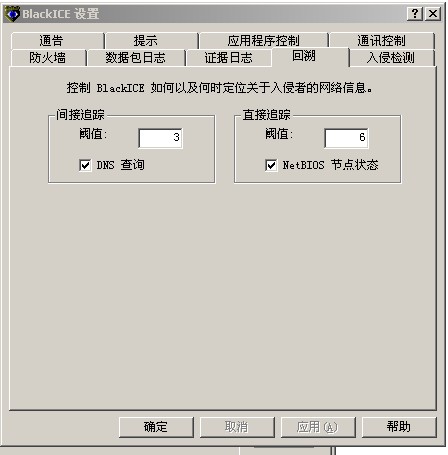 screen.width*0.7) {this.resized=true; this.width=screen.width*0.7; this.alt='Click here to open new window';}" border=0>
这里选择是否跟踪并分析攻击者的网络信息,其中第一项是启用DNS追踪,而第二项是启用NetBIOS节点追踪,建议全部选中
用来追踪入侵者的信息。。用默认就可以了
再来看一下图5
入侵检测
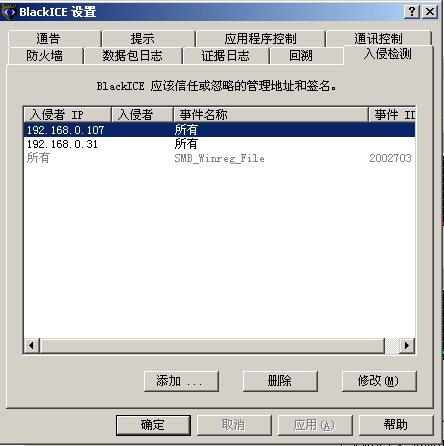 screen.width*0.7) {this.resized=true; this.width=screen.width*0.7; this.alt='Click here to open new window';}" border=0>
这里是允许哪个IP进来。。。直接添加就可以。。。
再来看一下图6
通告,可以在此设置出现异常事件时是否进行提示,以及是否进行声音报警。通常应该选中。
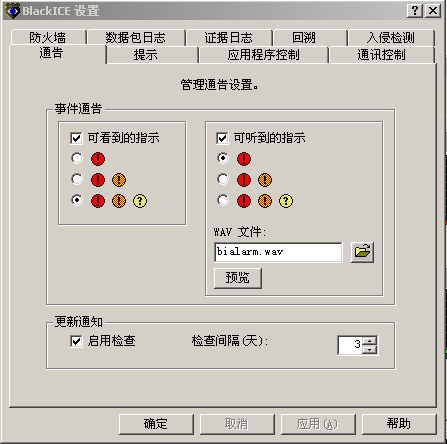 screen.width*0.7) {this.resized=true; this.width=screen.width*0.7; this.alt='Click here to open new window';}" border=0>
这个都打勾左边是可以显示的图有三种,右边是可以听到的声音,我们让他最高的时侯响就可以了。。。
下面是更新通知。。。启用检查,打勾每隔三天他会自动更新。。
看下图7提示,这个默认就可以。。。
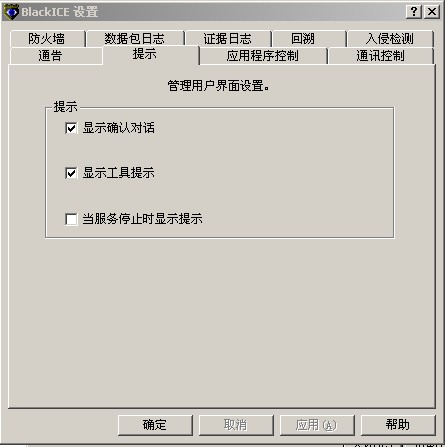 screen.width*0.7) {this.resized=true; this.width=screen.width*0.7; this.alt='Click here to open new window';}" border=0>
再来看一下图8
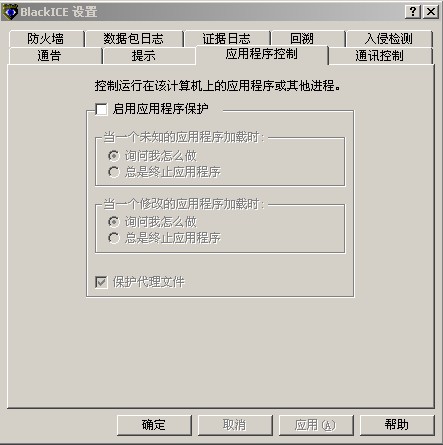
应用程序控制,这个呢是指我们运行程序时他会提示,看一下也知道。。
 screen.width*0.7) {this.resized=true; this.width=screen.width*0.7; this.alt='Click here to open new window';}" border=0>
当出现一个未经许可的应用程序访问网络时,应该怎么办?为了安全起见,可以在此标签下选择询问我怎么做。
下面也是一样,当修改一个应用程序加载时。。也是询问我怎么做。。。
再来看一下图9
 screen.width*0.7) {this.resized=true; this.width=screen.width*0.7; this.alt='Click here to open new window';}" border=0>
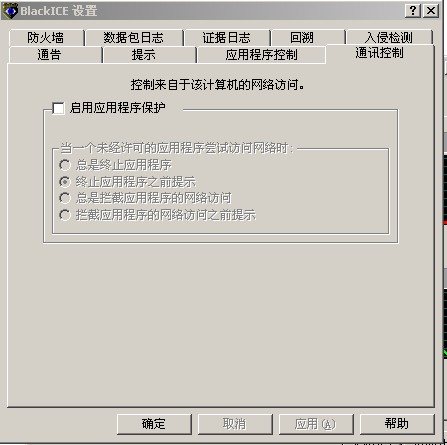
这个其实跟刚才的图8是差不多一样的。。。这个是当程序访问网络的时侯询问我要怎么做?
一般都是用提示,,
记住图8跟图9只有打开就是前面打勾之后才能对其进行选择。。。
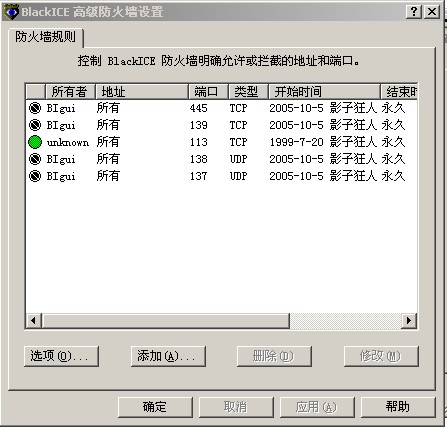
现在再来看一下高级防火墙的设置。。。。
图10
 screen.width*0.7) {this.resized=true; this.width=screen.width*0.7; this.alt='Click here to open new window';}" border=0>
这里我们看到上面黑色代表禁止,绿色代表通行,
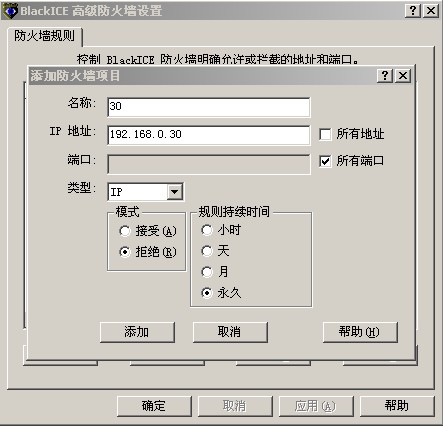
这里可以添加IP也可以,添加端口。。。。。
如图11
 screen.width*0.7) {this.resized=true; this.width=screen.width*0.7; this.alt='Click here to open new window';}" border=0>
我这里添加的是IP,这里看一下就知道了,直接点添加这个192.168.0.30永久的禁止通行了。。
再来看一下端口是怎么屏蔽的如图12
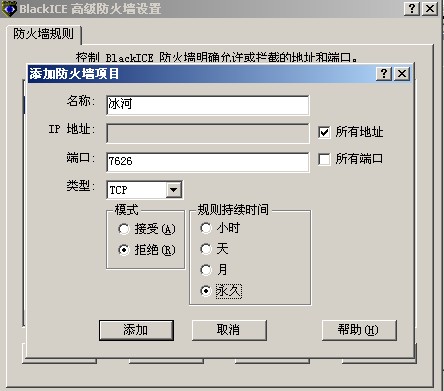 screen.width*0.7) {this.resized=true; this.width=screen.width*0.7; this.alt='Click here to open new window';}" border=0>
端口也差不多就是这样子设了。。。如果有UDP的话那么在类型那里选。。。
这里可以再看图13
 screen.width*0.7) {this.resized=true; this.width=screen.width*0.7; this.alt='Click here to open new window';}" border=0 resized="true">
高级应用程序设置,
这个大家看到了没有,这个可以按默认的盘内软件进行扫描。。。
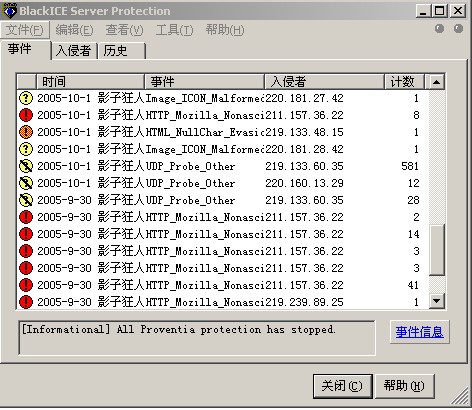
这里有几张是别人入侵我的图样。。。。
图14
 screen.width*0.7) {this.resized=true; this.width=screen.width*0.7; this.alt='Click here to open new window';}" border=0>
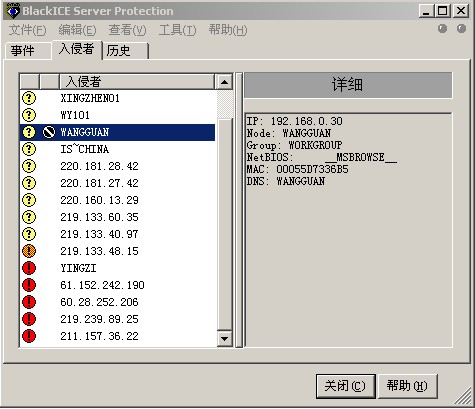
当我们双击一下事情的同时他会显示出入侵者的一些情况。。。如
图15
 screen.width*0.7) {this.resized=true; this.width=screen.width*0.7; this.alt='Click here to open new window';}" border=0>
我们可以看到对方的IP,工作组,MAC地址。。。跟DNS。。。。
针对于历史如图16
 screen.width*0.7) {this.resized=true; this.width=screen.width*0.7; this.alt='Click here to open new window';}" border=0>
一般用小时就可以了。。。。
差不多BlackIce 就是这样子设置了。。。。其实还是比较简单,他是一个功能强大的防火墙,也可以说是安全性能比较高的。。。针对于安全意识弱一点的人很适合。。
BY:影子狂人
我用了三个多小时才写完的.....大家看看....

