springboot2.3.1替换为其他的嵌入式servlet容器的详细方法

现阶段,springboot内嵌了Tomcat服务器,如果你不想使用Tomcat,springboot也是支持其他的服务器切换的。

如果你想了解底层springboot所支持的服务器你可以使用idea的快捷键快速按两次shift查询一个ServerProperties 的类,通过这个类你可以知道你想要了解的情况:

springboot里面支持的服务器有Jetty、Netty…等等,大家有兴趣的话可以百度一下。

接着通过在pom文件的视图依赖分析可以得知:
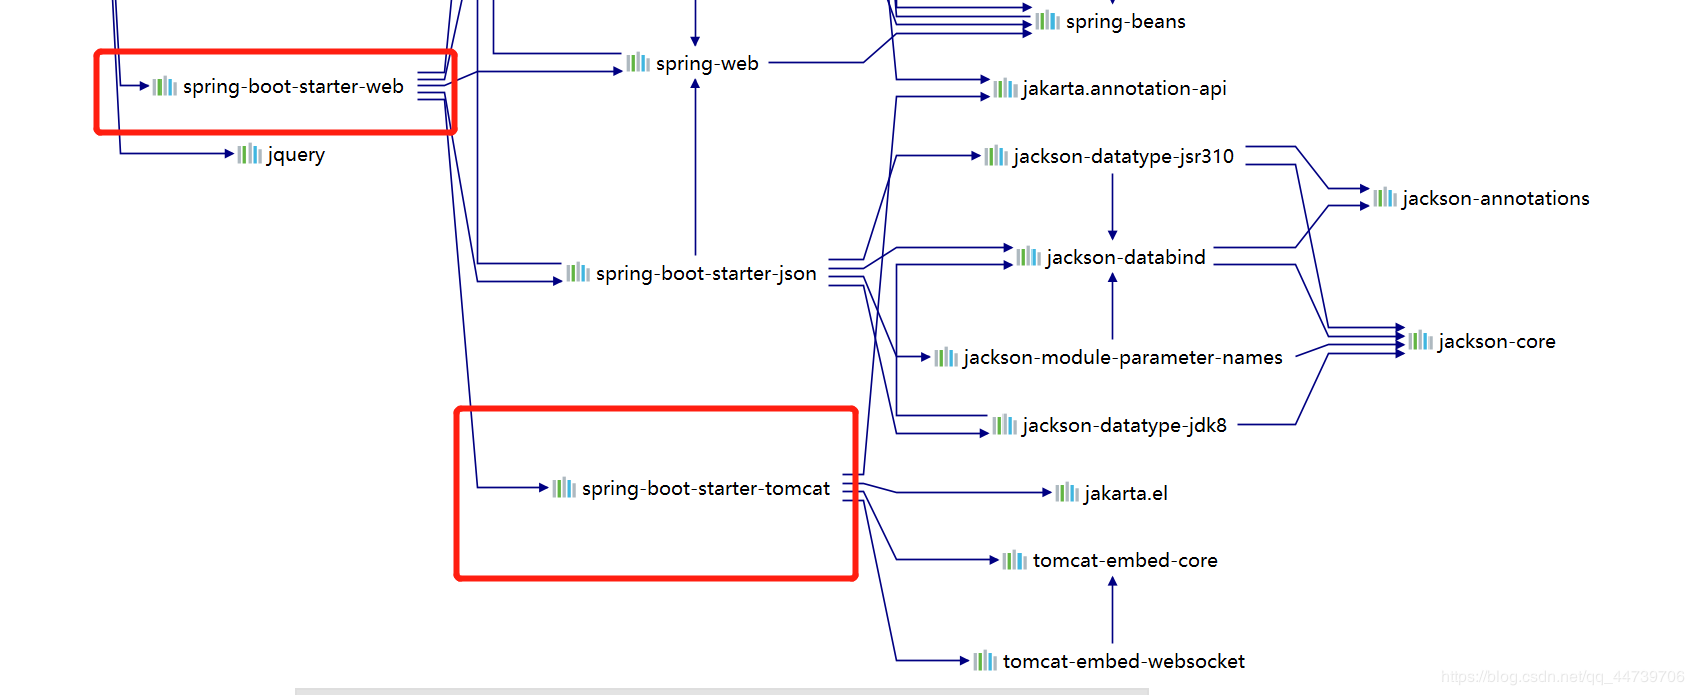
springboot里面的Tomcat是在spring-boot-starter-web下,
所以我们如果需要切换服务器的话,需要先移除了spring-boot-starter-web里面的Tomcat依赖,再建立你想要切换的服务器。

 <!--排除Tomcat starter-->
      <exclusions>
        <exclusion>
          <groupId>org.springframework.boot</groupId>
          <artifactId>spring-boot-starter-tomcat</artifactId>
        </exclusion>
      </exclusions>
    </dependency>

    <!--引入其他的jetty starter容器-->
    <dependency>
      <groupId>org.springframework.boot</groupId>
      <artifactId>spring-boot-starter-jetty</artifactId>
    </dependency>

在嵌入式servlet容器启动的时候需要先配置一个servlet类继承HttpServlet并且实现get和post的方法:

package com.example.springbootdemo.servlet;

import javax.servlet.ServletException;
import javax.servlet.http.HttpServlet;
import javax.servlet.http.HttpServletRequest;
import javax.servlet.http.HttpServletResponse;
import java.io.IOException;

/**
 * @author Think
 */
public class MyServlet extends HttpServlet {

  @Override
  protected void doGet(HttpServletRequest req, HttpServletResponse resp) throws ServletException, IOException {
    doPost(req, resp);

  }

  @Override
  protected void doPost(HttpServletRequest req, HttpServletResponse resp) throws ServletException, IOException {
    resp.getWriter().write("hello,MyServlet");
  }
}

配置好了之后我们才可以定制自己想要定制的规则
springboot1X和springboot2X定制之间会有所差异:
2X

/**
   * 配置嵌入式的servlet容器的相关规则
   * @return
   */
  @Bean
  public WebServerFactoryCustomizer<ConfigurableWebServerFactory> webServerFactoryCustomizer() {
    return new WebServerFactoryCustomizer<ConfigurableWebServerFactory >() {
      @Override
      public void customize(ConfigurableWebServerFactory factory) {
      	//设置服务器启动的端口号为8090
        factory.setPort(8090);
      }
    };
  }

1X

@Bean
public EmbeddedServletContainerCustomizer embeddedServletContainerCustomizer(){
  return new EmbeddedServletContainerCustomizer() {
    @Override
    public void customize(ConfigurableEmbeddedServletContainer container) {
    //设置服务器启动的端口号为8090
      container.setPort(8090);
    }
  };
}

配置好之后之间重启一下服务器。
在这里给大家展示一下我切换Jetty的运行结果:

当出现类似红色方框的字体的时候,说明就配置成功了。
如果你想了解更多的底层源码,你可以到一些学习的网站了解更多比如哔哩哔哩、掘金、Stack Overflow…等。
springboot会随着时代的发展而不断的更新,所以如果版本更新了,这里就可能不是你想要的答案了,那么你需要再继续去寻找合理的答案。只要不放弃,你想要的答案总是能找到的。

到此这篇关于springboot2.3.1替换为其他的嵌入式servlet容器的详细方法的文章就介绍到这了,更多相关springboot嵌入式servlet容器内容请搜索我们以前的文章或继续浏览下面的相关文章希望大家以后多多支持我们!

(0)

相关推荐

  • SpringBoot初始教程之Servlet、Filter、Listener配置详解

    1.介绍 通过之前的文章来看,SpringBoot涵盖了很多配置,但是往往一些配置是采用原生的Servlet进行的,但是在SpringBoot中不需要配置web.xml的 因为有可能打包之后是一个jar包的形式,这种情况下如何解决?SpringBoot 提供了两种方案进行解决 2.快速开始 2.1 方案一 方案一采用原生Servlet3.0的注解进行配置.@WebServlet .@WebListener.@WebFilter是Servlet3.0 api中提供的注解 通过注解可以完全代替web

  • springboot注入servlet的方法

    问:有了springMVC,为什么还要用servlet?有了servlet3的注解,为什么还要使用ServletRegistrationBean注入的方式? 使用场景:在有些场景下,比如我们要使用hystrix-dashboard,这时候就需要注入HystrixMetricsStreamServlet(第三方的servlet),该servlet是hystrix的组件. 一.代码 1.TestServlet(第一个servlet) package com.xxx.secondboot.servle

  • SpringBoot配置嵌入式Servlet容器和使用外置Servlet容器的教程图解

    配置嵌入式Servlet容器 SpringBoot默认使用Tomcat作为嵌入式的Servlet容器: 问题? 1).如何定制和修改Servlet容器的相关配置: 1.修改和server有关的配置(ServerProperties[也是EmbeddedServletContainerCustomizer]): server.port=8081 server.context-path=/crud server.tomcat.uri-encoding=UTF-8 //通用的Servlet容器设置 s

  • SpringBoot 项目如何在tomcat容器中运行的实现方法

    一. SpringBoot内嵌容器的部署方式 SpringBoot内部默认提供内嵌的tomcat容器,所以可以直接打成jar包,丢到服务器上的任何一个目录,然后在当前目录下执行java -jar demo.jar即可运行,但是这种方式的运行退出进程就结束了.如果想在后台可以运行,则需要执行 java -jar demo.jar > log_demo.file 2>&1 & 即可在后台运行该服务了,log_demo.file是日志文件.如需停止该进程 执行ps -ef|grep

  • 关于SpringBoot获取IOC容器中注入的Bean(推荐)

    一: 注入一个TestUtils类 package com.shop.sell.Utils; import com.shop.sell.dto.CartDTO; import org.springframework.context.annotation.Bean; import org.springframework.context.annotation.Configuration; @Configuration public class TestUtils { @Bean(name="test

  • springboot2.3.1替换为其他的嵌入式servlet容器的详细方法

    现阶段,springboot内嵌了Tomcat服务器,如果你不想使用Tomcat,springboot也是支持其他的服务器切换的. 如果你想了解底层springboot所支持的服务器你可以使用idea的快捷键快速按两次shift查询一个ServerProperties 的类,通过这个类你可以知道你想要了解的情况: springboot里面支持的服务器有Jetty.Netty-等等,大家有兴趣的话可以百度一下. 接着通过在pom文件的视图依赖分析可以得知: springboot里面的Tomcat是

  • SpringBoot嵌入式Servlet容器与定制化组件超详细讲解

    目录 嵌入式Servlet容器 1.原理分析 2.Servlet容器切换 3.定制Servlet容器配置 定制化组件 嵌入式Servlet容器 在Spring Boot中,默认支持的web容器有 Tomcat, Jetty, 和 Undertow 1.原理分析 那么这些web容器是怎么注入的呢?我们一起来分析一下 当SpringBoot应用启动发现当前是Web应用,它会创建一个web版的ioc容器ServletWebServerApplicationContext 这个类下面有一个createW

  • springboot配置嵌入式servlet容器的方法

    配置嵌入式Servlet容器 springboot默认tomcat为嵌入式servlet容器,所以不用在配置tomcat. 1.如何定制修改servlet容器? 1.在applicatio.properties里修改和server有关的配置(推荐) 如: server.tomcat server.tomcat.connection-timeout= 连接超时时间 server.tomcat.uri-encoding=UTF-8 修改编码 server.servlet.XXX 通用servlet容

  • Spring Boot 中嵌入式 Servlet 容器自动配置原理解析

    目录 1.参照 Spring Boot 自动配置包里面的web模块 2.EmbeddedServletContainerFactory(嵌入式Servlet容器工厂) 3.EmbeddedServletContainer(嵌入式的Servlet容器) 4.以TomcatEmbeddedServletContainerFactory为例 5.嵌入式容器的配置修改生效原理 1.参照 Spring Boot 自动配置包里面的web模块 EmbeddedServletContainerAutoConfi

  • SpringBoot如何切换成其它的嵌入式Servlet容器(Jetty和Undertow)

    目录 如何切换成其它的嵌入式Servlet容器(Jetty和Undertow) SpringBoot默认使用的内置Servlet容器是Tomcat SpringBoot还支持Jetty和Undertow SpringBoot web开发_嵌入式Servlet容器 1.切换嵌入式Servlet容器 2.定制Servlet容器 如何切换成其它的嵌入式Servlet容器(Jetty和Undertow) SpringBoot默认使用的内置Servlet容器是Tomcat 然而 SpringBoot还支持

  • Spring Boot如何支持嵌入式Servlet容器

    Spring Boot支持Tomcat.Jetty和Undertow三种Servlet容器嵌入到Web应用程序中,开发者使用starter即可方便嵌入,默认情况下,嵌入服务器的访问端口为8080. Servlets.Filters & Listeners 这些组件可以同组件扫描注册,即把他们定义为Spring Bean. 默认情况下,如果只有一个servlet,则把它映射到/:如果有多个servlet,则加上bean name作为前缀然后映射到/*. 如果默认策略不能满足你,你可以通过Servl

  • SpringBoot 嵌入式web容器的启动原理详解

    目录 SpringBoot应用启动run方法 SpringApplication.java 中执行的代码 ServletWebServerApplicationContext.java执行的方法 SpringBoot 2.x 版本 嵌入式Servlet容器自动配置原理以及启动原理 一.版本说明 二.总结 三.嵌入式Servlet容器自动配置原理(以Tomcat为例) 四.嵌入式Servlet容器启动原理(以Tomcat为例) SpringBoot应用启动run方法 SpringApplicati

  • thinkphp3.2中Lite文件替换框架入口文件或应用入口文件的方法

    本文实例讲述了thinkphp3.2中Lite文件替换框架入口文件或应用入口文件的方法.分享给大家供大家参考.具体分析如下: 3.2版本支持根据当前的运行环境生成Lite文件,可以替换框架的入口文件或者应用入口文件,提高运行效率. 我们的建议是在生产环境中关闭调试模式后生成Lite文件. 注意,目前SAE平台不支持直接生成Lite文件. 生成Lite文件 要生成Lite文件,需要在入口文件中增加常量定义: 复制代码 代码如下: define('BUILD_LITE_FILE',true); 默认

  • Java替换中使用正则表达式实现中间模糊匹配的方法

    使用".+?"实现中间模糊匹配的代码: public class Test { public static void main(String[] args) { String str="总会在某一个回眸的时刻醉了流年,濡湿了柔软的心.总会有某一个回眸的时刻醉了流年,濡湿了柔软的心"; str=str.replaceAll("总会在.+?流年", "总会有某一个回眸的时刻醉了流年"); System.out.println(st

随机推荐