Redis之sql缓存的具体使用
目录
- 1.环境搭建
- 2.Redis配置
- 3.功能实现
- 4.缓存注解的使用说明
1.环境搭建
 <!-- RedisTemplate -->
 <dependency>
     <groupId>org.springframework.boot</groupId>
     <artifactId>spring-boot-starter-data-redis</artifactId>
 </dependency>
spring:
  redis:
    host: 192.168.8.128
    port: 6380
    password: 1234
    database: 0
    timeout: 3000
    jedis:
      pool:
        max-wait: -1
        max-active: -1
        max-idle: 20
        min-idle: 10
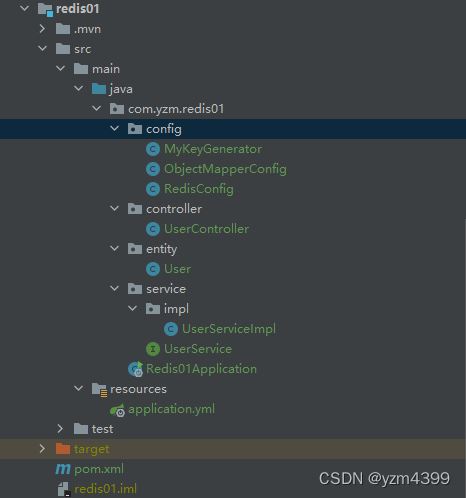
2.Redis配置
package com.yzm.redis01.config;

import com.fasterxml.jackson.annotation.JsonAutoDetect;
import com.fasterxml.jackson.annotation.JsonInclude;
import com.fasterxml.jackson.annotation.JsonTypeInfo;
import com.fasterxml.jackson.annotation.PropertyAccessor;
import com.fasterxml.jackson.core.JsonGenerator;
import com.fasterxml.jackson.core.JsonParser;
import com.fasterxml.jackson.databind.*;
import com.fasterxml.jackson.datatype.jsr310.JavaTimeModule;
import org.springframework.context.annotation.Bean;
import org.springframework.context.annotation.Configuration;

import java.io.IOException;
import java.text.SimpleDateFormat;
import java.time.LocalDateTime;
import java.time.format.DateTimeFormatter;

@Configuration
public class ObjectMapperConfig {

    private static final String PATTERN = "yyyy-MM-dd HH:mm:ss";

    @Bean(name = "myObjectMapper")
    public ObjectMapper objectMapper() {
        JavaTimeModule javaTimeModule = new JavaTimeModule();
        javaTimeModule.addSerializer(LocalDateTime.class, new LocalDateTimeSerializer());
        javaTimeModule.addDeserializer(LocalDateTime.class, new LocalDateTimeDeserializer());
        return new ObjectMapper()
                // 转换为格式化的json(控制台打印时,自动格式化规范)
                //.enable(SerializationFeature.INDENT_OUTPUT)
                // Include.ALWAYS  是序列化对像所有属性(默认)
                // Include.NON_NULL 只有不为null的字段才被序列化,属性为NULL 不序列化
                // Include.NON_EMPTY 如果为null或者 空字符串和空集合都不会被序列化
                // Include.NON_DEFAULT 属性为默认值不序列化
                .setSerializationInclusion(JsonInclude.Include.NON_NULL)
                // 如果是空对象的时候,不抛异常
                .configure(SerializationFeature.FAIL_ON_EMPTY_BEANS, false)
                // 反序列化的时候如果多了其他属性,不抛出异常
                .configure(DeserializationFeature.FAIL_ON_UNKNOWN_PROPERTIES, false)
                // 取消时间的转化格式,默认是时间戳,可以取消,同时需要设置要表现的时间格式
                .configure(SerializationFeature.WRITE_DATES_AS_TIMESTAMPS, false)
                .setDateFormat(new SimpleDateFormat(PATTERN))
                // 对LocalDateTime序列化跟反序列化
                .registerModule(javaTimeModule)

                .setVisibility(PropertyAccessor.ALL, JsonAutoDetect.Visibility.ANY)
                // 此项必须配置,否则会报java.lang.ClassCastException: java.util.LinkedHashMap cannot be cast to XXX
                .enableDefaultTyping(ObjectMapper.DefaultTyping.NON_FINAL, JsonTypeInfo.As.PROPERTY)
                ;
    }

    static class LocalDateTimeSerializer extends JsonSerializer<LocalDateTime> {
        @Override
        public void serialize(LocalDateTime value, JsonGenerator gen, SerializerProvider serializers) throws IOException {
            gen.writeString(value.format(DateTimeFormatter.ofPattern(PATTERN)));
        }
    }

    static class LocalDateTimeDeserializer extends JsonDeserializer<LocalDateTime> {
        @Override
        public LocalDateTime deserialize(JsonParser p, DeserializationContext deserializationContext) throws IOException {
            return LocalDateTime.parse(p.getValueAsString(), DateTimeFormatter.ofPattern(PATTERN));
        }
    }
}
package com.yzm.redis01.config;

import lombok.extern.slf4j.Slf4j;
import org.springframework.cache.interceptor.KeyGenerator;
import org.springframework.cache.interceptor.SimpleKey;

import java.lang.reflect.Method;
import java.util.Arrays;
/**
 * key生成器
 */
@Slf4j
public class MyKeyGenerator implements KeyGenerator {

    private static final String NO_PARAM = "[]";
    private static final String NULL_PARAM = "_";

    @Override
    public Object generate(Object target, Method method, Object... params) {
        StringBuilder key = new StringBuilder();
        key.append(target.getClass().getSimpleName()).append(".").append(method.getName()).append(":");

        if (params.length == 0) {
            return new SimpleKey(key.append(NO_PARAM).toString());
        }

        return new SimpleKey(key.append(Arrays.toString(params).replace("null", NULL_PARAM)).toString());
    }
}
package com.yzm.redis01.config;

import com.fasterxml.jackson.databind.ObjectMapper;
import org.springframework.cache.CacheManager;
import org.springframework.cache.annotation.EnableCaching;
import org.springframework.context.annotation.Bean;
import org.springframework.context.annotation.Configuration;
import org.springframework.data.redis.cache.RedisCacheConfiguration;
import org.springframework.data.redis.cache.RedisCacheManager;
import org.springframework.data.redis.cache.RedisCacheWriter;
import org.springframework.data.redis.connection.RedisConnectionFactory;
import org.springframework.data.redis.core.*;
import org.springframework.data.redis.serializer.Jackson2JsonRedisSerializer;
import org.springframework.data.redis.serializer.RedisSerializationContext;
import org.springframework.data.redis.serializer.StringRedisSerializer;

import javax.annotation.Resource;
import java.time.Duration;

@Configuration
@EnableCaching // 启动缓存
public class RedisConfig {

	@Bean(name = "myKeyGenerator")
    public MyKeyGenerator myKeyGenerator() {
        return new MyKeyGenerator();
    }

    @Resource(name = "myObjectMapper")
    private ObjectMapper objectMapper;

    /**
     * 选择redis作为默认缓存工具
     */
    @Bean
    public CacheManager cacheManager(RedisConnectionFactory connectionFactory) {
        RedisCacheWriter redisCacheWriter = RedisCacheWriter.nonLockingRedisCacheWriter(connectionFactory);
        RedisCacheConfiguration cacheConfiguration = RedisCacheConfiguration
                .defaultCacheConfig()
                // 默认缓存时间(秒)
                .entryTtl(Duration.ofSeconds(300L))
                // 序列化key、value
                .serializeKeysWith(RedisSerializationContext.SerializationPair.fromSerializer(new StringRedisSerializer()))
                .serializeValuesWith(RedisSerializationContext.SerializationPair.fromSerializer(jackson2JsonRedisSerializer()))
                // 禁用缓存空值
                .disableCachingNullValues();
        return new RedisCacheManager(redisCacheWriter, cacheConfiguration);
    }

    /**
     * redisTemplate配置
     */
    @Bean
    public RedisTemplate<String, Object> redisTemplate(RedisConnectionFactory factory) {
        RedisTemplate<String, Object> template = new RedisTemplate<>();
        // 配置连接工厂
        template.setConnectionFactory(factory);

        Jackson2JsonRedisSerializer<Object> jacksonSerializer = jackson2JsonRedisSerializer();
        StringRedisSerializer stringRedisSerializer = new StringRedisSerializer();

        // 使用StringRedisSerializer来序列化和反序列化redis的key,value采用json序列化
        template.setKeySerializer(stringRedisSerializer);
        template.setValueSerializer(jacksonSerializer);

        // 设置hash key 和value序列化模式
        template.setHashKeySerializer(stringRedisSerializer);
        template.setHashValueSerializer(jacksonSerializer);

        //支持事务
        template.setEnableTransactionSupport(true);
        template.afterPropertiesSet();

        return template;
    }

    private Jackson2JsonRedisSerializer<Object> jackson2JsonRedisSerializer() {
        //使用Jackson2JsonRedisSerializer来序列化和反序列化redis的value值(默认使用JDK的序列化方式)
        Jackson2JsonRedisSerializer<Object> jacksonSerializer = new Jackson2JsonRedisSerializer<>(Object.class);
        jacksonSerializer.setObjectMapper(objectMapper);
        return jacksonSerializer;
    }
}
3.功能实现
新增、更新、删除、查询数据时,对缓存执行对应相同的操作
package com.yzm.redis01.entity;

import lombok.AllArgsConstructor;
import lombok.Builder;
import lombok.Data;
import lombok.NoArgsConstructor;
import lombok.experimental.Accessors;

import java.io.Serializable;
import java.time.LocalDateTime;
import java.util.Date;

@Data
@Builder
@NoArgsConstructor
@AllArgsConstructor
@Accessors(chain = true)
public class User implements Serializable {
    private static final long serialVersionUID = -2468903864827432779L;
    private Integer id;
    private String username;
    private String password;
    private Date createDate;
    private LocalDateTime updateDate;
}
package com.yzm.redis01.service;

import com.yzm.redis01.entity.User;

import java.util.List;

public interface UserService {

    User saveUser(User user);

    User updateUser(User user);

    int deleteUser(Integer id);

    void deleteAllCache();

    User getUserById(Integer id);

    List<User> selectAll();

	List<User> findAll(Object... params);
}
为了简便,数据不从数据库获取,这里是创建Map存储数据实现
package com.yzm.redis01.service.impl;

import com.yzm.redis01.entity.User;
import com.yzm.redis01.service.UserService;
import lombok.extern.slf4j.Slf4j;
import org.springframework.cache.annotation.CacheConfig;
import org.springframework.cache.annotation.CacheEvict;
import org.springframework.cache.annotation.CachePut;
import org.springframework.cache.annotation.Cacheable;
import org.springframework.stereotype.Service;

import java.time.LocalDateTime;
import java.util.*;

@Slf4j
@Service
@CacheConfig(cacheNames = "users")
public class UserServiceImpl implements UserService {

    private static final Map<Integer, User> userMap;

    static {
        userMap = new HashMap<>();
        userMap.put(userMap.size() + 1, User.builder()
                .id(userMap.size() + 1).username("root").password("root").createDate(new Date()).updateDate(LocalDateTime.now()).build());
        userMap.put(userMap.size() + 1, User.builder()
                .id(userMap.size() + 1).username("admin").password("admin").createDate(new Date()).updateDate(LocalDateTime.now()).build());
    }

    @Override
    @CachePut(key = "#result.id", condition = "#result.id gt 0")
    public User saveUser(User user) {
        log.info("保存数据");
        int id = userMap.size() + 1;
        User build = User.builder()
                .id(id)
                .username(user.getUsername())
                .password(user.getPassword())
                .createDate(new Date())
                .updateDate(LocalDateTime.now())
                .build();
        userMap.put(id, build);
        return build;
    }

    @Override
    @CachePut(key = "#user.id", unless = "#result eq null")
    public User updateUser(User user) {
        log.info("更新数据");
        if (userMap.containsKey(user.getId())) {
            User update = userMap.get(user.getId());
            update.setUsername(user.getUsername())
                    .setPassword(user.getPassword())
                    .setUpdateDate(LocalDateTime.now());
            userMap.replace(user.getId(), update);
            return update;
        }
        return null;
    }

    @Override
    @CacheEvict(key = "#id", condition = "#result gt 0")
    public int deleteUser(Integer id) {
        log.info("删除数据");
        if (userMap.containsKey(id)) {
            userMap.remove(id);
            return 1;
        }
        return 0;
    }

    @Override
    @CacheEvict(allEntries = true)
    public void deleteAllCache() {
        log.info("清空缓存");
    }

    @Override
    @Cacheable(key = "#id", condition = "#id gt 1")
    public User getUserById(Integer id) {
        log.info("查询用户");
        return userMap.get(id);
    }

    @Override
    @Cacheable(key = "#root.methodName")
    public List<User> selectAll() {
        log.info("查询所有");
        return new ArrayList<>(userMap.values());
    }

    @Override
    @Cacheable(keyGenerator = "myKeyGenerator")
    public List<User> findAll(Object... params) {
        log.info("查询所有");
        return new ArrayList<>(userMap.values());
    }

}
package com.yzm.redis01.controller;

import com.yzm.redis01.entity.User;
import com.yzm.redis01.service.UserService;
import org.springframework.web.bind.annotation.GetMapping;
import org.springframework.web.bind.annotation.RequestMapping;
import org.springframework.web.bind.annotation.RequestParam;
import org.springframework.web.bind.annotation.RestController;

import java.util.List;

@RestController
@RequestMapping("/user")
public class UserController {

    private final UserService userService;

    public UserController(UserService userService) {
        this.userService = userService;
    }

    @GetMapping("/saveUser")
    public void saveUser() {
        User user = new User();
        user.setUsername("yzm");
        user.setPassword("yzm");
        System.out.println(userService.saveUser(user));
    }

    @GetMapping("/updateUser")
    public void updateUser(Integer id) {
        User user = new User();
        user.setId(id);
        user.setUsername("yzm");
        user.setPassword("123");
        System.out.println(userService.updateUser(user));
    }

    @GetMapping("/deleteUser")
    public void deleteUser(@RequestParam Integer id) {
        System.out.println(userService.deleteUser(id));
    }

    @GetMapping("/deleteAllCache")
    public void deleteAllCache() {
        userService.deleteAllCache();
    }

    @GetMapping("/getUserById")
    public void getUserById(@RequestParam Integer id) {
        System.out.println(userService.getUserById(id));
    }

    @GetMapping("/selectAll")
    public void selectAll() {
        List<User> users = userService.selectAll();
        users.forEach(System.out::println);
    }
}
4.缓存注解的使用说明
@CacheConfig:注解在类上,表示该类所有缓存方法使用统一指定的缓存区,也可以作用在方法上

@CacheAble:注解在方法上,应用到读数据的方法上,如查找方法:调用方法之前根据条件判断是否从缓存获取相应的数据,缓存没有数据,方法执行后添加到缓存
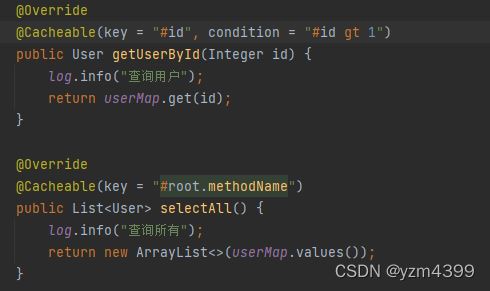
#id 直接使用参数名
#p0 p0对应参数列表的第一个参数,以此类推
#user.id 参数是对象时,使用对象属性
#root. 可以点出很多方法
#root.methodName
#result 返回值
http://localhost:8080/user/getUserById?id=1

http://localhost:8080/user/getUserById?id=2

http://localhost:8080/user/selectAll

@Cacheable运行流程:在调用方法之前判断condition,如果为true,则查缓存;没有缓存就调用方法并将数据添加到缓存;condition=false就与缓存无关了
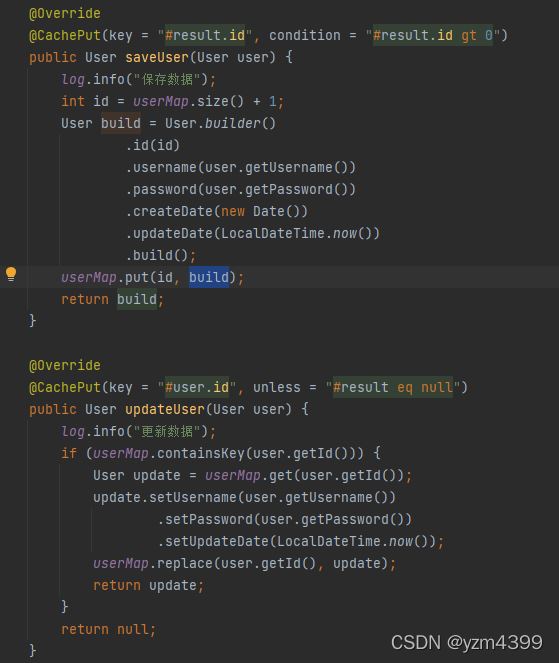
@CachePut:注解在方法上,应用到写数据的方法上,如新增/修改方法,调用方法之后根据条件判断是否添加/更新相应的数据到缓存:
http://localhost:8080/user/saveUser

condition条件为true,添加到缓存,根据id查询直接从缓存获取
http://localhost:8080/user/getUserById?id=3

http://localhost:8080/user/updateUser?id=3
http://localhost:8080/user/getUserById?id=3
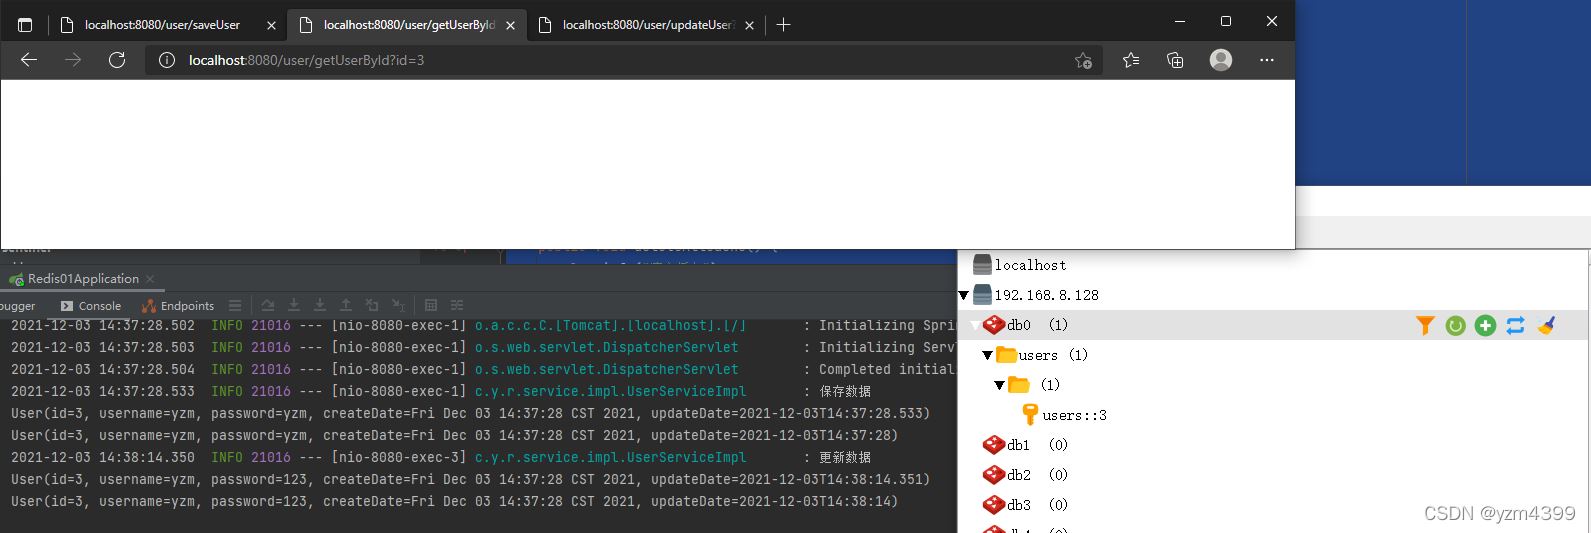
条件condition=true,执行缓存操作
条件unless=false,执行缓存操作;跟condition相反
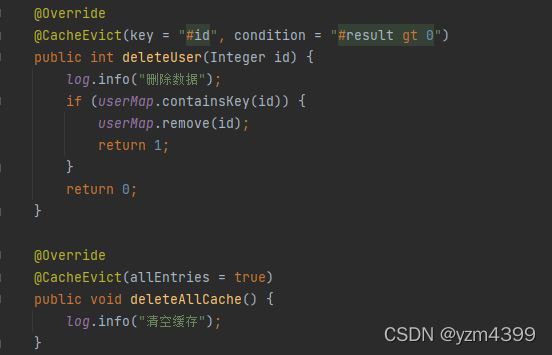
@CacheEvict 注解在方法上,应用到删除数据的方法上,如删除方法,调用方法之后根据条件判断是否从缓存中移除相应的数据
http://localhost:8080/user/saveUser
http://localhost:8080/user/getUserById?id=3
http://localhost:8080/user/deleteUser?id=3

自定义缓存key自动生成器
    @Override
    @Cacheable(keyGenerator = "myKeyGenerator")
    public List<User> findAll(Object... params) {
        log.info("查询所有");
        return new ArrayList<>(userMap.values());
    }
@Slf4j
public class MyKeyGenerator implements KeyGenerator {

    private static final String NO_PARAM = "[]";
    private static final String NULL_PARAM = "_";

    @Override
    public Object generate(Object target, Method method, Object... params) {
        StringBuilder key = new StringBuilder();
        key.append(target.getClass().getSimpleName()).append(".").append(method.getName()).append(":");

        if (params.length == 0) {
            return new SimpleKey(key.append(NO_PARAM).toString());
        }

        return new SimpleKey(key.append(Arrays.toString(params).replace("null", NULL_PARAM)).toString());
    }
}
http://localhost:8080/user/findAll

http://localhost:8080/user/findAll?id=123

http://localhost:8080/user/findAll?username=yzm

@Caching
有时候我们可能组合多个Cache注解使用;比如用户新增成功后,我们要添加id–>user;username—>user;email—>user的缓存;
此时就需要@Caching组合多个注解标签了。
@Caching(
    put = {
        @CachePut(value = "users", key = "#user.id"),
        @CachePut(value = "users", key = "#user.username"),
        @CachePut(value = "users", key = "#user.email")
    }
)
public User save(User user) {}
到此这篇关于Redis之sql缓存的具体使用的文章就介绍到这了,更多相关Redis sql缓存 内容请搜索我们以前的文章或继续浏览下面的相关文章希望大家以后多多支持我们!

