android studio实现简单考试应用程序实例代码详解
一、问题
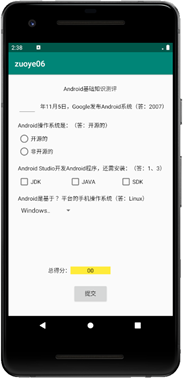
1、如图所示,设计一个包含四种题型的简单考试应用程序(具体考试题目可以选用以下设计,也可以自己另外确定),项目名称:zuoye06_666 ;(666,改成自己的实际编号)。
2、布局管理器任选(约束布局相对容易实现)。
3、“提交”按钮的Text通过字符串资源赋值,不要直接输入“提交”两个字。
4、每题按25分计算,编写相应的程序,答题完成后单击“提交”按钮,在“总得分:”右边文本框中显示实际得分;同时,显示一个Toast消息框:
答对不足3题,显示:“还需努力啊!”;
答对3题,显示:“祝贺你通过考试!”;
全部答对,显示:“你真棒!祝贺你!”

二、分析
1.这次作业比较简单,就是上课讲的东西的集合,练习spinner、checkbox、radiobutton、edittext以及button的监听,还有setText和Toast用法。
2.注意点,要考虑到正常考试的时候学生第一次选对后来改错,或者一开始选错后来改对的情况,考生的分数应该由最后一次监听到结果来确定,所以添加了boolean类型的以及checkbox的计数。
三、代码
1.布局代码
<?xml version="1.0" encoding="utf-8"?>
<androidx.constraintlayout.widget.ConstraintLayout xmlns:android="http://schemas.android.com/apk/res/android"
 xmlns:app="http://schemas.android.com/apk/res-auto"
 xmlns:tools="http://schemas.android.com/tools"
 android:layout_width="match_parent"
 android:layout_height="match_parent"
 tools:context=".MainActivity">

 <TextView
  android:id="@+id/textView2"
  android:layout_width="wrap_content"
  android:layout_height="wrap_content"
  android:text="Android基础知识测评"
  app:layout_constraintBottom_toBottomOf="parent"
  app:layout_constraintHorizontal_bias="0.498"
  app:layout_constraintLeft_toLeftOf="parent"
  app:layout_constraintRight_toRightOf="parent"
  app:layout_constraintTop_toTopOf="parent"
  app:layout_constraintVertical_bias="0.058" />

 <EditText
  android:id="@+id/et_on"
  android:layout_width="wrap_content"
  android:layout_height="wrap_content"
  android:layout_marginStart="16dp"
  android:ems="3"
  android:inputType="textPersonName"
  app:layout_constraintBottom_toBottomOf="@+id/textView"
  app:layout_constraintStart_toStartOf="parent"
  app:layout_constraintTop_toTopOf="@+id/textView"
  app:layout_constraintVertical_bias="0.615" />

 <TextView
  android:id="@+id/textView"
  android:layout_width="wrap_content"
  android:layout_height="wrap_content"
  android:layout_marginTop="20dp"
  android:text="@string/di1ti"
  app:layout_constraintStart_toEndOf="@+id/et_on"
  app:layout_constraintTop_toBottomOf="@+id/textView2" />

 <TextView
  android:id="@+id/textView3"
  android:layout_width="wrap_content"
  android:layout_height="wrap_content"
  android:layout_marginTop="20dp"
  android:text="@string/di2ti"
  app:layout_constraintStart_toStartOf="@+id/et_on"
  app:layout_constraintTop_toBottomOf="@+id/textView" />

 <RadioGroup
  android:id="@+id/radioGroup"
  android:layout_width="113dp"
  android:layout_height="64dp"
  app:layout_constraintStart_toStartOf="@+id/textView3"
  app:layout_constraintTop_toBottomOf="@+id/textView3">

  <RadioButton
   android:id="@+id/rd1"
   android:layout_width="match_parent"
   android:layout_height="wrap_content"
   android:text="开源的" />

  <RadioButton
   android:id="@+id/rd2"
   android:layout_width="match_parent"
   android:layout_height="wrap_content"
   android:text="非开源的" />
 </RadioGroup>

 <TextView
  android:id="@+id/textView4"
  android:layout_width="wrap_content"
  android:layout_height="wrap_content"
  android:layout_marginTop="20dp"
  android:text="@string/di3ti"
  app:layout_constraintStart_toStartOf="@+id/textView3"
  app:layout_constraintTop_toBottomOf="@+id/radioGroup" />

 <CheckBox
  android:id="@+id/cb2"
  android:layout_width="wrap_content"
  android:layout_height="wrap_content"
  android:layout_marginStart="60dp"
  android:text="JAVA"
  app:layout_constraintStart_toEndOf="@+id/cb1"
  app:layout_constraintTop_toBottomOf="@+id/textView4" />

 <CheckBox
  android:id="@+id/cb1"
  android:layout_width="wrap_content"
  android:layout_height="wrap_content"
  android:text="JDK"
  app:layout_constraintStart_toStartOf="@+id/textView4"
  app:layout_constraintTop_toBottomOf="@+id/textView4" />

 <CheckBox
  android:id="@+id/cb3"
  android:layout_width="wrap_content"
  android:layout_height="wrap_content"
  android:layout_marginStart="60dp"
  android:text="SDK"
  app:layout_constraintStart_toEndOf="@+id/cb2"
  app:layout_constraintTop_toBottomOf="@+id/textView4" />

 <TextView
  android:id="@+id/textView5"
  android:layout_width="wrap_content"
  android:layout_height="wrap_content"
  android:layout_marginTop="20dp"
  android:text="@string/di4ti"
  app:layout_constraintStart_toStartOf="@+id/textView4"
  app:layout_constraintTop_toBottomOf="@+id/cb1" />

 <Spinner
  android:id="@+id/spinner"
  android:layout_width="130dp"
  android:layout_height="30dp"
  android:entries="@array/Systems"
  app:layout_constraintStart_toStartOf="@+id/textView5"
  app:layout_constraintTop_toBottomOf="@+id/textView5" />

 <TextView
  android:id="@+id/textView6"
  android:layout_width="wrap_content"
  android:layout_height="wrap_content"
  android:layout_marginStart="104dp"
  android:layout_marginBottom="36dp"
  android:text="总得分:"
  app:layout_constraintBottom_toTopOf="@+id/button"
  app:layout_constraintStart_toStartOf="parent" />

 <TextView
  android:id="@+id/sorce"
  android:layout_width="wrap_content"
  android:layout_height="wrap_content"
  android:background="#F1ED06"
  android:text="   00   "
  app:layout_constraintBottom_toBottomOf="@+id/textView6"
  app:layout_constraintEnd_toEndOf="parent"
  app:layout_constraintHorizontal_bias="0.025"
  app:layout_constraintStart_toEndOf="@+id/textView6"
  app:layout_constraintTop_toTopOf="@+id/textView6"
  app:layout_constraintVertical_bias="0.0" />

 <Button
  android:id="@+id/button"
  android:layout_width="wrap_content"
  android:layout_height="wrap_content"
  android:layout_marginBottom="20dp"
  android:text="@string/subscribe"
  app:layout_constraintBottom_toBottomOf="parent"
  app:layout_constraintEnd_toEndOf="parent"
  app:layout_constraintStart_toStartOf="parent" />

</androidx.constraintlayout.widget.ConstraintLayout>
2.strings.xml
<resources>
 <string name="app_name">zuoye06_231</string>
 <string name="di1ti">年11月5日,Google发布安卓系统(答:2007)</string>
 <string name="di2ti">Android操作系统是(答:开源的)</string>
 <string name="di3ti">Android Studio 开发Android程序,还需安装:(1、3)</string>
 <string name="di4ti">Android是基于?平台手机的操作系统(Linux)</string>
 <string name="subscribe">提交</string>
</resources>
3.Systems.xml
<?xml version="1.0" encoding="utf-8"?>
<resources>
 <string-array name="Systems">
  <item>Windows</item>
  <item>Linux</item>
  <item>Mac</item>
 </string-array>
</resources>
4.java代码
package com.example.lenovo.zuoye06_231;

import androidx.appcompat.app.AppCompatActivity;

import android.os.Bundle;
import android.view.KeyEvent;
import android.view.View;
import android.widget.AdapterView;
import android.widget.Button;
import android.widget.CheckBox;
import android.widget.RadioButton;
import android.widget.RadioGroup;
import android.widget.Spinner;
import android.widget.TextView;
import android.widget.Toast;
import android.widget.CompoundButton;

public class MainActivity extends AppCompatActivity {
 static int i = 0,cb_num = 0;
 boolean rd_num = false,sp_num = false,et_num = false;
 TextView sorce;
 TextView et_on;
 RadioGroup rd;
 Button button;
 CheckBox checkBox1;
 CheckBox checkBox2;
 CheckBox checkBox3;

 @Override
 protected void onCreate(Bundle savedInstanceState) {
  super.onCreate(savedInstanceState);
  setContentView(R.layout.activity_main);

  //定义
  et_on = findViewById(R.id.et_on);
  sorce = findViewById(R.id.sorce);
  rd = findViewById(R.id.radioGroup);
  button = findViewById(R.id.button);
  checkBox1 = findViewById(R.id.cb1);
  checkBox2 = findViewById(R.id.cb2);
  checkBox3 = findViewById(R.id.cb3);

  //为每个复选按钮设置状态改变监听器
  checkBox1.setOnCheckedChangeListener(new CompoundButton.OnCheckedChangeListener(){
   @Override
   public void onCheckedChanged(CompoundButton buttonView, boolean isChecked) {
    // TODO Auto-generated method stub
    if(isChecked) cb_num++;
    else cb_num--;
   }
  });
  checkBox2.setOnCheckedChangeListener(new CompoundButton.OnCheckedChangeListener(){
   @Override
   public void onCheckedChanged(CompoundButton buttonView, boolean isChecked) {
    // TODO Auto-generated method stub
    if(isChecked) cb_num--;
    else cb_num++;
   }
  });
  checkBox3.setOnCheckedChangeListener(new CompoundButton.OnCheckedChangeListener(){
   @Override
   public void onCheckedChanged(CompoundButton buttonView, boolean isChecked) {
    // TODO Auto-generated method stub
    if(isChecked) cb_num++;
    else cb_num--;
   }
  });

  //设置单选按钮组添加事件监听
  rd.setOnCheckedChangeListener(new RadioGroup.OnCheckedChangeListener() {

   @Override
   public void onCheckedChanged(RadioGroup group, int checkedId) {
    //获取被选择的单选按钮
    RadioButton r = (RadioButton) findViewById(checkedId);
    if(r.getText().equals("开源的")) rd_num = true;
    else rd_num = false;
   }
  });

  //edittext监听
  et_on.setOnEditorActionListener(new TextView.OnEditorActionListener() {
   @Override
   public boolean onEditorAction(TextView textView, int i, KeyEvent keyEvent) {
    if(et_on.getText().toString().equals("2007")) et_num = true;
    else et_num = false;
    return false;
   }
  });

  //获取下拉列表对象
  final Spinner spinner = (Spinner) findViewById(R.id.spinner);
  //为Spinner添加选择监听器
  spinner.setOnItemSelectedListener(new AdapterView.OnItemSelectedListener() {
   @Override
   //数据选择事件处理
   public void onItemSelected(AdapterView<?> parent, View view, int pos, long id) {
    String[] Systems = getResources().getStringArray(R.array.Systems);
    //显示选择结果
    if(Systems[pos].equals("Linux")) sp_num = true;
    else sp_num = false;
   }
   //以下方法重写必须有
   @Override
   public void onNothingSelected(AdapterView<?> parent) {
    // Another interface callback
   }
  });

  button.setOnClickListener(new View.OnClickListener() {
   @Override
   public void onClick(View v) {
    if(cb_num == 2) i++;
    if(sp_num) i++;
    if(et_num) i++;
    if(rd_num) i++;
    sorce.setText("   "+(i*25)+"   ");
    if(i == 4)
     Toast.makeText(MainActivity.this,"你真棒!祝贺你!", Toast.LENGTH_SHORT).show();
    else if(i == 3)
     Toast.makeText(MainActivity.this,"祝贺你通过考试!", Toast.LENGTH_SHORT).show();
    else
     Toast.makeText(MainActivity.this,"还需努力啊!", Toast.LENGTH_SHORT).show();
   }
  });
 }
}
四、结论
1.当用户填写的时候最终答案是按最后修改的来确定的。
2.考虑到正常情况下当用户提交后数据已经上传到网络上,所以没有添加不能二次修改的代码,因此测试的时候会出现第一次提交后不退出,修改后结果会出问题。
五、参考文章
3.29更新
如果想要解决不能2次修改问题可以加一个状态标志符。
如果想要解决二次提交后累加的问题,可以在Toast后加一个i=0。
到此这篇关于android studio实现简单考试应用程序的文章就介绍到这了,更多相关android studio实现 考试应用程序内容请搜索我们以前的文章或继续浏览下面的相关文章希望大家以后多多支持我们!

