java+jsp+struts2实现发送邮件功能
以下总结是2016/3/23在做一个网站时遇到的一个功能模块,现在将总结从为知笔记上搬家到CSDN,与大家共享,欢迎指正。


0.准备工作
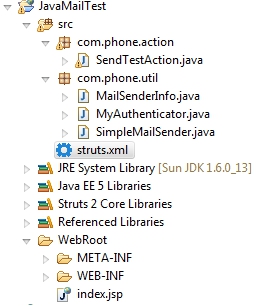
0.1先建立一个web项目,添加struts2开发包
0.2.需要另外导入一下两个jar包 mail.jar,activation.jar,可以自己网上下载,很多的!
以下为详细过程!
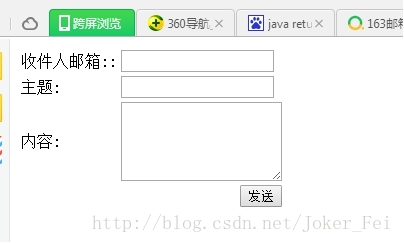
1.index.jsp页面
<%@ page language="java" import="java.util.*" pageEncoding="UTF-8"%>
<%@ taglib prefix="s" uri="/struts-tags" %>
<!DOCTYPE HTML PUBLIC "-//W3C//DTD HTML 4.01 Transitional//EN">
<%
String path = request.getContextPath();
String basePath = request.getScheme()+"://"+request.getServerName()+":"+request.getServerPort()+path+"/";
%>

<html>
 <head>

  <title>My JSP 'index.jsp' starting page</title>
    <meta http-equiv="pragma" content="no-cache">
<meta http-equiv="cache-control" content="no-cache">
<meta http-equiv="expires" content="0">
<meta http-equiv="keywords" content="keyword1,keyword2,keyword3">
<meta http-equiv="description" content="This is my page">
 </head>
 <body>
  <s:form action="sendTextMail" namespace="/mail">
    <s:textfield name="to" label="收件人邮箱:"></s:textfield>
    <s:textfield name="subject" label="主题"></s:textfield>
    <s:textarea name="content" label="内容" rows="5"></s:textarea>
    <s:submit value="发送"></s:submit>
  </s:form>
 </body>
</html>
2.SendTestAction.java类
package com.phone.action;
import java.io.PrintWriter;
import javax.servlet.http.HttpServletResponse;
import com.opensymphony.xwork2.ActionSupport;
import com.phone.util.MailSenderInfo;
import com.phone.util.SimpleMailSender;

public class SendTestAction extends ActionSupport {
  private static final long serialVersionUID = 1L;
  private String to;
  private String qq;
  private String password;
  private String subject;
  private String content;

  public String getTo() {
    return to;
  }

  public void setTo(String to) {
    this.to = to;
  }
  public String getQq() {
    return qq;
  }

  public void setQq(String qq) {
    this.qq = qq;
  }

  public String getPassword() {
    return password;
  }

  public void setPassword(String password) {
    this.password = password;
  }

  public String getSubject() {
    return subject;
  }

  public void setSubject(String subject) {
    this.subject = subject;
  }

  public String getContent() {
    return content;
  }

  public void setContent(String content) {
    this.content = content;
  }

  @Override
  public String execute() throws Exception {
    MailSenderInfo mailInfo = new MailSenderInfo();
    mailInfo.setMailServerHost("smtp.163.com");
    mailInfo.setMailServerPort("25");
    mailInfo.setValidate(true);
    mailInfo.setFromAddress("m15504506083@163.com");//自己邮箱
    mailInfo.setToAddress(to);//目标邮箱
    mailInfo.setUserName("m15504506083@163.com");//自己邮箱
    //需要开启此邮箱的POP3/SMTP/IMAP服务,具体设置进入邮箱以后在“设置”里进行开启
    mailInfo.setPassword("syfhhd52");//自己邮箱密码
    //System.out.println("password="+password);
    mailInfo.setSubject(subject);
    mailInfo.setContent(content);

    boolean isSend = SimpleMailSender.sendTextMail(mailInfo);

    /*HttpServletResponse response;
    PrintWriter out = response.getWriter();*/

    if(isSend){
      return SUCCESS;
      //return out.write("<script>alert('发送成功!');history.back();</script>");

    }
    addActionError("发送失败!");
    return INPUT;
  }
}
3.3个主要实现发送邮件的类
3.1 MailSenderInfo.java –邮件实体类
package com.phone.util;

import java.util.Properties;

public class MailSenderInfo {
  //发送邮件服务器IP
  private String mailServerHost ;
  //发送邮件服务器端口
  private String mailServerPort = "25";
  //邮件发送地址
  private String fromAddress;
  //邮件接受者地址
  private String toAddress;
  //发送邮件服务器的登录用户名
  private String userName;
  //发送邮件服务器的登录密码
  private String password;
  //是否需要身份验证
  private boolean validate = false;
  //邮件主题
  private String subject;
  //邮件的文本内容
  private String content;
  //邮件附件的文件名
  private String[] attachFileNames;
  //发送人的邮件信息,在创建Session是使用
  public Properties getProperties(){
    Properties p = new Properties();
    p.put("mail.smtp.host", this.mailServerHost);
    p.put("mail.smtp.port", this.mailServerPort);
    p.put("mail.smtp.auth", validate ? "true" : "false");
    return p;
  }
  public String getMailServerHost() {
    return mailServerHost;
  }
  public void setMailServerHost(String mailServerHost) {
    this.mailServerHost = mailServerHost;
  }
  public String getMailServerPort() {
    return mailServerPort;
  }
  public void setMailServerPort(String mailServerPort) {
    this.mailServerPort = mailServerPort;
  }
  public String getFromAddress() {
    return fromAddress;
  }
  public void setFromAddress(String fromAddress) {
    this.fromAddress = fromAddress;
  }
  public String getToAddress() {
    return toAddress;
  }
  public void setToAddress(String toAddress) {
    this.toAddress = toAddress;
  }
  public String getUserName() {
    return userName;
  }
  public void setUserName(String userName) {
    this.userName = userName;
  }
  public String getPassword() {
    return password;
  }
  public void setPassword(String password) {
    this.password = password;
  }
  public boolean isValidate() {
    return validate;
  }
  public void setValidate(boolean validate) {
    this.validate = validate;
  }
  public String getSubject() {
    return subject;
  }
  public void setSubject(String subject) {
    this.subject = subject;
  }
  public String getContent() {
    return content;
  }
  public void setContent(String content) {
    this.content = content;
  }
  public String[] getAttachFileNames() {
    return attachFileNames;
  }
  public void setAttachFileNames(String[] attachFileNames) {
    this.attachFileNames = attachFileNames;
  }
}
3.2 MyAuthenticator.java —认证所需
package com.phone.util;

import javax.mail.Authenticator;
import javax.mail.PasswordAuthentication;

public class MyAuthenticator extends Authenticator{
  private String userName;
  private String password;

  public MyAuthenticator() {}

  public MyAuthenticator(String userName, String password) {
    this.userName = userName;
    this.password = password;
  }

  @Override
  protected PasswordAuthentication getPasswordAuthentication() {
    return new PasswordAuthentication(userName, password);
  }

}
3.3 SimpleMailSender.java –构建发送邮件
package com.phone.util;
import java.util.Date;
import java.util.Properties;
import javax.mail.Address;
import javax.mail.BodyPart;
import javax.mail.Message;
import javax.mail.MessagingException;
import javax.mail.Multipart;
import javax.mail.Session;
import javax.mail.Transport;
import javax.mail.internet.InternetAddress;
import javax.mail.internet.MimeBodyPart;
import javax.mail.internet.MimeMessage;
import javax.mail.internet.MimeMultipart;

public class SimpleMailSender {
  // 发送文本格式的邮件
  public static boolean sendTextMail(MailSenderInfo mailInfo) {

    MyAuthenticator authenticator = null;
    Properties properties = mailInfo.getProperties();
    // 如果需要身份认证,则创建一个密码验证器
    if (mailInfo.isValidate()) {
      authenticator = new MyAuthenticator(mailInfo.getUserName(),
          mailInfo.getPassword());
    }
    // 根据发件人的服务器信息和发件人用户名和密码构造一个发送邮件的session
    Session sendMailSession = Session.getDefaultInstance(properties,
        authenticator);
    try {
      // 根据session创建一个邮件消息
      Message mailMessage = new MimeMessage(sendMailSession);
      // 创建邮件发送者地址
      Address from = new InternetAddress(mailInfo.getFromAddress());
      // 设置邮件消息的发送者
      mailMessage.setFrom(from);
      // 创建邮件的接收者地址,并设置到邮件消息中
      Address to = new InternetAddress(mailInfo.getToAddress());
      mailMessage.setRecipient(Message.RecipientType.TO, to);
      // 设置邮件消息的主题
      mailMessage.setSubject(mailInfo.getSubject());
      // 设置邮件消息发送的时间
      mailMessage.setSentDate(new Date());
      // 设置邮件消息的主要内容
      String mailContent = mailInfo.getContent();
      mailMessage.setText(mailContent);
      // 发送邮件
      Transport.send(mailMessage);
      return true;
    } catch (Exception e) {
      e.printStackTrace();
    }

    return false;
  }

  // 发送HTML格式的邮件
  public static boolean sendHtmlMail(MailSenderInfo mailInfo) {
    // 判断是否需要身份认证
    MyAuthenticator authenticator = null;
    Properties pro = mailInfo.getProperties();
    // 如果需要身份认证,则创建一个密码验证器
    if (mailInfo.isValidate()) {
      authenticator = new MyAuthenticator(mailInfo.getUserName(),
          mailInfo.getPassword());
    }
    // 根据邮件会话属性和密码验证器构造一个发送邮件的session
    Session sendMailSession = Session.getInstance(pro, authenticator);
    try {
      // 根据session创建一个邮件消息
      Message mailMessage = new MimeMessage(sendMailSession);
      // 创建邮件发送者地址
      Address from = new InternetAddress(mailInfo.getFromAddress());
      // 设置邮件消息的发送者
      mailMessage.setFrom(from);
      // 创建邮件的接收者地址,并设置到邮件消息中
      Address to = new InternetAddress(mailInfo.getToAddress());
      // Message.RecipientType.TO属性表示接收者的类型为TO
      mailMessage.setRecipient(Message.RecipientType.TO, to);
      // 设置邮件消息的主题
      mailMessage.setSubject(mailInfo.getSubject());
      // 设置邮件消息发送的时间
      mailMessage.setSentDate(new Date());
      // MiniMultipart类是一个容器类,包含MimeBodyPart类型的对象
      Multipart mainPart = new MimeMultipart();
      // 创建一个包含HTML内容的MimeBodyPart
      BodyPart html = new MimeBodyPart();
      // 设置HTML内容
      html.setContent(mailInfo.getContent(), "text/html;charset=utf-8");
      mainPart.addBodyPart(html);
      // 将MiniMultipart对象设置为邮件内容
      mailMessage.setContent(mainPart);
      // 发送邮件
      Transport.send(mailMessage);
      return true;
    } catch (MessagingException ex) {
      ex.printStackTrace();
    }
    return false;
  }
}
4. struts.xml配置
<?xml version="1.0" encoding="UTF-8" ?>
<!DOCTYPE struts PUBLIC "-//Apache Software Foundation//DTD Struts Configuration 2.1//EN" "http://struts.apache.org/dtds/struts-2.1.dtd">
<struts>
 <!-- 设置浏览器不缓存 -->
  <constant name="struts.serve.static.browserCache" value="false"></constant>
  <!-- 修改XML后不重启自动加载 -->
  <constant name="struts.configuration.xml.reload" value="true"></constant>
  <!-- 打印更详细的错误信息 -->
  <constant name="struts.devMode" value="true"></constant>
  <package name="mail" namespace="/mail" extends="struts-default">
    <action name="sendTextMail" class="com.phone.action.SendTestAction">
      <result name="success">/success.jsp</result>
      <result name="input">/index.jsp</result>
    </action>
  </package>
</struts>
注意:
登陆所用邮箱必须开启POP3/SMTP/IMAP服务,登陆邮箱,点击“设置”进行开启。

以上就是本文的全部内容,希望对大家的学习有所帮助,也希望大家多多支持我们。
赞 (0)

