rabbitmq五种模式详解(含实现代码)
一、五种模式详解
1.简单模式(Queue模式)
当生产端发送消息到交换机,交换机根据消息属性发送到队列,消费者监听绑定队列实现消息的接收和消费逻辑编写.简单模式下,强调的一个队列queue只被一个消费者监听消费.
1.1 结构

生产者:生成消息,发送到交换机交换机:根据消息属性,将消息发送给队列消费者:监听这个队列,发现消息后,获取消息执行消费逻辑
1.2应用场景
常见的应用场景就是一发,一接的结构
例如:
手机短信邮件单发
2.争抢模式(Work模式)
强调的也是后端队列与消费者绑定的结构
2.1结构

生产者:发送消息到交换机交换机:根据消息属性将消息发送给队列消费者:多个消费者,同时绑定监听一个队列,之间形成了争抢消息的效果
2.2应用场景
- 抢红包
- 资源分配系统
3.路由模式(Route模式 Direct定向)
从路由模式开始,关心的就是消息如何到达的队列,路由模式需要使用的交换机类型就是路由交换机(direct)
3.1 结构

- 生产端:发送消息,在消息中处理消息内容,携带一个routingkey
- 交换机:接收消息,根据消息的routingkey去计算匹配后端队列的routingkey
- 队列:存储交换机发送的消息
- 消费端:简单模式 工作争抢
3.2应用场景
- 短信
- 聊天工具
- 邮箱。。
手机号/邮箱地址,都可以是路由key
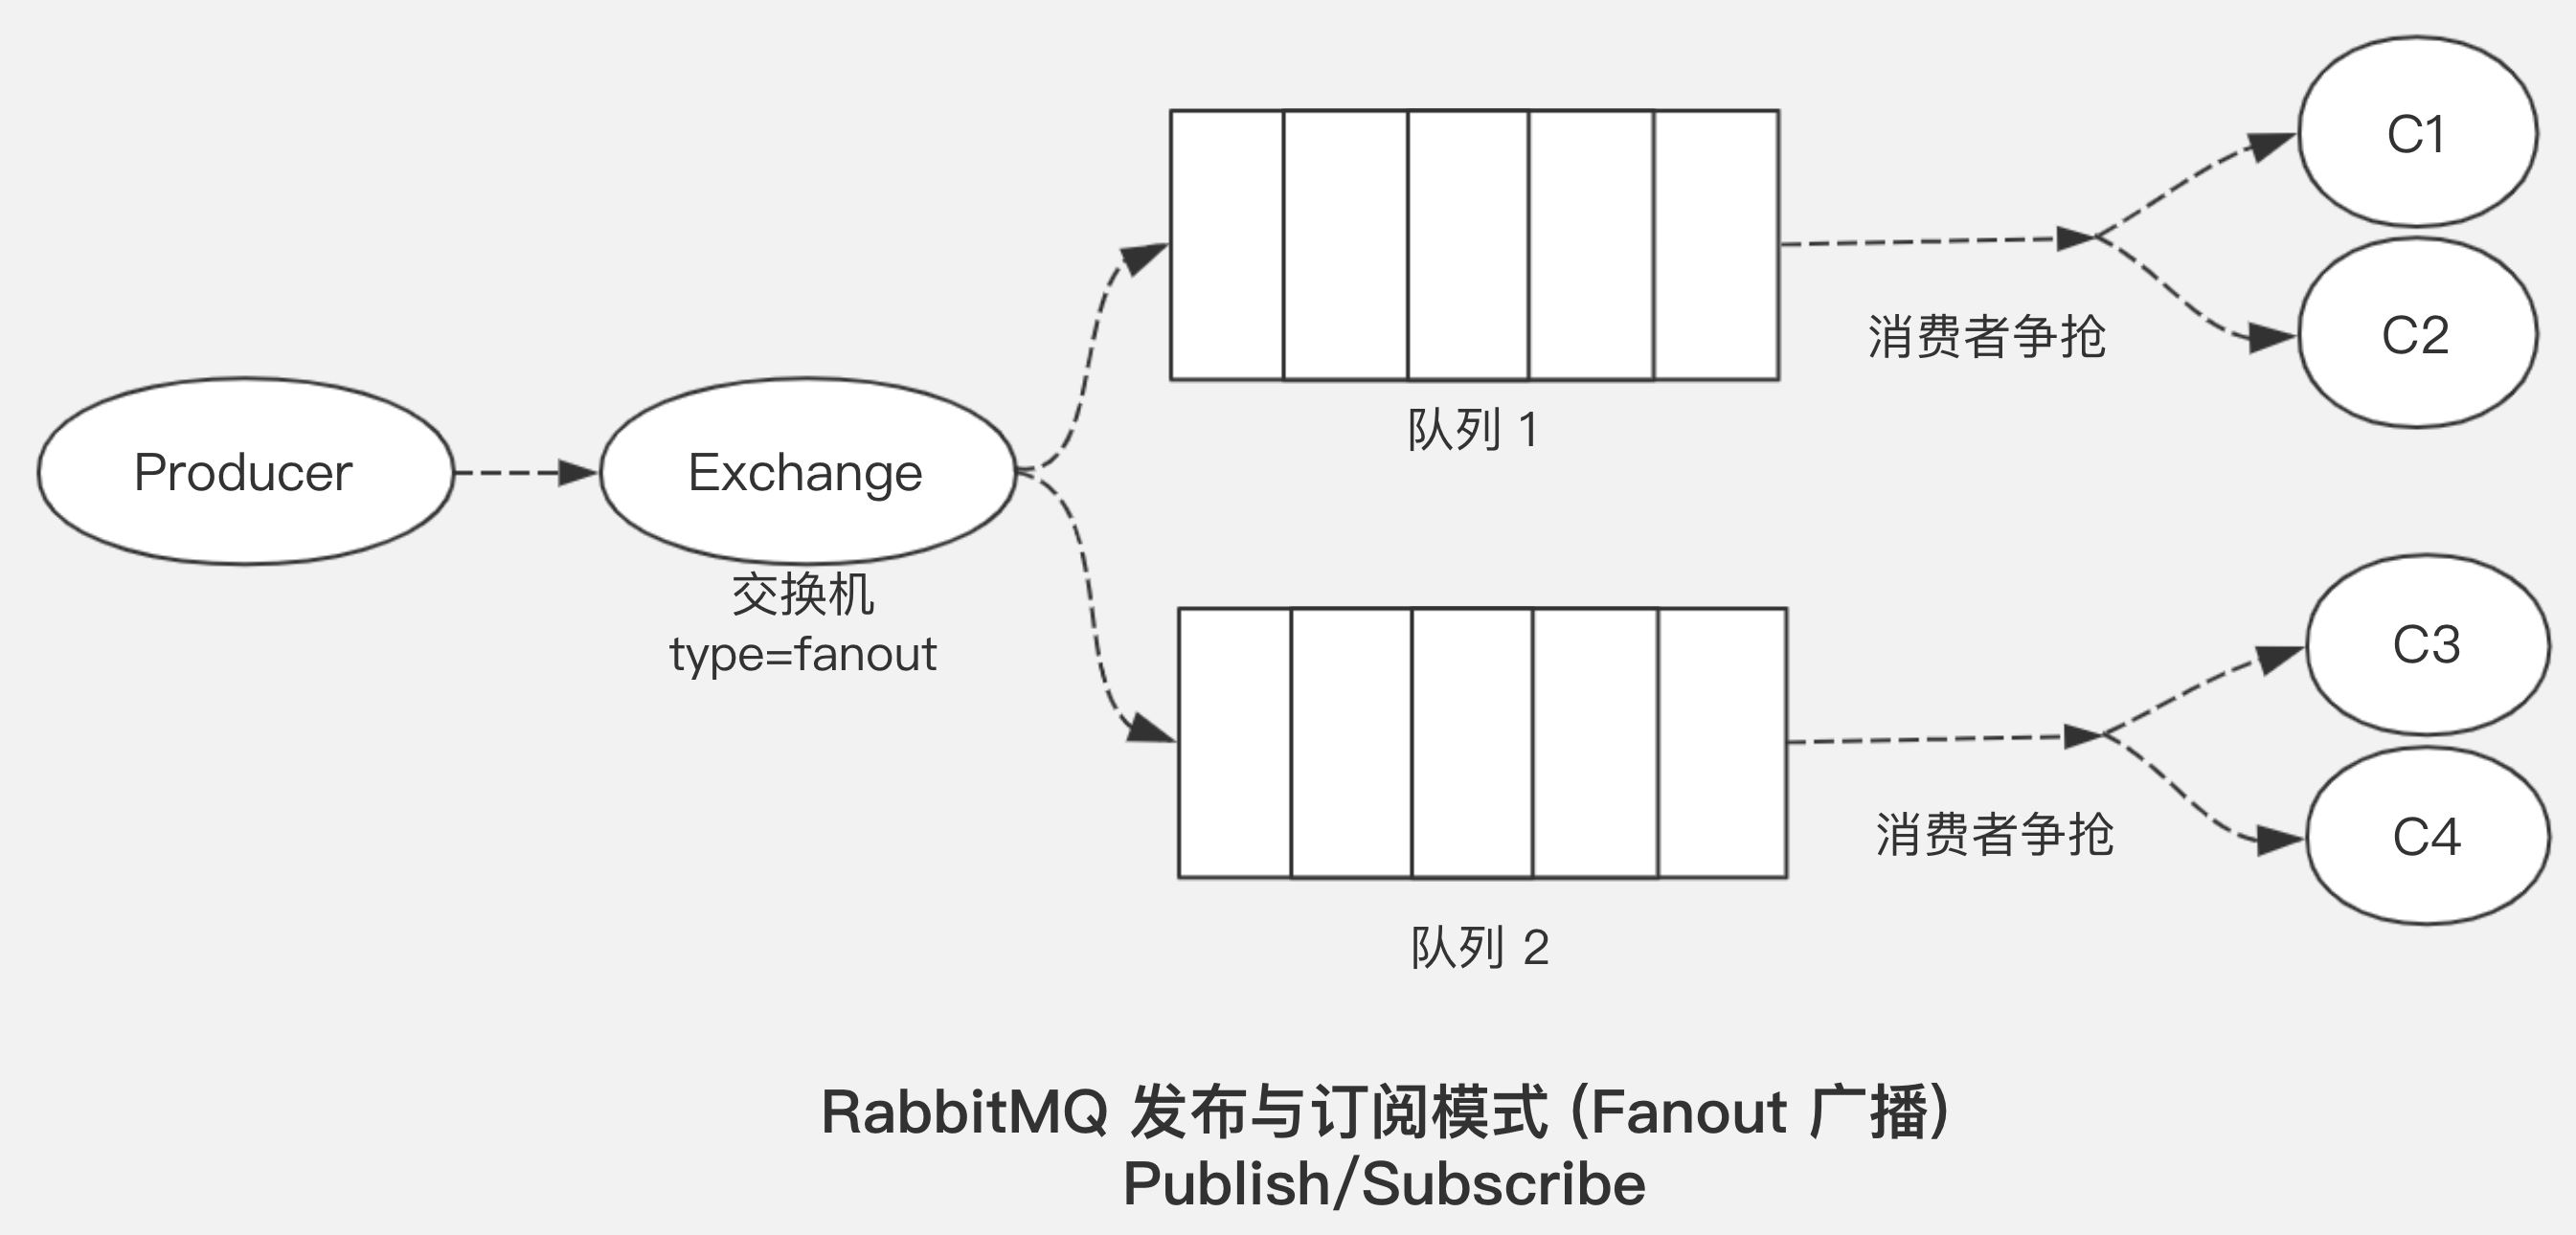
4.发布订阅模式(Pulish/Subscribe模式 Fanout广播)
不计算路由的一种特殊交换机
4.1结构
4.2应用场景
- 消息推送
- 广告
5.主题模式(Topics模式 Tpoic通配符)
路由key值是一种多级路径。中国.四川.成都.武侯区
5.1结构

生产端:携带路由key,发送消息到交换机
队列:绑定交换机和路由不一样,不是一个具体的路由key,而可以使用*和#代替一个范围
| * | 字符串,只能表示一级 |
| --- | --- |
| # | 多级字符串 |
交换机:根据匹配规则,将路由key对应发送到队列
消息路由key:
- 北京市.朝阳区.酒仙桥
- 北京市.#: 匹配true
- 上海市.浦东区.*: 没匹配false
- 新疆.乌鲁木齐.#
5.2 应用场景
做物流分拣的多级传递.
6.完整结构

二、代码实现
1.创建SpringBoot工程
1.1 工程基本信息

1.2 依赖信息

1.3 配置文件applicasion.properties
# 应用名称
spring.application.name=springboot-demo
# Actuator Web 访问端口
management.server.port=8801
management.endpoints.jmx.exposure.include=*
management.endpoints.web.exposure.include=*
management.endpoint.health.show-details=always
# 应用服务 WEB 访问端口
server.port=8801

######################### RabbitMQ配置 ########################
# RabbitMQ主机
spring.rabbitmq.host=127.0.0.1
# RabbitMQ虚拟主机
spring.rabbitmq.virtual-host=demo
# RabbitMQ服务端口
spring.rabbitmq.port=5672
# RabbitMQ服务用户名
spring.rabbitmq.username=admin
# RabbitMQ服务密码
spring.rabbitmq.password=admin
# RabbitMQ服务发布确认属性配置
## NONE值是禁用发布确认模式,是默认值
## CORRELATED值是发布消息成功到交换器后会触发回调方法
## SIMPLE值经测试有两种效果,其一效果和CORRELATED值一样会触发回调方法,其二在发布消息成功后使用rabbitTemplate调用waitForConfirms或waitForConfirmsOrDie方法等待broker节点返回发送结果,根据返回结果来判定下一步的逻辑,要注意的点是waitForConfirmsOrDie方法如果返回false则会关闭channel,则接下来无法发送消息到broker;
spring.rabbitmq.publisher-confirm-type=simple
# RabbitMQ服务开启消息发送确认
spring.rabbitmq.publisher-returns=true
######################### simple模式配置 ########################
# RabbitMQ服务 消息接收确认模式
## NONE:不确认
## AUTO:自动确认
## MANUAL:手动确认
spring.rabbitmq.listener.simple.acknowledge-mode=manual
# 指定最小的消费者数量
spring.rabbitmq.listener.simple.concurrency=1
# 指定最大的消费者数量
spring.rabbitmq.listener.simple.max-concurrency=1
# 开启支持重试
spring.rabbitmq.listener.simple.retry.enabled=true
2.简单模式
2.1 创建SimpleQueueConfig 简单队列配置类
package com.gmtgo.demo.simple;

import org.springframework.amqp.core.Queue;
import org.springframework.context.annotation.Bean;
import org.springframework.context.annotation.Configuration;

/**
 * @author 大帅
 */
@Configuration
public class SimpleQueueConfig {
    /**
     * 定义简单队列名.
     */
    private final String simpleQueue = "queue_simple";
    @Bean
    public Queue simpleQueue() {
        return new Queue(simpleQueue);
    }
}
2.2 编写生产者
package com.gmtgo.demo.simple;

import lombok.extern.slf4j.Slf4j;
import org.springframework.amqp.rabbit.core.RabbitTemplate;
import org.springframework.beans.factory.annotation.Autowired;
import org.springframework.stereotype.Component;

/**
 * @author 大帅
 */
@Slf4j
@Component
public class SimpleProducer {
    @Autowired
    private RabbitTemplate rabbitTemplate;

    public void sendMessage() {
        for (int i = 0; i < 5; i++) {
            String message = "简单消息" + i;
            log.info("我是生产信息:{}", message);
            rabbitTemplate.convertAndSend( "queue_simple", message);
        }
    }
}
2.3 编写消费者
package com.gmtgo.demo.simple;

import com.rabbitmq.client.Channel;
import lombok.extern.slf4j.Slf4j;
import org.springframework.amqp.core.Message;
import org.springframework.amqp.rabbit.annotation.RabbitListener;
import org.springframework.stereotype.Component;

import java.io.IOException;

/**
 * @author 大帅
 */
@Slf4j
@Component
public class SimpleConsumers {

    @RabbitListener(queues = "queue_simple")
    public void readMessage(Message message, Channel channel) throws IOException {
        channel.basicAck(message.getMessageProperties().getDeliveryTag(), false);
        log.info("我是消费信息:{}", new String(message.getBody()));
    }
}
2.4 编写访问类
package com.gmtgo.demo.simple;

import org.springframework.beans.factory.annotation.Autowired;
import org.springframework.web.bind.annotation.RequestMapping;
import org.springframework.web.bind.annotation.RestController;

/**
 * @author 大帅
 */
@RestController
@RequestMapping(value = "/rabbitMq")
public class SimpleRabbitMqController {

    @Autowired
    private SimpleProducer simpleProducer;

    @RequestMapping(value = "/simpleQueueTest")
    public String simpleQueueTest() {
        simpleProducer.sendMessage();
        return "success";
    }
}
2.5 测试启动项目访问 simpleQueueTest
访问地址:http://127.0.0.1:8801/rabbitMq/simpleQueueTest
结果:

3.Work队列
3.1 编写工作配置
package com.gmtgo.demo.work;

import org.springframework.amqp.core.Queue;
import org.springframework.context.annotation.Bean;
import org.springframework.context.annotation.Configuration;

/**
 * @author 大帅
 */
@Configuration
public class WorkQueueConfig {

    /**
     * 队列名.
     */
    private final String work = "work_queue";

    @Bean
    public Queue workQueue() {
        return new Queue(work);
    }
}
3.2 编写生产者
package com.gmtgo.demo.work;

import lombok.extern.slf4j.Slf4j;
import org.springframework.amqp.rabbit.core.RabbitTemplate;
import org.springframework.beans.factory.annotation.Autowired;
import org.springframework.stereotype.Component;

/**
 * @author 大帅
 */
@Slf4j
@Component
public class WorkProducer {

    @Autowired
    private RabbitTemplate rabbitTemplate;

    public void sendMessage() {
        for (int i = 0; i < 10; i++) {
            String message = "工作消息" + i;
            log.info("我是生产信息:{}", message);
            rabbitTemplate.convertAndSend("work_queue", message);
        }
    }
}
3.3 编写消费者1
package com.gmtgo.demo.work;

import com.rabbitmq.client.Channel;
import lombok.extern.slf4j.Slf4j;
import org.springframework.amqp.core.Message;
import org.springframework.amqp.rabbit.annotation.RabbitListener;
import org.springframework.stereotype.Component;

import java.io.IOException;

/**
 * @author 大帅
 */
@Slf4j
@Component
public class WorkConsumers1 {

    @RabbitListener(queues = "work_queue")
    public void readMessage(Message message, Channel channel) throws IOException {
        channel.basicAck(message.getMessageProperties().getDeliveryTag(), false);
        log.info("我是消费信息1:{}", new String(message.getBody()));
    }
}
3.4 编写消费者2
package com.gmtgo.demo.work;

import com.rabbitmq.client.Channel;
import lombok.extern.slf4j.Slf4j;
import org.springframework.amqp.core.Message;
import org.springframework.amqp.rabbit.annotation.RabbitListener;
import org.springframework.stereotype.Component;

import java.io.IOException;

/**
 * @author 大帅
 */
@Slf4j
@Component
public class WorkConsumers2 {

    @RabbitListener(queues = "work_queue")
    public void readMessage(Message message, Channel channel) throws IOException {
        channel.basicAck(message.getMessageProperties().getDeliveryTag(), false);
        log.info("我是消费信息2:{}", new String(message.getBody()));
    }
}
3.5 编写测试方法
package com.gmtgo.demo.work;

import org.springframework.beans.factory.annotation.Autowired;
import org.springframework.web.bind.annotation.RequestMapping;
import org.springframework.web.bind.annotation.RestController;

/**
 * @author 大帅
 */
@RestController
@RequestMapping(value = "rabbitMq")
public class WorkRabbitMqController {
    @Autowired
    private WorkProducer workProducer;

    @RequestMapping(value = "workQueueTest")
    public String workQueueTest() {
        workProducer.sendMessage();
        return "success";
    }
}
3.6 测试启动项目访问 workQueueTest
访问地址http://127.0.0.1:8801/rabbitMq/workQueueTest
结果:

控制台打印,发现10条消息 偶数条消费者1获取,奇数条消费者2获取,并且平均分配。
当然通过代码实现按需分配,即谁的性能强,谁优先原则,实现负载均衡。
配置可控分配数

4. 发布订阅模式(Publish/Subscibe模式)
订阅模式–多个消费者监听不同的队列,但队列都绑定同一个交换机
4.1 编写订阅配置类
package com.gmtgo.demo.fanout;

import org.springframework.amqp.core.Binding;
import org.springframework.amqp.core.BindingBuilder;
import org.springframework.amqp.core.FanoutExchange;
import org.springframework.amqp.core.Queue;
import org.springframework.context.annotation.Bean;
import org.springframework.context.annotation.Configuration;

/**
 * @author 大帅
 */
@Configuration
public class FanoutQueueConfig {

    /**
     * 声明队列名.
     */
    private final String fanout1 = "fanout_queue_1";

    private final String fanout2 = "fanout_queue_2";

    /**
     * 声明交换机的名字.
     */
    private final String fanoutExchange = "fanoutExchange";

    /**
     * 声明队列.
     *
     * @return
     */
    @Bean
    public Queue fanoutQueue1() {
        return new Queue(fanout1);
    }

    @Bean
    public Queue fanoutQueue2() {
        return new Queue(fanout2);
    }

    /**
     * 声明交换机.
     */
    @Bean
    public FanoutExchange exchange() {
        return new FanoutExchange(fanoutExchange);
    }

    /**
     * 队列绑定交换机,也可在可视化工具中进行绑定.
     *
     * @return
     */
    @Bean
    public Binding bindingFanoutQueue1(Queue fanoutQueue1, FanoutExchange exchange) {
        return BindingBuilder.bind(fanoutQueue1).to(exchange);
    }

    @Bean
    public Binding bindingFanoutQueue2(Queue fanoutQueue2, FanoutExchange exchange) {
        return BindingBuilder.bind(fanoutQueue2).to(exchange);
    }
}
4.2 编写订阅生产者
package com.gmtgo.demo.fanout;

import lombok.extern.slf4j.Slf4j;
import org.springframework.amqp.rabbit.core.RabbitTemplate;
import org.springframework.beans.factory.annotation.Autowired;
import org.springframework.stereotype.Component;

/**
 * @author 大帅
 */
@Slf4j
@Component
public class FanoutProducer {

    @Autowired
    private RabbitTemplate rabbitTemplate;

    public void sendMessage() {
        for (int i = 0; i < 5; i++) {
            String message = "订阅模式消息" + i;
            log.info("我是生产信息:{}", message);
            rabbitTemplate.convertAndSend("fanoutExchange", "", message);
        }
    }
}
4.3 编写订阅消费者1
package com.gmtgo.demo.fanout;

import com.rabbitmq.client.Channel;
import lombok.extern.slf4j.Slf4j;
import org.springframework.amqp.core.Message;
import org.springframework.amqp.rabbit.annotation.RabbitListener;
import org.springframework.stereotype.Component;

import java.io.IOException;

/**
 * @author 大帅
 */
@Slf4j
@Component
public class FanoutConsumers1 {

    @RabbitListener(queues = "fanout_queue_1")
    public void readMessage(Message message, Channel channel) throws IOException {
        channel.basicAck(message.getMessageProperties().getDeliveryTag(), false);
        log.info("我是消费信息1:{}", new String(message.getBody()));
    }
}
4.4 编写订阅消费者2
package com.gmtgo.demo.fanout;

import com.rabbitmq.client.Channel;
import lombok.extern.slf4j.Slf4j;
import org.springframework.amqp.core.Message;
import org.springframework.amqp.rabbit.annotation.RabbitListener;
import org.springframework.stereotype.Component;

import java.io.IOException;

/**
 * @author 大帅
 */
@Slf4j
@Component
public class FanoutConsumers2 {

    @RabbitListener(queues = "fanout_queue_2")
    public void readMessage(Message message, Channel channel) throws IOException {
        channel.basicAck(message.getMessageProperties().getDeliveryTag(), false);
        log.info("我是消费信息2:{}", new String(message.getBody()));
    }
}
4.5 编写测试方法
package com.gmtgo.demo.fanout;

import org.springframework.beans.factory.annotation.Autowired;
import org.springframework.web.bind.annotation.RequestMapping;
import org.springframework.web.bind.annotation.RestController;

/**
 * @author 大帅
 */
@RestController
@RequestMapping(value = "rabbitMq")
public class FanoutRabbitMqController {
    @Autowired
    private FanoutProducer fanoutProducer;

    @RequestMapping(value = "fanoutQueueTest")
    public String fanoutQueueTest() {
        fanoutProducer.sendMessage();
        return "success";
    }
}
3.6 测试启动项目访问 fanoutQueueTest

控制台打印 ,发现两个绑定了不同队列的消费者都接受到了同一条消息查看RabbitMq 服务器:


5. 路由模式(Route模式 Direct定向)
5.1 编写路由配置类
package com.gmtgo.demo.direct;

import org.springframework.amqp.core.Binding;
import org.springframework.amqp.core.BindingBuilder;
import org.springframework.amqp.core.DirectExchange;
import org.springframework.amqp.core.Queue;
import org.springframework.context.annotation.Bean;
import org.springframework.context.annotation.Configuration;

/**
 * @author 大帅
 */
@Configuration
public class DirectQueueConfig {

    /**
     * 声明队列名.
     */
    private final String direct1 = "direct_queue_1";

    private final String direct2 = "direct_queue_2";

    /**
     * 声明交换机的名字.
     */
    private final String directExchange = "directExchange";

    /**
     * 声明队列.
     *
     * @return
     */
    @Bean
    public Queue directQueue1() {
        return new Queue(direct1);
    }

    @Bean
    public Queue directQueue2() {
        return new Queue(direct2);
    }

    /**
     * 声明路由交换机.
     *
     * @return
     */
    @Bean
    public DirectExchange directExchange() {
        return new DirectExchange(directExchange);
    }

    /**
     * 队列绑定交换机,指定routingKey,也可在可视化工具中进行绑定.
     *
     * @return
     */
    @Bean
    Binding bindingDirectExchange1(Queue directQueue1, DirectExchange exchange) {
        return BindingBuilder.bind(directQueue1).to(exchange).with("update");
    }

    /**
     * 队列绑定交换机,指定routingKey,也可在可视化工具中进行绑定.
     *
     * @return
     */
    @Bean
    Binding bindingDirectExchange2(Queue directQueue2, DirectExchange exchange) {
        return BindingBuilder.bind(directQueue2).to(exchange).with("add");
    }

}
5.2 编写生产者
package com.gmtgo.demo.direct;

import lombok.extern.slf4j.Slf4j;
import org.springframework.amqp.rabbit.core.RabbitTemplate;
import org.springframework.beans.factory.annotation.Autowired;
import org.springframework.stereotype.Component;

/**
 * @author 大帅
 */
@Slf4j
@Component
public class DirectProducer {

    @Autowired
    private RabbitTemplate rabbitTemplate;

    public void sendMessageA() {
        for (int i = 0; i < 5; i++) {
            String message = "路由模式--routingKey=update消息" + i;
            log.info("我是生产信息:{}", message);
            rabbitTemplate.convertAndSend("directExchange", "update", message);
        }
    }

    public void sendMessageB() {
        for (int i = 0; i < 5; i++) {
            String message = "路由模式--routingKey=add消息" + i;
            log.info("我是生产信息:{}", message);
            rabbitTemplate.convertAndSend("directExchange", "add", message);
        }
    }
}
5.3 编写消费者1
package com.gmtgo.demo.direct;

import com.rabbitmq.client.Channel;
import lombok.extern.slf4j.Slf4j;
import org.springframework.amqp.core.Message;
import org.springframework.amqp.rabbit.annotation.RabbitListener;
import org.springframework.stereotype.Component;

import java.io.IOException;

/**
 * @author 大帅
 */
@Slf4j
@Component
public class DirectConsumers1 {

    @RabbitListener(queues = "direct_queue_1")
    public void readMessage(Message message, Channel channel) throws IOException {
        channel.basicAck(message.getMessageProperties().getDeliveryTag(), false);
        log.info("我是消费信息1:{}", new String(message.getBody()));
    }
}
5.4 编写消费者2
package com.gmtgo.demo.direct;

import com.rabbitmq.client.Channel;
import lombok.extern.slf4j.Slf4j;
import org.springframework.amqp.core.Message;
import org.springframework.amqp.rabbit.annotation.RabbitListener;
import org.springframework.stereotype.Component;

import java.io.IOException;

/**
 * @author 大帅
 */
@Slf4j
@Component
public class DirectConsumers2 {

    @RabbitListener(queues = "direct_queue_2")
    public void readMessage(Message message, Channel channel) throws IOException {
        channel.basicAck(message.getMessageProperties().getDeliveryTag(), false);
        log.info("我是消费信息2:{}", new String(message.getBody()));
    }
}
5.5 编写访问类
package com.gmtgo.demo.direct;

import org.springframework.beans.factory.annotation.Autowired;
import org.springframework.web.bind.annotation.RequestMapping;
import org.springframework.web.bind.annotation.RestController;

/**
 * @author 大帅
 */
@RestController
@RequestMapping(value = "rabbitMq")
public class DirectRabbitMqController {
    @Autowired
    private DirectProducer directProducer;

    @RequestMapping(value = "directQueueTest1")
    public String directQueueTest1() {
        directProducer.sendMessageA();
        return "success";
    }

    @RequestMapping(value = "directQueueTest2")
    public String directQueueTest2() {
        directProducer.sendMessageB();
        return "success";
    }
}
5.6 测试启动项目访问directQueueTest1 , directQueueTest2
访问地址http://127.0.0.1:8801/rabbitMq/directQueueTest1
访问地址http://127.0.0.1:8801/rabbitMq/directQueueTest2
结果:directQueueTest1:

directQueueTest2:

6. 主题模式(Topics模式 Tpoic通配符)
6.1 编写路由配置类
package com.gmtgo.demo.topic;

import org.springframework.amqp.core.*;
import org.springframework.context.annotation.Bean;
import org.springframework.context.annotation.Configuration;

/**
 * @author 大帅
 */
@Configuration
public class TopicQueueConfig {
    /**
     * 声明队列名.
     */
    private final String topic1 = "topic_queue_1";

    private final String topic2 = "topic_queue_2";

    /**
     * 声明交换机的名字.
     */
    private final String topicExchange = "topicExchange";

    /**
     * 声明队列.
     *
     * @return
     */
    @Bean
    public Queue topicQueue1() {
        return new Queue(topic1);
    }

    @Bean
    public Queue topicQueue2() {
        return new Queue(topic2);
    }

    /**
     * 声明路由交换机.
     *
     * @return
     */
    @Bean
    public TopicExchange topicExchange() {
        return new TopicExchange(topicExchange);
    }

    /**
     * 队列绑定交换机,指定routingKey,也可在可视化工具中进行绑定.
     *
     * @return
     */
    @Bean
    Binding bindingTopicExchange1(Queue topicQueue1, TopicExchange exchange) {
        return BindingBuilder.bind(topicQueue1).to(exchange).with("topic.keyA");
    }

    /**
     * 队列绑定交换机,指定routingKey,也可在可视化工具中进行绑定.
     * 绑定的routing key 也可以使用通配符:
     * *:匹配不多不少一个词
     * #:匹配一个或多个词
     *
     * @return
     */
    @Bean
    Binding bindingTopicExchange2(Queue topicQueue2, TopicExchange exchange) {
        return BindingBuilder.bind(topicQueue2).to(exchange).with("topic.#");
    }
}
6.2 编写生产者
package com.gmtgo.demo.topic;

import lombok.extern.slf4j.Slf4j;
import org.springframework.amqp.rabbit.core.RabbitTemplate;
import org.springframework.beans.factory.annotation.Autowired;
import org.springframework.stereotype.Component;
/**
 * @author 大帅
 */
@Slf4j
@Component
public class TopicProducer {

    @Autowired
    private RabbitTemplate rabbitTemplate;

    public void sendMessageA() {
        for (int i = 0; i < 5; i++) {
            String message = "通配符模式--routingKey=topic.keyA消息" + i;
            log.info("我是生产信息:{}", message);
            rabbitTemplate.convertAndSend("topicExchange", "topic.keyA", message);
        }
    }

    public void sendMessageB() {
        for (int i = 0; i < 5; i++) {
            String message = "通配符模式--routingKey=topic.#消息" + i;
            log.info("我是生产信息:{}", message);
            rabbitTemplate.convertAndSend("topicExchange", "topic.keyD.keyE", message);
        }
    }
}
6.3 编写消费者1
package com.gmtgo.demo.topic;
import com.rabbitmq.client.Channel;
import lombok.extern.slf4j.Slf4j;
import org.springframework.amqp.core.Message;
import org.springframework.amqp.rabbit.annotation.RabbitListener;
import org.springframework.stereotype.Component;

import java.io.IOException;
/**
 * @author 大帅
 */
@Slf4j
@Component
public class TopicConsumers1 {

    @RabbitListener(queues = "topic_queue_1")
    public void readMessage(Message message, Channel channel) throws IOException {
        channel.basicAck(message.getMessageProperties().getDeliveryTag(), false);
        log.info("我是消费信息1:{}",new String(message.getBody()));
    }
}
6.4 编写消费者2
package com.gmtgo.demo.topic;
import com.rabbitmq.client.Channel;
import lombok.extern.slf4j.Slf4j;
import org.springframework.amqp.core.Message;
import org.springframework.amqp.rabbit.annotation.RabbitListener;
import org.springframework.stereotype.Component;

import java.io.IOException;
/**
 * @author 大帅
 */
@Slf4j
@Component
public class TopicConsumers2 {

    @RabbitListener(queues = "topic_queue_2")
    public void readMessage(Message message, Channel channel) throws IOException {
        channel.basicAck(message.getMessageProperties().getDeliveryTag(), false);
        log.info("我是消费信息2:{}",new String(message.getBody()));
    }
}
6.5 编写访问类
package com.gmtgo.demo.topic;

import org.springframework.beans.factory.annotation.Autowired;
import org.springframework.web.bind.annotation.RequestMapping;
import org.springframework.web.bind.annotation.RestController;

/**
 * @author 大帅
 */
@RestController
@RequestMapping(value = "rabbitMq")
public class TopicRabbitMqController {
    @Autowired
    private TopicProducer topicProducer;

    @RequestMapping(value = "topicQueueTest1")
    public String topicQueueTest1() {
        topicProducer.sendMessageA();
        return "success";
    }

    @RequestMapping(value = "topicQueueTest2")
    public String topicQueueTest2() {
        topicProducer.sendMessageB();
        return "success";
    }
}
6.6 测试启动项目访问topicQueueTest1 , topicQueueTest2
- 访问地址http://127.0.0.1:8801/rabbitMq/topicQueueTest1
- 访问地址http://127.0.0.1:8801/rabbitMq/topicQueueTest2
- 结果:
topicQueueTest1,两个消费者都能消费

topicQueueTest2,只有消费者2 可以消费

至此,五种队列的实现已结束!
7. 实现生产者消息确认
7.1 配置文件
######################### RabbitMQ配置 ########################
# RabbitMQ主机
spring.rabbitmq.host=127.0.0.1
# RabbitMQ虚拟主机
spring.rabbitmq.virtual-host=demo
# RabbitMQ服务端口
spring.rabbitmq.port=5672
# RabbitMQ服务用户名
spring.rabbitmq.username=admin
# RabbitMQ服务密码
spring.rabbitmq.password=admin
# RabbitMQ服务发布确认属性配置
## NONE值是禁用发布确认模式,是默认值
## CORRELATED值是发布消息成功到交换器后会触发回调方法
## SIMPLE值经测试有两种效果,其一效果和CORRELATED值一样会触发回调方法,其二在发布消息成功后使用rabbitTemplate调用waitForConfirms或waitForConfirmsOrDie方法等待broker节点返回发送结果,根据返回结果来判定下一步的逻辑,要注意的点是waitForConfirmsOrDie方法如果返回false则会关闭channel,则接下来无法发送消息到broker;
spring.rabbitmq.publisher-confirm-type=simple
# 连接超时时间
spring.rabbitmq.connection-timeout=20000
# RabbitMQ服务开启消息发送确认
spring.rabbitmq.publisher-returns=true
######################### simple模式配置 ########################
# RabbitMQ服务 消息接收确认模式
## NONE:不确认
## AUTO:自动确认
## MANUAL:手动确认
spring.rabbitmq.listener.simple.acknowledge-mode=manual
# 指定最小的消费者数量
spring.rabbitmq.listener.simple.concurrency=1
# 指定最大的消费者数量
spring.rabbitmq.listener.simple.max-concurrency=1
# 每次只消费一个消息
spring.rabbitmq.listener.simple.prefetch=1
# 开启支持重试
spring.rabbitmq.listener.simple.retry.enabled=true
# 启用强制信息,默认为false
spring.rabbitmq.template.mandatory=true
7.2 编写消息发送确认类 RabbitConfirmCallback
package com.gmtgo.demo.config;

import lombok.extern.slf4j.Slf4j;
import org.springframework.amqp.rabbit.connection.CorrelationData;
import org.springframework.amqp.rabbit.core.RabbitTemplate;
/**
 * @author 大帅
 */
@Slf4j
public class RabbitConfirmCallback implements RabbitTemplate.ConfirmCallback {
    @Override
    public void confirm(CorrelationData correlationData, boolean ack, String cause) {
        log.info("=======ConfirmCallback=========");
        log.info("correlationData {} " , correlationData);
        log.info("ack = {}" , ack);
        log.info("cause = {}" , cause);
        log.info("=======ConfirmCallback=========");
    }
}
7.3 编写消息发送交换机返回机制RabbitConfirmReturnCallBack
package com.gmtgo.demo.config;

import lombok.extern.slf4j.Slf4j;
import org.springframework.amqp.core.Message;
import org.springframework.amqp.rabbit.core.RabbitTemplate;

/**
 * @author 大帅
 */
@Slf4j
public class RabbitConfirmReturnCallBack implements RabbitTemplate.ReturnCallback {
    @Override
    public void returnedMessage(Message message, int replyCode, String replyText, String exchange, String routingKey) {
        log.info("--------------ReturnCallback----------------");
        log.info("message = " + message);
        log.info("replyCode = {}", replyCode);
        log.info("replyText = {}", replyText);
        log.info("exchange = {}", exchange);
        log.info("routingKey = {}", routingKey);
        log.info("--------------ReturnCallback----------------");
    }
}
7.4 RabbitMQ配置
在我们的rabbit队列配置类里设置RabbitTemplate
举例:
package com.gmtgo.demo.topic;

import com.gmtgo.demo.config.RabbitConfirmCallback;
import com.gmtgo.demo.config.RabbitConfirmReturnCallBack;
import org.springframework.amqp.core.Binding;
import org.springframework.amqp.core.BindingBuilder;
import org.springframework.amqp.core.Queue;
import org.springframework.amqp.core.TopicExchange;
import org.springframework.amqp.rabbit.core.RabbitTemplate;
import org.springframework.beans.factory.annotation.Autowired;
import org.springframework.context.annotation.Bean;
import org.springframework.context.annotation.Configuration;

import javax.annotation.PostConstruct;

/**
 * @author 大帅
 */
@Configuration
public class TopicQueueConfig {
    @Autowired
    private RabbitTemplate rabbitTemplate;

    @PostConstruct
    public void initRabbitTemplate() {
        // 设置生产者消息确认
        rabbitTemplate.setConfirmCallback(new RabbitConfirmCallback());
        rabbitTemplate.setReturnCallback(new RabbitConfirmReturnCallBack());
    }

    /**
     * 声明队列名.
     */
    private final String topic1 = "topic_queue_1";

    private final String topic2 = "topic_queue_2";

    /**
     * 声明交换机的名字.
     */
    private final String topicExchange = "topicExchange";

    /**
     * 声明队列.
     *
     * @return
     */
    @Bean
    public Queue topicQueue1() {
        return new Queue(topic1);
    }

    @Bean
    public Queue topicQueue2() {
        return new Queue(topic2);
    }

    /**
     * 声明路由交换机.
     *
     * @return
     */
    @Bean
    public TopicExchange topicExchange() {
        return new TopicExchange(topicExchange);
    }

    /**
     * 队列绑定交换机,指定routingKey,也可在可视化工具中进行绑定.
     *
     * @return
     */
    @Bean
    Binding bindingTopicExchange1(Queue topicQueue1, TopicExchange exchange) {
        return BindingBuilder.bind(topicQueue1).to(exchange).with("topic.keyA");
    }

    /**
     * 队列绑定交换机,指定routingKey,也可在可视化工具中进行绑定.
     * 绑定的routing key 也可以使用通配符:
     * *:匹配不多不少一个词
     * #:匹配一个或多个词
     *
     * @return
     */
    @Bean
    Binding bindingTopicExchange2(Queue topicQueue2, TopicExchange exchange) {
        return BindingBuilder.bind(topicQueue2).to(exchange).with("topic.#");
    }
}
启动项目发送消息,消息被正常消费,confim回调返回ack=true如果我们将exchange修改,发送到一个不存在的exchange中,会怎么样呢?
会发现confirm回调为false,打印出结果为不存在topicExchange1111的交换机

如果我们在消费端处理逻辑时出错会怎么样呢?修改消费端代码我们在消费时让它报错

confirm回调为true,但是在rabbitmq的web界面会发现存在5条没有消费的消息

如果我们把
channel.basicNack(message.getMessageProperties().getDeliveryTag(),false,false);
中最后一个参数改为false呢,会发现在web管理界面没有未被消费的消息,说明这条消息已经被摒弃。
实际开发中,到底是打回到队列呢还是摒弃,要看自己的需求,但是打回队列应该有次数限制,不然会陷入死循环。
继续测试,将routingKey修改为一个没有的key,
7.5 结论
- 如果消息没有到exchange,则confirm回调,ack=false
- 如果消息到达exchange,则confirm回调,ack=true
- exchange到queue成功,则不回调return
- exchange到queue失败,则回调return
8. 项目示例代码:
下载地址:springboot-rabbitmq-demo_1619322789961
到此这篇关于rabbitmq五种模式详解(含实现代码)的文章就介绍到这了,更多相关rabbitmq五种模式内容请搜索我们以前的文章或继续浏览下面的相关文章希望大家以后多多支持我们!
相关推荐
-

spring boot整合RabbitMQ实例详解(Fanout模式)
1.Fanout Exchange介绍 Fanout Exchange 消息广播的模式,不管路由键或者是路由模式,会把消息发给绑定给它的全部队列,如果配置了routing_key会被忽略. 如上图所示,即当使用fanout交换器时,他会将消息广播到与该交换器绑定的所有队列上,这有利于你对单条消息做不同的反应. 例如存在以下场景:一个web服务要在用户完善信息时,获得积分奖励,这样你就可以创建两个对列,一个用来处理用户信息的请求,另一个对列获取这条消息是来完成积分奖励的任务. 2.代码示例 1).
-
C#使用RabbitMq队列(Sample,Work,Fanout,Direct等模式的简单使用)
1:RabbitMQ是个啥?(专业术语参考自网络) RabbitMQ是实现了高级消息队列协议(AMQP)的开源消息代理软件(亦称面向消息的中间件). RabbitMQ服务器是用Erlang语言编写的,Erlang是专门为高并发而生的语言,而集群和故障转移是构建在开发电信平台框架上的.所有主要的编程语言均有与代理接口通讯的客户端库 2:使用RabbitMQ有啥好处? RabbitMQ是使用Erlang语言开发的开源消息队列系统,基于AMQP协议来实现. AMQP的主要特征是面向消息.队列.路由(包
-
RabbitMQ 最常用的三大模式实例解析
这篇文章主要介绍了RabbitMQ 最常用的三大模式实例解析,文中通过示例代码介绍的非常详细,对大家的学习或者工作具有一定的参考学习价值,需要的朋友可以参考下 Direct 模式 所有发送到 Direct Exchange 的消息被转发到 RouteKey 中指定的 Queue. Direct 模式可以使用 RabbitMQ 自带的 Exchange: default Exchange,所以不需要将 Exchange 进行任何绑定(binding)操作. 消息传递时,RouteKey 必须完全匹
-
Spring Boot整合RabbitMQ实例(Topic模式)
1.Topic交换器介绍 Topic Exchange 转发消息主要是根据通配符. 在这种交换机下,队列和交换机的绑定会定义一种路由模式,那么,通配符就要在这种路由模式和路由键之间匹配后交换机才能转发消息. 在这种交换机模式下: 路由键必须是一串字符,用句号(.) 隔开,比如说 agreements.us,或者 agreements.eu.stockholm 等. 路由模式必须包含一个 星号(*),主要用于匹配路由键指定位置的一个单词,比如说,一个路由模式是这样子:agreements..b.*
-
基于RabbitMQ几种Exchange 模式详解
AMQP协议中的核心思想就是生产者和消费者隔离,生产者从不直接将消息发送给队列.生产者通常不知道是否一个消息会被发送到队列中,只是将消息发送到一个交换机.先由Exchange来接收,然后Exchange按照特定的策略转发到Queue进行存储.同理,消费者也是如此.Exchange 就类似于一个交换机,转发各个消息分发到相应的队列中. RabbitMQ提供了四种Exchange模式:fanout,direct,topic,header . header模式在实际使用中较少,本文只对前三种模式进行比
-
Python rabbitMQ如何实现生产消费者模式
(一)安装一个消息中间件,如:rabbitMQ (二)生产者 sendmq.py import pika import sys import time # 远程rabbitmq服务的配置信息 username = 'admin' # 指定远程rabbitmq的用户名密码 pwd = 'admin' ip_addr = '10.1.7.7' port_num = 5672 # 消息队列服务的连接和队列的创建 credentials = pika.PlainCredentials(username,
-
spring boot整合RabbitMQ(Direct模式)
springboot集成RabbitMQ非常简单,如果只是简单的使用配置非常少,springboot提供了spring-boot-starter-amqp项目对消息各种支持. 1.新建一个Spring Boot工程,命名为:"rabbitmq-hello". 在pom.xml中引入如下依赖内容,其中spring-boot-starter-amqp用于支持RabbitMQ. <dependency> <groupId>org.springframework.boo
-
rabbitmq五种模式详解(含实现代码)
一.五种模式详解 1.简单模式(Queue模式) 当生产端发送消息到交换机,交换机根据消息属性发送到队列,消费者监听绑定队列实现消息的接收和消费逻辑编写.简单模式下,强调的一个队列queue只被一个消费者监听消费. 1.1 结构 生产者:生成消息,发送到交换机交换机:根据消息属性,将消息发送给队列消费者:监听这个队列,发现消息后,获取消息执行消费逻辑 1.2应用场景 常见的应用场景就是一发,一接的结构 例如: 手机短信邮件单发 2.争抢模式(Work模式) 强调的也是后端队列与消费者绑定的结构
-
Spring为IOC容器注入Bean的五种方式详解
这篇文章主要介绍了Spring为IOC容器注入Bean的五种方式详解,文中通过示例代码介绍的非常详细,对大家的学习或者工作具有一定的参考学习价值,需要的朋友可以参考下 一 @Import导入组件,id默认是组件的全类名 //类中组件统一设置.满足当前条件,这个类中配置的所有bean注册才能生效: @Conditional({WindowsCondition.class}) @Configuration @Import({Color.class,Red.class,MyImportSelector
-
关于pytorch中全连接神经网络搭建两种模式详解
pytorch搭建神经网络是很简单明了的,这里介绍两种自己常用的搭建模式: import torch import torch.nn as nn first: class NN(nn.Module): def __init__(self): super(NN,self).__init__() self.model=nn.Sequential( nn.Linear(30,40), nn.ReLU(), nn.Linear(40,60), nn.Tanh(), nn.Linear(60,10), n
-
JavaScript生成UUID的五种方法详解
目录 简介 1.第一种 2.第二种 3.第三种 4.第四种 5.第五种 简介 UUID(Universally Unique IDentifier) 全局唯一标识符. UUID是一种由算法生成的二进制长度为128位的数字标识符.UUID的格式为“xxxxxxxx-xxxx-xxxx-xxxx-xxxxxxxxxxxx”,其中的 x 是 0-9 或 a-f范围内的一个32位十六进制数.在理想情况下,任何计算机和计算机集群都不会生成两个相同的UUID. 1.第一种 function guid() {
-
Redis实现分布式锁的五种方法详解
目录 1. 单机数据一致性 2. 分布式数据一致性 3. Redis实现分布式锁 3.1 方式一 3.2 方式二(改进方式一) 3.3 方式三(改进方式二) 3.4 方式四(改进方式三) 3.5 方式五(改进方式四) 3.6 小结 在单体应用中,如果我们对共享数据不进行加锁操作,会出现数据一致性问题,我们的解决办法通常是加锁. 在分布式架构中,我们同样会遇到数据共享操作问题,本文章使用Redis来解决分布式架构中的数据一致性问题. 1. 单机数据一致性 单机数据一致性架构如下图所示:多个可客户访
-
JavaScript中数组去重常用的五种方法详解
目录 1.对象属性(indexof) 2.new Set(数组) 3.new Map() 4.filter() + indexof 5.reduce() + includes 补充 原数组 const arr = [1, 1, '1', 17, true, true, false, false, 'true', 'a', {}, {}]; 1.对象属性(indexof) 利用对象属性key排除重复项 遍历数组,每次判断新数组中是否存在该属性,不存在就存储在新数组中 并把数组元素作为key,最后返
-
Springboot配置返回日期格式化五种方法详解
目录 格式化全局时间字段 1.前端时间格式化(不做无情人) 2.SimpleDateFormat格式化(不推荐) 3.DateTimeFormatter格式化(不推荐) 4.全局时间格式化(推荐) 实现原理分析 5.部分时间格式化(推荐) 总结 应急就这样 格式化全局时间字段 在yml中添加如下配置: spring.jackson.date-format=yyyy-MM-dd HH:mm:ss 或者 spring: jackson: ## 格式为yyyy-MM-dd HH:mm:ss date-
-
Java中的代理模式详解及实例代码
java 代理模式详解 前言: 在某些情况下,一个客户不想或者不能直接引用一个对象,此时可以通过一个称之为"代理"的第三者来实现间接引用.代理对象可以在客户端和目标对象之间起到 中介的作用,并且可以通过代理对象去掉客户不能看到 的内容和服务或者添加客户需要的额外服务. 简单来说代理模式就是通过一个代理对象去访问一个实际对象,并且可以像装饰模式一样给对象添加一些功能. 静态代理 所谓静态代理即在程序运行前代理类就已经存在,也就是说我们编写代码的时候就已经把代理类的代码写好了,而动态代理则
-
ajax readyState的五种状态详解
在<Pragmatic Ajax A Web 2.0 Primer >中对readyStae状态的介绍,摘译如下: 0: (Uninitialized) the send( ) method has not yet been invoked. 1: (Loading) the send( ) method has been invoked, request in progress. 2: (Loaded) the send( ) method has completed, entire res
-
Linux集群/分布式环境下session处理的五种策略详解
前言 我们一般在搭建完集群环境后,不得不考虑的一个问题就是用户访问产生的session如何处理.如果不做任何处理的话,用户将出现频繁登录的现象,比如集群中存在A.B两台服务器,用户在第一次访问网站时,Nginx通过其负载均衡机制将用户请求转发到A服务器,这时A服务器就会给用户创建一个Session.当用户第二次发送请求时,Nginx将其负载均衡到B服务器,而这时候B服务器并不存在Session,所以就会将用户踢到登录页面.这将大大降低用户体验度,导致用户的流失,这种情况是项目绝不应该出现的. 我