手撸一个Spring Boot Starter并上传到Maven中央仓库
目录
- 打包上传到中央仓库
- 第一步 在issues.sonatype.org注册一个账号
- 第二步 在issues.sonatype.org提交Issue
- 第三步 配置Maven Setting.xml
- 第四步 配置项目的pom.xml
- 第五步 安装和配置GPG
- 第六步 项目打包上传
- 第七步 处理验证
- 问题 我1.0.1版本发布错了,有办法修改或者删除吗?
先手撸一个Spring Boot Starter
准备搞个项目,包含以下几个功能后边还会加新功能。
- 配置项加密(已实现)
- 服务调用链
- 数据脱敏
- …
我的项目地址:https://github.com/lakernote/laker(求star,看能不能混个免费的Idea license)
代码很简单就几行,有兴趣的自己看下哈。
GitHub太卡了,这个就是个尝试,我后边会切到Gitee。
例如原始配置项内容为:
laker:
  password: laker11111111111111111
密码是明文的不安全,我们用AES对称加密,假设我们的秘钥为:1234567890123456, 把上面的内容换为加密后字符串,以enc:开头。
laker:
  password: enc:25d778c22331899a1f79eab82a1d930b9abc4633fb948387c764e5f1f9e5bd3f
项目引入依赖
<dependency>
        <groupId>io.github.lakernote</groupId>
        <artifactId>laker-spring-boot-starter</artifactId>
        <version>1.0.2</version>
</dependency>
项目启动时在命令行加入秘钥
-Denc.key=A string of 16 characters
例如 -Denc.key=1234567890123456
项目运行后实际得到的就是 laker.password:laker11111111111111111
现在我们来打包上传到中央仓库,供其他小伙伴使用吧。
打包上传到中央仓库
步骤很简单,人人都能搞,不要慌。申请时间为2022年5月份。
我的项目地址:https://github.com/lakernote/laker(求star,看能不能混个免费的Idea license)
<dependency>
        <groupId>io.github.lakernote</groupId>
        <artifactId>laker-spring-boot-starter</artifactId>
        <version>1.0.2</version>
</dependency>
GitHub太卡了,这个就是个尝试,我后边会切到Gitee。
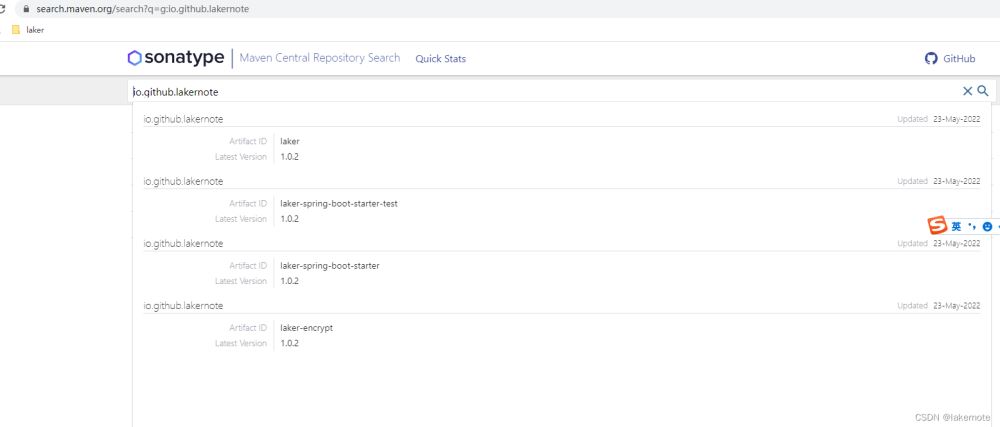
已经上传到中央仓库,大家可以体验使用。可以在https://search.maven.org/search查询。

第一步 在issues.sonatype.org注册一个账号
地址如下:https://issues.sonatype.org
要记录下自己的用户名和密码,后边要用的。
密码要求如下:
- 密码必须至少有 12 个字符。
- 密码必须至少包含 1 个大写字符。
- 密码必须至少包含 1 个特殊字符,例如 &、%、™ 或 É。
- 密码必须包含至少 3 种不同的字符,例如大写字母、小写字母、数字和标点符号。
- 密码不得与用户名或电子邮件地址相似。
第二步 在issues.sonatype.org提交Issue

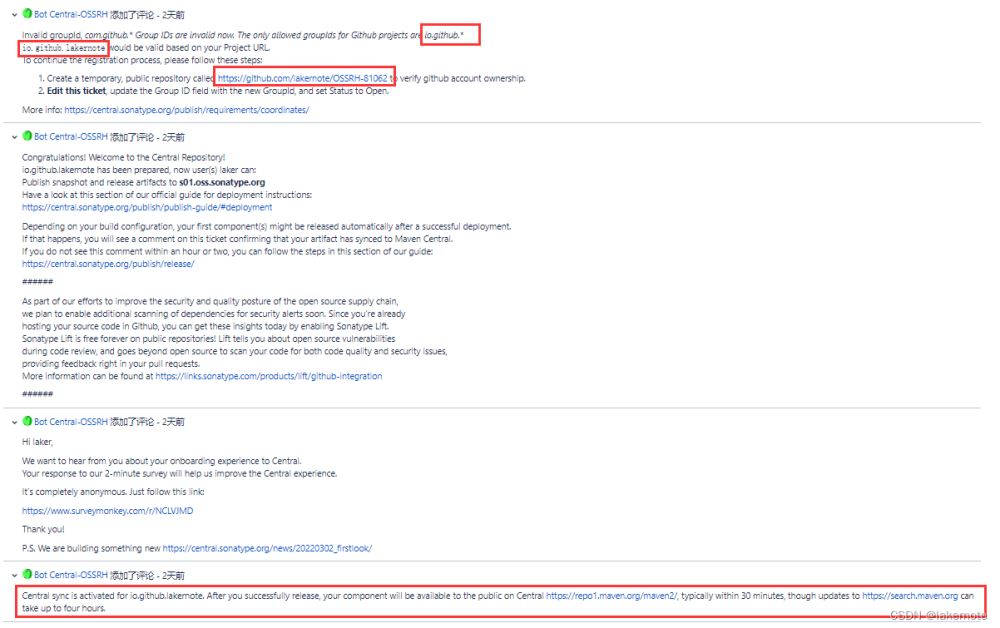
注意与国外时差问题,晚上干,基本秒回。当Issue的Status变为RESOLVED后,就可以进行下一步操作了。
- 项目:看图片红色部分
- 问题类型:看图片红色部分
- 概要: 说下你项目干啥的
- GroupId: com.github.* 现在不能用了,改为 io.github.lakernote
- ProjectURL: 看图片红色部分,填写项目地址
- SCMURL: 看图片红色部分,填写git地址
- 其他使用默认即可。
注意:你填写的GroupId要等于你pom中的io.github.lakernote。
填写完毕后,点击提交,然后会有人审核让你在GitHub上建立个项目以用于证明是你的项目。

第三步 配置Maven Setting.xml
https://central.sonatype.org/publish/publish-maven/#distribution-management-and-authentication
<settings>
  <servers>
    <server>
      <id>ossrh</id>
      <username>your-jira-id</username>
      <password>your-jira-pwd</password>
    </server>
  </servers>
</settings>
注意:server的id元素值要与第四步即下面的snapshotRepository的id元素值和repository的id元素值相同。
你不要改就行,使用默认的,把username和password改为第一步你自己的jira用户名和密码。
第四步 配置项目的pom.xml
https://central.sonatype.org/publish/requirements/#license-information
整个pom你不想看也可以,直接复制走傻瓜式用就完事了。
<distributionManagement>
    <snapshotRepository>
        <id>ossrh</id>
        <url>https://s01.oss.sonatype.org/content/repositories/snapshots</url>
    </snapshotRepository>
    <repository>
        <id>ossrh</id>
        <url>https://s01.oss.sonatype.org/service/local/staging/deploy/maven2/</url>
    </repository>
</distributionManagement>
Javadoc、源附件、GPG 签名组件
<build>
  <plugins>
    <plugin>
      <groupId>org.apache.maven.plugins</groupId>
      <artifactId>maven-source-plugin</artifactId>
      <version>2.2.1</version>
      <executions>
        <execution>
          <id>attach-sources</id>
          <goals>
            <goal>jar-no-fork</goal>
          </goals>
        </execution>
      </executions>
    </plugin>
    <plugin>
      <groupId>org.apache.maven.plugins</groupId>
      <artifactId>maven-javadoc-plugin</artifactId>
      <version>2.9.1</version>
      <configuration>
           <additionalJOptions>
                <additionalJOption>-Xdoclint:none</additionalJOption>
           </additionalJOptions>
      </configuration>
      <executions>
        <execution>
          <id>attach-javadocs</id>
          <goals>
            <goal>jar</goal>
          </goals>
        </execution>
      </executions>
    </plugin>
    <plugin>
      <groupId>org.apache.maven.plugins</groupId>
      <artifactId>maven-gpg-plugin</artifactId>
      <version>1.5</version>
      <executions>
        <execution>
          <id>sign-artifacts</id>
          <phase>verify</phase>
          <goals>
            <goal>sign</goal>
          </goals>
        </execution>
      </executions>
    </plugin>
  </plugins>
</build>
项目名称、描述和 URl
<name>Example Application</name>
<description>A application used as an example on how to set up pushing
  its components to the Central Repository.</description>
<url>http://www.example.com/example-application</url>
开源协议
<licenses>
  <license>
    <name>The Apache License, Version 2.0</name>
    <url>http://www.apache.org/licenses/LICENSE-2.0.txt</url>
  </license>
</licenses>
开发者信息
 <developers>
    <developer>
      <name>laker</name>
      <email>935009066@qq.com</email>
      <organizationUrl>https://laker.blog.csdn.net</organizationUrl>
    </developer>
  </developers>
项目信息
<scm>
  <connection>scm:git:git://github.com/simpligility/ossrh-demo.git</connection>
  <developerConnection>scm:git:ssh://github.com:simpligility/ossrh-demo.git</developerConnection>
  <url>http://github.com/simpligility/ossrh-demo/tree/master</url>
</scm>
整体示例 https://github.com/lakernote/laker/blob/main/pom.xml
<?xml version="1.0" encoding="UTF-8"?>
<project xmlns="http://maven.apache.org/POM/4.0.0"
         xmlns:xsi="http://www.w3.org/2001/XMLSchema-instance"
         xsi:schemaLocation="http://maven.apache.org/POM/4.0.0 http://maven.apache.org/xsd/maven-4.0.0.xsd">
    <modelVersion>4.0.0</modelVersion>
    <groupId>io.github.lakernote</groupId>
    <artifactId>laker</artifactId>
    <packaging>pom</packaging>
    <version>1.0.2</version>
	...
    <modules>
        <module>laker-encrypt</module>
        <module>laker-spring-boot-starter</module>
        <module>laker-spring-boot-starter-test</module>
    </modules>
    <!-- start -->
    <name>laker</name>
    <description>A collection of tools based on Spring Boot</description>
    <url>https://github.com/lakernote/laker</url>
    <licenses>
        <license>
            <name>The Apache License, Version 2.0</name>
            <url>http://www.apache.org/licenses/LICENSE-2.0.txt</url>
        </license>
    </licenses>
    <developers>
        <developer>
            <name>laker</name>
            <email>935009066@qq.com</email>
            <organizationUrl>https://laker.blog.csdn.net</organizationUrl>
        </developer>
    </developers>
    <scm>
        <connection>scm:git:git://github.com/lakernote/laker.git</connection>
        <developerConnection>scm:git:ssh://github.com:lakernote/laker.git</developerConnection>
        <url>http://github.com/lakernote/laker/tree/master</url>
    </scm>

    <build>
        <plugins>
            <plugin>
                <groupId>org.apache.maven.plugins</groupId>
                <artifactId>maven-source-plugin</artifactId>
                <version>2.2.1</version>
                <executions>
                    <execution>
                        <id>attach-sources</id>
                        <goals>
                            <goal>jar-no-fork</goal>
                        </goals>
                    </execution>
                </executions>
            </plugin>
            <plugin>
                <groupId>org.apache.maven.plugins</groupId>
                <artifactId>maven-javadoc-plugin</artifactId>
                <version>2.9.1</version>
                <configuration>
                    <additionalJOptions>
                        <additionalJOption>-Xdoclint:none</additionalJOption>
                    </additionalJOptions>
                </configuration>
                <executions>
                    <execution>
                        <id>attach-javadocs</id>
                        <goals>
                            <goal>jar</goal>
                        </goals>
                    </execution>
                </executions>
            </plugin>
            <plugin>
                <groupId>org.apache.maven.plugins</groupId>
                <artifactId>maven-gpg-plugin</artifactId>
                <version>1.5</version>
                <executions>
                    <execution>
                        <id>sign-artifacts</id>
                        <phase>verify</phase>
                        <goals>
                            <goal>sign</goal>
                        </goals>
                    </execution>
                </executions>
            </plugin>
        </plugins>
    </build>
    <distributionManagement>
        <snapshotRepository>
            <id>ossrh</id>
            <url>https://s01.oss.sonatype.org/content/repositories/snapshots</url>
        </snapshotRepository>
        <repository>
            <id>ossrh</id>
            <url>https://s01.oss.sonatype.org/service/local/staging/deploy/maven2/</url>
        </repository>
    </distributionManagement>
        <!-- end -->
</project>
第五步 安装和配置GPG
发布到Maven仓库中的所有文件都要使用GPG签名,以保障完整性。因此,我们需要在本地安装并配置GPG。
Windows下载地址:https://www.gpg4win.org/
1.文件 - 新建密钥对
2.在证书列表,右键点击在服务器上发布

第六步 项目打包上传
首先:执行命令 mvn clean deploy或者在idea点击deploy按钮
然后:登陆https://s01.oss.sonatype.org/去处理你刚刚deploy的jar包
- 选择
taging Repositories - 选择你的项目
- 点击close
- 点击release

第七步 处理验证
上面执行完成后,我们去https://repo1.maven.org/maven2/ 中可以搜索,大概10-30分钟后可以搜索到。这个时候我们就可以在项目中引用了。
但是同步到中央仓库搜索可能要4个小时左右。
中央仓库地址: https://search.maven.org/。
例如我的:https://repo1.maven.org/maven2/io/github/lakernote/laker-spring-boot-starter/

问题 我1.0.1版本发布错了,有办法修改或者删除吗?
官方答复如下:Sonatype 政策禁止在工件发布后对其进行移除或任何其他修改。即无法覆盖现有版本。必须发布一个新的更正版本。

到此这篇关于手撸一个Spring Boot Starter并上传到Maven中央仓库的文章就介绍到这了,更多相关SpringBoot Starter上传Maven仓库内容请搜索我们以前的文章或继续浏览下面的相关文章希望大家以后多多支持我们!

