Unity实现物体弧线运动到规定的坐标
本文实例为大家分享了Unity实现以弧线的形式运动到规定坐标的具体代码,供大家参考,具体内容如下
1、u3d场景的设置

2、 Run 脚本
using UnityEngine;
using System.Collections;

public class Run : MonoBehaviour
{
 public GameObject target;  //要到达的目标
 public float speed = 10;  //速度
 private float distanceToTarget;  //两者之间的距离
 private bool move = true;

 void Start()
 {
 //计算两者之间的距离
 distanceToTarget = Vector3.Distance(this.transform.position, target.transform.position);
 StartCoroutine(StartShoot());
 }

 IEnumerator StartShoot()
 {

 while (move)
 {
  Vector3 targetPos = target.transform.position;

  //让始终它朝着目标
  this.transform.LookAt(targetPos);

  //计算弧线中的夹角
  float angle = Mathf.Min(1, Vector3.Distance(this.transform.position, targetPos) / distanceToTarget) * 45;
  this.transform.rotation = this.transform.rotation * Quaternion.Euler(Mathf.Clamp(-angle, -42, 42), 0, 0);
  float currentDist = Vector3.Distance(this.transform.position, target.transform.position);
  if (currentDist < 0.5f)
  move = true;
  this.transform.Translate(Vector3.forward * Mathf.Min(speed * Time.deltaTime, currentDist));
  yield return null;
 }
 }

}
3、 运行结果
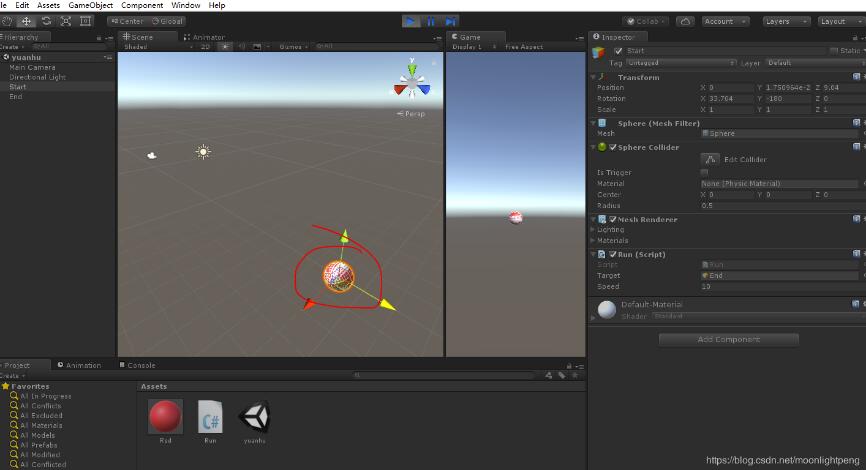
重合到一起后,拖动Start的小球,松手后又会重合。
以上就是本文的全部内容,希望对大家的学习有所帮助,也希望大家多多支持我们。
相关推荐
-
unity绘制一条流动的弧线(贝塞尔线)
本文实例为大家分享了unity绘制一条流动弧线的具体代码,供大家参考,具体内容如下 最终效果 把下面脚本复制,直接拖上脚本,设置两个点(物体)的位置 GameObject1是开始点的位置,GameObject2是结束点的位置 public Transform[] controlPoints; public LineRenderer lineRenderer; public float centerPoint =0.1f; private int layerOrder = 0; //生成弧线中间的
-
Unity实现物体弧线运动到规定的坐标
本文实例为大家分享了Unity实现以弧线的形式运动到规定坐标的具体代码,供大家参考,具体内容如下 1.u3d场景的设置 2. Run 脚本 using UnityEngine; using System.Collections; public class Run : MonoBehaviour { public GameObject target; //要到达的目标 public float speed = 10; //速度 private float distanceToTarget; //两
-

Unity实现物体运动时画出轨迹
本文实例为大家分享了Unity实现物体运动时画出轨迹的具体代码,供大家参考,具体内容如下 1.新建空物体,上赋LineRenderer 2.新建空物体,把轨迹画出来,设计和脚本. 3.LineMark的脚本是 using System.Collections; using System.Collections.Generic; using UnityEngine; public class LineMark : MonoBehaviour { private GameObject clone;
-
Unity实现物体跟随鼠标移动
本文实例为大家分享了Unity实现物体跟随鼠标移动的具体代码,供大家参考,具体内容如下 相关函数 Vector3.Lerp 线性插值C# => static Vector3 Lerp(Vector3 from, Vector3 to, float t); Vector3.MoveTpwards 移向C# => static function MoveTowards(current: Vector3, target: Vector3, maxDistanceDelta: float): Vect
-
JavaScript运动框架 多物体任意值运动(三)
前面两篇都是单物体的运动,本文开始讲多物体的运动,比如多个div的各自不同的属性如宽,高,字体大小,透明度的缓冲运动变化. 从本文起,就不再使用offsetWdith,offsetHeight了等等,因为会出现问题,比如加个border,offsetWidth就会出现严重问题,参见我个人的博客JavaScript中offsetWidth的'bug'及其对策解决方案就是封装getStyle(obj, attr) 函数,用了获取运动中的当前值! function getStyle(obj, name
-
Unity实现物体左右移动效果
本文实例为大家分享了Unity实现物体左右移动效果的具体代码,供大家参考,具体内容如下 效果如下 代码: using UnityEngine; using System.Collections; //Add this script to the platform you want to move. //左右移动的平台 public class MovingPlatform : MonoBehaviour { //Platform movement speed.平台移动速度 public floa
-
Unity实现物体沿自身的任意轴向旋转
本文实例为大家分享了Unity实现物体沿任意轴向旋转,供大家参考,具体内容如下 一.创建一个需要旋转的物体 二.编写控制该物体的脚本 using UnityEngine; using System.Collections; public class Test_ElectricFan : MonoBehaviour { public bool isOpen=false; //是否开始旋转 public int speed=2; //旋转的速度 // Use this for initializat
-
JavaScript实现多个物体同时运动
本文实例为大家分享了JavaScript实现多个物体同时运动的具体代码,供大家参考,具体内容如下 1.多个物体同时运动 ---例子:多个Div,鼠标移入变宽 单定时器,存在问题 每个Div一个定时器 2.多物体运动框架 定时器作为物体的属性 参数的传递:物体.目标值 ---例子:多个Div淡入淡出 所有东西都不能公用 属性与运动对象绑定:速度.其他属性值(如透明度等) 3.多个Div,鼠标移入变宽的例子 3.1 代码 <head> <meta charset=
-
Unity给物体添加多个Tag的实现
在unity中,我们经常通过给物体添加标签来判断这个物体是不是我们想要的 但是unity默认只能添加一个标签,那如果我们要给一个物体添加多个标签应该怎么办 首先,我们定义一个Tag.cs类,这个类用来存储物体的tag信息 public class Tags : MonoBehaviour{ public List<string> tags=new List<string>(); } 然后创建一个单例类TagManager.cs用来管理tag public class TagMana
-
unity实现物体延时出现
本文实例为大家分享了unity实现物体延时出现的具体代码,供大家参考,具体内容如下 新建一个cube和plane,隐藏cube,脚本挂在plane上. 1. update计时器实现 using System.Collections; using System.Collections.Generic; using UnityEngine; //一个隐藏的物体等待t秒后显示,updata计时器实现 public class activeShow : MonoBehaviour { public Ga
-
Unity实现物体运动轨迹的绘制
本文实例为大家分享了unity物体运动轨迹绘制的具体代码,供大家参考,具体内容如下 ① create empty,命名为LineRender ② 在Assects中新建材质,选择Shader为Sprites/Default,并设置轨迹颜色,如下图: ③ 选择①中创建的object,添加Line Render属性,然后将②中新建的材质赋给该object,如下图: 展开Line Render,拖动Width可设置轨迹宽度 ④ 创建c#脚本,拖至运动物体上,代码如下: using System.Col