Android自定义流式布局/自动换行布局实例
最近,Google开源了一个流式排版库“FlexboxLayout”,功能强大,支持多种排版方式,如各种方向的自动换行等,具体资料各位可搜索学习^_^。
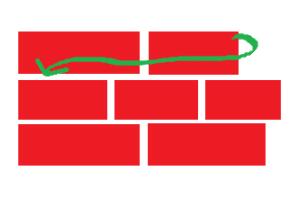
由于我的项目中,只需要从左到右S型的自动换行,需求效果图如下:

使用FlexboxLayout这个框架未免显得有些臃肿,所以自己动手写了一个流式ViewGroup。
安卓中自定义ViewGroup的步骤是:
1. 新建一个类,继承ViewGroup
2. 重写构造方法
3. 重写onMeasure、onLayout方法
onMeasuer方法里一般写测量子View宽高、确定此控件宽高的代码;onLayout方法则是确定子View如何摆放(排版)。
代码如下:
  import android.content.Context;
  import android.util.AttributeSet;
  import android.view.View;
  import android.view.ViewGroup;

  public class FlexBoxLayout extends ViewGroup {

    private int mScreenWidth;
    private int horizontalSpace, verticalSpace;
    private float mDensity;//设备密度,用于将dp转为px

    public FlexBoxLayout(Context context) {
      this(context, null);
    }

    public FlexBoxLayout(Context context, AttributeSet attrs) {
      super(context, attrs);
      //获取屏幕宽高、设备密度
      mScreenWidth = context.getResources().getDisplayMetrics().widthPixels;
      mDensity = context.getResources().getDisplayMetrics().density;
    }

    @Override
    protected void onMeasure(int widthMeasureSpec, int heightMeasureSpec) {
      super.onMeasure(widthMeasureSpec, heightMeasureSpec);
      //确定此容器的宽高
      int widthMode = MeasureSpec.getMode(widthMeasureSpec);
      int widthSize = MeasureSpec.getSize(widthMeasureSpec);
      int heightMode = MeasureSpec.getMode(heightMeasureSpec);
      int heightSize = MeasureSpec.getSize(heightMeasureSpec);

      //测量子View的宽高
      int childCount = getChildCount();
      View child = null;
      //子view摆放的起始位置
      int left = getPaddingLeft();
      //一行view中将最大的高度存于此变量,用于子view进行换行时高度的计算
      int maxHeightInLine = 0;
      //存储所有行的高度相加,用于确定此容器的高度
      int allHeight = 0;
      for (int i = 0; i < childCount; i++) {
        child = getChildAt(i);
        //测量子View宽高
        measureChild(child, widthMeasureSpec, heightMeasureSpec);
        //两两对比,取得一行中最大的高度
        if (child.getMeasuredHeight() + child.getPaddingTop() + child.getPaddingBottom() > maxHeightInLine) {
          maxHeightInLine = child.getMeasuredHeight() + child.getPaddingTop() + child.getPaddingBottom();
        }
        left += child.getMeasuredWidth() + dip2px(horizontalSpace) + child.getPaddingLeft() + child.getPaddingRight();
        if (left >= widthSize - getPaddingRight() - getPaddingLeft()) {//换行
          left = getPaddingLeft();
          //累积行的总高度
          allHeight += maxHeightInLine + dip2px(verticalSpace);
          //因为换行了,所以每行的最大高度置0
          maxHeightInLine = 0;
        }
      }
      //再加上最后一行的高度,因为之前的高度累积条件是换行
      //最后一行没有换行操作,所以高度应该再加上
      allHeight += maxHeightInLine;

      if (widthMode != MeasureSpec.EXACTLY) {
        widthSize = mScreenWidth;//如果没有指定宽,则默认为屏幕宽
      }

      if (heightMode != MeasureSpec.EXACTLY) {//如果没有指定高度
        heightSize = allHeight + getPaddingBottom() + getPaddingTop();
      }

      setMeasuredDimension(widthSize, heightSize);
    }

    @Override
    protected void onLayout(boolean changed, int l, int t, int r, int b) {
     if (changed) {
       //摆放子view
       View child = null;
       //初始子view摆放的左上位置
       int left = getPaddingLeft();
       int top = getPaddingTop();
       //一行view中将最大的高度存于此变量,用于子view进行换行时高度的计算
       int maxHeightInLine = 0;
       for (int i = 0, len = getChildCount(); i < len; i++) {
         child = getChildAt(i);
         //从第二个子view开始算起
         //因为第一个子view默认从头开始摆放
         if (i > 0) {
           //两两对比,取得一行中最大的高度
         if (getChildAt(i - 1).getMeasuredHeight() > maxHeightInLine) {
             maxHeightInLine = getChildAt(i - 1).getMeasuredHeight();
           }
           //当前子view的起始left为 上一个子view的宽度+水平间距
           left += getChildAt(i - 1).getMeasuredWidth() + dip2px(horizontalSpace);
           if (left + child.getMeasuredWidth() >= getWidth() - getPaddingRight() - getPaddingLeft()) {//这一行所有子view相加的宽度大于容器的宽度,需要换行
             //换行的首个子view,起始left应该为0+容器的paddingLeft
             left = getPaddingLeft();
             //top的位置为上一行中拥有最大高度的某个View的高度+垂直间距
             top += maxHeightInLine + dip2px(verticalSpace);
             //将上一行View的最大高度置0
             maxHeightInLine = 0;
           }
         }
         //摆放子view
         child.layout(left, top, left + child.getMeasuredWidth(), top + child.getMeasuredHeight());
       }
     }
   }

    /**
     * dp转为px
     *
     * @param dpValue
     * @return
     */
    private int dip2px(float dpValue) {
      return (int) (dpValue * mDensity + 0.5f);
    }

    /**
     * 设置子view间的水平间距 单位dp
     *
     * @param horizontalSpace
     */
    public void setHorizontalSpace(int horizontalSpace) {
      this.horizontalSpace = horizontalSpace;
    }

    /**
     * 设置子view间的垂直间距 单位dp
     *
     * @param verticalSpace
     */
    public void setVerticalSpace(int verticalSpace) {
      this.verticalSpace = verticalSpace;
    }
  }
使用如下:
xml文件:
    <com.zengd.FlexBoxLayout
      android:id="@+id/flexBoxLayout"
      android:layout_width="match_parent"
      android:layout_height="match_parent">
      <!--这里写子View,也可代码动态添加-->
      ……

    </com.zengd.FlexBoxLayout>
Activity里的代码:
  FlexBoxLayout flexBoxLayout = (FlexBoxLayout) findViewById(R.id.flex_box_layout);
  flexBoxLayout.setHorizontalSpace(10);//不设置默认为0
  flexBoxLayout.setVerticalSpace(10);//不设置默认为0
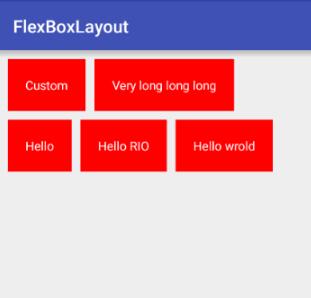
运行效果如图:

本项目Demo地址:
https://github.com/zengd0/FlexBoxLayout
补充知识:Android 流式布局(修改版) 当达到两行,隐藏多余的
我就废话不多说了,还是直接看代码吧!
public class SearchLayout extends LinearLayout {

  private final int mParentWidth;
  private float textSize;
  private boolean textColor;
  private boolean background;
  private boolean isHide = true;

  public void setHide(boolean hide) {
    isHide = hide;
  }

  public SearchLayout(Context context, AttributeSet attrs) {
    super(context, attrs);
    //获取屏幕的宽度
    DisplayMetrics metrics = context.getResources().getDisplayMetrics();
    mParentWidth = metrics.widthPixels - dip2px(16f);
    //自定义属性
    TypedArray array = context.obtainStyledAttributes(attrs, R.styleable.SearchLayout);
    background = array.getBoolean(R.styleable.SearchLayout_Sear_background,false);
    textColor = array.getBoolean(R.styleable.SearchLayout_Sear_textColor, false);
    textSize = array.getDimension(R.styleable.SearchLayout_Sear_textSize, 0);
    //方向为纵向
    setOrientation(VERTICAL);
  }

  //移除子控件
  public void removeView() {
    removeAllViews();
  }

  //流式布局
  public void setData(List<String> data) {
    if (data.isEmpty()){
      return;
    }
    //获取一个子布局
    LinearLayout linearLayout = getLinearLayout();
    for (int i = 0; i < data.size(); i++) {
      //标题
      final String name = data.get(i);
      //已存在的宽度
      int numBar = 0;
      //子控件的个数
      int count = linearLayout.getChildCount();
      for (int j = 0; j < count; j++) {
        //一个一个获取
        ThemeTextView textView = (ThemeTextView) linearLayout.getChildAt(j);
        //获取左外边距
        LayoutParams params = (LayoutParams) textView.getLayoutParams();
        int leftWidth = params.leftMargin;
        int rightWidth = params.rightMargin;
        //获取宽高
        textView.measure(getMeasuredWidth(), getMeasuredHeight());
        //计算已存在的宽度
        numBar += textView.getMeasuredWidth()+leftWidth+rightWidth;
      }
      //获取一个子控件
      ThemeTextView text = getText();
      //给每一个控件设置点击事件
      text.setOnClickListener(new OnClickListener() {
        @Override
        public void onClick(View view) {
          if (onItemTitleClickListener != null){
            onItemTitleClickListener.onItemTitle(name);
          }
        }
      });
      //赋值
      text.setText(name);
      //获取宽高
      text.measure(getMeasuredWidth(), getMeasuredHeight());
      //当前控件的宽度
      int textWidth = text.getMeasuredWidth() + text.getPaddingLeft() + text.getPaddingRight();
      //判断是否超过屏幕
      if (isHide && getChildCount() == 2){
        ImageView imageView = getMore(false);
        LayoutParams layoutParams = (LayoutParams) imageView.getLayoutParams();
        int leftM = layoutParams.leftMargin;
        int rightM = layoutParams.rightMargin;
        imageView.measure(getMeasuredWidth(), getMeasuredHeight());
        int width = imageView.getMeasuredWidth() + imageView.getPaddingLeft() + imageView.getPaddingRight();
        int imageWidth = leftM + rightM + width;
        if (numBar + textWidth + imageWidth >= mParentWidth){
          if (numBar + textWidth + imageWidth > mParentWidth){
            imageView.setOnClickListener(new OnClickListener() {
              @Override
              public void onClick(View v) {
                if (onMoreClickListener != null){
                  onMoreClickListener.onShowMore(isHide);
                }
              }
            });
            linearLayout.addView(imageView);
            return;
          } else {
            imageView.setOnClickListener(new OnClickListener() {
              @Override
              public void onClick(View v) {
                if (onMoreClickListener != null){
                  onMoreClickListener.onShowMore(isHide);
                }
              }
            });
            linearLayout.addView(text);
            linearLayout.addView(imageView);
            return;
          }
        }else {
          if (i + 1 <= data.size()-1) {
            String title = data.get(i + 1);
            ThemeTextView themeTextView = getText();
            themeTextView.setText(title);
            themeTextView.measure(getMeasuredWidth(),getMeasuredHeight());
            int themeTextViewWidth = themeTextView.getMeasuredWidth() + themeTextView.getPaddingLeft() + themeTextView.getPaddingRight();
            if (mParentWidth >= numBar + textWidth + imageWidth + themeTextViewWidth ){
              linearLayout.addView(text);
              continue;
            }else {
              imageView.setOnClickListener(new OnClickListener() {
                @Override
                public void onClick(View v) {
                  if (onMoreClickListener != null){
                    onMoreClickListener.onShowMore(isHide);
                  }
                }
              });
              linearLayout.addView(text);
              linearLayout.addView(imageView);
              return;
            }
          }
        }
      }

      if (i == data.size() - 1 && (getChildCount() >= 3 || (mParentWidth < numBar + textWidth) && getChildCount() == 2)){
        ImageView imageView = getMore(true);
        LayoutParams layoutParams = (LayoutParams) imageView.getLayoutParams();
        int leftM = layoutParams.leftMargin;
        int rightM = layoutParams.rightMargin;
        imageView.measure(getMeasuredWidth(), getMeasuredHeight());
        int width = imageView.getMeasuredWidth() + imageView.getPaddingLeft() + imageView.getPaddingRight();
        int imageWidth = leftM + rightM + width;
        imageView.setOnClickListener(new OnClickListener() {
          @Override
          public void onClick(View v) {
            if (onMoreClickListener != null){
              onMoreClickListener.onShowMore(isHide);
            }
          }
        });
        if (mParentWidth >= numBar + textWidth + imageWidth){
          linearLayout.addView(text);
          linearLayout.addView(imageView);
        }else {
          if (mParentWidth >= numBar + textWidth){
            linearLayout.addView(text);
            linearLayout = getLinearLayout();
            linearLayout.addView(imageView);
          }else {
            linearLayout = getLinearLayout();
            linearLayout.addView(text);
            linearLayout.addView(imageView);
          }
        }
        return;
      }

      if (mParentWidth >= numBar + textWidth) {
        //没有,继续添加
        linearLayout.addView(text);
      } else {
        //否者,重新获取一个子布局,再添加
        linearLayout = getLinearLayout();
        linearLayout.addView(text);
      }

    }
  }

  public LinearLayout getLinearLayout() {
    //创建LinearLayout布局
    LinearLayout linearLayout = new LinearLayout(getContext());
    //设置宽高
    LayoutParams params = new LayoutParams(LinearLayout.LayoutParams.MATCH_PARENT, LinearLayout.LayoutParams.WRAP_CONTENT);
    linearLayout.setLayoutParams(params);
    //添加到主布局中
    this.addView(linearLayout);
    return linearLayout;
  }

  public ThemeTextView getText() {
    //创建TextView控件
    //设置字体大小,颜色,内边距
    ThemeTextView themeTextView = new ThemeTextView(getContext());
    themeTextView.setTextSize(TypedValue.COMPLEX_UNIT_PX , textSize);
    themeTextView.setMaxEms(7);
    themeTextView.setLines(1);
    themeTextView.setEllipsize(TextUtils.TruncateAt.END);
    themeTextView.setPadding(dip2px(8), dip2px(4), dip2px(8), dip2px(4));
    if (textColor){//可以根据自己的需求修改判断
    	themeTextView.setTextColor(ContextCompat.getColor(getContext(),R.color.day_text_color_thirdly));
    }else {
      themeTextView.setTextColor(ContextCompat.getColor(getContext(),R.color.day_text_color_thirdly));
    }

    if (background){
       themeTextView.setBackgroundResource(R.drawable.border_search_background_day);
    }
    //设置宽高
    LayoutParams params = new LayoutParams(LayoutParams.WRAP_CONTENT, LayoutParams.WRAP_CONTENT);
    //外边距
    params.setMargins(dip2px(8),dip2px(8),dip2px(8),dip2px(8));
    themeTextView.setLayoutParams(params);
    return themeTextView;
  }

  public ImageView getMore(boolean isHide){
    ImageView imageView = new ImageView(getContext());
    if (background){
      imageView.setBackgroundResource(R.drawable.border_search_background_day);
    }
    imageView.setImageResource(R.drawable.icon_more);

    if (isHide){
      imageView.setRotation(180f);
    }
	  imageView.setColorFilter(ContextCompat.getColor(getContext(),R.color.day_text_color_primary));
    imageView.setPadding(dip2px(6), dip2px(6), dip2px(7), dip2px(7));

    //设置宽高
    LayoutParams params = new LayoutParams(ConfigSingleton.dip2px(27), ConfigSingleton.dip2px(27));
    //外边距
    params.setMargins(dip2px(8),dip2px(8),dip2px(8),dip2px(8));
    imageView.setLayoutParams(params);
    return imageView;
  }

  public interface OnItemTitleClickListener{
    void onItemTitle(String title);
  }

  public interface OnMoreClickListener{
    void onShowMore(boolean ishide);
  }

  private OnItemTitleClickListener onItemTitleClickListener;
  private OnMoreClickListener onMoreClickListener;

  public void setOnItemTitleClickListener(OnItemTitleClickListener onItemTitleClickListener) {
    this.onItemTitleClickListener = onItemTitleClickListener;
  }

  public void setOnMoreClickListener(OnMoreClickListener onMoreClickListener) {
    this.onMoreClickListener = onMoreClickListener;
  }

	public int dip2px(float dipValue) {
			float scale = getContext().getResources().getDisplayMetrics().density;
			return (int) (dipValue * scale + 0.5f);
		}
}
attrs文件:
 <declare-styleable name="SearchLayout">
    <attr name="Sear_textSize" format="dimension"/>
    <attr name="Sear_textColor" format="boolean"/>
    <attr name="Sear_background" format="boolean"/>
  </declare-styleable>
以上这篇Android自定义流式布局/自动换行布局实例就是小编分享给大家的全部内容了,希望能给大家一个参考,也希望大家多多支持我们。
赞 (0)

