Spring注解@Value及属性加载配置文件方式
Spring中使用@Value注解给bean加载属性的配置文件有两种使用方式
第一种:使用@Value("#{configProperties['websit.msgname']}")
spring中配置属性加载文件的配置方式
<bean id="configProperties" class="org.springframework.beans.factory.config.PropertiesFactoryBean">
        <property name="locations">
            <list>
                <value>classpath:/properties/websit.properties</value>
            </list>
        </property>
</bean>
注意
1.这里使用的configProperties必须要和定义的bean名称一致。
2.websit用来指定msgname来源于那个配置文件
3.配置的加载属性bean名称为org.springframework.beans.factory.config.PropertiesFactoryBean
第二种:使用@Value("${websit.msgname}");
使用这种方式,又可以有两种配置方式
方式一
<bean id="propertyConfigurer" class="org.springframework.beans.factory.config.PreferencesPlaceholderConfigurer">
        <property name="properties" ref="configProperties"/>
</bean>

<bean id="configProperties" class="org.springframework.beans.factory.config.PropertiesFactoryBean">
        <property name="locations">
            <list>
                <value>classpath:/properties/websit.properties</value>
            </list>
        </property>
</bean>
方式二
<bean id="propertyConfigurer" class="org.springframework.beans.factory.config.PropertyPlaceholderConfigurer">
     <property name="locations">
     <list>
         <value>classpath:properties/websit.properties</value>
     </list>
        </property>
</bean>
当使用@Value注解bean属性时,如果没有在配置文件中配置,这时启动spring就会抛出异常。@Value提供了一种默认值的设置方式,如果在属性文件中没有配置则可以使用默认值。
形式如下
@Value("${avg.age:22}")
private int userAge;
如果使用@Value注解后,数据不能正常的被注入则需要在xml的配置文件中加入下列代码
<context:annotation-config/>
SpringBoot使用注解(@value)读取properties(yml)文件中 配置信息
为了简化读取properties文件中的配置值,spring支持@value注解的方式来获取,这种方式大大简化了项目配置,提高业务中的灵活性。
1. 两种使用方法
1)@Value("#{configProperties['key']}")
2)@Value("${key}")
2. 配置文件示例
ftp:
ftplp: 10.2.23.89
ftpPort: 21
ftpUser: uftp
ftpPwd: 12345678
ftpRemotePath: /home
说明:以上是配置文件中的信息,主要是一些账号密码等信息。
3. 读取yml配置文件的工具类
package com.dbright.dataprediction.entity;
import org.springframework.beans.factory.annotation.Value;
import org.springframework.boot.context.properties.ConfigurationProperties;
import org.springframework.context.annotation.PropertySource;
import org.springframework.stereotype.Component;
@Component
@PropertySource("classpath:ftpconfig.yml")
@ConfigurationProperties(prefix = "ftp")
public class FtpProperties {

    @Value("${ftplp}")
    public String ftplp;
    @Value("${ftpPort}")
    public String ftpPort;
    @Value("${ftpUser}")
    public String ftpUser;
    @Value("${ftpPwd}")
    public String ftpPwd;
    @Value("${ftpRemotePath}")
    public String ftpRemotePath;

    public String getFtplp() {
        return ftplp;
    }

    public void setFtplp(String ftplp) {
        this.ftplp = ftplp;
    }

    public String getFtpPort() {
        return ftpPort;
    }

    public void setFtpPort(String ftpPort) {
        this.ftpPort = ftpPort;
    }

    public String getFtpUser() {
        return ftpUser;
    }

    public void setFtpUser(String ftpUser) {
        this.ftpUser = ftpUser;
    }

    public String getFtpPwd() {
        return ftpPwd;
    }

    public void setFtpPwd(String ftpPwd) {
        this.ftpPwd = ftpPwd;
    }

    public String getFtpRemotePath() {
        return ftpRemotePath;
    }

    public void setFtpRemotePath(String ftpRemotePath) {
        this.ftpRemotePath = ftpRemotePath;
    }
}
说明:以上是使用@value注解来读取yml配置文件的代码示例
1)@component —— 把普通pojo实例化到spring容器中,相当于配置文件中的`<bean id="" class=""/>`
2) @PropertySource("classpath:ftpconfig.yml") —— 设置yml文件的路径,方便扫描到。一般我们配置文件都是放在resources包下。所以我们只需要 classpath+所需要读取的配置文件名称。
3)@ConfigurationProperties(prefix = "ftp") —— 这个不需要解释太多,配置文件里面内容的前缀,我们读取的是ftp下的信息。
4)@Value("${ftplp}") —— 这是读取我们所需的配置信息,美元符号+{字段名}即可制定
5)下面定义字符串来接收所读取到的配置信息。
6)写set和get方法,方便外部类调用。
4. 演示:效果图如下
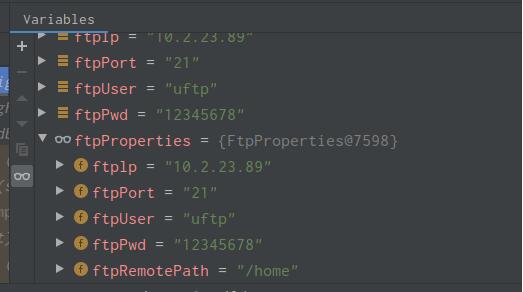

可以看到,我们成功取到了我们想要的值。
5. 一开始说的第二种和这个差不多
把{}外的 $ 变成 # 号,然后里面指定配置文件的信息+字段而已。大同小异,我就不贴代码上来了。
今天的内容就到这里啦,以上为个人经验,希望能给大家一个参考,也希望大家多多支持我们!
相关推荐
-
SpringBoot 使用 @Value 注解读取配置文件给静态变量赋值
1.application.properties 配置文件 mail.username=xue@163.com mail.password=xue mail.host=smtp.163.com mail.smtp.auth=true 2.给普通变量赋值,直接在变量上添加 @Value 注解 import org.springframework.beans.factory.annotation.Value; public class MailConfig { @Value("${mail.user
-
详解Spring通过@Value注解注入属性的几种方式
场景 假如有以下属性文件dev.properties, 需要注入下面的tag tag=123 通过PropertyPlaceholderConfigurer <bean class="org.springframework.beans.factory.config.PropertyPlaceholderConfigurer"> <property name="location" value="dev.properties" /&
-

Spring使用@Value注解与@PropertySource注解加载配置文件操作
1.@Value注解简介 Spring框架提供的@Value注解可以将外部的值动态注入到Bean中,@Value注解使用在字段.构造器参数和方法参数上. @Value可以指定属性取值的表达式,支持通过#{}使用SpringEL来取值,也支持使用${}来将属性来源中(Properties文件.本地环境变量.系统属性等)的值注入到Bean的属性中. 此注解值的注入发生在AutowiredAnnotationBeanPostProcessor类中. @Value注解实现以下几种情况: (1)注入普通字
-
Spring中利用配置文件和@value注入属性值代码详解
1 简单属性值注入 package com.xy.test1; import org.springframework.beans.factory.annotation.Value; import org.springframework.stereotype.Service; @Service // 需要被注入属性值的类需要被Spring管理 public class PropertiesService1 { // 利用@Value注解,即使没有该属性或者属性文件也不会报错 // @Value输入
-
Spring注解@Value及属性加载配置文件方式
Spring中使用@Value注解给bean加载属性的配置文件有两种使用方式 第一种:使用@Value("#{configProperties['websit.msgname']}") spring中配置属性加载文件的配置方式 <bean id="configProperties" class="org.springframework.beans.factory.config.PropertiesFactoryBean"> <p
-
详解Spring Boot 配置加载顺序及属性加载顺序
先给大家介绍下spring boot 配置加载顺序,具体内容如下所示: 使用 Spring Boot 会涉及到各种各样的配置,如开发.测试.线上就至少 3 套配置信息了.Spring Boot 可以轻松的帮助我们使用相同的代码就能使开发.测试.线上环境使用不同的配置. 在 Spring Boot 里面,可以使用以下几种方式来加载配置.本章内容基于 Spring Boot 2.0 进行详解. 1.properties文件: 2.YAML文件: 3.系统环境变量: 4.命令行参数: 等等-- 我们可
-
Spring Boot加载配置文件的完整步骤
前言 本文针对版本2.2.0.RELEASE来分析SpringBoot的配置处理源码,通过查看SpringBoot的源码来弄清楚一些常见的问题比如: SpringBoot从哪里开始加载配置文件? SpringBoot从哪些地方加载配置文件? SpringBoot是如何支持yaml和properties类型的配置文件? 如果要支持json配置应该如何做? SpringBoot的配置优先级是怎么样的? placeholder是如何被解析的? 带着我们的问题一起去看一下SpringBoot配置相关的源
-
Spring Junit单元测试加载配置文件失败问题
JUnit是Java中最有名的单元测试框架,用于编写和运行可重复的测试,多数Java的开发环境都已经集成了JUnit作为单元测试的工具.好的单元测试能极大的提高开发效率和代码质量. 使用SpringJunit单元测试,通过@ContextConfiguration加载配置文件后,只会在src/test/resources目录下寻找配置文件,不会加载src/main/resources中的. 这样就导致了项目可以正常启动,但是单元测试时会提示找不到注入的类. 可以通过pom.xml配置来解决该问题
-
spring boot中的静态资源加载处理方式
1.spring boot默认资源处理 Spring Boot 默认为我们提供了静态资源处理,使用 WebMvcAutoConfiguration 中的配置各种属性. spring boot默认加载文件的路径是: /META-INF/resources/ /resources/ /static/ /public/ 这些目录下面, 当然我们也可以从spring boot源码也可以看到Java代码: private static final String[] CLASSPATH_RESOURCE_L
-
Spring详解四种加载配置项的方法
目录 1.spring加载yml文件 2.spring 加载 properties 文件 3.spring加载系统磁盘(properties)文件 4.spring加载xml文件 5.Java基于InputStream读取properties配置文件 本文默认 spring 版本是 spring5 1 spring 加载 yml 文件 2 spring 加载 properties 文件 3 spring 加载 系统磁盘 文件 4 spring 加载 xml 文件 5 Java 基于 InputS
-
Spring集成JPA配置懒加载报错解决方案
一:报错no session 因为entitymanager对象在事物提交后就关闭了 报错的 no session相当于sql的session 解决办法:解决办法 在web.xmL配置一个过滤器 使其在这个session中的manager在结束后再关闭open <!--配置openmanager--> <filter> <filter-name>openEntity</filter-name> <filter-class>org.springfr
-
springboot启动时是如何加载配置文件application.yml文件
今天启动springboot时,明明在resources目录下面配置了application.yml的文件,但是却读不出来,无奈看了下源码,总结一下springboot查找配置文件路径的过程,能力有限,欢迎各位大牛指导!!! spring加载配置文件是通过listener监视器实现的,在springboot启动时: 在容器启动完成后会广播一个SpringApplicationEvent事件,而SpringApplicationEvent事件是继承自ApplicationEvent时间的,代码如下
-
详解springboot启动时是如何加载配置文件application.yml文件
今天启动springboot时,明明在resources目录下面配置了application.yml的文件,但是却读不出来,无奈看了下源码,总结一下springboot查找配置文件路径的过程,能力有限,欢迎各位大牛指导!!! spring加载配置文件是通过listener监视器实现的,在springboot启动时: 在容器启动完成后会广播一个SpringApplicationEvent事件,而SpringApplicationEvent事件是继承自ApplicationEvent时间的,代码如下