loadavg数据异常引发问题起源分析
目录
- proc
- loadavg
- 1: 问题起源
- 2: 数据来源
- 2.1:scheduler_tick
- 2.2: calc_global_load_tick
- 2.3: calc_load_fold_active
- 3: 数据计算
- 3.1: tick_sched_timer
- 3.2: calc_global_load
- 3.3:计算规则 calc_load
- 问题解析
- 简述结果
- 收获和总结
proc
- NAME (名称解释):
proc - process information pseudo-filesystem (存储进程信息的伪文件系统)
- DESCRIPTION (详细)
The proc filesystem is a pseudo-filesystem which provides an interface to kernel data structures.
It is commonly mounted at /proc. Most of it is read-only, but some files allow kernel variables to
be changedpooc文件系统是一个伪装的文件系统,它提供接口给内核来存储数据,通常挂载在设备的/proc目录,
大部分文件是只读的,但是有些文件可以被内和变量给改变.
具体代表的含义可以通过man proc去查看. 以上信息就是通过man获取.翻译不一定精确.
loadavg
cat /proc/loadavg
/proc/loadavg
The first three fields in this file are load average figures giving the number of
jobs in the run queue (state R) or waiting for disk I/O (state D) averaged over 1, 5,
and 15 minutes.这个文件的前三个数字是平均负载的数值,计算平均1分钟,5分钟,15分钟内的运行队列中(R状态)或等待磁盘I/O(D状态)的任务数.
The first of these is the number of cur‐rently runnable kernel scheduling entities
(processes, threads). The value after the slash is the number of kernel scheduling
entities that currently exist on the system.第四个参数/前面是可运行的内核调度实体的数量(调度实体指 进程,线程), /后的值是系统中存在的内核调度实体的数量.
The fifth field is the PID of the process that was most recently created on the system.
第五个参数是系统最新创建进程的PID
1: 问题起源
在从事的大屏领域遇到一个问题,就是loadavg中的数值其高无比,对比8核手机的3+,4+,目前的手头的设备loadavg竟然高达70+,这个问题一直困扰了我很久,最近腾出一个整块的时间来研究一下这个数值的计算规则.
在kernel中的loadvg.c文件中有这样的一个函数.我们看到它就是最终的输出函数.
static int loadavg_proc_show(struct seq_file *m, void *v)
{
   unsigned long avnrun[3];
   get_avenrun(avnrun, FIXED_1/200, 0);
   seq_printf(m, "%lu.%02lu %lu.%02lu %lu.%02lu %ld/%d %d\n",
      LOAD_INT(avnrun[0]), LOAD_FRAC(avnrun[0]),  // 1分钟平均值
      LOAD_INT(avnrun[1]), LOAD_FRAC(avnrun[1]),  // 5分钟平均值
      LOAD_INT(avnrun[2]), LOAD_FRAC(avnrun[2]),  // 15分钟平均值
      // 可运行实体使用  nr_running()获取, nr_threads 是存在的所有实体
      nr_running() , nr_threads,
      // 获取最新创建的进程PID
      task_active_pid_ns(current)->last_pid);
   return 0;
}
看过上面的代码获取具体平均负载的函数是get_avenrun(),我们接着找一下它的具体实现.
unsigned long avenrun[3];
EXPORT_SYMBOL(avenrun); /* should be removed */
/**
 * get_avenrun - get the load average array
 * @loads: pointer to dest load array
 * @offset:    offset to add
 * @shift: shift count to shift the result left
 *
 * These values are estimates at best, so no need for locking.
 */
void get_avenrun(unsigned long *loads, unsigned long offset, int shift)
{
    //数据来源主要是avenrun数组
   loads[0] = (avenrun[0] + offset) << shift;
   loads[1] = (avenrun[1] + offset) << shift;
   loads[2] = (avenrun[2] + offset) << shift;
}
2: 数据来源
接着我们接着寻找avenrun[]在哪里赋值,我们先看数据的来源问题.
kernel版本4.9代码路径kernel/sched/core.c,kernel/sched/loadavg.c.

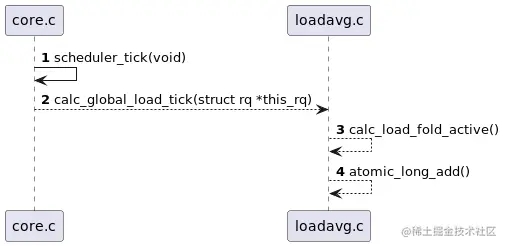
2.1:scheduler_tick
/*
 * This function gets called by the timer code, with HZ frequency.
 * We call it with interrupts disabled.
 * 这里注释就比较清楚了,由计时器调度,调度的频率为HZ
 */
void scheduler_tick(void)
{
   int cpu = smp_processor_id();
   struct rq *rq = cpu_rq(cpu);
   struct task_struct *curr = rq->curr;
   sched_clock_tick();
   raw_spin_lock(&rq->lock);
   walt_set_window_start(rq);
   walt_update_task_ravg(rq->curr, rq, TASK_UPDATE,
         walt_ktime_clock(), 0);
   update_rq_clock(rq);
   curr->sched_class->task_tick(rq, curr, 0);
   cpu_load_update_active(rq);
   calc_global_load_tick(rq); // 这里调度
   raw_spin_unlock(&rq->lock);
   perf_event_task_tick();
#ifdef CONFIG_SMP
   rq->idle_balance = idle_cpu(cpu);
   trigger_load_balance(rq);
#endif
   rq_last_tick_reset(rq);
   if (curr->sched_class == &fair_sched_class)
      check_for_migration(rq, curr);
}
2.2: calc_global_load_tick
/*
 * Called from scheduler_tick() to periodically update this CPU's
 * active count.
 */
void calc_global_load_tick(struct rq *this_rq)
{
   long delta;
    //过滤系统负载重复更新,这里是同过jiffies进行过滤,jiffies也在下面统一介绍
   if (time_before(jiffies, this_rq->calc_load_update))
      return;
   // 更新数据
   delta  = calc_load_fold_active(this_rq, 0);
   if (delta)
       // 将数据同步到calc_load_tasks, atomic_long_add 是kernel中的一个原子操作函数
      atomic_long_add(delta, &calc_load_tasks);
    // 下一次系统更新系统负载的时间 LOAD_FREQ定义在include/linux/sched.h
    //   #define LOAD_FREQ   (5*HZ+1)   /* 5 sec intervals */
   this_rq->calc_load_update += LOAD_FREQ;
}
2.3: calc_load_fold_active
long calc_load_fold_active(struct rq *this_rq, long adjust)
{
   long nr_active, delta = 0;
   nr_active = this_rq->nr_running - adjust; //统计调度器中nr_running的task数量 adjust传入为0,不做讨论.
   nr_active += (long)this_rq->nr_uninterruptible; //统计调度器中nr_uninterruptible的task的数量.
    // calc_load_active代表了nr_running和nr_uninterruptible的数量,如果存在差值就计算差值
   if (nr_active != this_rq->calc_load_active) {
      delta = nr_active - this_rq->calc_load_active;
      this_rq->calc_load_active = nr_active;
   }
    // 统计完成,return后,将数据更新到 calc_load_tasks.
   return delta;
}
3: 数据计算
看完数据来源的逻辑,我们接着梳理数据计算的逻辑

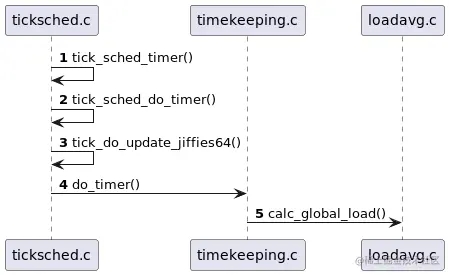
这里前半部分的逻辑设计的底层驱动的高分辨率定时器模块,我并不是十分了解.简单的介绍一下,感兴趣的可以自己去研究一下.(类名:tick-sched.c,因为planuml不支持类名存在-)
3.1: tick_sched_timer
/*
 * High resolution timer specific code
 */
 //这里要看下内核是否开启了高分辨率定时器+ CONFIG_HIGH_RES_TIMERS = y
#ifdef CONFIG_HIGH_RES_TIMERS
/*
 * We rearm the timer until we get disabled by the idle code.
 * Called with interrupts disabled.
 */
 // tick_sched_timer函数是高分辨率定时器的到期函数,也就是定时的每个周期结束都会执行
static enum hrtimer_restart tick_sched_timer(struct hrtimer *timer)
{
   struct tick_sched *ts =
      container_of(timer, struct tick_sched, sched_timer);
   struct pt_regs *regs = get_irq_regs();
   ktime_t now = ktime_get();
   tick_sched_do_timer(now);
    ...
   return HRTIMER_RESTART;
}
3.2: calc_global_load
中间的定时器模块的函数就跳过了,已经超出本文的范围,我也并不是完全了解其中的逻辑.
/*
 * calc_load - update the avenrun load estimates 10 ticks after the
 * CPUs have updated calc_load_tasks.
 *
 * Called from the global timer code.
 */
void calc_global_load(unsigned long ticks)
{
   long active, delta;
    // 在前文出现过的时间,这里有加上了10个tick,总间隔就是5s + 10 tick
   if (time_before(jiffies, calc_load_update + 10))
      return;
   /*
    * Fold the 'old' idle-delta to include all NO_HZ cpus.
    */
    // 统计NO_HZ模式下,cpu陷入空闲时间段错过统计的task数据
   delta = calc_load_fold_idle();
   if (delta)
      atomic_long_add(delta, &calc_load_tasks); // 更新数据
   active = atomic_long_read(&calc_load_tasks); // 原子的方式读取前面存入的全局变量
   active = active > 0 ? active * FIXED_1 : 0; // 乘FIXED_1
   avenrun[0] = calc_load(avenrun[0], EXP_1, active); // 1分钟负载
   avenrun[1] = calc_load(avenrun[1], EXP_5, active); // 5分钟负载
   avenrun[2] = calc_load(avenrun[2], EXP_15, active); // 15分钟负载
   calc_load_update += LOAD_FREQ; //更新时间
   /*
    * In case we idled for multiple LOAD_FREQ intervals, catch up in bulk.
    */
    //统计了NO_HZ模式下的task数据,也要将NO_HZ模式下的tick数重新计算,要不然数据会不准.
   calc_global_nohz();
}
这里出现了一个NO_HZ模式,这个是CPU的一个概念,后文专门介绍一下.下面就是负载的计算规则了
3.3:计算规则 calc_load
/*
 * a1 = a0 * e + a * (1 - e)
 */
static unsigned long
calc_load(unsigned long load, unsigned long exp, unsigned long active)
{
   unsigned long newload;
   newload = load * exp + active * (FIXED_1 - exp);
   if (active >= load)
      newload += FIXED_1-1;
   return newload / FIXED_1;
}
具体的计算规则注释也是非常清晰了,并不复杂,整体下来就和使用man proc获取到的信息一样,系统负载统计的是nr_running和nr_uninterruptible的数量.这两个数据的来源就是core.c的struct rq,rq是CPU运行队列中重要的存储结构之一.
问题解析
回到最初的问题,我司的设备系统负载达到70+还没有卡爆炸的原因,通过上面的代码逻辑还是没有直接给出答案.不过已经有了逻辑,其他就很简单了.
- 1: 我输出了
nr_running和nr_uninterruptible的task数量发现,nr_running的数据是正常的,出问题的在与nr_uninterruptible的数量. - 2:出问题的是
nr_uninterruptibletask数量,那么我司的设备真的有那么多任务在等待I/O么,真的有怎么多任务在等待I/O,设备依然会十分卡顿,我抓取了systrace查看后,一切是正常的. - 3: 事情到了这里,就只能借助搜索引擎了.根据
nr_uninterruptible的关键字,我查到了一些蛛丝马迹.
简述结果
首先在UNIX系统上是没有统计nr_uninterruptible的,Linux在引入后,有人提出不统计I/O等待的任务数量,无法体现真正体现系统的负载状况.
后面在很多Linux大佬的文章中看到一个信息,NFS系统出现问题的的时候,会将所有访问这个文件系统的线程都标识为nr_uninterruptible,这部分的知识太贴近内核了.(ps:如果有大佬有相关的内核书籍推荐的话,请务必推荐一下).
- 结论: 因为
nr_uninterruptible的数据异常,导致系统负载数据并没有体现出目前设备的真实状况.
收获和总结
- 1: scheduler_tick这个函数注释中提到的
HZ,应该是软中断,软中断和内核配置中的CONFIG_HZ_250,CONFIG_HZ_1000是关联的,例如CONFIG_HZ_1000=y,CONFIG_HZ=1000,就是每秒内核会发出1000的软中断信号. 对应的时间就是1s/1000. (通常CONFIG_HZ=250) - 2:
jiffies它就是时钟中断次数,jiffies = 1s / HZ - 3:
rq结构体太长了,就不全部贴出来了,结构体定义在kernel/sched/sched.h中,有兴趣的自行查看.
   struct rq *rq = cpu_rq(cpu);
/*
 * This is the main, per-CPU runqueue data structure.
 *
 * Locking rule: those places that want to lock multiple runqueues
 * (such as the load balancing or the thread migration code), lock
 * acquire operations must be ordered by ascending &runqueue.
 */
struct rq {
   /* runqueue lock: */
   raw_spinlock_t lock;
   /*
    * nr_running and cpu_load should be in the same cacheline because
    * remote CPUs use both these fields when doing load calculation.
    */
   unsigned int nr_running; // 这里
#ifdef CONFIG_NUMA_BALANCING
   unsigned int nr_numa_running;
   unsigned int nr_preferred_running;
#endif
   #define CPU_LOAD_IDX_MAX 5
   unsigned long cpu_load[CPU_LOAD_IDX_MAX];
   unsigned int misfit_task;
#ifdef CONFIG_NO_HZ_COMMON
#ifdef CONFIG_SMP
   unsigned long last_load_update_tick;
#endif /* CONFIG_SMP */
   unsigned long nohz_flags;
#endif /* CONFIG_NO_HZ_COMMON */
#ifdef CONFIG_NO_HZ_FULL
   unsigned long last_sched_tick;
#endif
#ifdef CONFIG_CPU_QUIET
   /* time-based average load */
   u64 nr_last_stamp;
   u64 nr_running_integral;
   seqcount_t ave_seqcnt;
#endif
   /* capture load from *all* tasks on this cpu: */
   struct load_weight load;
   unsigned long nr_load_updates;
   u64 nr_switches;
   struct cfs_rq cfs;
   struct rt_rq rt;
   struct dl_rq dl;
#ifdef CONFIG_FAIR_GROUP_SCHED
   /* list of leaf cfs_rq on this cpu: */
   struct list_head leaf_cfs_rq_list;
   struct list_head *tmp_alone_branch;
#endif /* CONFIG_FAIR_GROUP_SCHED */
   /*
    * This is part of a global counter where only the total sum
    * over all CPUs matters. A task can increase this counter on
    * one CPU and if it got migrated afterwards it may decrease
    * it on another CPU. Always updated under the runqueue lock:
    */
   unsigned long nr_uninterruptible; // 这里
   struct task_struct *curr, *idle, *stop;
   unsigned long next_balance;
   struct mm_struct *prev_mm;
   unsigned int clock_skip_update;
   u64 clock;
   u64 clock_task;
   atomic_t nr_iowait;
#ifdef CONFIG_SMP
   struct root_domain *rd;
   struct sched_domain *sd;
   unsigned long cpu_capacity;
   unsigned long cpu_capacity_orig;
   struct callback_head *balance_callback;
   unsigned char idle_balance;
   /* For active balancing */
   int active_balance;
   int push_cpu;
   struct task_struct *push_task;
   struct cpu_stop_work active_balance_work;
   /* cpu of this runqueue: */
   int cpu;
   int online;
    ...
};
- 4高分辨率定时器针对单处理器系统,可以为CPU提供的纳米级定时精度.内核配置
CONFIG_HIGH_RES_TIMERS=y - 5:
NO_HZ就是在CPU进入休眠状态时,不再持续的发送软中断信号,来减少设备功耗与耗电.内核配置CONFIG_NO_HZ=y&CONFIG_NO_HZ_IDLE=y,那么相反,如果设备对功耗并不敏感,需要外部输入电源,可以关闭这个模式,来提高性能. - 6:
Android提取内核配置:
adb pull /proc/config.gz .
以上就是loadavg数据异常引发问题起源分析的详细内容,更多关于loadavg 数据异常的资料请关注我们其它相关文章!

